Rust 编程语言
作者:Steve Klabnik、Carol Nichols 和 Chris Krycho,以及 Rust 社区的贡献者们
本书的这一版本假定你使用的是 Rust 1.90.0(发布于 2025-09-18)或更高版本,并在所有项目的 Cargo.toml 文件中设置 edition = "2024",以配置它们使用 Rust 2024 版次(Edition)的惯用写法。请参阅第 1 章的“安装“章节获取安装或更新 Rust 的说明,并参阅附录 E了解关于版次的信息。
HTML 格式可通过在线方式访问 https://doc.rust-lang.org/stable/book/,也可通过 rustup 安装 Rust 后离线获取;运行 rustup doc --book 即可打开。
此外还提供了若干社区翻译版本。
本书还提供来自 No Starch Press 的平装本和电子书格式。
关于The Rust Programming Language | 《Rust 编程语言》 中文翻译的说明
译者注:
Rust是一门更新非常频繁的语言,从它的博客页面就能看出.仅2026年1月份到现在(5月),rust就完成了从1.93到1.95的版本号变化。平均算下来,它每几周就要更新一个版本。
因此,保持文档快捷的更新也是必要的。
所以我选择从头再次构建了这个文档,并在项目中细化了翻译、构建和贡献的流程,使得人人都可以部署和更新文档。当然,需要说明的是,此版The Rust Programming Language翻译是由AI机翻的。
最后,译者在此呼吁rust官方和社区尽快推进rust文档本地化功能完善的工作。
该翻译版本的项目地址:rustbook_zhcn
🚨 想要更具互动性的学习体验?试试 Rust 书的另一个版本,它包含:测验、高亮、可视化等功能:https://rust-book.cs.brown.edu
前言
Rust 编程语言在短短几年内走过了漫长的道路——从一个由少数新兴爱好者组成的小众社区创建和孵化,到成为世界上最受欢迎和最受需求的编程语言之一。回首过去,Rust 的强大和前景必然会吸引关注并在系统编程领域站稳脚跟,这是不可避免的。但并非必然的是,其在全球范围内通过开源社区渗透开来的兴趣与创新增长,以及在各个行业中催生的大规模采用。
此时此刻,我们很容易指出 Rust 所提供的精彩特性,来解释这种兴趣和采用的爆发式增长。谁会不想要内存安全性(memory safety)、以及高性能(fast performance)、以及友好的编译器(friendly compiler)、以及出色的工具链(great tooling)——除了众多其他精彩特性之外?你今天看到的 Rust 语言,结合了系统编程领域多年研究的成果,以及一个充满活力和热情的社区的实践智慧。这门语言是有目的性地设计、并精心打造的,为开发者提供了一款能更轻松编写安全、快速和可靠代码的工具。
但真正让 Rust 与众不同的,是它植根于赋能你——用户——去实现你的目标。这是一门希望你成功的语言,这种赋能(empowerment)的原则贯穿于构建、维护和倡导这门语言的社区核心之中。自从这本权威著作的上一个版本以来,Rust 已进一步发展成为真正全球化和值得信赖的语言。Rust 项目现在得到了 Rust 基金会(Rust Foundation)的有力支持,该基金会还投资于关键举措,以确保 Rust 的安全性、稳定性和可持续性。
这一版的 The Rust Programming Language(《Rust 编程语言》)是一次全面的更新,反映了该语言多年来的演变,并提供了宝贵的新的信息。但这不仅仅是一本关于语法和库的指南——它是一份邀请,邀请你加入一个重视质量、性能和深思熟虑的设计的社区。无论你是一位经验丰富的开发者想第一次探索 Rust,还是一位的资深 Rustacean(Rust 爱好者)想精进自己的技能,这一版都能为每个人提供有价值的内容。
Rust 之旅是一次协作、学习和迭代的过程。这门语言及其生态系统的成长,直接反映了其背后充满活力、多元化的社区。从核心语言设计者到偶尔的贡献者,成千上万开发者的贡献,正是使 Rust 成为如此独特而强大工具的原因。通过拿起这本书,你不仅是在学习一门新的编程语言——你更是在加入一场让软件变得更好、更安全、更有趣的运动。
欢迎来到 Rust 社区!
- Bec Rumbul,Rust 基金会执行董事
简介
注:本书的这一版与 No Starch Press 出版的 The Rust Programming Language 印刷版和电子书版内容相同。
欢迎阅读 The Rust Programming Language(《Rust 程序设计语言》),一本关于 Rust 的入门书籍。 Rust 编程语言能帮助你编写更快、更可靠的软件。 高级易用性(high-level ergonomics)和底层控制力(low-level control)在编程语言设计中常常相互矛盾;Rust 挑战了这一矛盾。通过平衡强大的技术能力和优秀的开发者体验,Rust 让你能够在没有传统底层控制所带来的种种麻烦的情况下,掌控底层细节(例如内存使用)。
Rust 的受众
Rust 因多种原因而适合许多人。让我们来看看其中几个最重要的群体。
开发者团队
Rust 已被证明是一个高效的协作工具,适用于具有不同系统编程知识水平的大型开发者团队。底层代码容易出现各种微妙的 bug(漏洞),在大多数其他语言中,这些 bug 只能通过大量测试和经验丰富的开发者的仔细代码审查(code review)才能发现。在 Rust 中,编译器扮演着守门人的角色,拒绝编译包含这些难以捉摸的 bug(包括并发 bug)的代码。通过与编译器协同工作,团队可以将时间集中在程序的逻辑上,而不是追查 bug。
Rust 还将现代开发者工具带到了系统编程领域:
- Cargo,内置的依赖管理器(dependency manager)和构建工具(build tool),使得在 Rust 生态系统中添加、编译和管理依赖变得轻松且一致。
rustfmt格式化工具确保了开发者之间一致的编码风格。- Rust Language Server(RLS,Rust 语言服务器)为集成开发环境(IDE)提供了代码补全(code completion)和内联错误消息(inline error messages)的支持。
通过使用 Rust 生态系统中的这些工具以及其他工具,开发者在编写系统级代码时也能保持高效。
学生
Rust 适合学生以及那些有兴趣学习系统概念的人。许多人通过使用 Rust 学习了操作系统开发等主题。社区非常友好,乐于回答学生的问题。通过本书这样的努力,Rust 团队希望让更多人(尤其是编程新手)能够更容易地接触系统概念。
公司
数百家大大小小的公司将 Rust 用于生产环境中的各种任务,包括命令行工具(command line tools)、Web 服务(web services)、DevOps 工具、嵌入式设备(embedded devices)、音视频分析与转码(audio and video analysis and transcoding)、加密货币(cryptocurrencies)、生物信息学(bioinformatics)、搜索引擎(search engines)、物联网(IoT)应用、机器学习(machine learning),甚至 Firefox 浏览器的大部分核心功能。
开源开发者
Rust 适合那些想要构建 Rust 编程语言本身、社区、开发者工具和库的人。我们非常欢迎你为 Rust 语言做出贡献。
重视速度和稳定性的用户
Rust 适合那些追求语言的速度和稳定性的用户。所谓速度,我们既指 Rust 代码执行的速度,也指 Rust 让你编写程序的速度。Rust 编译器的检查确保了在添加功能和重构(refactoring)过程中的稳定性。相比之下,没有这些检查的语言中的脆弱遗留代码,开发者往往不敢轻易修改。通过追求零成本抽象(zero-cost abstractions)——即能够编译为与手写底层代码速度相当的高级特性——Rust 致力于让安全代码也成为快速代码。
Rust 语言也希望能支持许多其他用户;这里提到的只是其中一些最大的利益相关者。总的来说,Rust 最大的抱负是消除程序员几十年来所接受的权衡取舍,同时提供安全性 与 生产力、速度 与 易用性。试试 Rust,看看它的选择是否适合你。
本书的受众
本书假设你曾经用其他编程语言写过代码,但不对具体是哪一种语言做任何假设。我们努力使内容对来自各种编程背景的读者都具有广泛的易读性。我们不会花大量时间讨论编程 是什么 或如何思考编程。如果你是编程新手,那么阅读专门介绍编程入门的书籍会更合适。
如何使用本书
总的来说,本书假设你按照从前到后的顺序阅读。后面的章节建立在前面章节的概念之上,而前面的章节可能不会深入探讨某个特定主题的细节,但会在后面的章节中再次讨论。
你会在本书中找到两种章节:概念章节和项目章节。在概念章节中,你将学习 Rust 的某个方面。在项目章节中,我们将一起构建小型程序,应用你目前所学到的知识。第 2 章、第 12 章和第 21 章是项目章节;其余的是概念章节。
第 1 章 介绍如何安装 Rust、如何编写 “Hello, world!” 程序,以及如何使用 Cargo(Rust 的包管理器和构建工具)。第 2 章 是 Rust 编程的动手实践入门,让你构建一个猜数字游戏。在这里,我们高层次地介绍概念,后面的章节将提供更多细节。如果你想马上动手实践,第 2 章正合适。如果你是一个特别细致的学习者,喜欢在进入下一步之前掌握每一个细节,你可能想跳过第 2 章直接进入 第 3 章,其中介绍了 Rust 与其他编程语言相似的特性;然后,当你希望做一个应用所学细节的项目时,再回到第 2 章。
在 第 4 章 中,你将学习 Rust 的所有权(ownership)系统。第 5 章 讨论结构体(struct)和方法(method)。第 6 章 介绍枚举(enum)、match 表达式以及 if let 和 let...else 控制流结构。你将使用结构体和枚举来创建自定义类型。
在 第 7 章 中,你将学习 Rust 的模块(module)系统以及用于组织代码及其公有应用程序编程接口(API)的隐私规则。第 8 章 讨论标准库提供的一些常见集合数据结构:vector(向量)、字符串(string)和哈希 map(hash map)。第 9 章 探讨 Rust 的错误处理哲学和技术。
第 10 章 深入探讨泛型(generic)、trait(特质)和生命周期(lifetime),它们使你能够定义适用于多种类型的代码。第 11 章 全部关于测试(testing),即使有 Rust 的安全性保证,测试对于确保程序逻辑的正确性也是必要的。在 第 12 章 中,我们将自己实现 grep 命令行工具的部分功能,用于在文件中搜索文本。为此,我们将使用之前章节中讨论的许多概念。
第 13 章 探讨闭包(closure)和迭代器(iterator):这些是 Rust 从函数式编程语言中借鉴的特性。在 第 14 章 中,我们将更深入地研究 Cargo,并讨论与他人共享库的最佳实践。第 15 章 讨论标准库提供的智能指针(smart pointer)以及实现其功能的 trait。
在 第 16 章 中,我们将介绍不同的并发编程模型,并讨论 Rust 如何帮助你在多线程中无畏地编程。在 第 17 章 中,我们在此基础上探索 Rust 的 async 和 await 语法,以及 task(任务)、future(未来)和 stream(流),以及它们所支持的轻量级并发模型。
第 18 章 探讨 Rust 的惯用写法与你可能熟悉的面向对象编程(object-oriented programming)原则的比较。第 19 章 是关于模式(pattern)和模式匹配(pattern matching)的参考,这是在 Rust 程序中表达思想的强大方式。第 20 章 包含了一系列有趣的高级主题,包括 unsafe Rust(不安全 Rust)、宏(macro),以及更多关于生命周期、trait、类型、函数和闭包的内容。
在 第 21 章 中,我们将完成一个项目,实现一个底层的多线程 Web 服务器!
最后,一些附录以更接近参考文档的格式提供了有关该语言的有用信息。附录 A 介绍 Rust 的关键字(keyword),附录 B 介绍 Rust 的运算符和符号,附录 C 介绍标准库中可派生(derivable)的 trait,附录 D 介绍一些有用的开发工具,附录 E 解释 Rust 的版本(edition)。在 附录 F 中,你可以找到本书的翻译版本,附录 G 将介绍 Rust 是如何制作的以及什么是 nightly Rust。
阅读本书没有错误的方式:如果你想跳着读,请便!如果遇到任何困惑,你可能需要回到前面的章节。但无论如何,选择适合你的方式。
学习 Rust 的一个重要部分是学习如何阅读编译器显示的错误消息:这些消息将引导你编写正确的代码。因此,我们将提供许多无法编译的示例,并附上编译器在每个情况下会显示的错误消息。请注意,如果你随意输入并运行某个示例,它可能无法编译!请确保你阅读了周围的文本,以确定你试图运行的示例是否本就应该出错。在大多数情况下,我们会引导你找到无法编译代码的正确版本。Ferris 也会帮助你区分哪些代码本就不该工作:
| Ferris | 含义 |
|---|---|
 | 此代码无法编译! |
 | 此代码会 panic! |
 | 此代码不会产生期望的行为。 |
在大多数情况下,我们会引导你找到无法编译代码的正确版本。
源代码
生成本书的源文件可以在 GitHub 上找到。
入门指南
让我们开始你的 Rust 之旅吧!有很多东西需要学习,但千里之行,始于足下。 在本章中,我们将讨论:
- 在 Linux、macOS 和 Windows 上安装 Rust
- 编写一个打印
Hello, world!的程序 - 使用
cargo,Rust 的包管理器和构建系统
安装
安装
第一步是安装 Rust。我们将通过 rustup(一个用于管理 Rust 版本及相关工具的命令行工具)来下载 Rust。你需要联网才能下载。
注意:如果你出于某些原因不想使用
rustup,请参阅 其他 Rust 安装方法页面 了解更多选项。
以下步骤将安装最新稳定版的 Rust 编译器。 Rust 的稳定性保证确保本书中所有能编译的示例在更新的 Rust 版本中也能继续编译。不同版本之间的输出可能略有差异,因为 Rust 经常改进错误信息和警告。换句话说,你通过这些步骤安装的任何较新的稳定版 Rust 都应该能正常使用本书的内容。
命令行符号说明
在本章及全书范围内,我们会展示一些在终端中使用的命令。你需要在终端中输入的行都以 $ 开头。你不需要输入 $ 字符;它只是命令行提示符,用于指示每一条命令的开始。不以 $ 开头的行通常显示上一条命令的输出。此外,特定于 PowerShell 的示例将使用 > 而不是 $。
在 Linux 或 macOS 上安装 rustup
如果你使用的是 Linux 或 macOS,打开终端并输入以下命令:
$ curl --proto '=https' --tlsv1.2 https://sh.rustup.rs -sSf | sh
该命令会下载一个脚本并开始安装 rustup 工具,该工具会安装最新稳定版的 Rust。系统可能会提示你输入密码。如果安装成功,将显示以下内容:
Rust is installed now. Great!
你还需要一个 链接器(linker),它是 Rust 用来将其编译输出合并成一个文件的程序。你可能已经拥有一个。如果遇到链接器错误,你应该安装一个 C 编译器,它通常会包含链接器。C 编译器也很有用,因为一些常见的 Rust 包依赖 C 代码,因此需要 C 编译器。
在 macOS 上,你可以通过运行以下命令来获取 C 编译器:
$ xcode-select --install
Linux 用户通常应根据其发行版的文档安装 GCC 或 Clang。例如,如果你使用 Ubuntu,可以安装 build-essential 包。
在 Windows 上安装 rustup
在 Windows 上,请访问 https://www.rust-lang.org/tools/install 并按照说明安装 Rust。在安装过程中,系统会提示你安装 Visual Studio。这提供了编译程序所需的链接器和本地库。如果你在此步骤中需要更多帮助,请参阅 https://rust-lang.github.io/rustup/installation/windows-msvc.html。
本书的其余部分使用的命令在 cmd.exe 和 PowerShell 中都可运行。如果有特定差异,我们会说明应该使用哪一种。
故障排除
要检查 Rust 是否正确安装,打开终端并输入以下命令:
$ rustc --version
你应该会看到最新稳定版发布的版本号、提交哈希值(commit hash)和提交日期(commit date),格式如下:
rustc x.y.z (abcabcabc yyyy-mm-dd)
如果你看到了这些信息,说明 Rust 已成功安装!如果没有看到这些信息,请按照以下步骤检查 Rust 是否在你的 %PATH% 系统变量中。
在 Windows CMD 中,使用:
> echo %PATH%
在 PowerShell 中,使用:
> echo $env:Path
在 Linux 和 macOS 中,使用:
$ echo $PATH
如果这些都没问题但 Rust 仍然无法工作,你可以在多个地方获得帮助。请访问社区页面了解如何与其他 Rustaceans(我们对自已的一个昵称)取得联系。
更新与卸载
一旦通过 rustup 安装了 Rust,更新到新发布的版本就很容易了。在终端中运行以下更新脚本:
$ rustup update
要卸载 Rust 和 rustup,请在终端中运行以下卸载脚本:
$ rustup self uninstall
阅读本地文档
安装 Rust 时也会附带一份本地文档副本,方便你离线阅读。运行 rustup doc 即可在浏览器中打开本地文档。
每当标准库提供了某个类型或函数,而你不确定它的用途或使用方法时,可以查阅应用程序编程接口(API)文档来了解!
使用文本编辑器和 IDE
本书对你使用什么工具来编写 Rust 代码没有任何预设。几乎任何文本编辑器都能胜任!不过,许多文本编辑器和集成开发环境(IDE)都内置了对 Rust 的支持。你可以在 Rust 官网的工具页面上找到一份相当最新的编辑器及 IDE 列表。
离线使用本书
在几个示例中,我们会用到标准库之外的 Rust 包。要完成这些示例,你需要联网或提前下载这些依赖项。要提前下载依赖项,可以运行以下命令(我们稍后会详细解释 cargo 是什么以及这些命令各自的作用):
$ cargo new get-dependencies
$ cd get-dependencies
$ cargo add rand@0.8.5 trpl@0.2.0
这将缓存这些包的下载内容,这样你就不需要之后再下载了。运行此命令后,你不需要保留 get-dependencies 文件夹。如果你已经运行过此命令,可以在本书后续的所有 cargo 命令中使用 --offline 标志,以使用这些缓存版本,而无需尝试联网。
Hello, World!
Hello, World!
现在你已经安装了 Rust,是时候编写你的第一个 Rust 程序了。学习一门新语言时,传统上都会编写一个在屏幕上打印 Hello, world! 的小程序,我们这里也一样!
注意:本书假定你对命令行有基本的了解。Rust 对你的编辑工具、开发工具或代码存放位置没有特别要求,因此如果你更喜欢使用 IDE 而不是命令行,请随意使用你喜欢的 IDE。许多 IDE 现在都已不同程度地支持 Rust;请查看相应 IDE 的文档以了解详情。Rust 团队一直致力于通过
rust-analyzer提供出色的 IDE 支持。更多细节请参见附录 D。
创建项目目录
首先,创建一个目录来存放你的 Rust 代码。Rust 并不关心你的代码存放在哪里,但对于本书中的练习和项目,我们建议在你的 home 目录下创建一个 projects 目录,并将你所有的项目都保存在那里。
打开终端,输入以下命令来创建一个 projects 目录,并在 projects 目录下为“Hello, world!“项目创建一个子目录。
对于 Linux、macOS 和 Windows 上的 PowerShell,请输入:
$ mkdir ~/projects
$ cd ~/projects
$ mkdir hello_world
$ cd hello_world
对于 Windows CMD,请输入:
> mkdir "%USERPROFILE%\projects"
> cd /d "%USERPROFILE%\projects"
> mkdir hello_world
> cd hello_world
Rust 程序基础
接下来,创建一个新的源文件并命名为 main.rs。Rust 文件始终以 .rs 扩展名结尾。如果你的文件名包含多个单词,约定使用下划线来分隔它们。例如,使用 hello_world.rs 而不是 helloworld.rs。
现在打开你刚刚创建的 main.rs 文件,并输入示例 1-1 中的代码。
fn main() {
    println!("Hello, world!");
}Hello, world! 的程序保存文件,然后返回到 ~/projects/hello_world 目录下的终端窗口。在 Linux 或 macOS 上,输入以下命令来编译并运行该文件:
$ rustc main.rs
$ ./main
Hello, world!
在 Windows 上,使用 .\main 代替 ./main:
> rustc main.rs
> .\main
Hello, world!
无论你使用什么操作系统,字符串 Hello, world! 都应该打印到终端上。如果你没有看到这个输出,请返回安装章节的“故障排除”部分,了解获取帮助的方法。
如果 Hello, world! 成功打印出来了,恭喜你!你已经正式编写了一个 Rust 程序。这意味着你已经是一名 Rust 程序员了——欢迎你!
Rust 程序剖析
让我们仔细回顾一下这个“Hello, world!“程序。以下是代码的第一部分:
fn main() {

}
这些代码定义了一个名为 main 的函数。main 函数很特殊:它始终是每个可执行 Rust 程序中第一个运行的代码。这里,第一行声明了一个名为 main 的函数,它没有参数,也没有返回值。如果有参数,它们会放在括号 () 内。
函数体被包裹在 {} 中。Rust 要求所有函数体都要用花括号括起来。好的代码风格是将开头的花括号放在函数声明的同一行,并在中间加一个空格。
注意:如果你想在 Rust 项目中保持统一的代码风格,可以使用名为
rustfmt的自动格式化工具来按特定风格格式化代码(更多关于rustfmt的内容请参见附录 D)。Rust 团队已将该工具随标准 Rust 发行版一同提供,就像rustc一样,因此它应该已经安装在了你的电脑上!
main 函数体包含以下代码:
#![allow(unused)]
fn main() {
println!("Hello, world!");
}
这一行代码完成了这个小程序中的所有工作:它将文本打印到屏幕上。这里有三个重要的细节需要注意。
第一,println! 调用了一个 Rust 宏(macro)。如果它调用的是一个普通函数,那么应该写成 println(不带 !)。Rust 宏是一种编写生成代码以扩展 Rust 语法的方式,我们将在第 20 章中更详细地讨论它们。目前,你只需要知道使用 ! 意味着你在调用一个宏而不是普通函数,并且宏并不总是遵循与函数相同的规则。
第二,你看到了 "Hello, world!" 字符串。我们将这个字符串作为参数传递给 println!,然后该字符串被打印到屏幕上。
第三,我们用分号(;)结束这一行,这表明这个表达式已经结束,下一个表达式可以开始了。Rust 代码的大多数行都以分号结尾。
编译与执行
你刚刚运行了一个新创建的程序,现在让我们回顾一下这个过程的具体步骤。
在运行 Rust 程序之前,你必须使用 Rust 编译器进行编译,输入 rustc 命令并将源文件名作为参数传入,如下所示:
$ rustc main.rs
如果你有 C 或 C++ 背景,你会注意到这与 gcc 或 clang 类似。编译成功后,Rust 会输出一个二进制可执行文件。
在 Linux、macOS 和 Windows 的 PowerShell 上,可以通过在终端中输入 ls 命令来查看可执行文件:
$ ls
main  main.rs
在 Linux 和 macOS 上,你会看到两个文件。在 Windows 的 PowerShell 上,你会看到与使用 CMD 时相同的三个文件。在 Windows 的 CMD 上,需要输入以下命令:
> dir /B %= the /B option says to only show the file names =%
main.exe
main.pdb
main.rs
这里显示了扩展名为 .rs 的源代码文件、可执行文件(在 Windows 上是 main.exe,在其他平台上则是 main),以及在 Windows 上还有一个包含调试信息的 .pdb 文件。然后,你可以运行 main 或 main.exe 文件,如下所示:
$ ./main # or .\main on Windows
如果你的 main.rs 是“Hello, world!“程序,这行命令会将 Hello, world! 打印到终端上。
如果你更熟悉动态语言,比如 Ruby、Python 或 JavaScript,你可能不习惯将编译和运行分成两个步骤。Rust 是一种_预编译(ahead-of-time compiled)语言,这意味着你可以编译程序并将可执行文件交给别人,即使他们没有安装 Rust 也能运行。如果你给别人一个 .rb、.py_ 或 .js 文件,他们需要分别安装 Ruby、Python 或 JavaScript 的运行时环境。不过在这些语言中,你只需要一条命令就能编译并运行程序。语言设计中处处存在权衡。
对于简单的程序,仅用 rustc 编译就足够了,但随着项目的增长,你会希望管理所有选项并方便地共享代码。接下来,我们将向你介绍 Cargo 工具,它将帮助你编写真实的 Rust 程序。
Hello, Cargo!
Hello, Cargo!
Cargo 是 Rust 的构建系统和包管理器。大多数 Rustaceans(Rust 开发者)使用这个工具来管理他们的 Rust 项目,因为 Cargo 为你处理了许多任务,例如构建代码、下载代码所依赖的库以及构建这些库。(我们把代码所需要的库称为_依赖项(dependencies)_。)
最简单的 Rust 程序,比如我们目前编写的这个,没有任何依赖项。如果我们用 Cargo 构建“Hello, world!“项目,它只会用到 Cargo 中处理代码构建的部分。随着你编写更复杂的 Rust 程序,你会添加依赖项,而如果你从一开始就使用 Cargo 创建项目,添加依赖项就会变得容易得多。
因为绝大多数 Rust 项目都使用 Cargo,本书的其余部分也假设你使用 Cargo。如果你使用“安装”章节中讨论的官方安装程序安装了 Rust,那么 Cargo 会随 Rust 一同安装。如果你通过其他方式安装了 Rust,请在终端中输入以下命令来检查 Cargo 是否已安装:
$ cargo --version
如果你看到了版本号,说明已经安装成功!如果你看到类似 command not found 的错误信息,请查阅你的安装方式对应的文档,了解如何单独安装 Cargo。
使用 Cargo 创建项目
让我们使用 Cargo 创建一个新项目,并看看它与我们之前的“Hello, world!“项目有何不同。首先回到你的 projects 目录(或者你决定存放代码的任何位置)。然后,在任何操作系统上运行以下命令:
$ cargo new hello_cargo
$ cd hello_cargo
第一个命令创建了一个名为 hello_cargo 的新目录和项目。我们将项目命名为 hello_cargo,Cargo 会在同名目录中创建它的文件。
进入 hello_cargo 目录并列出文件。你会看到 Cargo 为我们生成了两个文件和一个目录:一个 Cargo.toml 文件和一个 src 目录,其中包含一个 main.rs 文件。
它同时还初始化了一个新的 Git 仓库以及一个 .gitignore 文件。如果你在已有的 Git 仓库中运行 cargo new,则不会生成 Git 文件;你可以通过使用 cargo new --vcs=git 来覆盖此行为。
注意:Git 是一种常见的版本控制系统。你可以通过
--vcs标志改变cargo new使用的版本控制系统,或不使用任何版本控制系统。运行cargo new --help可查看可用选项。
用你选择的文本编辑器打开 Cargo.toml。它应该类似于示例 1-2 中的代码。
[package]
name = "hello_cargo"
version = "0.1.0"
edition = "2024"

[dependencies]
cargo new 生成的 Cargo.toml 内容该文件采用 TOML(Tom’s Obvious, Minimal Language)格式,这是 Cargo 的配置格式。
第一行 [package] 是一个章节标题,表示接下来的语句是在配置一个包。随着我们向此文件添加更多信息,我们将添加其他章节。
接下来的三行设置了 Cargo 编译程序所需的配置信息:名称(name)、版本(version)和要使用的 Rust 版本(edition)。我们将在附录 E中讨论 edition 键。
最后一行 [dependencies] 是一个章节的开始,用于列出项目的所有依赖项。在 Rust 中,代码包被称为_crate_。这个项目不需要任何其他 crate,但在第 2 章的第一个项目中我们将会用到,到时我们会使用这个 dependencies 章节。
现在打开 src/main.rs 看一看:
Filename: src/main.rs
fn main() {
    println!("Hello, world!");
}
Cargo 已经为你生成了一个“Hello, world!“程序,就像我们在示例 1-1 中编写的一样!到目前为止,我们的项目与 Cargo 生成的项目的区别在于:Cargo 将代码放在了 src 目录中,并且我们在顶层目录中有一个 Cargo.toml 配置文件。
Cargo 期望你的源文件存放在 src 目录内。项目顶层目录只存放 README 文件、许可信息、配置文件以及与代码无关的其他内容。使用 Cargo 有助于你组织项目。每样东西都有其位置,所有东西都各就各位。
如果你启动的项目没有使用 Cargo,就像我们之前的“Hello, world!“项目一样,你可以将其转换为使用 Cargo 的项目。将项目代码移到 src 目录中,并创建一个合适的 Cargo.toml 文件。获取 Cargo.toml 文件的一个简单方法是运行 cargo init,它会自动为你创建该文件。
构建并运行 Cargo 项目
现在让我们看看使用 Cargo 构建和运行“Hello, world!“程序有什么不同!在 hello_cargo 目录下,输入以下命令来构建你的项目:
$ cargo build
   Compiling hello_cargo v0.1.0 (file:///projects/hello_cargo)
    Finished dev [unoptimized + debuginfo] target(s) in 2.85 secs
该命令会在 target/debug/hello_cargo(Windows 上是 target\debug\hello_cargo.exe)中创建一个可执行文件,而不是在当前目录中。因为默认构建是调试构建(debug build),Cargo 将二进制文件放在名为 debug 的目录中。你可以使用以下命令运行该可执行文件:
$ ./target/debug/hello_cargo # or .\target\debug\hello_cargo.exe on Windows
Hello, world!
如果一切顺利,Hello, world! 将打印到终端。首次运行 cargo build 还会使 Cargo 在顶层创建一个新文件:Cargo.lock。该文件用于跟踪项目中依赖项的确切版本。这个项目没有依赖项,所以该文件内容比较简单。你永远不需要手动修改这个文件;Cargo 会为你管理其内容。
我们刚刚用 cargo build 构建了项目,并用 ./target/debug/hello_cargo 运行了它,但我们也可以使用 cargo run 一次性编译代码并运行生成的可执行文件:
$ cargo run
    Finished dev [unoptimized + debuginfo] target(s) in 0.0 secs
     Running `target/debug/hello_cargo`
Hello, world!
使用 cargo run 比记住先运行 cargo build 再输入完整的二进制文件路径要方便得多,因此大多数开发者使用 cargo run。
注意这次我们没有看到 Cargo 正在编译 hello_cargo 的输出。Cargo 发现文件没有改变,因此它没有重新构建,而是直接运行了二进制文件。如果你修改了源代码,Cargo 会在运行之前重新构建项目,你会看到如下输出:
$ cargo run
   Compiling hello_cargo v0.1.0 (file:///projects/hello_cargo)
    Finished dev [unoptimized + debuginfo] target(s) in 0.33 secs
     Running `target/debug/hello_cargo`
Hello, world!
Cargo 还提供了一个名为 cargo check 的命令。该命令会快速检查你的代码,确保它能编译,但不会生成可执行文件:
$ cargo check
   Checking hello_cargo v0.1.0 (file:///projects/hello_cargo)
    Finished dev [unoptimized + debuginfo] target(s) in 0.32 secs
为什么你不需要可执行文件呢?通常,cargo check 比 cargo build 快得多,因为它跳过了生成可执行文件的步骤。如果你在编写代码时持续检查工作,使用 cargo check 可以加快你了解项目是否仍能编译的过程!因此,许多 Rustaceans 在编写程序时会定期运行 cargo check 以确保代码能编译。然后,当他们准备使用可执行文件时,再运行 cargo build。
让我们总结一下目前学到的关于 Cargo 的知识:
- 我们可以使用
cargo new创建项目。 - 我们可以使用
cargo build构建项目。 - 我们可以使用
cargo run一步完成构建和运行项目。 - 我们可以使用
cargo check在不生成二进制文件的情况下检查错误。 - Cargo 不会将构建结果保存在代码所在的目录中,而是存储在 target/debug 目录中。
使用 Cargo 的另一个优点是,无论你使用哪个操作系统,命令都是相同的。因此,从现在开始,我们将不再分别提供 Linux/macOS 与 Windows 的特定说明。
构建发布版本
当你的项目最终准备好发布时,你可以使用 cargo build --release 在优化模式下编译它。该命令会在 target/release 而不是 target/debug 中创建可执行文件。优化使你的 Rust 代码运行得更快,但启用优化会延长程序编译时间。这就是为什么有两种不同的配置:一种用于开发,当你需要频繁快速重建时使用;另一种用于构建最终提供给用户的程序,该程序不会被反复重建,并且会尽可能快地运行。如果你在基准测试(benchmarking)代码的运行时间,请务必运行 cargo build --release 并使用 target/release 中的可执行文件进行测试。
充分利用 Cargo 的约定
对于简单的项目,Cargo 相比直接使用 rustc 并没有提供太多优势,但随着程序变得越来越复杂,它会证明自己的价值。一旦程序增长到多个文件或需要依赖项时,让 Cargo 来协调构建会容易得多。
尽管 hello_cargo 项目很简单,但它现在使用了你将在 Rust 编程生涯中用到的大部分真实工具。实际上,要处理任何现有项目,你可以使用以下命令通过 Git 检出代码,切换到该项目的目录,然后进行构建:
$ git clone example.org/someproject
$ cd someproject
$ cargo build
有关 Cargo 的更多信息,请查看其文档。
总结
你的 Rust 之旅已经有了一个良好的开端!在本章中,你学会了如何:
- 使用
rustup安装最新稳定版 Rust。 - 更新到更新的 Rust 版本。
- 打开本地安装的文档。
- 直接使用
rustc编写并运行一个“Hello, world!“程序。 - 使用 Cargo 的约定创建并运行一个新项目。
现在是时候构建一个更充实的程序来熟悉阅读和编写 Rust 代码了。因此,在第 2 章中,我们将构建一个猜谜游戏程序。如果你更愿意先学习常见编程概念在 Rust 中的用法,可以阅读第 3 章,然后再回到第 2 章。
编写猜数字游戏
让我们通过一个动手项目一起深入 Rust!本章通过向你展示如何在实际程序中使用它们,介绍一些常见的 Rust 概念。你将学习 let、match、方法(methods)、关联函数(associated functions)、外部 crate 以及更多!在接下来的章节中,我们将更详细地探讨这些概念。在本章中,你只需练习基础知识。
我们将实现一个经典的初学者编程问题:猜数字游戏(guessing game)。它的工作原理如下:程序将生成一个 1 到 100 之间的随机整数。然后提示玩家输入一个猜测。输入猜测后,程序会提示猜测是太小还是太大。如果猜对了,游戏会打印祝贺信息并退出。
设置新项目
要设置新项目,请进入你在第 1 章中创建的 projects 目录,并使用 Cargo 创建一个新项目,如下所示:
$ cargo new guessing_game
$ cd guessing_game
第一个命令 cargo new 将项目名称(guessing_game)作为第一个参数。第二个命令切换到新项目的目录。
查看生成的 Cargo.toml 文件:
Filename: Cargo.toml
[package]
name = "guessing_game"
version = "0.1.0"
edition = "2024"

[dependencies]
正如你在第 1 章中看到的,cargo new 会为你生成一个 “Hello, world!” 程序。查看 src/main.rs 文件:
文件名: src/main.rs
fn main() {
    println!("Hello, world!");
}
现在让我们编译这个 “Hello, world!” 程序并使用 cargo run 命令一步运行它:
$ cargo run
   Compiling guessing_game v0.1.0 (file:///projects/guessing_game)
    Finished `dev` profile [unoptimized + debuginfo] target(s) in 0.08s
     Running `target/debug/guessing_game`
Hello, world!
当你需要快速迭代项目时,run 命令非常方便,正如我们在这个游戏中所做的,在进入下一个迭代之前快速测试每个迭代。
重新打开 src/main.rs 文件。你将在此文件中编写所有代码。
处理猜测
猜数字游戏程序的第一部分将请求用户输入,处理该输入,并检查输入是否符合预期格式。首先,我们将允许玩家输入一个猜测。将清单 2-1 中的代码输入到 src/main.rs 中。
use std::io;

fn main() {
    println!("Guess the number!");

    println!("Please input your guess.");

    let mut guess = String::new();

    io::stdin()
        .read_line(&mut guess)
        .expect("Failed to read line");

    println!("You guessed: {guess}");
}这段代码包含很多信息,让我们逐行来看。为了获取用户输入并将结果作为输出打印,我们需要将 io 输入/输出库引入作用域。io 库来自标准库(standard library),即 std:
use std::io;

fn main() {
    println!("Guess the number!");

    println!("Please input your guess.");

    let mut guess = String::new();

    io::stdin()
        .read_line(&mut guess)
        .expect("Failed to read line");

    println!("You guessed: {guess}");
}
默认情况下,Rust 在标准库中定义了一组项,它会将这些项引入每个程序的作用域。这组项称为 prelude(预导入模块),你可以在标准库文档中查看其所有内容。
如果你要使用的类型不在 prelude 中,则必须使用 use 语句显式地将该类型引入作用域。使用 std::io 库可以为你提供许多有用的功能,包括接受用户输入的能力。
正如你在第 1 章中看到的,main 函数是程序的入口点:
use std::io;

fn main() {
    println!("Guess the number!");

    println!("Please input your guess.");

    let mut guess = String::new();

    io::stdin()
        .read_line(&mut guess)
        .expect("Failed to read line");

    println!("You guessed: {guess}");
}
fn 语法声明了一个新函数;圆括号 () 表示没有参数;花括号 { 开始函数体。
正如你在第 1 章中也学到的,println! 是一个宏(macro),用于将字符串打印到屏幕:
use std::io;

fn main() {
    println!("Guess the number!");

    println!("Please input your guess.");

    let mut guess = String::new();

    io::stdin()
        .read_line(&mut guess)
        .expect("Failed to read line");

    println!("You guessed: {guess}");
}
这段代码打印了一条提示信息,说明游戏的名称并请求用户输入。
使用变量存储值
接下来,我们将创建一个 变量(variable)来存储用户输入,如下所示:
use std::io;

fn main() {
    println!("Guess the number!");

    println!("Please input your guess.");

    let mut guess = String::new();

    io::stdin()
        .read_line(&mut guess)
        .expect("Failed to read line");

    println!("You guessed: {guess}");
}
现在程序变得有趣了!这一小行代码中包含了很多内容。我们使用 let 语句来创建变量。下面是另一个例子:
let apples = 5;这一行创建了一个名为 apples 的新变量,并将其绑定到值 5。在 Rust 中,变量默认是不可变的(immutable),这意味着一旦我们给变量赋值,该值就不会改变。我们将在第 3 章的\u201c变量与可变性\u201d 部分详细讨论这个概念。要使变量可变,我们在变量名之前添加 mut:
let apples = 5; // immutable
let mut bananas = 5; // mutable
注意:
//语法开始一个注释,该注释持续到行尾。Rust 会忽略注释中的所有内容。我们将在第 3 章 中更详细地讨论注释。
回到猜数字游戏程序,你现在知道 let mut guess 将引入一个名为 guess 的可变变量。等号(=)告诉 Rust 我们现在想将某些东西绑定到该变量。等号右侧是 guess 所绑定的值,即调用 String::new 的结果,该函数返回一个新的 String 实例。String 是标准库提供的一种字符串类型,是一种可增长的、UTF-8 编码的文本。
::new 行中的 :: 语法表示 new 是 String 类型的关联函数(associated function)。关联函数 是在类型上实现的函数,在本例中是 String 类型。这个 new 函数创建了一个新的空字符串。你会在许多类型上找到 new 函数,因为它是一种常见命名约定,用于创建某种类型的新值。
总的来说,let mut guess = String::new(); 这一行创建了一个可变变量,该变量当前绑定到一个新的空 String 实例。呼!
接收用户输入
回想一下,我们在程序的第一行使用 use std::io; 引入了标准库的输入/输出功能。现在我们将调用 io 模块中的 stdin 函数,这将允许我们处理用户输入:
use std::io;

fn main() {
    println!("Guess the number!");

    println!("Please input your guess.");

    let mut guess = String::new();

    io::stdin()
        .read_line(&mut guess)
        .expect("Failed to read line");

    println!("You guessed: {guess}");
}
如果我们没有在程序开头使用 use std::io; 导入 io 模块,我们仍然可以通过将此函数调用写为 std::io::stdin 来使用该函数。stdin 函数返回一个 std::io::Stdin 实例,这是一种表示终端标准输入句柄的类型。
接下来,.read_line(&mut guess) 这一行调用了标准输入句柄上的 read_line 方法来获取用户输入。我们还将 &mut guess 作为参数传递给 read_line,告诉它将用户输入存储到哪个字符串中。read_line 的全部工作是将用户输入到标准输入中的任何内容追加到该字符串中(而不覆盖其内容),因此我们将该字符串作为参数传递。字符串参数需要是可变的,以便方法可以更改字符串的内容。
& 表示此参数是一个 引用(reference),它让你能够使代码的多个部分访问同一份数据,而无需多次将该数据复制到内存中。引用是一个复杂的功能,而 Rust 的主要优势之一就是使用引用既安全又容易。你不需要了解很多细节就能完成这个程序。现在,你只需要知道,像变量一样,引用默认也是不可变的。因此,你需要写 &mut guess 而不是 &guess 来使其可变。(第 4 章会更详细地解释引用。)
使用 Result 处理潜在的错误
我们还在处理这一行代码。我们现在正在讨论第三行文本,但请注意它仍然是单个逻辑代码行的一部分。下一部分是这个方法:
use std::io;

fn main() {
    println!("Guess the number!");

    println!("Please input your guess.");

    let mut guess = String::new();

    io::stdin()
        .read_line(&mut guess)
        .expect("Failed to read line");

    println!("You guessed: {guess}");
}
我们本可以将这段代码写成:
io::stdin().read_line(&mut guess).expect("Failed to read line");但是,一个长行难以阅读,所以最好将其拆分。当你使用 .method_name() 语法调用方法时,通常明智的做法是引入换行和其他空白来帮助分隔长行。现在让我们讨论这一行的作用。
如前所述,read_line 将用户输入的任何内容放入我们传递的字符串中,但它也会返回一个 Result 值。Result 是一个枚举(enumeration,通常称为 enum),它是一种可以有多种可能状态的类型。我们将每种可能的状态称为一个 变体(variant)。
第 6 章 将更详细地介绍枚举。这些 Result 类型的目的是编码错误处理信息。
Result 的变体是 Ok 和 Err。Ok 变体表示操作成功,并包含成功生成的值。Err 变体表示操作失败,并包含有关操作失败方式或原因的信息。
Result 类型的值,就像任何类型的值一样,都定义了方法。Result 实例有一个你可以调用的 expect 方法。如果这个 Result 实例是 Err 值,expect 将导致程序崩溃并显示你传递给 expect 作为参数的消息。如果 read_line 方法返回 Err,这很可能是底层操作系统出现错误的结果。如果这个 Result 实例是 Ok 值,expect 将获取 Ok 持有的返回值并仅将该值返回给你,以便你可以使用它。在这种情况下,该值是用户输入的字节数。
如果你不调用 expect,程序可以编译,但你会收到一个警告:
$ cargo build
   Compiling guessing_game v0.1.0 (file:///projects/guessing_game)
warning: unused `Result` that must be used
  --> src/main.rs:10:5
   |
10 |     io::stdin().read_line(&mut guess);
   |     ^^^^^^^^^^^^^^^^^^^^^^^^^^^^^^^^^
   |
   = note: this `Result` may be an `Err` variant, which should be handled
   = note: `#[warn(unused_must_use)]` on by default
help: use `let _ = ...` to ignore the resulting value
   |
10 |     let _ = io::stdin().read_line(&mut guess);
   |     +++++++

warning: `guessing_game` (bin "guessing_game") generated 1 warning
    Finished `dev` profile [unoptimized + debuginfo] target(s) in 0.59s
Rust 警告你没有使用 read_line 返回的 Result 值,表明程序没有处理可能的错误。
消除警告的正确方法是实际编写错误处理代码,但在我们的案例中,我们只希望在出现问题时使程序崩溃,因此我们可以使用 expect。你将在第 9 章 中学习如何从错误中恢复。
使用 println! 占位符打印值
除了右花括号之外,到目前为止的代码中还有一行需要讨论:
use std::io;

fn main() {
    println!("Guess the number!");

    println!("Please input your guess.");

    let mut guess = String::new();

    io::stdin()
        .read_line(&mut guess)
        .expect("Failed to read line");

    println!("You guessed: {guess}");
}这一行打印了现在包含用户输入的字符串。{} 花括号是一个占位符:可以将 {} 想象成小小的螃蟹钳子,它们将值固定在适当位置。打印变量的值时,变量名可以放在花括号内。打印表达式求值结果时,在格式字符串中放置空花括号,然后格式字符串后跟一个逗号分隔的表达式列表,按照相同的顺序打印到每个空花括号占位符中。在一次 println! 调用中打印变量和表达式的结果如下所示:
#![allow(unused)]
fn main() {
let x = 5;
let y = 10;

println!("x = {x} and y + 2 = {}", y + 2);
}
这段代码将打印 x = 5 and y + 2 = 12。
测试第一部分
让我们测试猜数字游戏的第一部分。使用 cargo run 运行它:
$ cargo run
   Compiling guessing_game v0.1.0 (file:///projects/guessing_game)
    Finished `dev` profile [unoptimized + debuginfo] target(s) in 6.44s
     Running `target/debug/guessing_game`
Guess the number!
Please input your guess.
6
You guessed: 6
至此,游戏的第一部分完成了:我们从键盘获取输入然后打印出来。
生成一个秘密数字
接下来,我们需要生成一个秘密数字,玩家将尝试猜测它。秘密数字每次都应该不同,这样游戏才能多次玩耍仍然有趣。我们将使用 1 到 100 之间的随机数,这样游戏不会太难。Rust 的标准库中尚未包含随机数功能。但是,Rust 团队提供了一个包含此功能的 rand crate。
使用 crate 增加功能
记住,crate(包)是一个 Rust 源代码文件的集合。我们一直在构建的项目是一个二进制 crate(binary crate),它是一个可执行文件。rand crate 是一个库 crate(library crate),其中包含旨在用于其他程序的代码,不能独立执行。
Cargo 对外部 crate 的协调才是 Cargo 真正闪耀的地方。在我们可以编写使用 rand 的代码之前,需要修改 Cargo.toml 文件以将 rand crate 作为依赖包含进来。现在打开该文件,并在 Cargo 为你创建的 [dependencies] 部分标题下方添加以下行。请务必像我们这里一样精确指定 rand 及其版本号,否则本教程中的代码示例可能无法正常工作:
文件名: Cargo.toml
[dependencies]
rand = "0.8.5"
在 Cargo.toml 文件中,标题后的所有内容都是该部分的一部分,直到另一个部分开始。在 [dependencies] 中,你告诉 Cargo 你的项目依赖哪些外部 crate 以及你需要这些 crate 的哪些版本。在这种情况下,我们使用语义版本说明符 0.8.5 指定了 rand crate。Cargo 理解语义化版本(Semantic Versioning)(有时称为 SemVer),这是一种编写版本号的标准。说明符 0.8.5 实际上是 ^0.8.5 的简写,这意味着任何至少为 0.8.5 但低于 0.9.0 的版本。
Cargo 认为这些版本具有与 0.8.5 兼容的公共 API,并且此规范确保你将获得最新的补丁版本,该版本仍然可以与本章中的代码一起编译。任何 0.9.0 或更高版本都不能保证具有与以下示例相同的 API。
现在,在不更改任何代码的情况下,让我们构建项目,如清单 2-2 所示。
$ cargo build
  Updating crates.io index
   Locking 15 packages to latest Rust 1.85.0 compatible versions
    Adding rand v0.8.5 (available: v0.9.0)
 Compiling proc-macro2 v1.0.93
 Compiling unicode-ident v1.0.17
 Compiling libc v0.2.170
 Compiling cfg-if v1.0.0
 Compiling byteorder v1.5.0
 Compiling getrandom v0.2.15
 Compiling rand_core v0.6.4
 Compiling quote v1.0.38
 Compiling syn v2.0.98
 Compiling zerocopy-derive v0.7.35
 Compiling zerocopy v0.7.35
 Compiling ppv-lite86 v0.2.20
 Compiling rand_chacha v0.3.1
 Compiling rand v0.8.5
 Compiling guessing_game v0.1.0 (file:///projects/guessing_game)
  Finished `dev` profile [unoptimized + debuginfo] target(s) in 2.48s
rand crate 添加为依赖后运行 cargo build 的输出你可能会看到不同的版本号(但由于 SemVer,它们都将与代码兼容!)和不同的行(取决于操作系统),并且行的顺序可能不同。
当我们包含一个外部依赖时,Cargo 会从 registry(注册表)获取该依赖所需的所有内容的最新版本,该注册表是来自 Crates.io 的数据副本。Crates.io 是 Rust 生态系统中的人们发布其开源 Rust 项目供他人使用的地方。
更新注册表后,Cargo 会检查 [dependencies] 部分,并下载任何尚未下载的已列出的 crate。在这种情况下,虽然我们只列出了 rand 作为依赖,但 Cargo 也获取了 rand 依赖的其他 crate 才能工作。下载完 crate 后,Rust 编译它们,然后编译可用的依赖项目。
如果你立即再次运行 cargo build 而不做任何更改,你将看不到除 Finished 行之外的任何输出。Cargo 知道它已经下载并编译了依赖项,并且你没有在 Cargo.toml 文件中更改它们。Cargo 也知道你没有更改任何代码,因此它也不会重新编译。无事可做,它就简单退出了。
如果你打开 src/main.rs 文件,做一个微不足道的更改,然后保存并再次构建,你将只看到两行输出:
$ cargo build
   Compiling guessing_game v0.1.0 (file:///projects/guessing_game)
    Finished `dev` profile [unoptimized + debuginfo] target(s) in 0.13s
这些行显示 Cargo 仅更新了构建,因为你对你对 src/main.rs 文件的小改动。你的依赖项没有改变,因此 Cargo 知道它可以重复使用已经下载和编译的内容。
确保可重现的构建
Cargo 有一个机制,可确保你或其他任何人每次构建代码时都能重建相同的工件:Cargo 将只使用你指定的依赖版本,直到你另有指示。例如,假设下周 rand crate 的 0.8.6 版本发布了,该版本包含一个重要错误修复,但也包含一个会破坏你的代码的回归。为了处理这种情况,Rust 会在你第一次运行 cargo build 时创建 Cargo.lock 文件,因此我们现在在 guessing_game 目录中有这个文件。
当你第一次构建项目时,Cargo 会找出符合条件的所有依赖版本,然后将它们写入 Cargo.lock 文件。当你将来构建项目时,Cargo 会看到 Cargo.lock 文件存在,并使用其中指定的版本,而不是重新做所有找出版本的工作。这让你自动获得可重现的构建。换句话说,多亏了 Cargo.lock 文件,你的项目将保持在 0.8.5 版本,直到你显式升级。由于 Cargo.lock 文件对于可重现的构建非常重要,它通常会与项目中的其余代码一起检入源代码管理。
更新 crate 以获取新版本
当你 确实 想要更新一个 crate 时,Cargo 提供了 update 命令,该命令将忽略 Cargo.lock 文件,并找出符合 Cargo.toml 中规范的所有最新版本。然后 Cargo 会将这些版本写入 Cargo.lock 文件。否则,默认情况下,Cargo 只会查找大于 0.8.5 且小于 0.9.0 的版本。如果 rand crate 发布了两个新版本 0.8.6 和 0.999.0,那么如果你运行 cargo update,你会看到以下内容:
$ cargo update
    Updating crates.io index
     Locking 1 package to latest Rust 1.85.0 compatible version
    Updating rand v0.8.5 -> v0.8.6 (available: v0.999.0)
Cargo 会忽略 0.999.0 版本。此时,你还会注意到 Cargo.lock 文件中的更改,表明你现在使用的 rand crate 版本是 0.8.6。要使用 rand 版本 0.999.0 或 0.999.x 系列中的任何版本,你需要将 Cargo.toml 文件更新为如下所示(不要实际进行此更改,因为以下示例假定你使用的是 rand 0.8):
[dependencies]
rand = "0.999.0"
下次运行 cargo build 时,Cargo 将更新可用 crate 的注册表,并根据你指定的新版本重新评估你的 rand 需求。
关于 Cargo 及其生态系统,还有很多要说的,我们将在第 14 章讨论,但现在,这就是你需要知道的一切。Cargo 使得重用库变得非常容易,因此 Rustaceans 能够编写由多个包组装而成的更小项目。
生成一个随机数
让我们开始使用 rand 来生成一个要猜测的数字。下一步是更新 src/main.rs,如清单 2-3 所示。
use std::io;

use rand::Rng;

fn main() {
    println!("Guess the number!");

    let secret_number = rand::thread_rng().gen_range(1..=100);

    println!("The secret number is: {secret_number}");

    println!("Please input your guess.");

    let mut guess = String::new();

    io::stdin()
        .read_line(&mut guess)
        .expect("Failed to read line");

    println!("You guessed: {guess}");
}首先,我们添加一行 use rand::Rng;。Rng trait(特征)定义了随机数生成器实现的方法,并且这个 trait 必须在作用域内,我们才能使用这些方法。第 10 章将详细介绍 trait。
接下来,我们在中间添加了两行。在第一行中,我们调用 rand::thread_rng 函数,该函数提供我们将要使用的特定随机数生成器:一个当前执行线程本地且由操作系统提供种子的生成器。然后,我们在随机数生成器上调用 gen_range 方法。这个方法由 Rng trait 定义,我们通过 use rand::Rng; 语句将其引入作用域。gen_range 方法接受一个范围表达式作为参数,并生成该范围内的一个随机数。我们在这里使用的范围表达式形式为 start..=end,包括上下限,因此我们需要指定 1..=100 来请求一个 1 到 100 之间的数字。
注意:你不会仅仅知道要使用哪些 trait 以及要从 crate 调用哪些方法和函数,因此每个 crate 都有带有使用说明的文档。Cargo 的另一个巧妙功能是运行
cargo doc --open命令将在本地构建所有依赖项提供的文档,并在你的浏览器中打开它。例如,如果你对randcrate 中的其他功能感兴趣,请运行cargo doc --open并单击左侧边栏中的rand。
第二行新代码打印了秘密数字。这在开发程序时用于测试非常有用,但我们将在最终版本中删除它。如果程序一开始就打印答案,那就不太像游戏了!
尝试运行该程序几次:
$ cargo run
   Compiling guessing_game v0.1.0 (file:///projects/guessing_game)
    Finished `dev` profile [unoptimized + debuginfo] target(s) in 0.02s
     Running `target/debug/guessing_game`
Guess the number!
The secret number is: 7
Please input your guess.
4
You guessed: 4

$ cargo run
    Finished `dev` profile [unoptimized + debuginfo] target(s) in 0.02s
     Running `target/debug/guessing_game`
Guess the number!
The secret number is: 83
Please input your guess.
5
You guessed: 5
你应该得到不同的随机数,而且它们都应该是 1 到 100 之间的数字。干得漂亮!
比较猜测与秘密数字
现在我们已经有了用户输入和一个随机数,可以比较它们了。这一步如清单 2-4 所示。请注意,这段代码暂时还不能编译,我们接下来会解释。
use std::cmp::Ordering;
use std::io;

use rand::Rng;

fn main() {
    // --snip--
    println!("Guess the number!");

    let secret_number = rand::thread_rng().gen_range(1..=100);

    println!("The secret number is: {secret_number}");

    println!("Please input your guess.");

    let mut guess = String::new();

    io::stdin()
        .read_line(&mut guess)
        .expect("Failed to read line");

    println!("You guessed: {guess}");

    match guess.cmp(&secret_number) {
        Ordering::Less => println!("Too small!"),
        Ordering::Greater => println!("Too big!"),
        Ordering::Equal => println!("You win!"),
    }
}首先,我们添加另一个 use 语句,将标准库中一个名为 std::cmp::Ordering 的类型引入作用域。Ordering 类型是另一个枚举(enum),具有 Less、Greater 和 Equal 三个变体(variants)。这是比较两个值时可能出现的三种结果。
然后,我们在底部添加了五行新代码,使用了 Ordering 类型。cmp 方法比较两个值,可以在任何可比较的内容上调用。它接受一个对你想要比较的值的引用:在这里,它比较 guess 和 secret_number。然后,它返回我们通过 use 语句引入作用域的 Ordering 枚举的一个变体。我们使用一个 match 表达式来决定接下来做什么,基于调用 cmp 比较 guess 和 secret_number 的值后返回的 Ordering 变体。
一个 match 表达式由 分支(arms)组成。每个分支包含一个要匹配的 模式(pattern),以及当提供给 match 的值匹配该分支的模式时应运行的代码。Rust 获取提供给 match 的值,然后依次检查每个分支的模式。模式和 match 结构是强大的 Rust 特性:它们让你能够表达代码可能遇到的各种情况,并确保你处理了所有情况。这些特性将分别在第 6 章和第 19 章详细介绍。
让我们通过这里使用的 match 表达式来举例说明。假设用户猜了 50,而此次随机生成的秘密数字是 38。
当代码比较 50 和 38 时,cmp 方法将返回 Ordering::Greater,因为 50 大于 38。match 表达式获取 Ordering::Greater 值并开始检查每个分支的模式。它查看第一个分支的模式 Ordering::Less,发现值 Ordering::Greater 不匹配 Ordering::Less,因此忽略该分支中的代码并移至下一个分支。下一个分支的模式是 Ordering::Greater,它 确实 匹配了 Ordering::Greater!该分支中的关联代码将执行并在屏幕上打印 Too big!。match 表达式在第一个成功匹配后结束,因此在这种场景下它不会查看最后一个分支。
然而,清单 2-4 中的代码还不能编译。让我们试试:
$ cargo build
   Compiling libc v0.2.86
   Compiling getrandom v0.2.2
   Compiling cfg-if v1.0.0
   Compiling ppv-lite86 v0.2.10
   Compiling rand_core v0.6.2
   Compiling rand_chacha v0.3.0
   Compiling rand v0.8.5
   Compiling guessing_game v0.1.0 (file:///projects/guessing_game)
error[E0308]: mismatched types
  --> src/main.rs:23:21
   |
23 |     match guess.cmp(&secret_number) {
   |                 --- ^^^^^^^^^^^^^^ expected `&String`, found `&{integer}`
   |                 |
   |                 arguments to this method are incorrect
   |
   = note: expected reference `&String`
              found reference `&{integer}`
note: method defined here
  --> /rustc/1159e78c4747b02ef996e55082b704c09b970588/library/core/src/cmp.rs:979:8

For more information about this error, try `rustc --explain E0308`.
error: could not compile `guessing_game` (bin "guessing_game") due to 1 previous error
错误的核心表明存在 类型不匹配(mismatched types)。Rust 拥有强大的静态类型系统。然而,它也有类型推断(type inference)。当我们写 let mut guess = String::new() 时,Rust 能够推断出 guess 应该是一个 String,而不需要我们写出类型。而 secret_number 则是一个数字类型。Rust 的几种数字类型可以具有 1 到 100 之间的值:i32(32 位数字)、u32(无符号 32 位数字)、i64(64 位数字)等等。除非另有指定,Rust 默认使用 i32,这就是 secret_number 的类型,除非你在其他地方添加了类型信息导致 Rust 推断出不同的数字类型。错误的原因是 Rust 无法比较字符串和数字类型。
最终,我们想要将程序读取为输入的 String 转换为数字类型,以便我们可以将其与秘密数字进行数值比较。我们通过在 main 函数体中添加这一行来实现:
文件名: src/main.rs
use std::cmp::Ordering;
use std::io;

use rand::Rng;

fn main() {
    println!("Guess the number!");

    let secret_number = rand::thread_rng().gen_range(1..=100);

    println!("The secret number is: {secret_number}");

    println!("Please input your guess.");

    // --snip--

    let mut guess = String::new();

    io::stdin()
        .read_line(&mut guess)
        .expect("Failed to read line");

    let guess: u32 = guess.trim().parse().expect("Please type a number!");

    println!("You guessed: {guess}");

    match guess.cmp(&secret_number) {
        Ordering::Less => println!("Too small!"),
        Ordering::Greater => println!("Too big!"),
        Ordering::Equal => println!("You win!"),
    }
}
这一行是:
let guess: u32 = guess.trim().parse().expect("Please type a number!");我们创建了一个名为 guess 的变量。但是等等,程序中不是已经有一个名为 guess 的变量了吗?是的,但 Rust 允许我们用新值覆盖 guess 的旧值,这很有用。遮蔽(Shadowing)让我们可以重用 guess 变量名,而不必强迫我们创建两个不同的变量,例如 guess_str 和 guess。我们将在第 3 章 中更详细地介绍这一点,但现在,要知道这个特性在你想要将值从一种类型转换为另一种类型时经常使用。
我们将这个新变量绑定到表达式 guess.trim().parse()。表达式中的 guess 指的是包含输入字符串的原始 guess 变量。String 实例上的 trim 方法将消除开头和结尾的任何空白,在将字符串转换为只能包含数字数据的 u32 之前,我们必须这样做。用户必须按下 enter 才能满足 read_line 并输入他们的猜测,这会在字符串中添加一个换行符。例如,如果用户输入 5 并按下 enter,guess 看起来像这样:5\n。\n 表示换行符(newline)。(在 Windows 上,按下 enter 会产生一个回车符和一个换行符,\r\n。)trim 方法会消除 \n 或 \r\n,结果只剩下 5。
字符串上的 parse 方法 将字符串转换为另一种类型。在这里,我们用它从字符串转换为数字。我们需要通过 let guess: u32 告诉 Rust 我们想要的精确数字类型。guess 后面的冒号(:)告诉 Rust 我们要标注变量的类型。Rust 有几种内置的数字类型;这里看到的 u32 是一个无符号 32 位整数。对于小的正数来说,这是一个很好的默认选择。你将在第 3 章 中了解其他数字类型。
此外,这个示例程序中的 u32 标注以及与 secret_number 的比较意味着 Rust 将推断 secret_number 也应该是 u32。所以,现在比较将在两个相同类型的值之间进行!
parse 方法只对可以逻辑转换为数字的字符有效,因此很容易导致错误。例如,如果字符串包含 A👍%,则无法将其转换为数字。因为它可能会失败,parse 方法返回一个 Result 类型,很像 read_line 方法(前面在“使用 Result 处理潜在的错误” 中讨论过)。我们将以同样的方式通过再次使用 expect 方法来处理这个 Result。如果 parse 因为无法从字符串创建数字而返回 Err Result 变体,expect 调用将使游戏崩溃并打印我们给它的消息。如果 parse 成功将字符串转换为数字,它将返回 Result 的 Ok 变体,而 expect 将返回我们想要从 Ok 值中获取的数字。
让我们现在运行程序:
$ cargo run
   Compiling guessing_game v0.1.0 (file:///projects/guessing_game)
    Finished `dev` profile [unoptimized + debuginfo] target(s) in 0.26s
     Running `target/debug/guessing_game`
Guess the number!
The secret number is: 58
Please input your guess.
  76
You guessed: 76
Too big!
太棒了!即使在猜测前添加了空格,程序仍然能判断出用户猜了 76。多次运行程序以验证不同类型输入的不同行为:猜对数字、猜一个太大的数字、猜一个太小的数字。
现在游戏大部分已经可以运行了,但用户只能猜一次。让我们通过添加循环来改变这一点!
使用循环允许多次猜测
loop 关键字创建了一个无限循环。我们将添加一个循环,给用户更多猜测数字的机会:
文件名: src/main.rs
use std::cmp::Ordering;
use std::io;

use rand::Rng;

fn main() {
    println!("Guess the number!");

    let secret_number = rand::thread_rng().gen_range(1..=100);

    // --snip--

    println!("The secret number is: {secret_number}");

    loop {
        println!("Please input your guess.");

        // --snip--


        let mut guess = String::new();

        io::stdin()
            .read_line(&mut guess)
            .expect("Failed to read line");

        let guess: u32 = guess.trim().parse().expect("Please type a number!");

        println!("You guessed: {guess}");

        match guess.cmp(&secret_number) {
            Ordering::Less => println!("Too small!"),
            Ordering::Greater => println!("Too big!"),
            Ordering::Equal => println!("You win!"),
        }
    }
}
如你所见,我们将从猜测输入提示开始的所有内容移到了一个循环中。确保将循环内的行再缩进四个空格,然后再次运行程序。程序现在会永远要求再猜一次,这实际上引入了一个新问题。用户似乎无法退出!
用户总是可以通过键盘快捷键 ctrl-C 中断程序。但还有另一种方法可以逃离这个永不满足的怪物,正如在 parse 讨论中提到的“比较猜测与秘密数字”:如果用户输入一个非数字的回答,程序将崩溃。我们可以利用这一点来允许用户退出,如下所示:
$ cargo run
   Compiling guessing_game v0.1.0 (file:///projects/guessing_game)
    Finished `dev` profile [unoptimized + debuginfo] target(s) in 0.23s
     Running `target/debug/guessing_game`
Guess the number!
The secret number is: 59
Please input your guess.
45
You guessed: 45
Too small!
Please input your guess.
60
You guessed: 60
Too big!
Please input your guess.
59
You guessed: 59
You win!
Please input your guess.
quit

thread 'main' panicked at src/main.rs:28:47:
Please type a number!: ParseIntError { kind: InvalidDigit }
note: run with `RUST_BACKTRACE=1` environment variable to display a backtrace
输入 quit 将退出游戏,但你会注意到,输入任何其他非数字输入也会退出。至少可以说这不太理想;我们希望在猜对数字时游戏也能停止。
猜对后退出
让我们通过在用户获胜时添加 break 语句来编程让游戏退出:
文件名: src/main.rs
use std::cmp::Ordering;
use std::io;

use rand::Rng;

fn main() {
    println!("Guess the number!");

    let secret_number = rand::thread_rng().gen_range(1..=100);

    println!("The secret number is: {secret_number}");

    loop {
        println!("Please input your guess.");

        let mut guess = String::new();

        io::stdin()
            .read_line(&mut guess)
            .expect("Failed to read line");

        let guess: u32 = guess.trim().parse().expect("Please type a number!");

        println!("You guessed: {guess}");

        // --snip--

        match guess.cmp(&secret_number) {
            Ordering::Less => println!("Too small!"),
            Ordering::Greater => println!("Too big!"),
            Ordering::Equal => {
                println!("You win!");
                break;
            }
        }
    }
}
在 You win! 之后添加 break 行使得程序在用户猜对秘密数字时退出循环。退出循环也意味着退出程序,因为循环是 main 的最后一部分。
处理无效输入
为了进一步优化游戏的行为,我们让游戏忽略非数字输入,而不是在用户输入非数字时使程序崩溃,这样用户可以继续猜测。我们可以通过修改将 guess 从 String 转换为 u32 的那一行来实现,如清单 2-5 所示。
use std::cmp::Ordering;
use std::io;

use rand::Rng;

fn main() {
    println!("Guess the number!");

    let secret_number = rand::thread_rng().gen_range(1..=100);

    println!("The secret number is: {secret_number}");

    loop {
        println!("Please input your guess.");

        let mut guess = String::new();

        // --snip--

        io::stdin()
            .read_line(&mut guess)
            .expect("Failed to read line");

        let guess: u32 = match guess.trim().parse() {
            Ok(num) => num,
            Err(_) => continue,
        };

        println!("You guessed: {guess}");

        // --snip--

        match guess.cmp(&secret_number) {
            Ordering::Less => println!("Too small!"),
            Ordering::Greater => println!("Too big!"),
            Ordering::Equal => {
                println!("You win!");
                break;
            }
        }
    }
}我们将 expect 调用切换为 match 表达式,从出错时崩溃转变为处理错误。回想一下,parse 返回一个 Result 类型,而 Result 是一个枚举,具有 Ok 和 Err 变体。我们在这里使用了 match 表达式,就像我们对 cmp 方法的 Ordering 结果所做的那样。
如果 parse 能够成功地将字符串转换为数字,它将返回一个包含结果数字的 Ok 值。该 Ok 值将匹配第一个分支的模式,match 表达式将直接返回 parse 产生并放入 Ok 值中的 num 值。该数字将正好位于我们在新创建的 guess 变量中想要的位置。
如果 parse 不能 将字符串转换为数字,它将返回一个包含有关错误的更多信息的 Err 值。Err 值不匹配第一个 match 分支中的 Ok(num) 模式,但它确实匹配第二个分支中的 Err(_) 模式。下划线 _ 是一个通配符(catch-all value);在这个例子中,我们说我们想要匹配所有 Err 值,无论它们内部包含什么信息。因此,程序将执行第二个分支的代码 continue,这告诉程序进入 loop 的下一次迭代并请求另一个猜测。所以,实际上,程序忽略了 parse 可能遇到的所有错误!
现在程序中的所有内容都应该按预期工作了。让我们试试:
$ cargo run
   Compiling guessing_game v0.1.0 (file:///projects/guessing_game)
    Finished `dev` profile [unoptimized + debuginfo] target(s) in 0.13s
     Running `target/debug/guessing_game`
Guess the number!
The secret number is: 61
Please input your guess.
10
You guessed: 10
Too small!
Please input your guess.
99
You guessed: 99
Too big!
Please input your guess.
foo
Please input your guess.
61
You guessed: 61
You win!
太棒了!再做一个小小的最后调整,我们就完成了猜数字游戏。回想一下,程序仍然在打印秘密数字。这在测试时效果很好,但会破坏游戏。让我们删除输出秘密数字的 println!。清单 2-6 显示了最终代码。
use std::cmp::Ordering;
use std::io;

use rand::Rng;

fn main() {
    println!("Guess the number!");

    let secret_number = rand::thread_rng().gen_range(1..=100);

    loop {
        println!("Please input your guess.");

        let mut guess = String::new();

        io::stdin()
            .read_line(&mut guess)
            .expect("Failed to read line");

        let guess: u32 = match guess.trim().parse() {
            Ok(num) => num,
            Err(_) => continue,
        };

        println!("You guessed: {guess}");

        match guess.cmp(&secret_number) {
            Ordering::Less => println!("Too small!"),
            Ordering::Greater => println!("Too big!"),
            Ordering::Equal => {
                println!("You win!");
                break;
            }
        }
    }
}至此,你已经成功构建了猜数字游戏。恭喜!
总结
这个项目是一个动手实践的方式,向你介绍了许多新的 Rust 概念:let、match、函数、使用外部 crate 等等。在接下来的几章中,你将更详细地学习这些概念。第 3 章涵盖大多数编程语言都有的概念,例如变量、数据类型和函数,并展示如何在 Rust 中使用它们。第 4 章探讨所有权(ownership),这是使 Rust 与其他语言不同的一个特性。第 5 章讨论结构体(structs)和方法语法,第 6 章解释枚举(enums)如何工作。
通用编程概念
本章涵盖了几乎所有编程语言中都出现的概念以及它们在 Rust 中的工作方式。许多编程语言在核心上有许多共同之处。本章中介绍的概念都不是 Rust 独有的,但我们将在 Rust 的背景下讨论它们,并解释使用它们的惯例。
具体来说,你将学习变量(variables)、基本类型(basic types)、函数(functions)、注释(comments)和控制流(control flow)。这些基础将会出现在每一个 Rust 程序中,尽早学习它们将为你打下坚实的基础。
关键字
Rust 语言拥有一组 关键字(keywords),与其他语言一样,这些关键字仅供语言本身使用。请记住,你不能将这些词用作变量或函数的名称。大多数关键字具有特殊含义,你将在 Rust 程序中使用它们执行各种任务;少数关键字目前没有与之关联的功能,但已被保留以备将来可能添加到 Rust 中的功能。你可以在附录 A中找到关键字列表。
变量与可变性
变量(Variables)与可变性(Mutability)
正如在“使用变量存储值”一节中提到的,默认情况下, 变量(variables)是不可变的(immutable)。这是 Rust 引导你利用其提供的安全性和轻松并发(concurrency)优势来编写代码的众多方式之一。 不过,你仍然可以选择让变量变为可变的(mutable)。 让我们来探讨 Rust 为何以及如何鼓励你倾向于使用不可变性(immutability),以及为什么有时你可能想要选择不使用它。
当一个变量不可变时,一旦值被绑定(bound)到一个名字上,你就无法改变
该值。为了说明这一点,在你的 projects 目录下使用 cargo new variables
生成一个名为 variables 的新项目。
然后,在你的新 variables 目录中,打开 src/main.rs 并将其代码替换为 以下代码,这段代码暂时还无法编译:
文件名:src/main.rs
fn main() {
    let x = 5;
    println!("The value of x is: {x}");
    x = 6;
    println!("The value of x is: {x}");
}
使用 cargo run 保存并运行该程序。你应该会收到一条关于
不可变性(immutability)错误的错误信息,如下所示:
$ cargo run
   Compiling variables v0.1.0 (file:///projects/variables)
error[E0384]: cannot assign twice to immutable variable `x`
 --> src/main.rs:4:5
  |
2 |     let x = 5;
  |         - first assignment to `x`
3 |     println!("The value of x is: {x}");
4 |     x = 6;
  |     ^^^^^ cannot assign twice to immutable variable
  |
help: consider making this binding mutable
  |
2 |     let mut x = 5;
  |         +++

For more information about this error, try `rustc --explain E0384`.
error: could not compile `variables` (bin "variables") due to 1 previous error
这个例子展示了编译器如何帮助你找到程序中的错误。 编译器错误可能会令人沮丧,但实际上它们只是意味着你的程序 还没有安全地完成你想要它做的事情;它们并 不 意味着你不是 一个优秀的程序员!经验丰富的 Rustaceans 也会遇到编译器错误。
你收到的错误信息是 cannot assign twice to immutable variable `x`(不能对不可变变量 x 二次赋值),因为你试图给不可变的 x 变量赋予第二个值。
当我们试图更改一个被指定为不可变的值时,能够在编译时(compile-time)得到错误是很重要的,因为这种情况正是 bug(程序错误)的源头。如果代码的一部分假定某个值永远不会改变,而另一部分代码改变了该值,那么第一部分代码可能就无法按预期工作了。这类 bug 的原因在事后很难追踪,尤其是当第二段代码只是 有时 改变该值时。Rust 编译器保证,当你声明一个值不会改变时,它就真的不会改变,因此你无需自己追踪它。你的代码因此 更易于推理(reason)。
但是可变性(mutability)可能非常有用,并且可以让代码编写起来更便捷。
虽然变量默认是不可变的,但你仍然可以通过在变量名前添加 mut 来使其可变,就像你在第 2 章中所做的那样。添加 mut 还向未来的代码阅读者传达了意图,表明代码的其他部分将会改变这个变量的值。
例如,让我们将 src/main.rs 改为以下内容:
文件名:src/main.rs
fn main() {
    let mut x = 5;
    println!("The value of x is: {x}");
    x = 6;
    println!("The value of x is: {x}");
}
现在当我们运行这个程序时,会得到如下输出:
$ cargo run
   Compiling variables v0.1.0 (file:///projects/variables)
    Finished `dev` profile [unoptimized + debuginfo] target(s) in 0.30s
     Running `target/debug/variables`
The value of x is: 5
The value of x is: 6
当使用了 mut 时,我们可以将绑定到 x 的值从 5 改为 6。
最终,是否使用可变性取决于你,以及你认为在特定情况下哪种方式最清晰。
声明常量(Constants)
与不可变变量类似,常量(constants) 也是绑定到名字上且不允许改变的值,但常量与变量之间有几个不同之处。
首先,不允许对常量使用 mut。常量不仅仅是默认不可变——它们始终不可变。声明常量使用 const 关键字而不是 let 关键字,并且 必须 标注值的类型。我们将在下一节 “数据类型”中介绍类型和类型注解(type annotations),所以现在不必担心细节。只需知道你必须始终标注类型。
常量可以在任何作用域(scope)中声明,包括全局作用域(global scope),这使得它们对于代码中许多部分都需要知道的值非常有用。
最后一个区别是,常量只能设置为常量表达式(constant expression),而不能设置为只能在运行时计算得出的值。
以下是一个常量声明的示例:
#![allow(unused)]
fn main() {
const THREE_HOURS_IN_SECONDS: u32 = 60 * 60 * 3;
}
该常量的名称为 THREE_HOURS_IN_SECONDS,其值被设置为 60(一分钟的秒数)乘以 60(一小时的分钟数)再乘以 3(我们想计算的程序中的小时数)的结果。Rust 的常量命名约定(naming convention)是全部使用大写字母,单词之间用下划线分隔。编译器能够在编译时(compile time)评估有限的一组操作,这让我们可以选择以一种更易于理解和验证的方式写出这个值,而不是将该常量直接设置为 10,800。有关声明常量时可以使用哪些操作的更多信息,请参阅 Rust 参考手册中关于常量求值的部分。
常量在其声明的整个作用域内,在程序运行的整个过程都有效。这一特性使得常量对于应用程序域中多个部分可能需要知道的值非常有用,例如游戏中任何玩家允许获得的最高分数,或者光速。
将程序中使用的硬编码(hardcoded)值命名为常量,有助于向未来的代码维护者传达该值的含义。如果将来需要更新这个硬编码的值,它也只需修改代码中的一个地方即可。
隐藏(Shadowing)
正如你在第 2 章的猜谜游戏教程中看到的,你可以声明一个与之前变量同名的新变量。Rustaceans 说第一个变量被第二个变量 隐藏(shadowed) 了,这意味着当你使用该变量名时,编译器将看到的是第二个变量。实际上,第二个变量遮蔽(overshadows)了第一个变量,将变量名的所有使用都指向自身,直到它自己被隐藏或作用域结束。我们可以通过使用相同的变量名并重复使用 let 关键字来隐藏变量,如下所示:
文件名:src/main.rs
fn main() {
    let x = 5;

    let x = x + 1;

    {
        let x = x * 2;
        println!("The value of x in the inner scope is: {x}");
    }

    println!("The value of x is: {x}");
}
这个程序首先将 x 绑定到值 5。然后,通过重复 let x = 创建了一个新的变量 x,将原始值加上 1,使得 x 的值变为 6。接着,在用花括号创建的内部作用域(inner scope)中,第三个 let 语句也隐藏了 x 并创建了一个新变量,将之前的值乘以 2,使 x 的值为 12。当该作用域结束时,内部隐藏结束,x 恢复为 6。当我们运行这个程序时,它会输出以下内容:
$ cargo run
   Compiling variables v0.1.0 (file:///projects/variables)
    Finished `dev` profile [unoptimized + debuginfo] target(s) in 0.31s
     Running `target/debug/variables`
The value of x in the inner scope is: 12
The value of x is: 6
隐藏(shadowing)与将变量标记为 mut 不同,因为如果我们不小心尝试在不使用 let 关键字的情况下重新赋值给这个变量,就会得到一个编译时错误。通过使用 let,我们可以对一个值进行几次变换(transformations),但在这些变换完成后,变量仍然保持不可变。
mut 与隐藏之间的另一个区别是,由于我们在再次使用 let 关键字时实际上是创建了一个新变量,因此我们可以改变值的类型(type),同时复用相同的名称。例如,假设我们的程序要求用户通过输入空格字符来显示他们希望在文本之间有多少空格,然后我们希望将该输入存储为一个数字:
fn main() {
    let spaces = "   ";
    let spaces = spaces.len();
}
第一个 spaces 变量是字符串(string)类型,第二个 spaces 变量是数字(number)类型。因此,隐藏使我们不必想出不同的名称,比如 spaces_str 和 spaces_num;相反,我们可以复用更简单的 spaces 名称。然而,如果我们尝试对此使用 mut,如下所示,就会得到一个编译时错误:
fn main() {
    let mut spaces = "   ";
    spaces = spaces.len();
}
错误信息表明我们不允许改变变量的类型:
$ cargo run
   Compiling variables v0.1.0 (file:///projects/variables)
error[E0308]: mismatched types
 --> src/main.rs:3:14
  |
2 |     let mut spaces = "   ";
  |                      ----- expected due to this value
3 |     spaces = spaces.len();
  |              ^^^^^^^^^^^^ expected `&str`, found `usize`

For more information about this error, try `rustc --explain E0308`.
error: could not compile `variables` (bin "variables") due to 1 previous error
现在我们已经探讨了变量的工作方式,接下来让我们看看变量可以拥有的更多数据类型(data types)。
数据类型
数据类型(Data Types)
Rust 中的每个值都属于某种特定的数据类型(data type),这告诉 Rust 它所处理的是哪种数据,从而知道该如何处理这些数据。我们将讨论两种数据类型子集:标量类型(scalar)和复合类型(compound)。
请记住,Rust 是一门静态类型(statically typed)语言,这意味着它在编译时必须知道所有变量的类型。编译器通常可以根据值及其使用方式推断出我们想使用的类型。在可能存在多种类型的情况下,例如我们在第 2 章的“将猜测的数字与秘密数字进行比较”章节中,使用 parse 将 String 转换为数值类型时,我们必须添加一个类型注解(type annotation),如下所示:
#![allow(unused)]
fn main() {
let guess: u32 = "42".parse().expect("Not a number!");
}
如果我们在前面的代码中没有添加 : u32 类型注解,Rust 将显示以下错误,这意味着编译器需要更多信息来确定我们想要使用哪种类型:
$ cargo build
   Compiling no_type_annotations v0.1.0 (file:///projects/no_type_annotations)
error[E0284]: type annotations needed
 --> src/main.rs:2:9
  |
2 |     let guess = "42".parse().expect("Not a number!");
  |         ^^^^^        ----- type must be known at this point
  |
  = note: cannot satisfy `<_ as FromStr>::Err == _`
help: consider giving `guess` an explicit type
  |
2 |     let guess: /* Type */ = "42".parse().expect("Not a number!");
  |              ++++++++++++

For more information about this error, try `rustc --explain E0284`.
error: could not compile `no_type_annotations` (bin "no_type_annotations") due to 1 previous error
对于其他数据类型,你也会看到不同的类型注解。
标量类型(Scalar Types)
标量(scalar)类型表示单个值。Rust 有四种主要的标量类型:整数(integer)、浮点数(floating-point number)、布尔值(Boolean)和字符(character)。你可能从其他编程语言中认识它们。让我们来看看它们在 Rust 中是如何工作的。
整数类型(Integer Types)
整数(integer)是一个没有小数部分的数字。我们在第 2 章中使用了一种整数类型 u32。这种类型声明表明与其关联的值应该是一个占用 32 位空间的无符号整数(有符号整数类型以 i 开头,而不是 u)。表 3-1 展示了 Rust 中内置的整数类型。我们可以使用其中任何一种变体来声明整数值的类型。
表 3-1:Rust 中的整数类型
| 长度 | 有符号(Signed) | 无符号(Unsigned) |
|---|---|---|
| 8 位 | i8 | u8 |
| 16 位 | i16 | u16 |
| 32 位 | i32 | u32 |
| 64 位 | i64 | u64 |
| 128 位 | i128 | u128 |
| 依架构而定(Architecture-dependent) | isize | usize |
每种变体可以是有符号(signed)或无符号(unsigned),并且具有明确的大小。有符号(signed)和无符号(unsigned)指的是数字是否可能为负数——换句话说,就是数字是否需要带符号(有符号),还是它只会是正数因此可以不带符号表示(无符号)。这就像在纸上写数字:当符号很重要时,数字会带有加号或减号;然而,当可以安全地假定数字为正数时,就会不带符号显示。有符号数以补码形式存储。
每个有符号变体可以存储从 −(2n − 1) 到 2n − 1 − 1(含)的数字,其中 n 是该变体使用的位数。因此,i8 可以存储从 −(27) 到 27 − 1 的数字,即 −128 到 127。无符号变体可以存储从 0 到 2n − 1 的数字,因此 u8 可以存储从 0 到 28 − 1 的数字,即 0 到 255。
此外,isize 和 usize 类型取决于程序所运行的计算机架构:在 64 位架构上是 64 位,在 32 位架构上是 32 位。
你可以用表 3-2 中所示的任何一种形式来书写整数字面量(integer literal)。请注意,可以属于多种数值类型的数字字面量允许使用类型后缀(type suffix),例如 57u8,来指定类型。数字字面量还可以使用 _ 作为视觉分隔符,使数字更易于阅读,例如 1_000,它与指定 1000 具有相同的值。
表 3-2:Rust 中的整数字面量
| 数字字面量(Number literals) | 示例(Example) |
|---|---|
| 十进制(Decimal) | 98_222 |
| 十六进制(Hex) | 0xff |
| 八进制(Octal) | 0o77 |
| 二进制(Binary) | 0b1111_0000 |
字节(Byte,仅 u8) | b'A' |
那么如何知道该使用哪种整数类型呢?如果你不确定,Rust 的默认值通常是不错的起点:整数类型默认为 i32。使用 isize 或 usize 的主要情况是在对某种集合进行索引时。
整数溢出(Integer Overflow)
假设你有一个类型为 u8 的变量,它可以保存 0 到 255 之间的值。如果你试图将该变量更改为超出该范围的值(例如 256),就会发生整数溢出(integer overflow),这可能会导致两种行为之一。当你在调试模式(debug mode)下编译时,Rust 会包含整数溢出检查,如果发生这种情况,会导致程序在运行时恐慌(panic)。当程序因错误而退出时,Rust 使用术语 panicking(恐慌);我们将在第 9 章的“使用 panic! 的不可恢复错误”章节中更深入地讨论恐慌。
当你使用 --release 标志在发布模式(release mode)下编译时,Rust 不会包含导致恐慌的整数溢出检查。相反,如果发生溢出,Rust 会执行补码环绕(two’s complement wrapping)。简而言之,大于该类型能容纳的最大值的值会“绕回”到该类型能容纳的最小值。以 u8 为例,值 256 变为 0,值 257 变为 1,依此类推。程序不会恐慌,但变量的值很可能不是你期望的值。依赖整数溢出的环绕行为被认为是一个错误。
为了显式地处理溢出的可能性,你可以使用标准库为原始数值类型提供的以下几类方法:
- 在所有模式下使用
wrapping_*方法进行环绕,例如wrapping_add。 - 如果发生溢出则返回
None值,使用checked_*方法。 - 返回值和一个指示是否发生溢出的布尔值(Boolean),使用
overflowing_*方法。 - 在值的最小或最大值处饱和(saturate),使用
saturating_*方法。
浮点类型(Floating-Point Types)
Rust 还有两种浮点数(floating-point numbers)的原始类型,即带有小数点的数字。Rust 的浮点类型是 f32 和 f64,分别占 32 位和 64 位。默认类型是 f64,因为在现代 CPU 上,它的速度与 f32 大致相同,但精度更高。所有浮点类型都是有符号的。
下面是一个展示浮点数用法的示例:
文件名(Filename): src/main.rs
fn main() {
    let x = 2.0; // f64

    let y: f32 = 3.0; // f32
}
浮点数按照 IEEE-754 标准表示。
数值运算(Numeric Operations)
Rust 支持你对所有数字类型所期望的基本数学运算:加法(addition)、减法(subtraction)、乘法(multiplication)、除法(division)和取余(remainder)。整数除法会向零截断(truncates toward zero)到最接近的整数。以下代码展示了如何在 let 语句中使用每种数值运算:
文件名(Filename): src/main.rs
fn main() {
    // addition
    let sum = 5 + 10;

    // subtraction
    let difference = 95.5 - 4.3;

    // multiplication
    let product = 4 * 30;

    // division
    let quotient = 56.7 / 32.2;
    let truncated = -5 / 3; // Results in -1

    // remainder
    let remainder = 43 % 5;
}这些语句中的每个表达式都使用一个数学运算符,并求值为单个值,然后绑定到一个变量。附录 B包含了 Rust 提供的所有运算符的列表。
布尔类型(The Boolean Type)
与大多数其他编程语言一样,Rust 中的布尔类型有两个可能的值:true 和 false。布尔值的大小为一个字节。Rust 中的布尔类型使用 bool 指定。例如:
文件名(Filename): src/main.rs
fn main() {
    let t = true;

    let f: bool = false; // with explicit type annotation
}
使用布尔值的主要方式是通过条件表达式,例如 if 表达式。我们将在“控制流”章节中介绍 if 表达式在 Rust 中是如何工作的。
字符类型(The Character Type)
Rust 的 char 类型是该语言最原始的字母类型。以下是一些声明 char 值的示例:
文件名(Filename): src/main.rs
fn main() {
    let c = 'z';
    let z: char = 'ℤ'; // with explicit type annotation
    let heart_eyed_cat = '😻';
}
需要注意的是,我们使用单引号指定 char 字面量,而字符串字面量则使用双引号。Rust 的 char 类型大小为 4 字节,表示一个 Unicode 标量值(Unicode scalar value),这意味着它可以表示比 ASCII 多得多的内容。重音字母;中文、日文和韩文字符;表情符号(emoji);以及零宽空格(zero-width space)在 Rust 中都是有效的 char 值。Unicode 标量值的范围是从 U+0000 到 U+D7FF 以及从 U+E000 到 U+10FFFF(含)。然而,“字符”在 Unicode 中并不是一个真正的概念,所以你对“字符”的人类直觉可能与 Rust 中的 char 并不完全一致。我们将在第 8 章的“使用字符串存储 UTF-8 编码的文本”中详细讨论这个主题。
复合类型(Compound Types)
复合类型(Compound types)可以将多个值组合成一个类型。Rust 有两种原始的复合类型:元组(tuple)和数组(array)。
元组类型(The Tuple Type)
元组(tuple)是一种将多个不同类型的值组合成一个复合类型的通用方式。元组具有固定长度:一旦声明,它们不能增长或缩小。
我们通过编写一个括号内的逗号分隔的值列表来创建元组。元组中的每个位置都有一个类型,并且元组中不同值的类型不必相同。在这个示例中,我们添加了可选的类型注解:
文件名(Filename): src/main.rs
fn main() {
    let tup: (i32, f64, u8) = (500, 6.4, 1);
}
变量 tup 绑定到整个元组,因为元组被认为是一个单一的复合元素。要从元组中取出各个值,我们可以使用模式匹配(pattern matching)来解构(destructure)元组值,如下所示:
文件名(Filename): src/main.rs
fn main() {
    let tup = (500, 6.4, 1);

    let (x, y, z) = tup;

    println!("The value of y is: {y}");
}
这个程序首先创建一个元组并将其绑定到变量 tup。然后它使用带有 let 的模式来获取 tup 并将其转换为三个独立的变量 x、y 和 z。这被称为解构(destructuring),因为它将单个元组拆分为三个部分。最后,程序打印 y 的值,即 6.4。
我们还可以直接使用句点(.)后跟要访问的值的索引来访问元组元素。例如:
文件名(Filename): src/main.rs
fn main() {
    let x: (i32, f64, u8) = (500, 6.4, 1);

    let five_hundred = x.0;

    let six_point_four = x.1;

    let one = x.2;
}
这个程序创建了元组 x,然后使用各自的索引访问元组的每个元素。与大多数编程语言一样,元组中的第一个索引是 0。
没有任何值的元组有一个特殊的名称,即单元(unit)。这个值及其对应的类型都写作 (),表示一个空值或空返回类型。如果表达式不返回任何其他值,则隐式返回单元值。
数组类型(The Array Type)
另一种拥有多个值的集合方式是使用数组(array)。与元组不同,数组中的每个元素必须具有相同的类型。与其他一些编程语言中的数组不同,Rust 中的数组具有固定长度。
我们以方括号内的逗号分隔列表的形式来编写数组的值:
文件名(Filename): src/main.rs
fn main() {
    let a = [1, 2, 3, 4, 5];
}当你希望数据分配在栈(stack)上而不是堆(heap)上时(我们将在第 4 章中更详细地讨论栈和堆),或者当你希望确保始终有固定数量的元素时,数组非常有用。不过,数组不像 vector(向量)类型那样灵活。vector 是标准库提供的一种类似的集合类型,它的大小是允许增长或缩小的,因为其内容位于堆上。如果你不确定应该使用数组还是 vector,那么很可能应该使用 vector。第 8 章会更详细地讨论 vector。
然而,当你确定元素的数量不需要改变时,数组更有用。例如,如果你在程序中使用月份的名称,你可能更倾向于使用数组而不是 vector,因为你清楚它总是包含 12 个元素:
#![allow(unused)]
fn main() {
let months = ["January", "February", "March", "April", "May", "June", "July",
              "August", "September", "October", "November", "December"];
}
你可以使用方括号来编写数组的类型,其中包含每个元素的类型、分号以及数组中的元素数量,如下所示:
#![allow(unused)]
fn main() {
let a: [i32; 5] = [1, 2, 3, 4, 5];
}这里,i32 是每个元素的类型。分号后面的数字 5 表示数组包含五个元素。
你还可以通过指定初始值,后跟分号,然后在方括号中指定数组的长度,来将数组初始化为每个元素都包含相同的值,如下所示:
#![allow(unused)]
fn main() {
let a = [3; 5];
}
名为 a 的数组将包含 5 个元素,这些元素最初都将被设置为值 3。这与编写 let a = [3, 3, 3, 3, 3]; 相同,但写法更简洁。
访问数组元素(Array Element Access)
数组是一块已知固定大小的连续内存,可以在栈上分配。你可以使用索引来访问数组中的元素,如下所示:
文件名(Filename): src/main.rs
fn main() {
    let a = [1, 2, 3, 4, 5];

    let first = a[0];
    let second = a[1];
}
在这个示例中,名为 first 的变量将获得值 1,因为这是数组中索引 [0] 处的值。名为 second 的变量将从数组中的索引 [1] 获得值 2。
无效的数组元素访问(Invalid Array Element Access)
让我们看看如果尝试访问超出数组末尾的元素会发生什么。假设你运行这段代码(类似于第 2 章中的猜数游戏),从用户那里获取一个数组索引:
文件名(Filename): src/main.rs
use std::io;

fn main() {
    let a = [1, 2, 3, 4, 5];

    println!("Please enter an array index.");

    let mut index = String::new();

    io::stdin()
        .read_line(&mut index)
        .expect("Failed to read line");

    let index: usize = index
        .trim()
        .parse()
        .expect("Index entered was not a number");

    let element = a[index];

    println!("The value of the element at index {index} is: {element}");
}
这段代码可以成功编译。如果你使用 cargo run 运行这段代码并输入 0、1、2、3 或 4,程序会打印出数组中该索引处的相应值。如果你输入一个超出数组末尾的数字,例如 10,你将看到类似如下的输出:
thread 'main' panicked at src/main.rs:19:19:
index out of bounds: the len is 5 but the index is 10
note: run with `RUST_BACKTRACE=1` environment variable to display a backtrace
程序在使用无效值进行索引操作时发生了运行时错误。程序退出并显示一条错误消息,且没有执行最后的 println! 语句。当你尝试使用索引访问元素时,Rust 会检查你指定的索引是否小于数组长度。如果索引大于或等于长度,Rust 将发生恐慌(panic)。这个检查必须在运行时进行,尤其是在这种情况下,因为编译器无法知道用户稍后运行代码时会输入什么值。
这是 Rust 内存安全原则的实际体现。在许多底层语言中,不会进行这种检查,当你提供不正确的索引时,可能会访问到无效的内存。Rust 通过立即退出而不是允许内存访问并继续执行,来保护你免受此类错误的影响。第 9 章将进一步讨论 Rust 的错误处理,以及如何编写既不会恐慌也不会允许无效内存访问的可读、安全的代码。
函数
函数(Functions)
函数(Functions)在 Rust 代码中随处可见。你已经见过这门语言中最重要的函数之一:main 函数,它是许多程序的入口点(entry point)。你也见过 fn 关键字,它用来声明新函数。
Rust 代码使用 蛇形命名法(snake case) 作为函数和变量名称的常规风格,即所有字母都是小写,单词之间用下划线分隔。下面是一个包含示例函数定义的程序:
文件名:src/main.rs
fn main() {
    println!("Hello, world!");

    another_function();
}

fn another_function() {
    println!("Another function.");
}
在 Rust 中,我们通过输入 fn 后跟函数名和一对圆括号来定义函数。花括号告诉编译器函数体(function body)的开始和结束位置。
我们可以通过输入函数名后跟一对圆括号来调用任何已定义的函数。因为 another_function 在程序中被定义了,所以它可以从 main 函数内部被调用。注意,我们在源代码中是在 main 函数 之后 定义 another_function 的;我们也可以将其定义在之前。Rust 不关心你在哪里定义函数,只要它们定义在调用者能看到的某个作用域(scope)中即可。
让我们新建一个名为 functions 的二进制项目(binary project)来进一步探索函数。将 another_function 示例放入 src/main.rs 中并运行它。你应该会看到以下输出:
$ cargo run
   Compiling functions v0.1.0 (file:///projects/functions)
    Finished `dev` profile [unoptimized + debuginfo] target(s) in 0.28s
     Running `target/debug/functions`
Hello, world!
Another function.
各行代码按照它们在 main 函数中出现的顺序执行。首先打印 “Hello, world!” 消息,然后调用 another_function 并打印其消息。
参数(Parameters)
我们可以定义带有 参数(parameters) 的函数,参数是函数签名(signature)的一部分的特殊变量。当一个函数有参数时,你可以为这些参数提供具体的值。从技术上讲,这些具体的值被称为 实参(arguments),但在日常交流中,人们往往会混用 parameter 和 argument 这两个词来指代函数定义中的变量或调用函数时传入的具体值。
在这个版本的 another_function 中,我们添加了一个参数:
文件名:src/main.rs
fn main() {
    another_function(5);
}

fn another_function(x: i32) {
    println!("The value of x is: {x}");
}
尝试运行这个程序;你应该会得到以下输出:
$ cargo run
   Compiling functions v0.1.0 (file:///projects/functions)
    Finished `dev` profile [unoptimized + debuginfo] target(s) in 1.21s
     Running `target/debug/functions`
The value of x is: 5
another_function 的声明有一个名为 x 的参数。x 的类型被指定为 i32。当我们向 another_function 传入 5 时,println! 宏会将 5 放入格式字符串中含有一对花括号 x 的位置。
在函数签名(function signatures)中,你 必须 声明每个参数的类型。这是 Rust 设计中的一个深思熟虑的决定:要求在函数定义中进行类型注解(type annotation),意味着编译器几乎不需要你在代码的其他地方使用它们来推断你的类型。如果编译器知道函数期望什么类型,它也能给出更有帮助的错误信息。
当定义多个参数时,使用逗号分隔参数声明,就像这样:
文件名:src/main.rs
fn main() {
    print_labeled_measurement(5, 'h');
}

fn print_labeled_measurement(value: i32, unit_label: char) {
    println!("The measurement is: {value}{unit_label}");
}
这个例子创建了一个名为 print_labeled_measurement 的函数,它有两个参数。第一个参数名为 value,类型是 i32。第二个参数名为 unit_label,类型是 char。然后该函数打印包含 value 和 unit_label 的文本。
让我们尝试运行这段代码。将当前 functions 项目的 src/main.rs 文件中的程序替换为前面的示例,然后使用 cargo run 运行它:
$ cargo run
   Compiling functions v0.1.0 (file:///projects/functions)
    Finished `dev` profile [unoptimized + debuginfo] target(s) in 0.31s
     Running `target/debug/functions`
The measurement is: 5h
因为我们用 5 作为 value 的值,用 'h' 作为 unit_label 的值调用了该函数,所以程序输出包含了这些值。
语句与表达式(Statements and Expressions)
函数体(Function bodies)由一系列语句(statements)组成,并可选择以一个表达式(expression)结尾。到目前为止,我们介绍的函数都没有包含结尾表达式,但你已经见过作为语句一部分的表达式了。因为 Rust 是一门基于表达式(expression-based)的语言,这是一个需要理解的重要区别。其他语言没有同样的区分,所以让我们来看看什么是语句和表达式,以及它们的差异如何影响函数体。
- 语句(Statements) 是执行某些操作但不返回值的指令。
- 表达式(Expressions) 会计算并产生一个结果值。
让我们看一些例子。
实际上,我们已经使用过语句和表达式了。使用 let 关键字创建变量并为其赋值是一个语句。在示例 3-1 中,let y = 6; 就是一个语句。
fn main() {
    let y = 6;
}main 函数声明函数定义也是语句;整个前面的例子本身就是一个语句。(不过,正如我们稍后将看到的,调用函数并不是一个语句。)
语句不返回值。因此,你不能将一个 let 语句赋值给另一个变量,就像下面的代码尝试做的那样;你会得到一个错误:
文件名:src/main.rs
fn main() {
    let x = (let y = 6);
}
当你运行这个程序时,你会看到如下错误:
$ cargo run
   Compiling functions v0.1.0 (file:///projects/functions)
error: expected expression, found `let` statement
 --> src/main.rs:2:14
  |
2 |     let x = (let y = 6);
  |              ^^^
  |
  = note: only supported directly in conditions of `if` and `while` expressions

warning: unnecessary parentheses around assigned value
 --> src/main.rs:2:13
  |
2 |     let x = (let y = 6);
  |             ^         ^
  |
  = note: `#[warn(unused_parens)]` on by default
help: remove these parentheses
  |
2 -     let x = (let y = 6);
2 +     let x = let y = 6;
  |

warning: `functions` (bin "functions") generated 1 warning
error: could not compile `functions` (bin "functions") due to 1 previous error; 1 warning emitted
let y = 6 语句不返回值,所以 x 没有可以绑定的东西。这与 C 和 Ruby 等其他语言不同,在这些语言中,赋值会返回赋值的值。在这些语言中,你可以写 x = y = 6 并让 x 和 y 都有值 6;但在 Rust 中并非如此。
表达式会计算出一个值,并且构成了你在 Rust 中编写的大部分其余代码。考虑一个数学运算,比如 5 + 6,这是一个计算结果为 11 的表达式。表达式可以是语句的一部分:在示例 3-1 中,语句 let y = 6; 中的 6 就是一个计算结果为 6 的表达式。调用函数是一个表达式。调用宏也是一个表达式。用花括号创建的新作用域块(scope block)也是一个表达式,例如:
文件名:src/main.rs
fn main() {
    let y = {
        let x = 3;
        x + 1
    };

    println!("The value of y is: {y}");
}
这个表达式:
{
    let x = 3;
    x + 1
}
是一个代码块,在这个例子中,它的计算结果为 4。该值作为 let 语句的一部分被绑定到 y。注意 x + 1 这一行末尾没有分号,这与你目前看到的大多数行不同。表达式不包含结尾的分号。如果你在表达式末尾加上分号,你就把它变成了一个语句,那么它将不再返回值。在接下来探索函数返回值(return values)和表达式时,请记住这一点。
具有返回值的函数(Functions with Return Values)
函数可以向调用它的代码返回值。我们不给返回值命名,但必须在箭头(->)之后声明其类型。在 Rust 中,函数的返回值(return value)与函数体(body)块中最后一个表达式的值同义。你可以通过使用 return 关键字并指定一个值来提前从函数返回,但大多数函数会隐式地返回最后一个表达式。下面是一个返回值的函数示例:
文件名:src/main.rs
fn five() -> i32 {
    5
}

fn main() {
    let x = five();

    println!("The value of x is: {x}");
}
在 five 函数中没有函数调用、宏、甚至 let 语句——只有数字 5 本身。这在 Rust 中是一个完全有效的函数。注意,函数的返回类型也被指定为 -> i32。尝试运行这段代码;输出应该如下所示:
$ cargo run
   Compiling functions v0.1.0 (file:///projects/functions)
    Finished `dev` profile [unoptimized + debuginfo] target(s) in 0.30s
     Running `target/debug/functions`
The value of x is: 5
five 中的 5 就是函数的返回值,这就是为什么返回类型是 i32。让我们更详细地分析一下。这里有两点很重要:首先,let x = five(); 这一行表明我们正在使用函数的返回值来初始化一个变量。因为函数 five 返回 5,所以这一行等同于以下代码:
#![allow(unused)]
fn main() {
let x = 5;
}其次,five 函数没有参数并定义了返回值的类型,但函数体只有一个孤零零的 5,没有分号,因为它是一个表达式,我们想要返回它的值。
让我们看另一个例子:
文件名:src/main.rs
fn main() {
    let x = plus_one(5);

    println!("The value of x is: {x}");
}

fn plus_one(x: i32) -> i32 {
    x + 1
}
运行这段代码将打印 The value of x is: 6。但是,如果我们在包含 x + 1 的那一行末尾加上一个分号,把它从一个表达式(expression)改为一个语句(statement),会发生什么呢?
文件名:src/main.rs
fn main() {
    let x = plus_one(5);

    println!("The value of x is: {x}");
}

fn plus_one(x: i32) -> i32 {
    x + 1;
}
编译这段代码会产生一个错误,如下所示:
$ cargo run
   Compiling functions v0.1.0 (file:///projects/functions)
error[E0308]: mismatched types
 --> src/main.rs:7:24
  |
7 | fn plus_one(x: i32) -> i32 {
  |    --------            ^^^ expected `i32`, found `()`
  |    |
  |    implicitly returns `()` as its body has no tail or `return` expression
8 |     x + 1;
  |          - help: remove this semicolon to return this value

For more information about this error, try `rustc --explain E0308`.
error: could not compile `functions` (bin "functions") due to 1 previous error
主要的错误信息 mismatched types(类型不匹配)揭示了这段代码的核心问题。函数 plus_one 的定义说明它将返回一个 i32,但语句不会计算出一个值,而是表达为 (),即单元类型(unit type)。因此,什么也没有返回,这与函数定义相矛盾并导致了一个错误。在这段输出中,Rust 提供了一条可能有助于修正此问题的消息:它建议删除分号,这将修复这个错误。
注释
注释(Comments)
所有程序员都努力使他们的代码易于理解,但有时额外的解释也是必要的。在这种情况下,程序员会在源代码中留下 注释(comments),编译器会忽略它们,但阅读源代码的人可能会觉得它们很有用。
这是一个简单的注释:
#![allow(unused)]
fn main() {
// hello, world
}
在 Rust 中,惯用的注释风格是用两个斜杠开始一个注释,并且注释一直延续到行尾。对于超过一行的注释,你需要在每一行都包含 //,就像这样:
#![allow(unused)]
fn main() {
// So we're doing something complicated here, long enough that we need
// multiple lines of comments to do it! Whew! Hopefully, this comment will
// explain what's going on.
}
注释也可以放在包含代码的行的末尾:
文件名:src/main.rs
fn main() {
    let lucky_number = 7; // I'm feeling lucky today
}
但更常见的是以下面这种格式使用注释,将注释放在它所注解的代码上方的单独一行:
文件名:src/main.rs
fn main() {
    // I'm feeling lucky today
    let lucky_number = 7;
}
Rust 还有另一种注释,即文档注释(documentation comments),我们将在第 14 章的“将 Crate 发布到 Crates.io” 一节中讨论。
控制流
控制流(Control Flow)
根据条件是否为 true 来执行某些代码,以及在条件为 true 时重复执行某些代码,这些都是大多数编程语言的基本构建块(building blocks)。让你控制 Rust 代码执行流的最常见结构是 if 表达式(expressions)和循环(loops)。
if 表达式(if Expressions)
if 表达式允许你根据条件来分支代码。你提供一个条件,然后声明:“如果满足此条件,则运行此代码块。如果不满足条件,则不运行此代码块。”
在你的 projects 目录下创建一个名为 branches 的新项目来探索 if 表达式。在 src/main.rs 文件中输入以下内容:
文件名:src/main.rs
fn main() {
    let number = 3;

    if number < 5 {
        println!("condition was true");
    } else {
        println!("condition was false");
    }
}
所有 if 表达式都以关键字 if 开头,后跟一个条件。在这个例子中,条件检查变量 number 的值是否小于 5。如果条件为 true,我们将要执行的代码块紧跟在条件之后放在花括号内。与 if 表达式中的条件关联的代码块有时被称为 分支(arms),就像我们在第 2 章的“将猜测的数字与秘密数字进行比较” 一节中讨论的 match 表达式中的分支一样。
我们还可以选择包含一个 else 表达式,我们在这里也这样做了,以便在条件计算结果为 false 时给程序一个备选的代码块来执行。如果你没有提供 else 表达式且条件为 false,程序将直接跳过 if 代码块并继续执行下一段代码。
尝试运行这段代码;你应该会看到以下输出:
$ cargo run
   Compiling branches v0.1.0 (file:///projects/branches)
    Finished `dev` profile [unoptimized + debuginfo] target(s) in 0.31s
     Running `target/debug/branches`
condition was true
让我们尝试将 number 的值改为使条件为 false 的值,看看会发生什么:
fn main() {
    let number = 7;

    if number < 5 {
        println!("condition was true");
    } else {
        println!("condition was false");
    }
}
再次运行该程序,并查看输出:
$ cargo run
   Compiling branches v0.1.0 (file:///projects/branches)
    Finished `dev` profile [unoptimized + debuginfo] target(s) in 0.31s
     Running `target/debug/branches`
condition was false
同样值得注意的是,这段代码中的条件 必须 是 bool 类型。如果条件不是 bool 类型,我们会得到一个错误。例如,尝试运行以下代码:
文件名:src/main.rs
fn main() {
    let number = 3;

    if number {
        println!("number was three");
    }
}
这次 if 条件计算出的值是 3,Rust 抛出了一个错误:
$ cargo run
   Compiling branches v0.1.0 (file:///projects/branches)
error[E0308]: mismatched types
 --> src/main.rs:4:8
  |
4 |     if number {
  |        ^^^^^^ expected `bool`, found integer

For more information about this error, try `rustc --explain E0308`.
error: could not compile `branches` (bin "branches") due to 1 previous error
该错误表明 Rust 期望一个 bool 类型但得到了一个整数。与 Ruby 和 JavaScript 等语言不同,Rust 不会自动尝试将非布尔类型转换为布尔类型。你必须明确地始终为 if 提供一个布尔值作为其条件。例如,如果我们希望 if 代码块仅在一个数字不等于 0 时运行,我们可以将 if 表达式改为以下形式:
文件名:src/main.rs
fn main() {
    let number = 3;

    if number != 0 {
        println!("number was something other than zero");
    }
}
运行这段代码将打印 number was something other than zero。
使用 else if 处理多个条件(Handling Multiple Conditions with else if)
你可以通过在 else if 表达式中结合 if 和 else 来使用多个条件。例如:
文件名:src/main.rs
fn main() {
    let number = 6;

    if number % 4 == 0 {
        println!("number is divisible by 4");
    } else if number % 3 == 0 {
        println!("number is divisible by 3");
    } else if number % 2 == 0 {
        println!("number is divisible by 2");
    } else {
        println!("number is not divisible by 4, 3, or 2");
    }
}
这个程序有四个可能的执行路径。运行它之后,你应该会看到以下输出:
$ cargo run
   Compiling branches v0.1.0 (file:///projects/branches)
    Finished `dev` profile [unoptimized + debuginfo] target(s) in 0.31s
     Running `target/debug/branches`
number is divisible by 3
当这个程序执行时,它会依次检查每个 if 表达式,并执行第一个条件为 true 的分支体。请注意,尽管 6 可以被 2 整除,但我们没有看到输出 number is divisible by 2,也没有看到来自 else 块的 number is not divisible by 4, 3, or 2 文本。这是因为 Rust 只执行第一个为 true 条件对应的代码块,一旦找到这样一个条件,它甚至不会检查其余的条件。
使用过多的 else if 表达式会使你的代码变得杂乱,因此如果你有多个条件,你可能想要重构你的代码。第 6 章将介绍一种强大的 Rust 分支结构 match,适用于这些情况。
在 let 语句中使用 if(Using if in a let Statement)
因为 if 是一个表达式,我们可以在 let 语句的右侧使用它来将结果赋值给一个变量,如示例 3-2 所示。
fn main() {
    let condition = true;
    let number = if condition { 5 } else { 6 };

    println!("The value of number is: {number}");
}if 表达式的结果赋值给一个变量number 变量将根据 if 表达式的结果绑定到一个值。运行这段代码看看会发生什么:
$ cargo run
   Compiling branches v0.1.0 (file:///projects/branches)
    Finished `dev` profile [unoptimized + debuginfo] target(s) in 0.30s
     Running `target/debug/branches`
The value of number is: 5
请记住,代码块的计算结果是其中的最后一个表达式,而数字本身也是表达式。在这种情况下,整个 if 表达式的值取决于哪个代码块被执行。这意味着 if 的每个分支可能产生的结果值必须是相同类型;在示例 3-2 中,if 分支和 else 分支的结果都是 i32 整数。如果类型不匹配,如下面的示例所示,我们会得到一个错误:
文件名:src/main.rs
fn main() {
    let condition = true;

    let number = if condition { 5 } else { "six" };

    println!("The value of number is: {number}");
}当我们尝试编译这段代码时,会得到一个错误。if 和 else 分支的值类型不兼容,Rust 会精确地指出问题在程序中的位置:
$ cargo run
   Compiling branches v0.1.0 (file:///projects/branches)
error[E0308]: `if` and `else` have incompatible types
 --> src/main.rs:4:44
  |
4 |     let number = if condition { 5 } else { "six" };
  |                                 -          ^^^^^ expected integer, found `&str`
  |                                 |
  |                                 expected because of this

For more information about this error, try `rustc --explain E0308`.
error: could not compile `branches` (bin "branches") due to 1 previous error
if 块中的表达式计算为一个整数,而 else 块中的表达式计算为一个字符串。这行不通,因为变量必须只有一个类型,并且 Rust 需要在编译时明确知道 number 变量的类型。知道 number 的类型可以让编译器验证该类型在我们使用 number 的任何地方都是有效的。如果 number 的类型只在运行时才能确定,Rust 将无法做到这一点;如果编译器必须跟踪任何变量的多种假设类型,它将变得更加复杂,并且对代码的保证也会更少。
使用循环重复执行(Repetition with Loops)
多次执行同一段代码通常非常有用。为此,Rust 提供了几种 循环(loops),它们会运行循环体(loop body)内的代码直到末尾,然后立即从头开始。为了试验循环,让我们创建一个名为 loops 的新项目。
Rust 有三种循环:loop、while 和 for。让我们逐一尝试。
使用 loop 重复执行代码(Repeating Code with loop)
loop 关键字告诉 Rust 反复执行一段代码,要么永远执行下去,直到你明确告诉它停止。
例如,将 loops 目录中的 src/main.rs 文件修改为如下内容:
文件名:src/main.rs
fn main() {
    loop {
        println!("again!");
    }
}
当我们运行这个程序时,我们会看到 again! 不断地被打印出来,直到我们手动停止程序。大多数终端支持键盘快捷键 ctrl-C 来中断一个陷入持续循环的程序。试试看:
$ cargo run
   Compiling loops v0.1.0 (file:///projects/loops)
    Finished `dev` profile [unoptimized + debuginfo] target(s) in 0.08s
     Running `target/debug/loops`
again!
again!
again!
again!
^Cagain!
符号 ^C 表示你按下 ctrl-C 的位置。
你可能会或可能不会在 ^C 之后看到 again! 被打印出来,这取决于代码在收到中断信号时处于循环的哪个位置。
幸运的是,Rust 也提供了一种通过代码跳出循环的方法。你可以在循环中使用 break 关键字来告诉程序何时停止执行循环。回想一下,我们在第 2 章的“猜对后退出” 一节的猜谜游戏中就是这样做的,当用户猜对数字赢得游戏时退出程序。
我们还在猜谜游戏中使用了 continue,它在循环中告诉程序跳过本次循环迭代中剩余的代码,并进入下一次迭代。
从循环中返回值(Returning Values from Loops)
loop 的用途之一是重试你知道可能会失败的操作,例如检查线程是否已完成其任务。你可能还需要将该操作的结果从循环中传递给你代码的其余部分。为此,你可以在用来停止循环的 break 表达式之后添加你想要返回的值;该值将从循环中被返回,以便你可以使用它,如下所示:
fn main() {
    let mut counter = 0;

    let result = loop {
        counter += 1;

        if counter == 10 {
            break counter * 2;
        }
    };

    println!("The result is {result}");
}
在循环之前,我们声明了一个名为 counter 的变量并将其初始化为 0。然后,我们声明了一个名为 result 的变量来保存从循环返回的值。在循环的每次迭代中,我们给 counter 变量加 1,然后检查 counter 是否等于 10。当它等于 10 时,我们使用 break 关键字并带上值 counter * 2。循环之后,我们使用分号结束将值赋给 result 的语句。最后,我们打印 result 中的值,在本例中为 20。
你也可以在循环内部使用 return。break 只退出当前循环,而 return 总是退出当前函数。
使用循环标签消除歧义(Disambiguating with Loop Labels)
如果你在循环中嵌套了循环,break 和 continue 将应用于该点最内层的循环。你可以选择在循环上指定一个 循环标签(loop label),然后你可以将它与 break 或 continue 一起使用,以指定这些关键字应用于带标签的循环,而不是最内层的循环。循环标签必须以单引号开头。下面是一个包含两个嵌套循环的例子:
fn main() {
    let mut count = 0;
    'counting_up: loop {
        println!("count = {count}");
        let mut remaining = 10;

        loop {
            println!("remaining = {remaining}");
            if remaining == 9 {
                break;
            }
            if count == 2 {
                break 'counting_up;
            }
            remaining -= 1;
        }

        count += 1;
    }
    println!("End count = {count}");
}
外层循环有标签 'counting_up,它将从 0 计数到 2。没有标签的内层循环从 10 向下计数到 9。第一个没有指定标签的 break 只会退出内层循环。break 'counting_up; 语句将退出外层循环。这段代码会打印:
$ cargo run
   Compiling loops v0.1.0 (file:///projects/loops)
    Finished `dev` profile [unoptimized + debuginfo] target(s) in 0.58s
     Running `target/debug/loops`
count = 0
remaining = 10
remaining = 9
count = 1
remaining = 10
remaining = 9
count = 2
remaining = 10
End count = 2
使用 while 简化条件循环(Streamlining Conditional Loops with while)
程序通常需要在循环内评估一个条件。当条件为 true 时,循环运行。当条件不再为 true 时,程序调用 break,停止循环。可以使用 loop、if、else 和 break 的组合来实现这种行为;如果你愿意,现在可以尝试在程序中这样做。然而,这种模式非常常见,以至于 Rust 为此内置了一个语言结构,称为 while 循环。在示例 3-3 中,我们使用 while 将程序循环三次,每次倒计时,然后在循环结束后打印一条消息并退出。
fn main() {
    let mut number = 3;

    while number != 0 {
        println!("{number}!");

        number -= 1;
    }

    println!("LIFTOFF!!!");
}true 时使用 while 循环运行代码这种结构消除了如果你使用 loop、if、else 和 break 所需的大量嵌套,并且更加清晰。当条件为 true 时,代码运行;否则,它退出循环。
使用 for 遍历集合(Looping Through a Collection with for)
你可以选择使用 while 结构来遍历集合(如数组)中的元素。例如,示例 3-4 中的循环打印数组 a 中的每个元素。
fn main() {
    let a = [10, 20, 30, 40, 50];
    let mut index = 0;

    while index < 5 {
        println!("the value is: {}", a[index]);

        index += 1;
    }
}while 循环遍历集合中的每个元素这里,代码逐个遍历数组中的元素。它从索引 0 开始,然后循环直到到达数组中的最后一个索引(即当 index < 5 不再为 true 时)。运行这段代码将打印数组中的每个元素:
$ cargo run
   Compiling loops v0.1.0 (file:///projects/loops)
    Finished `dev` profile [unoptimized + debuginfo] target(s) in 0.32s
     Running `target/debug/loops`
the value is: 10
the value is: 20
the value is: 30
the value is: 40
the value is: 50
所有五个数组值都按预期出现在终端中。尽管 index 在某个时刻会达到值 5,但循环在尝试从数组中获取第六个值之前就停止了执行。
然而,这种方法容易出错;如果索引值或测试条件不正确,我们可能会导致程序恐慌(panic)。例如,如果你将数组 a 的定义改为有四个元素,但忘记将条件更新为 while index < 4,代码就会 panic。它也很慢,因为编译器会添加运行时代码来在每次循环迭代中检查索引是否在数组的边界内。
作为一种更简洁的替代方案,你可以使用 for 循环为集合中的每个项目执行一些代码。for 循环看起来像示例 3-5 中的代码。
fn main() {
    let a = [10, 20, 30, 40, 50];

    for element in a {
        println!("the value is: {element}");
    }
}for 循环遍历集合中的每个元素当我们运行这段代码时,我们会看到与示例 3-4 相同的输出。更重要的是,我们现在提高了代码的安全性,消除了因超出数组末尾或未达到足够位置而遗漏某些项目而导致错误的可能性。由 for 循环生成的机器码也可能更高效,因为不需要在每次迭代时将索引与数组长度进行比较。
使用 for 循环,如果你更改了数组中值的数量,你不需要像示例 3-4 中使用的方法那样记住更改任何其他代码。
for 循环的安全性和简洁性使其成为 Rust 中最常用的循环结构。即使在你想要运行某段代码一定次数的情况下,比如示例 3-3 中使用 while 循环的倒计时示例,大多数 Rustacean(Rust 开发者)也会使用 for 循环。实现这一点的方法是使用标准库提供的 Range(范围),它按顺序生成从一个数字开始到另一个数字之前结束的所有数字。
以下是使用 for 循环和我们尚未讨论的另一种方法 rev(用于反转范围)来实现倒计时的样子:
文件名:src/main.rs
fn main() {
    for number in (1..4).rev() {
        println!("{number}!");
    }
    println!("LIFTOFF!!!");
}
这段代码更优雅一些,不是吗?
总结(Summary)
你做到了!这是相当大的一章:你学习了变量(variables)、标量(scalar)和复合数据类型(compound data types)、函数(functions)、注释(comments)、if 表达式(expressions)和循环(loops)!为了练习本章讨论的概念,尝试编写程序来完成以下任务:
- 在华氏度和摄氏度之间转换温度。
- 生成第 n 个斐波那契数(Fibonacci number)。
- 打印圣诞颂歌《The Twelve Days of Christmas》的歌词,利用歌曲中的重复部分。
当你准备好继续前进时,我们将讨论 Rust 中一个在其他编程语言中 不 常见的概念:所有权(ownership)。
理解所有权(Understanding Ownership)
所有权(Ownership)是 Rust 最独特的特性,并对语言的其余部分有着深远的影响。它使 Rust 能够在不需要垃圾收集器(garbage collector)的情况下保证内存安全(memory safety),因此理解所有权的工作原理非常重要。在本章中,我们将讨论所有权以及几个相关的特性:借用(borrowing)、切片(slices)以及 Rust 如何在内存中布局数据。
什么是所有权?
什么是所有权?(What Is Ownership?)
所有权(Ownership) 是一组规则,用于管理 Rust 程序如何管理内存。 所有程序在运行时都必须管理它们使用计算机内存的方式。 有些语言具有垃圾回收机制(garbage collection),可以在程序运行时定期查找不再使用的内存; 而在其他语言中,程序员必须显式地分配(allocate)和释放(free)内存。 Rust 采用了第三种方式:通过一套由编译器检查的所有权规则来管理内存。 如果违反了任何规则,程序将无法编译。 所有权的任何特性都不会在运行时降低程序的速度。
因为所有权对许多程序员来说是一个新概念,确实需要一些时间来适应。 好消息是,随着你对 Rust 和所有权系统规则的了解越来越深入, 你就会越自然地编写出既安全又高效的代码。坚持下去!
当你理解了所有权,你就为理解 Rust 的独特特性奠定了坚实的基础。 在本章中,你将通过一些专注于一种非常常见的数据结构——字符串——的示例来学习所有权。
栈(Stack)与堆(Heap)
许多编程语言不要求你经常考虑栈和堆的问题。 但在像 Rust 这样的系统编程语言中,一个值位于栈上还是堆上会影响语言的行为方式以及你为什么必须做出某些决定。 所有权的部分内容将在本章后面结合栈和堆进行描述,因此这里先做一个简单的解释作为准备。
栈和堆都是运行时可供代码使用的内存部分,但它们的结构方式不同。 栈按照获取值的顺序存储值,并以相反的顺序移除值。这被称为后进先出(last in, first out,LIFO)。 想象一摞盘子:当你添加更多盘子时,你将其放在堆叠的顶部,当你需要盘子时,你从顶部取下一个。 从中间或底部添加或移除盘子就不太行了!添加数据被称为入栈(pushing onto the stack), 移除数据被称为出栈(popping off the stack)。 所有存储在栈上的数据必须具有已知的、固定的大小。 在编译时大小未知或大小可能变化的数据必须存储在堆上。
堆的组织性较差:当你将数据放在堆上时,你请求一定数量的空间。 内存分配器(memory allocator)会在堆中找到一个足够大的空位,将其标记为正在使用, 并返回一个指针(pointer),即该位置的地址。 这个过程被称为在堆上分配(allocating on the heap),有时简称为分配(allocating) (将值推入栈不被视为分配)。 因为指向堆的指针是已知的、固定大小的,你可以将指针存储在栈上,但当你需要实际数据时,你必须跟随指针。 想象在餐厅就座的情景。当你进入时,你说出同行人数,服务员找到一张适合所有人的空桌子并带你过去。 如果你的团队中有人迟到,他们可以询问你坐在哪里来找到你。
入栈比在堆上分配更快,因为分配器不需要搜索存储新数据的位置;该位置始终在栈顶。 相比之下,在堆上分配空间需要更多工作,因为分配器必须首先找到足够大的空间来存放数据, 然后执行簿记(bookkeeping)工作以为下一次分配做准备。
访问堆上的数据通常比访问栈上的数据慢,因为你需要跟随指针才能到达那里。 当代处理器在内存中跳跃较少时速度更快。继续这个类比,考虑一个餐厅服务员为多张桌子点单。 最有效的方式是在转到下一张桌子之前,先把一张桌子的所有订单都拿到。 从 A 桌点单,然后 B 桌点单,再回到 A 桌,再到 B 桌,这会慢得多。 同理,处理器在处理与其他数据接近的数据(如在栈上)时,通常比处理更远的数据(如在堆上)时表现得更好。
当你的代码调用函数时,传递给函数的值(可能包括指向堆上数据的指针)以及函数的局部变量会被推入栈中。 当函数结束时,这些值会被弹出栈。
跟踪哪些代码正在使用堆上的哪些数据,最小化堆上的重复数据量, 以及清理堆上未使用的数据以避免空间耗尽,这些都是所有权(ownership)所解决的问题。 一旦你理解了所有权,你就不需要经常考虑栈和堆了。 但知道所有权的主要目的是管理堆数据,可以帮助解释它为什么以这种方式工作。
所有权规则(Ownership Rules)
首先,让我们来看看所有权的规则。在我们学习说明这些规则的示例时,请牢记这些规则:
- Rust 中的每个值都有一个所有者(owner)。
- 同一时间只能有一个所有者。
- 当所有者离开作用域(scope)时,该值将被丢弃(dropped)。
变量作用域(Variable Scope)
既然我们已经过了基础的 Rust 语法阶段,就不会在示例中包含所有 fn main() {
代码,所以如果你在跟着练习,请确保手动将以下示例放入 main 函数中。
这样一来,我们的示例会更加简洁,让我们能够专注于实际细节而不是样板代码。
作为所有权的第一个示例,我们来看看一些变量的作用域。 作用域(scope) 是程序中一个项(item)有效的范围。以下面的变量为例:
#![allow(unused)]
fn main() {
let s = "hello";
}
变量 s 引用了一个字符串字面量(string literal),其中字符串的值被硬编码在程序的文本中。
该变量从声明之处开始直到当前作用域结束都是有效的。示例 4-1 展示了一个程序及其注释,
标明了变量 s 在何处是有效的。
fn main() {
    {                      // s is not valid here, since it's not yet declared
        let s = "hello";   // s is valid from this point forward

        // do stuff with s
    }                      // this scope is now over, and s is no longer valid
}换句话说,这里有两个重要的时间点:
- 当
s进入作用域时,它是有效的。 - 它一直保持有效,直到它离开作用域。
至此,作用域与变量有效时间之间的关系与其他编程语言类似。
现在,我们将在此基础上通过引入 String 类型来进行进一步的学习。
String 类型(The String Type)
为了说明所有权(ownership)的规则,我们需要一个比第 3 章的“数据类型”部分所介绍的更为复杂的数据类型。
之前介绍的类型都是已知大小的,可以存储在栈上,并在其作用域结束时从栈中弹出,
并且如果需要代码的另一部分在不同的作用域中使用相同的值,可以快速、简单地复制以创建一个新的独立实例。
但我们想要看看存储在堆上的数据,并探索 Rust 如何知道何时清理这些数据,
而 String 类型正是一个很好的例子。
我们将重点讨论 String 中与所有权相关的部分。这些方面也适用于其他复杂的数据类型,
无论它们是标准库提供的还是你自己创建的。我们将在第 8 章中讨论 String 中与所有权无关的方面。
我们已经见过字符串字面量(string literal),即字符串值被硬编码(hardcoded)到程序中。
字符串字面量很方便,但它们并不适用于所有我们可能想要使用文本的场景。
一个原因是它们是不可变的(immutable)。另一个原因是并非每个字符串值在编写代码时就能确定:
例如,如果我们想要获取用户输入并存储它呢?正是为了应对这些情况,Rust 提供了 String 类型。
该类型管理在堆上分配的数据,因此能够存储在编译时未知大小的文本量。
你可以使用 from 函数从字符串字面量创建一个 String,如下所示:
#![allow(unused)]
fn main() {
let s = String::from("hello");
}
双冒号 :: 运算符允许我们将这个特定的 from 函数放在 String 类型的命名空间下,
而不是使用像 string_from 这样的名称。我们将在第 5 章的“方法”部分更详细地讨论这种语法,
并在第 7 章中讨论“用于在模块树中引用项的路径”时讲解模块的命名空间。
这种字符串是可以修改的:
fn main() {
    let mut s = String::from("hello");

    s.push_str(", world!"); // push_str() appends a literal to a String

    println!("{s}"); // this will print `hello, world!`
}
那么,这里的区别是什么呢?为什么 String 可以修改而字面量却不能?
区别在于这两种类型处理内存的方式不同。
内存与分配(Memory and Allocation)
对于字符串字面量(string literal),我们在编译时就知道其内容,因此文本被直接硬编码(hardcoded)到最终的可执行文件中。 这就是字符串字面量快速且高效的原因。但这些特性仅仅源于字符串字面量的不可变性(immutability)。 不幸的是,对于每一段在编译时大小未知且可能在程序运行时改变大小的文本, 我们不能将一块内存放入二进制文件中。
对于 String 类型,为了支持可变(mutable)、可增长的文本片段,
我们需要在堆上分配一块在编译时大小未知的内存来存放内容。这意味着:
- 必须在运行时向内存分配器(memory allocator)请求内存。
- 当我们使用完
String后,需要一种方式将这块内存返还给分配器。
第一部分由我们完成:当我们调用 String::from 时,其实现会请求它所需的内存。
这在编程语言中几乎是通用的。
然而,第二部分则有所不同。在拥有**垃圾回收器(garbage collector,GC)**的语言中,
GC 会跟踪并清理不再使用的内存,我们无需考虑这个问题。
在没有 GC 的大多数语言中,我们有责任识别内存何时不再被使用并显式调用代码来释放它,
就像我们请求它一样。历史上,正确做到这一点一直是一个困难的编程问题。
如果我们忘记了,就会浪费内存。如果我们释放得太早,就会产生一个无效的变量。
如果我们释放两次,那也是一个错误。我们需要恰好配对一次 allocate 与一次 free。
Rust 采取了一条不同的路径:一旦拥有它的变量离开作用域(scope),内存就会被自动返回。
下面是我们使用 String 而非字符串字面量的作用域示例(来自示例 4-1)的一个版本:
fn main() {
    {
        let s = String::from("hello"); // s is valid from this point forward

        // do stuff with s
    }                                  // this scope is now over, and s is no
                                       // longer valid
}
有一个自然的时机可以将我们的 String 所需的内存返还给分配器:当 s 离开作用域时。
当变量离开作用域,Rust 会为我们调用一个特殊的函数。这个函数被称为 drop,
String 的作者可以在其中放置返还内存的代码。
Rust 会在右花括号处自动调用 drop。
注意:在 C++ 中,这种在项(item)生命周期(lifetime)结束时释放资源的模式有时被称为 资源获取即初始化(Resource Acquisition Is Initialization,RAII)。 如果你使用过 RAII 模式,那么 Rust 中的
drop函数会让你感到很熟悉。
这种模式对 Rust 代码的编写方式有着深远的影响。目前看来可能很简单, 但在更复杂的情况下,当我们希望有多个变量使用我们在堆上分配的数据时, 代码的行为可能会出乎意料。现在让我们探讨其中一些情况。
变量与数据的交互方式:移动(Variables and Data Interacting with Move)
多个变量可以在 Rust 中以不同的方式与相同的数据进行交互。 示例 4-2 展示了一个使用整数的示例。
fn main() {
    let x = 5;
    let y = x;
}x 的整数值赋值给 y(Assigning the integer value of variable x to y)我们大概可以猜出这段代码的作用:“将值 5 绑定到 x;然后,复制 x 中的值并将其绑定到 y。”
现在我们有两个变量 x 和 y,且都等于 5。这确实就是发生的事情,
因为整数是具有已知、固定大小的简单值,这两个 5 值被推入栈中。
现在让我们看看 String 版本:
fn main() {
    let s1 = String::from("hello");
    let s2 = s1;
}
这看起来非常相似,因此我们可能认为它的工作方式也是相同的:
也就是说,第二行会复制 s1 中的值并将其绑定到 s2。
但实际上并非如此。
看一下图 4-1,了解 String 在底层的实际运作方式。
一个 String 由三部分组成,如左侧所示:一个指向存放字符串内容的内存的指针(pointer)、一个长度(length)和一个容量(capacity)。
这组数据存储在栈上。右侧是堆上存放内容的内存。
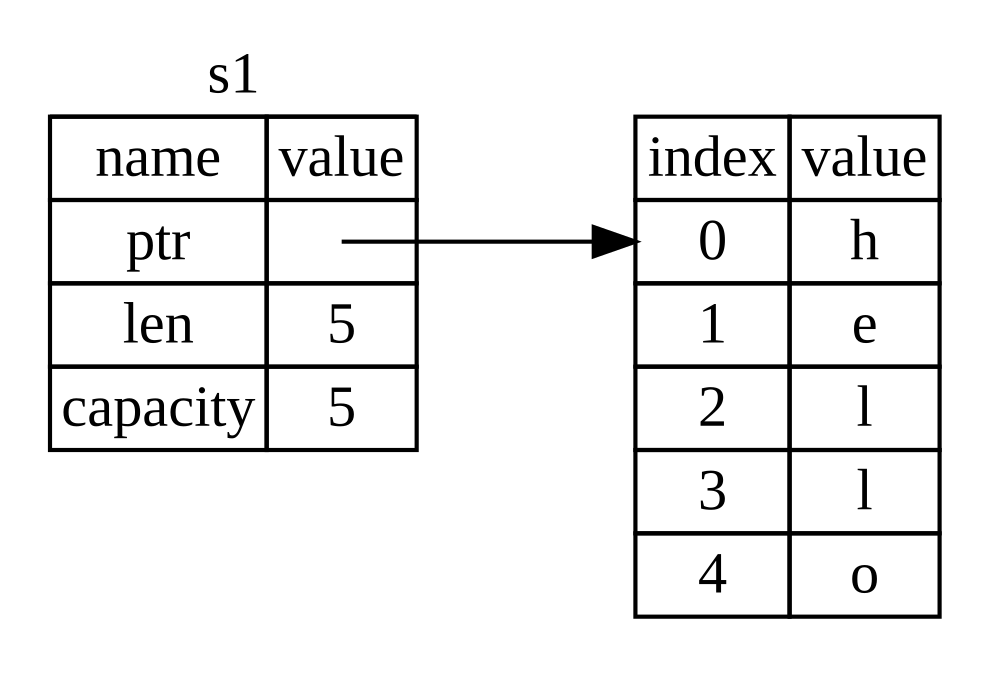
图 4-1:一个持有值 "hello" 且绑定到 s1 的 String 在内存中的表示(The representation in memory of a String holding the value "hello" bound to s1)
长度(length)表示 String 的内容当前使用的内存字节数。
容量(capacity)表示 String 从分配器获得的内存总量。
长度和容量的差异在某些情况下很重要,但在此上下文中并不关键,因此目前可以忽略容量。
当我们将 s1 赋值给 s2 时,会复制 String 的数据,即复制栈上的指针、长度和容量。
我们不会复制指针所指向的堆上的数据。换句话说,内存中的数据表示如图 4-2 所示。
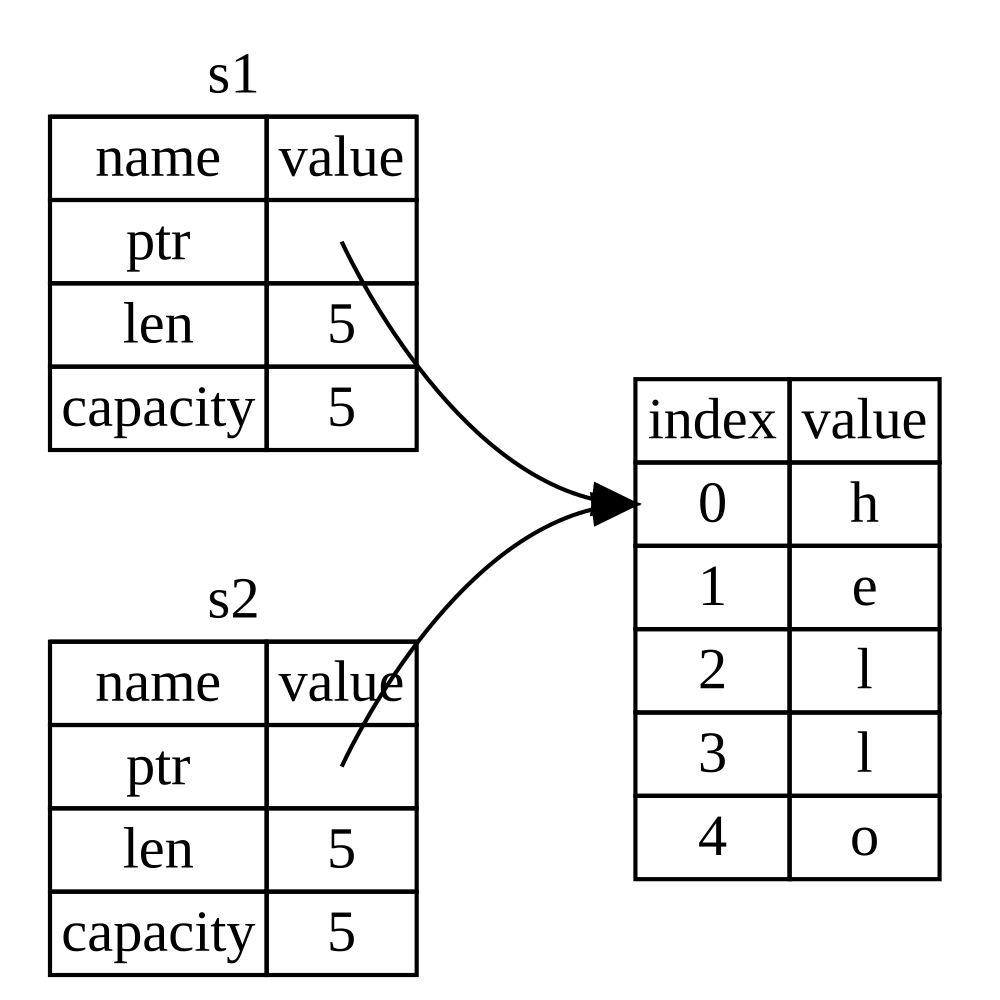
图 4-2:变量 s2 拥有 s1 的指针、长度和容量副本的内存表示(The representation in memory of the variable s2 that has a copy of the pointer, length, and capacity of s1)
该表示并非如图 4-3 所示,即如果 Rust 也复制了堆数据时的内存情况。
如果 Rust 这样做,那么当堆上的数据很大时,操作 s2 = s1 在运行时性能方面可能会非常昂贵。
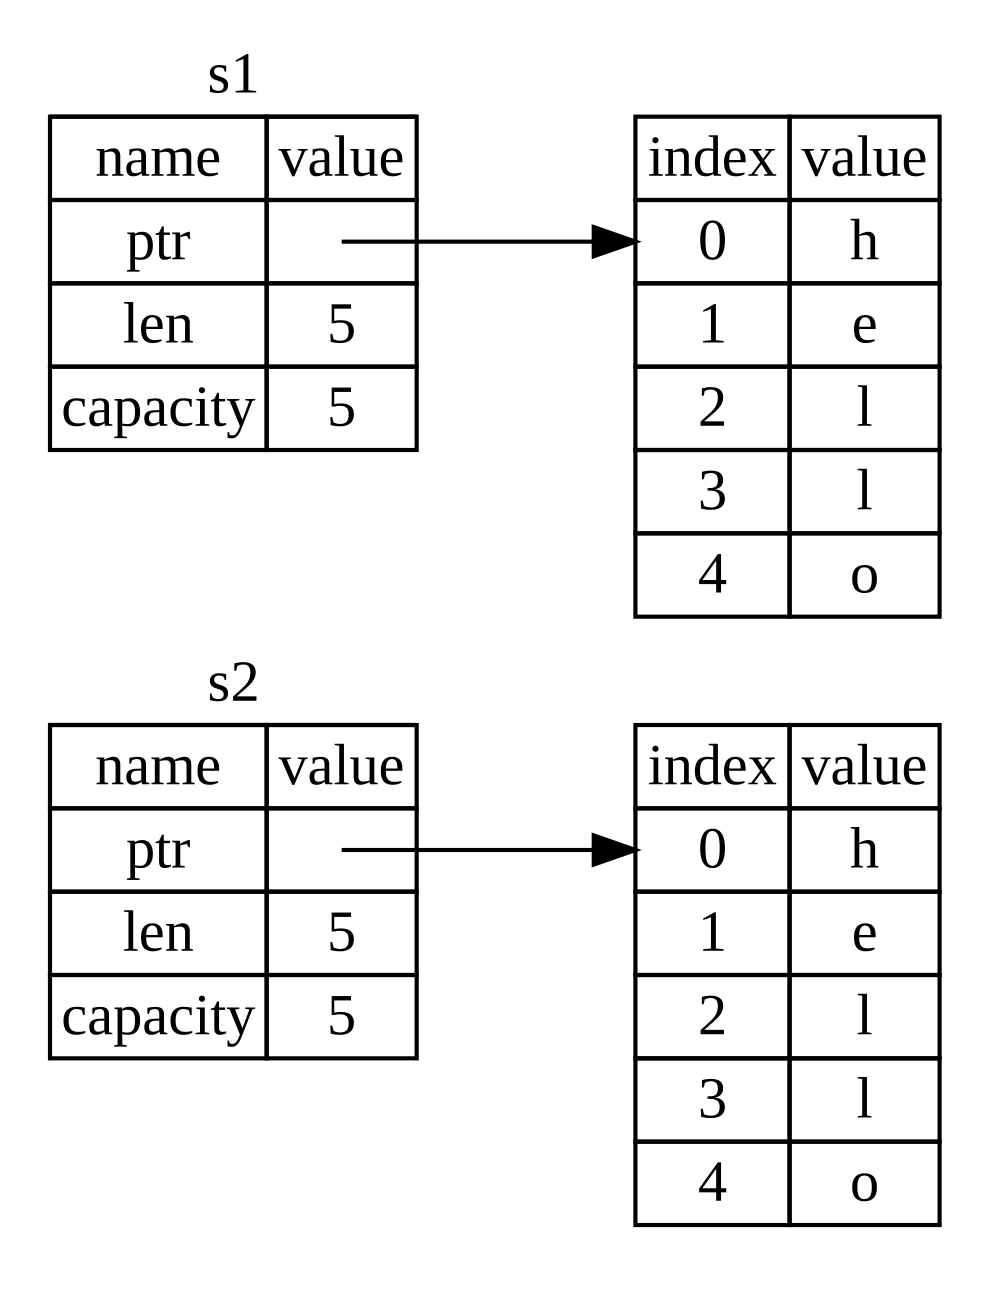
图 4-3:如果 Rust 也复制了堆数据时 s2 = s1 可能采取的另一种情况(Another possibility for what s2 = s1 might do if Rust copied the heap data as well)
之前我们说过,当变量离开作用域时,Rust 会自动调用 drop 函数并清理该变量的堆内存。
但图 4-2 显示两个数据指针指向同一个位置。这就产生了一个问题:
当 s2 和 s1 离开作用域时,它们都会尝试释放同一块内存。
这就是所谓的**二次释放(double free)**错误,也是我们之前提到的内存安全 bug 之一。
两次释放内存可能导致内存损坏(memory corruption),进而可能引发安全漏洞。
为了确保内存安全,在 let s2 = s1; 这一行之后,Rust 认为 s1 不再有效。
因此,当 s1 离开作用域时,Rust 不需要释放任何东西。
看看当你尝试在创建 s2 后使用 s1 会发生什么;它将无法工作:
fn main() {
    let s1 = String::from("hello");
    let s2 = s1;

    println!("{s1}, world!");
}
你会得到这样的错误,因为 Rust 阻止你使用失效的引用:
$ cargo run
   Compiling ownership v0.1.0 (file:///projects/ownership)
error[E0382]: borrow of moved value: `s1`
 --> src/main.rs:5:16
  |
2 |     let s1 = String::from("hello");
  |         -- move occurs because `s1` has type `String`, which does not implement the `Copy` trait
3 |     let s2 = s1;
  |              -- value moved here
4 |
5 |     println!("{s1}, world!");
  |                ^^ value borrowed here after move
  |
  = note: this error originates in the macro `$crate::format_args_nl` which comes from the expansion of the macro `println` (in Nightly builds, run with -Z macro-backtrace for more info)
help: consider cloning the value if the performance cost is acceptable
  |
3 |     let s2 = s1.clone();
  |                ++++++++

For more information about this error, try `rustc --explain E0382`.
error: could not compile `ownership` (bin "ownership") due to 1 previous error
如果你在其他语言中听说过浅拷贝(shallow copy)和深拷贝(deep copy)这两个术语,
那么复制指针、长度和容量而不复制数据的概念听起来可能像浅拷贝。
但由于 Rust 还会使第一个变量失效,这就不叫浅拷贝,而是被称为移动(move)。
在这个例子中,我们会说 s1 被**移动(moved)**到了 s2 中。因此,实际发生的情况如图 4-4 所示。
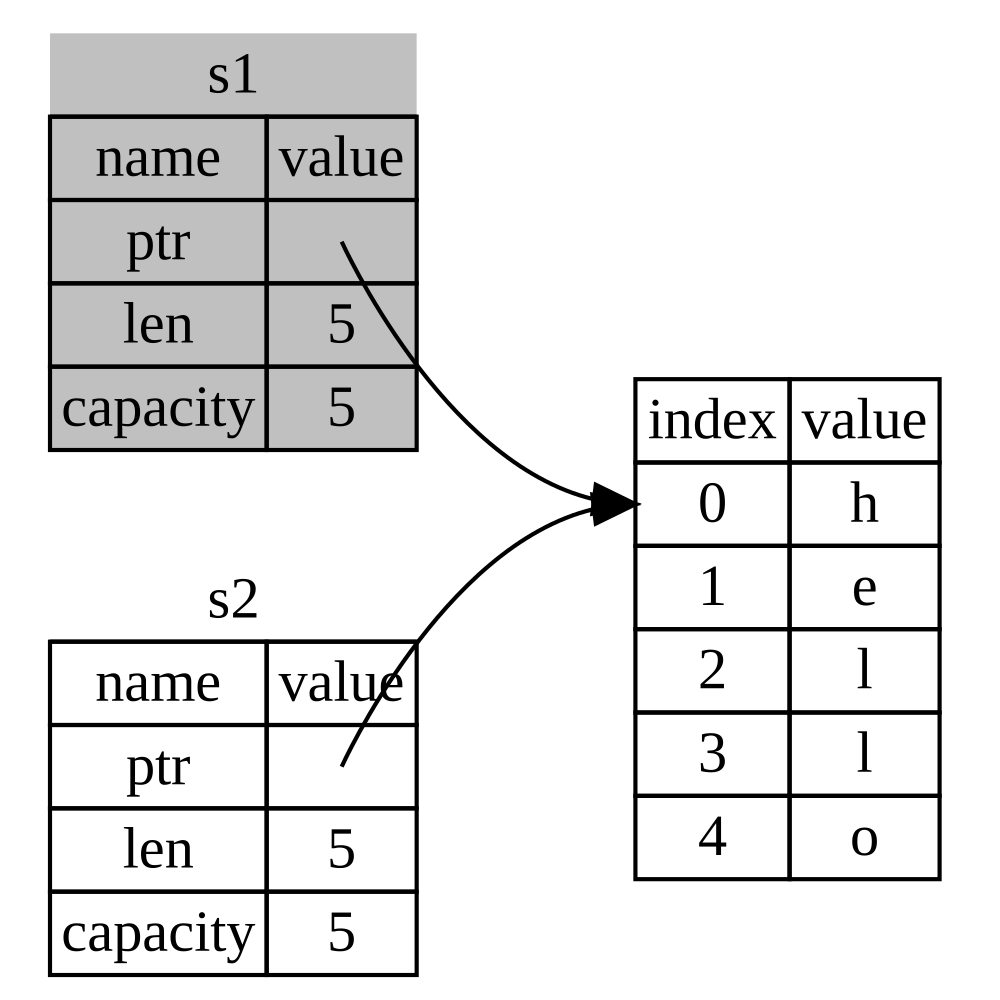
图 4-4:s1 被失效后的内存表示(The representation in memory after s1 has been invalidated)
这就解决了我们的问题!只有 s2 有效,当它离开作用域时,它将独自释放内存,一切就完成了。
此外,这还隐含着一个设计选择:Rust 永远不会自动创建数据的“深“拷贝。 因此,任何自动拷贝都可以被假定为在运行时性能方面是廉价的。
作用域与赋值(Scope and Assignment)
反过来,作用域、所有权以及通过 drop 函数释放内存之间的关系也同样成立。
当你为一个现有变量赋一个全新的值时,Rust 会调用 drop 并立即释放原值的内存。
例如,考虑下面的代码:
fn main() {
    let mut s = String::from("hello");
    s = String::from("ahoy");

    println!("{s}, world!");
}
我们首先声明了一个变量 s 并将其绑定到一个值为 "hello" 的 String。
然后,我们立即创建了一个值为 "ahoy" 的新 String 并将其赋值给 s。
此时,没有任何内容再指向堆上的原值。图 4-5 展示了现在的栈和堆数据:
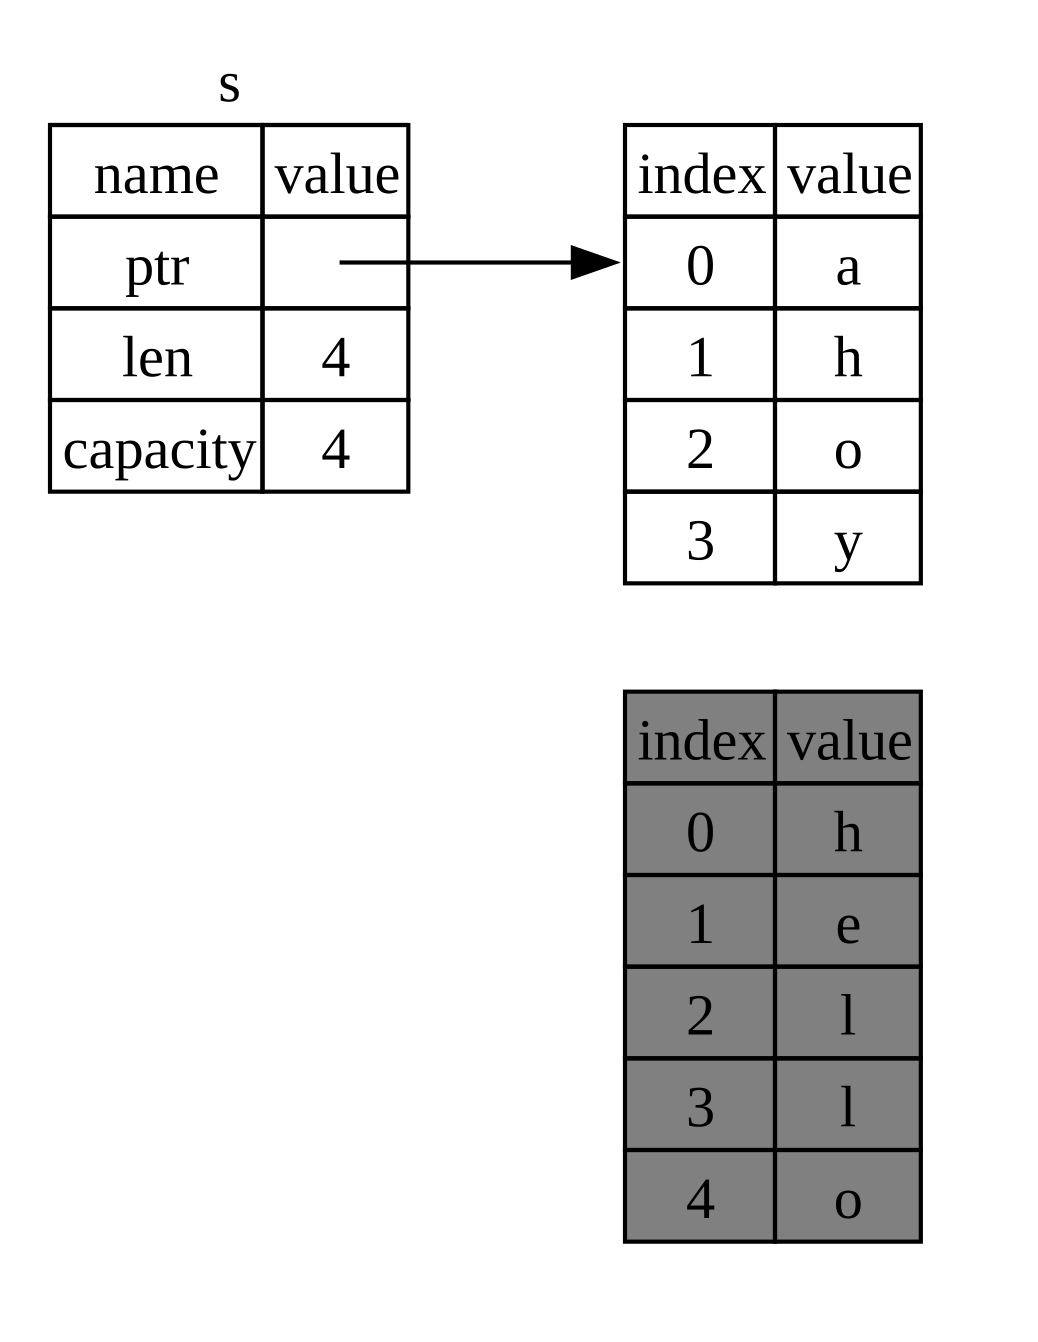
图 4-5:初始值被完全替换后的内存表示(The representation in memory after the initial value has been replaced in its entirety)
因此,原始字符串立即离开作用域。Rust 会对其调用 drop 函数,其内存也会被立即释放。
当我们在最后打印该值时,它将是 "ahoy, world!"。
变量与数据的交互方式:克隆(Variables and Data Interacting with Clone)
如果我们确实想要深度复制 String 的堆数据,而不仅仅是栈数据,
我们可以使用一个名为 clone 的通用方法。我们将在第 5 章讨论方法语法,
但由于方法是许多编程语言中的常见特性,你可能之前已经见过它们。
下面是 clone 方法的一个示例:
fn main() {
    let s1 = String::from("hello");
    let s2 = s1.clone();

    println!("s1 = {s1}, s2 = {s2}");
}
这完全可行,并且明确地产生了图 4-3 所示的行为,其中堆数据确实被复制了。
当你看到对 clone 的调用时,你就知道正在执行一些任意代码,并且这些代码可能是昂贵的。
它是一个视觉指示器,表明有不同的事情正在发生。
仅栈数据:复制(Stack-Only Data: Copy)
还有一个我们尚未讨论的细节。下面这段使用整数的代码(其中的一部分已在示例 4-2 中展示)是有效的:
fn main() {
    let x = 5;
    let y = x;

    println!("x = {x}, y = {y}");
}
但这段代码似乎与我们刚刚学到的相矛盾:我们没有调用 clone,
但 x 仍然有效且并未被移动(moved)到 y 中。
原因是像整数这样在编译时具有已知大小的类型完全存储在栈上,
因此复制实际的值非常快速。这意味着我们没有理由要在创建变量 y 后阻止 x 仍然有效。
换句话说,在这里深拷贝和浅拷贝没有区别,
因此调用 clone 与通常的浅拷贝没有什么不同,我们可以省略它。
Rust 有一个特殊的标注(annotation)叫做 Copy trait(特征),
我们可以将其放在存储在栈上的类型上,就像整数一样(我们将在第 10 章中更详细地讨论 trait)。
如果一个类型实现了 Copy trait,那么使用它的变量不会被移动,而是会被简单地复制,
这使得它们在赋值给另一个变量后仍然有效。
如果一个类型或其任何部分实现了 Drop trait,Rust 不会允许我们对该类型标注 Copy。
如果该类型在值离开作用域时需要做一些特殊的事情,而我们在该类型上添加了 Copy 标注,
就会得到一个编译时错误。要了解如何为你的类型添加 Copy 标注以实现该 trait,
请参阅附录 C 中的“可派生 trait”。
那么,哪些类型实现了 Copy trait?你可以查看给定类型的文档来确认,
但作为一般规则,任何一组简单的标量值都可以实现 Copy,
而任何需要分配或某种形式的资源则不能实现 Copy。以下是一些实现了 Copy 的类型:
- 所有整数类型,例如
u32。 - 布尔类型
bool,其值为true和false。 - 所有浮点数类型,例如
f64。 - 字符类型
char。 - 元组(tuple),前提是它们只包含也实现了
Copy的类型。例如,(i32, i32)实现了Copy,但(i32, String)则没有。
所有权与函数(Ownership and Functions)
将值传递给函数的机制与将值赋值给变量类似。 将变量传递给函数会进行移动(move)或复制(copy),就像赋值一样。 示例 4-3 是一个带有标注的示例,显示变量在何处进入和离开作用域。
fn main() {
    let s = String::from("hello");  // s comes into scope

    takes_ownership(s);             // s's value moves into the function...
                                    // ... and so is no longer valid here

    let x = 5;                      // x comes into scope

    makes_copy(x);                  // Because i32 implements the Copy trait,
                                    // x does NOT move into the function,
                                    // so it's okay to use x afterward.

} // Here, x goes out of scope, then s. However, because s's value was moved,
  // nothing special happens.

fn takes_ownership(some_string: String) { // some_string comes into scope
    println!("{some_string}");
} // Here, some_string goes out of scope and `drop` is called. The backing
  // memory is freed.

fn makes_copy(some_integer: i32) { // some_integer comes into scope
    println!("{some_integer}");
} // Here, some_integer goes out of scope. Nothing special happens.如果在调用 takes_ownership 之后尝试使用 s,Rust 会抛出一个编译时错误。
这些静态检查保护我们免于犯错。尝试向 main 中添加使用 s 和 x 的代码,
看看在何处可以使用它们,以及在何处所有权规则会阻止你这样做。
返回值与作用域(Return Values and Scope)
返回值也可以转移所有权。示例 4-4 展示了一个返回某个值的函数示例, 并带有与示例 4-3 类似的标注。
fn main() {
    let s1 = gives_ownership();        // gives_ownership moves its return
                                       // value into s1

    let s2 = String::from("hello");    // s2 comes into scope

    let s3 = takes_and_gives_back(s2); // s2 is moved into
                                       // takes_and_gives_back, which also
                                       // moves its return value into s3
} // Here, s3 goes out of scope and is dropped. s2 was moved, so nothing
  // happens. s1 goes out of scope and is dropped.

fn gives_ownership() -> String {       // gives_ownership will move its
                                       // return value into the function
                                       // that calls it

    let some_string = String::from("yours"); // some_string comes into scope

    some_string                        // some_string is returned and
                                       // moves out to the calling
                                       // function
}

// This function takes a String and returns a String.
fn takes_and_gives_back(a_string: String) -> String {
    // a_string comes into
    // scope

    a_string  // a_string is returned and moves out to the calling function
}变量的所有权每次都遵循相同的模式:将一个值赋值给另一个变量会移动它。
当包含堆上数据的变量离开作用域时,该值将被 drop 清理,除非数据的所有权已经移动到另一个变量。
虽然这样可行,但在每个函数中获取所有权然后再返回所有权有点繁琐。 如果我们想让一个函数使用某个值但不获取所有权呢? 如果我们想再次使用传入的值,除了函数体中可能想要返回的任何数据之外, 还需要将其传回来,这相当烦人。
Rust 确实允许我们使用元组(tuple)返回多个值,如示例 4-5 所示。
fn main() {
    let s1 = String::from("hello");

    let (s2, len) = calculate_length(s1);

    println!("The length of '{s2}' is {len}.");
}

fn calculate_length(s: String) -> (String, usize) {
    let length = s.len(); // len() returns the length of a String

    (s, length)
}但这对于一个本应常见的概念来说,仪式感太强,工作量也太大了。 幸运的是,Rust 有一个功能可以在不转移所有权的情况下使用值:引用(references)。
引用与借用
引用(References)与借用(Borrowing)
清单 4-5 中元组代码的问题在于,我们必须将 String 返回给调用函数,以便在调用 calculate_length 后仍能使用该 String,因为 String 被移动到了 calculate_length 中。相反,我们可以提供 String 值的一个引用(reference)。引用(reference)就像指针(pointer)一样,它是一个地址,我们可以通过它来访问存储在该地址的数据;这些数据由其他变量所拥有。与指针不同的是,引用保证在该引用的整个生命周期中都指向某个特定类型的有效值。
下面展示了如何定义并使用一个以对象引用作为参数(而非获取所有权)的 calculate_length 函数:
fn main() {
    let s1 = String::from("hello");

    let len = calculate_length(&s1);

    println!("The length of '{s1}' is {len}.");
}

fn calculate_length(s: &String) -> usize {
    s.len()
}
首先,注意变量声明和函数返回值中所有的元组代码都消失了。其次,注意我们将 &s1 传递给 calculate_length,并且在函数定义中,我们使用 &String 而非 String。这些与符号(ampersands)代表引用(reference),它们允许你引用某个值而不获取其所有权。图 4-6 展示了这一概念。
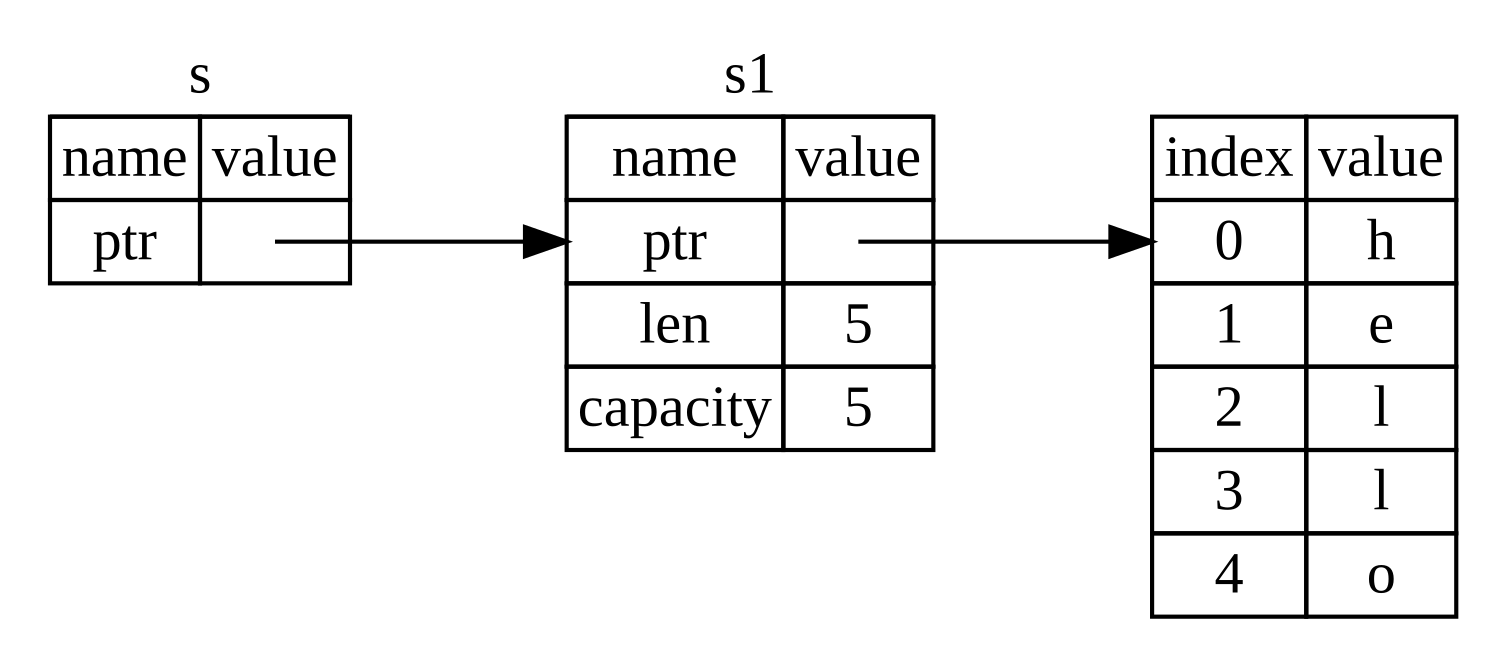
图 4-6:&String s 指向 String s1 的示意图
注意:与使用
&进行引用(referencing)相反的操作是 解引用(dereferencing),它通过解引用运算符*来完成。我们将在第 8 章看到解引用运算符的一些用法,并在第 15 章详细讨论解引用。
让我们更仔细地看一下这里的函数调用:
fn main() {
    let s1 = String::from("hello");

    let len = calculate_length(&s1);

    println!("The length of '{s1}' is {len}.");
}

fn calculate_length(s: &String) -> usize {
    s.len()
}
&s1 语法让我们创建一个 引用(reference) s1 的值但不会拥有它。因为引用并不拥有该值,所以当引用停止使用时,它所指向的值不会被丢弃(dropped)。
同样地,函数的签名使用了 & 来表明参数 s 的类型是一个引用。让我们添加一些解释性的注释:
fn main() {
    let s1 = String::from("hello");

    let len = calculate_length(&s1);

    println!("The length of '{s1}' is {len}.");
}

fn calculate_length(s: &String) -> usize { // s is a reference to a String
    s.len()
} // Here, s goes out of scope. But because s does not have ownership of what
  // it refers to, the String is not dropped.
变量 s 有效的作用域(scope)与任何函数参数的作用域相同,但当 s 停止使用时,引用所指向的值不会被丢弃,因为 s 没有所有权。当函数使用引用作为参数而不是实际值时,我们不需要返回值来交还所有权,因为我们从未拥有过所有权。
我们将创建引用的行为称为 借用(borrowing)。就像现实生活中,如果一个人拥有某样东西,你可以向他借用。当你用完时,你必须归还。你并不拥有它。
那么,如果我们试图修改正在借用的东西,会发生什么?试试清单 4-6 中的代码。剧透警告:它不会工作!
fn main() {
    let s = String::from("hello");

    change(&s);
}

fn change(some_string: &String) {
    some_string.push_str(", world");
}以下是错误信息:
$ cargo run
   Compiling ownership v0.1.0 (file:///projects/ownership)
error[E0596]: cannot borrow `*some_string` as mutable, as it is behind a `&` reference
 --> src/main.rs:8:5
  |
8 |     some_string.push_str(", world");
  |     ^^^^^^^^^^^ `some_string` is a `&` reference, so the data it refers to cannot be borrowed as mutable
  |
help: consider changing this to be a mutable reference
  |
7 | fn change(some_string: &mut String) {
  |                         +++

For more information about this error, try `rustc --explain E0596`.
error: could not compile `ownership` (bin "ownership") due to 1 previous error
正如变量默认是不可变的(immutable)一样,引用也是如此。我们不允许修改我们拥有引用的东西。
可变引用(Mutable References)
我们可以通过一些小的调整来修复清单 4-6 中的代码,使其允许我们修改一个借用的值,即使用 可变引用(mutable reference):
fn main() {
    let mut s = String::from("hello");

    change(&mut s);
}

fn change(some_string: &mut String) {
    some_string.push_str(", world");
}
首先,我们将 s 改为 mut。然后,在调用 change 函数的地方使用 &mut s 创建一个可变引用,并更新函数签名以通过 some_string: &mut String 接受一个可变引用。这清楚地表明 change 函数将会改变它借用的值。
可变引用有一个很大的限制:如果你有一个对某个值的可变引用,你就不能再有对该值的其他引用。这段试图创建两个对 s 的可变引用的代码将会失败:
fn main() {
    let mut s = String::from("hello");

    let r1 = &mut s;
    let r2 = &mut s;

    println!("{r1}, {r2}");
}
以下是错误信息:
$ cargo run
   Compiling ownership v0.1.0 (file:///projects/ownership)
error[E0499]: cannot borrow `s` as mutable more than once at a time
 --> src/main.rs:5:14
  |
4 |     let r1 = &mut s;
  |              ------ first mutable borrow occurs here
5 |     let r2 = &mut s;
  |              ^^^^^^ second mutable borrow occurs here
6 |
7 |     println!("{r1}, {r2}");
  |                -- first borrow later used here

For more information about this error, try `rustc --explain E0499`.
error: could not compile `ownership` (bin "ownership") due to 1 previous error
这个错误说明此代码无效,因为我们不能在同一时间多次将 s 作为可变借用。第一个可变借用是在 r1 中,并且必须持续到它在 println! 中被使用,但在该可变引用的创建与其使用之间,我们试图在 r2 中创建另一个可变引用,该引用借用了与 r1 相同的数据。
这个限制——禁止同一时间对同一数据存在多个可变引用——允许进行修改,但以一种非常受控的方式进行。这是新的 Rustacean(Rust 学习者)常常感到困扰的地方,因为大多数语言允许你随时随地进行修改。拥有这个限制的好处是 Rust 能够在编译时防止数据竞争(data race)。数据竞争(data race) 类似于竞态条件(race condition),当以下三种行为同时发生时就会发生:
- 两个或更多指针同时访问同一数据。
- 至少有一个指针被用来写入数据。
- 没有使用任何机制来同步对数据的访问。
数据竞争会导致未定义行为(undefined behavior),并且在运行时追踪排查时很难诊断和修复;Rust 通过拒绝编译存在数据竞争的代码来防止这个问题!
和往常一样,我们可以使用花括号创建一个新的作用域(scope),允许有多个可变引用,只是不能 同时(simultaneous) 存在:
fn main() {
    let mut s = String::from("hello");

    {
        let r1 = &mut s;
    } // r1 goes out of scope here, so we can make a new reference with no problems.

    let r2 = &mut s;
}
Rust 对组合可变引用和不可变引用也实施了类似的规则。以下代码会导致错误:
fn main() {
    let mut s = String::from("hello");

    let r1 = &s; // no problem
    let r2 = &s; // no problem
    let r3 = &mut s; // BIG PROBLEM

    println!("{r1}, {r2}, and {r3}");
}
以下是错误信息:
$ cargo run
   Compiling ownership v0.1.0 (file:///projects/ownership)
error[E0502]: cannot borrow `s` as mutable because it is also borrowed as immutable
 --> src/main.rs:6:14
  |
4 |     let r1 = &s; // no problem
  |              -- immutable borrow occurs here
5 |     let r2 = &s; // no problem
6 |     let r3 = &mut s; // BIG PROBLEM
  |              ^^^^^^ mutable borrow occurs here
7 |
8 |     println!("{r1}, {r2}, and {r3}");
  |                -- immutable borrow later used here

For more information about this error, try `rustc --explain E0502`.
error: could not compile `ownership` (bin "ownership") due to 1 previous error
呼!我们在拥有对同一个值的不可变引用时,也 不能拥有可变引用。
不可变引用的使用者并不期望值突然发生变化!然而,多个不可变引用是允许的,因为仅仅读取数据的人没有能力影响其他人对数据的读取。
请注意,引用的作用域从它被引入的地方开始,一直持续到该引用的最后一次使用。例如,以下代码可以编译,因为不可变引用的最后一次使用是在 println! 中,这发生在可变引用被引入之前:
fn main() {
    let mut s = String::from("hello");

    let r1 = &s; // no problem
    let r2 = &s; // no problem
    println!("{r1} and {r2}");
    // Variables r1 and r2 will not be used after this point.

    let r3 = &mut s; // no problem
    println!("{r3}");
}
不可变引用 r1 和 r2 的作用域在它们最后被使用的 println! 之后结束,这发生在可变引用 r3 创建之前。这些作用域不重叠,因此这段代码是允许的:编译器可以在作用域结束之前的某个时间点判断出该引用已不再使用。
尽管借用错误有时可能会令人沮丧,但请记住,这是 Rust 编译器在早期(编译时而非运行时)指出潜在的 bug,并精确地告诉你问题所在。这样,你就不必在之后追踪为什么数据不是你所想的那样了。
悬垂引用(Dangling References)
在存在指针的语言中,很容易错误地创建 悬垂指针(dangling pointer)——即指向某个内存位置的指针,该内存可能已被分配给其他人——通过释放某些内存的同时却保留指向该内存的指针。相比之下,在 Rust 中,编译器保证引用永远不会是悬垂引用:如果你拥有对某些数据的引用,编译器将确保数据不会在引用之前超出作用域。
让我们尝试创建一个悬垂引用,看看 Rust 如何通过编译时错误来防止它们:
fn main() {
    let reference_to_nothing = dangle();
}

fn dangle() -> &String {
    let s = String::from("hello");

    &s
}
以下是错误信息:
$ cargo run
   Compiling ownership v0.1.0 (file:///projects/ownership)
error[E0106]: missing lifetime specifier
 --> src/main.rs:5:16
  |
5 | fn dangle() -> &String {
  |                ^ expected named lifetime parameter
  |
  = help: this function's return type contains a borrowed value, but there is no value for it to be borrowed from
help: consider using the `'static` lifetime, but this is uncommon unless you're returning a borrowed value from a `const` or a `static`
  |
5 | fn dangle() -> &'static String {
  |                 +++++++
help: instead, you are more likely to want to return an owned value
  |
5 - fn dangle() -> &String {
5 + fn dangle() -> String {
  |

For more information about this error, try `rustc --explain E0106`.
error: could not compile `ownership` (bin "ownership") due to 1 previous error
这个错误信息提到了一个我们尚未涉及的特性:生命周期(lifetimes)。我们将在第 10 章详细讨论生命周期。但是,如果你忽略关于生命周期的部分,该信息确实包含了为什么这段代码有问题的关键:
this function's return type contains a borrowed value, but there is no value
for it to be borrowed from
让我们更仔细地看看 dangle 代码的每个阶段具体发生了什么:
fn main() {
    let reference_to_nothing = dangle();
}

fn dangle() -> &String { // dangle returns a reference to a String

    let s = String::from("hello"); // s is a new String

    &s // we return a reference to the String, s
} // Here, s goes out of scope and is dropped, so its memory goes away.
  // Danger!
因为 s 是在 dangle 内部创建的,当 dangle 的代码执行完毕后,s 将被释放。但我们试图返回一个对它的引用。这意味着这个引用将指向一个无效的 String。这可不行!Rust 不允许我们这样做。
这里的解决方案是直接返回 String:
fn main() {
    let string = no_dangle();
}

fn no_dangle() -> String {
    let s = String::from("hello");

    s
}
这样就能正常工作,没有任何问题。所有权被移出,没有任何东西被释放。
引用的规则
让我们回顾一下关于引用所讨论的内容:
- 在任意给定时间,你 要么 只能有一个可变引用,要么 只能有任意数量的不可变引用。
- 引用必须始终有效。
接下来,我们将介绍另一种引用:切片(slices)。
切片类型
切片(Slice)类型
切片(Slice) 让你可以引用集合中一段连续的元素序列。切片(Slice)是一种引用,因此它没有所有权。
这里有一个小编程问题:编写一个函数,它接收一个用空格分隔单词的字符串,并返回该字符串中找到的第一个单词。如果函数在字符串中没有找到空格,则整个字符串就是一个单词,所以应该返回整个字符串。
注意:为了介绍切片(Slice),本节仅假设使用 ASCII 字符;关于 UTF-8 处理的更详细讨论在第 8 章的“使用字符串存储 UTF-8 编码的文本”部分。
让我们先来思考一下,如果不使用切片(Slice),我们该如何编写这个函数的签名,以便理解切片(Slice)要解决的问题:
fn first_word(s: &String) -> ?first_word 函数有一个 &String 类型的参数。我们不需要所有权,所以这没问题。(在惯用的 Rust 代码中,函数除非必要,否则不会获取参数的所有权,原因我们将在后续中逐渐明了。)但是我们应该返回什么呢?我们确实没有办法来描述字符串的一部分。不过,我们可以返回单词结尾的索引(Index),由空格来指示。让我们试试看,如示例 4-7 所示。
fn first_word(s: &String) -> usize {
    let bytes = s.as_bytes();

    for (i, &item) in bytes.iter().enumerate() {
        if item == b' ' {
            return i;
        }
    }

    s.len()
}

fn main() {}first_word 函数返回 String 参数中的一个字节索引值因为我们需要逐元素地检查 String 中的值是否为空格,所以我们将使用 as_bytes 方法将 String 转换为字节数组。
fn first_word(s: &String) -> usize {
    let bytes = s.as_bytes();

    for (i, &item) in bytes.iter().enumerate() {
        if item == b' ' {
            return i;
        }
    }

    s.len()
}

fn main() {}
接下来,我们使用 iter 方法在字节数组上创建一个迭代器(Iterator):
fn first_word(s: &String) -> usize {
    let bytes = s.as_bytes();

    for (i, &item) in bytes.iter().enumerate() {
        if item == b' ' {
            return i;
        }
    }

    s.len()
}

fn main() {}我们将在第 13 章中更详细地讨论迭代器(Iterator)。现在,你只需要知道 iter 是一个返回集合中每个元素的方法,而 enumerate 包装了 iter 的结果,将每个元素作为元组(Tuple)的一部分返回。enumerate 返回的元组中的第一个元素是索引(Index),第二个元素是对该元素的引用。这比我们自己计算索引要方便一些。
因为 enumerate 方法返回一个元组(Tuple),我们可以使用模式(Pattern)来解构这个元组。我们将在第 6 章中更多地讨论模式(Pattern)。在 for 循环中,我们指定了一个模式:元组中的索引使用 i,元组中的单个字节使用 &item。因为我们从 .iter().enumerate() 获取的是元素的引用,所以我们在模式中使用了 &。
在 for 循环内部,我们使用字节字面量语法来搜索代表空格的字节。如果找到空格,就返回该位置。否则,使用 s.len() 返回字符串的长度。
fn first_word(s: &String) -> usize {
    let bytes = s.as_bytes();

    for (i, &item) in bytes.iter().enumerate() {
        if item == b' ' {
            return i;
        }
    }

    s.len()
}

fn main() {}
现在我们有办法找出字符串中第一个单词结尾的索引(Index),但有一个问题。我们返回了一个单独的 usize,但它只有在 &String 的上下文中才是一个有意义的数字。换句话说,因为它是一个与 String 分离的值,无法保证它在未来仍然有效。请考虑示例 4-8 中的程序,它使用了示例 4-7 中的 first_word 函数。
fn first_word(s: &String) -> usize {
    let bytes = s.as_bytes();

    for (i, &item) in bytes.iter().enumerate() {
        if item == b' ' {
            return i;
        }
    }

    s.len()
}

fn main() {
    let mut s = String::from("hello world");

    let word = first_word(&s); // word will get the value 5

    s.clear(); // this empties the String, making it equal to ""

    // word still has the value 5 here, but s no longer has any content that we
    // could meaningfully use with the value 5, so word is now totally invalid!
}first_word 函数的结果,然后更改 String 的内容这段程序编译时没有任何错误,而且在调用 s.clear() 之后使用 word 也不会有问题。因为 word 与 s 的状态完全没有关联,word 仍然包含值 5。我们可以用那个值 5 和变量 s 来尝试提取第一个单词,但这将是一个错误(Bug),因为自从我们将 5 保存到 word 中之后,s 的内容已经改变了。
担心 word 中的索引(Index)与 s 中的数据不同步是繁琐且容易出错的!如果我们编写一个 second_word 函数,管理这些索引(Index)会变得更加脆弱。它的签名必须像这样:
fn second_word(s: &String) -> (usize, usize) {现在我们追踪的是起始_和_结束索引(Index),而且我们有更多的值是根据特定状态下的数据计算出来的,却完全没有与该状态绑定。我们有三个不相关的变量需要保持同步。
幸运的是,Rust 对此问题有一个解决方案:字符串切片(String Slice)。
字符串切片(String Slice)
字符串切片(String Slice) 是对 String 中一段连续元素的引用,它看起来像这样:
fn main() {
    let s = String::from("hello world");

    let hello = &s[0..5];
    let world = &s[6..11];
}
hello 不是对整个 String 的引用,而是对 String 一部分的引用,通过额外的 [0..5] 部分来指定。我们使用方括号内的范围(Range)来创建切片(Slice),通过指定 [starting_index..ending_index],其中 starting_index 是切片(Slice)中的第一个位置,而 ending_index 是切片(Slice)中最后一个位置的下一个位置。在内部,切片(Slice)的数据结构存储了起始位置和切片(Slice)的长度,该长度对应于 ending_index 减去 starting_index。因此,对于 let world = &s[6..11]; 的情况,world 将是一个切片(Slice),它包含一个指向 s 中索引 6 处字节的指针,长度值为 5。
图 4-7 以图表形式展示了这一点。
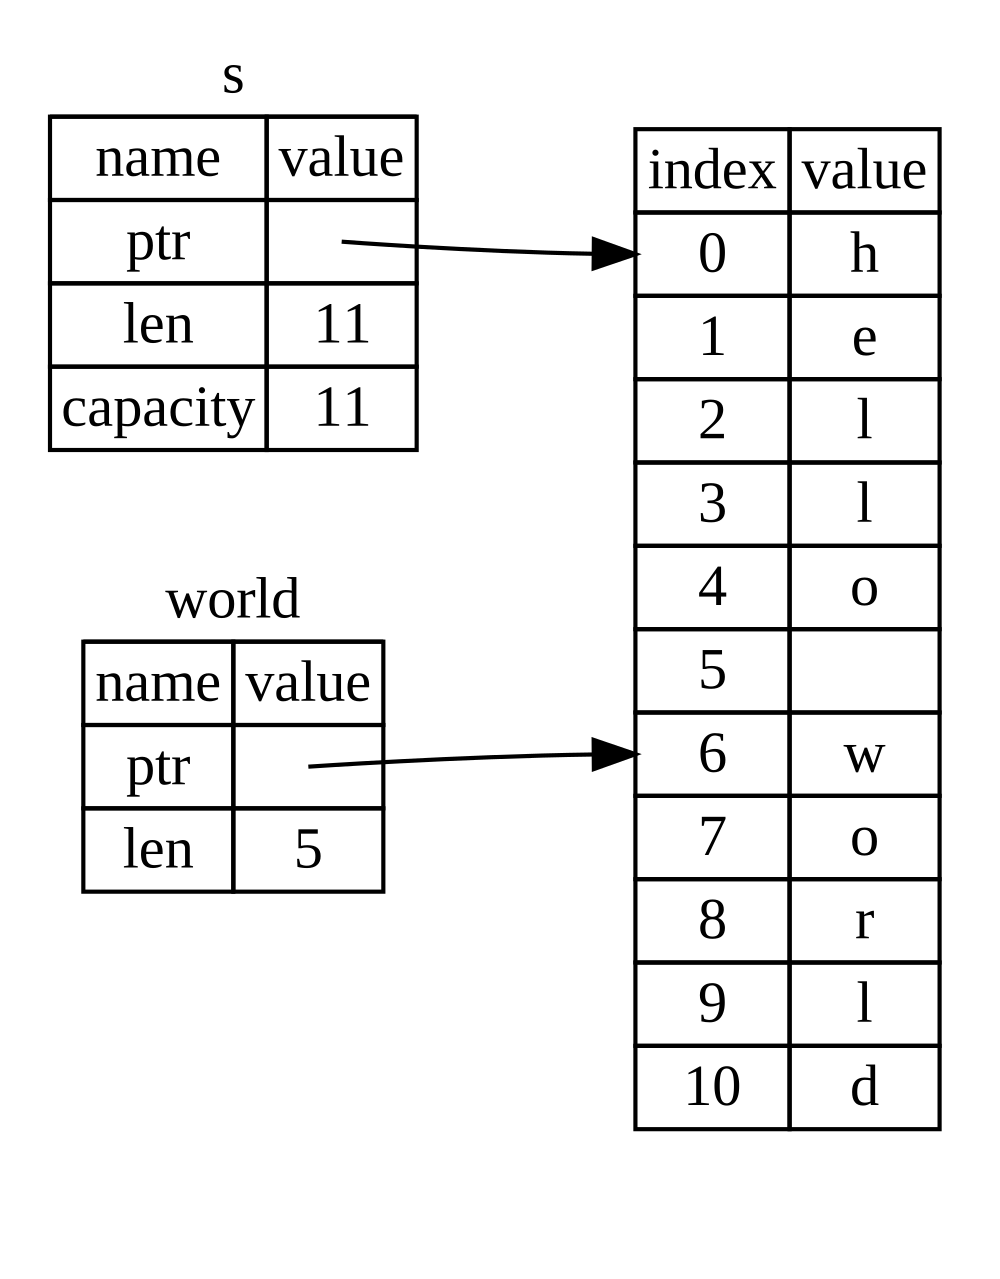
图 4-7:引用 String 一部分的字符串切片(String Slice)
使用 Rust 的 .. 范围(Range)语法,如果你想从索引 0 开始,可以省略两个点之前的值。换句话说,以下是等价的:
#![allow(unused)]
fn main() {
let s = String::from("hello");

let slice = &s[0..2];
let slice = &s[..2];
}
同理,如果你的切片(Slice)包含 String 的最后一个字节,你可以省略尾部的数字。这意味着以下是等价的:
#![allow(unused)]
fn main() {
let s = String::from("hello");

let len = s.len();

let slice = &s[3..len];
let slice = &s[3..];
}
你也可以同时省略两个值来获取整个字符串的切片(Slice)。因此,以下是等价的:
#![allow(unused)]
fn main() {
let s = String::from("hello");

let len = s.len();

let slice = &s[0..len];
let slice = &s[..];
}
注意:字符串切片(String Slice)的范围(Range)索引必须位于有效的 UTF-8 字符边界上。如果你尝试在多字节字符的中间创建字符串切片,程序将退出并报错。
有了这些信息,我们来重写 first_word 以返回一个切片(Slice)。表示“字符串切片“的类型写作 &str:
fn first_word(s: &String) -> &str {
    let bytes = s.as_bytes();

    for (i, &item) in bytes.iter().enumerate() {
        if item == b' ' {
            return &s[0..i];
        }
    }

    &s[..]
}

fn main() {}
我们使用与示例 4-7 相同的方式获取单词结尾的索引(Index):寻找第一个出现的空格。当找到空格时,我们返回一个字符串切片(String Slice),以字符串的开头和空格的索引作为起始和结束索引。
现在当我们调用 first_word 时,我们返回一个与底层数据绑定的单一值。该值由指向切片(Slice)起始点的引用和切片中元素的数量组成。
返回切片(Slice)同样适用于 second_word 函数:
fn second_word(s: &String) -> &str {现在我们有了一个更不易出错的直观 API,因为编译器会确保对 String 的引用保持有效。还记得示例 4-8 程序中的错误(Bug)吗?我们获取了第一个单词结尾的索引(Index),然后清空了字符串,导致索引失效?那段代码在逻辑上是错误的,但没有立即显示任何错误。如果我们继续尝试使用已清空字符串的第一个单词索引,问题会在之后暴露出来。切片(Slice)使这种错误(Bug)变得不可能,并让我们更早地知道代码存在问题。使用切片版本的 first_word 会抛出一个编译时错误:
fn first_word(s: &String) -> &str {
    let bytes = s.as_bytes();

    for (i, &item) in bytes.iter().enumerate() {
        if item == b' ' {
            return &s[0..i];
        }
    }

    &s[..]
}

fn main() {
    let mut s = String::from("hello world");

    let word = first_word(&s);

    s.clear(); // error!

    println!("the first word is: {word}");
}
这是编译器错误:
$ cargo run
   Compiling ownership v0.1.0 (file:///projects/ownership)
error[E0502]: cannot borrow `s` as mutable because it is also borrowed as immutable
  --> src/main.rs:18:5
   |
16 |     let word = first_word(&s);
   |                           -- immutable borrow occurs here
17 |
18 |     s.clear(); // error!
   |     ^^^^^^^^^ mutable borrow occurs here
19 |
20 |     println!("the first word is: {word}");
   |                                   ---- immutable borrow later used here

For more information about this error, try `rustc --explain E0502`.
error: could not compile `ownership` (bin "ownership") due to 1 previous error
回顾一下借用规则(Borrowing Rules):如果我们对某个值拥有不可变引用,就不能再获取可变引用。因为 clear 需要截断 String,它需要获取一个可变引用。而 clear 调用之后的 println! 使用了 word 中的引用,所以此时不可变引用必须仍然活跃。Rust 不允许 clear 中的可变引用和 word 中的不可变引用同时存在,因此编译失败。Rust 不仅让我们的 API 更易于使用,还在编译时消除了一整类错误!
字符串字面量(String Literal)作为切片(Slice)
回想一下,我们提到过字符串字面量(String Literal)存储在二进制文件中。既然我们已经了解了切片(Slice),就可以恰当地理解字符串字面量了:
#![allow(unused)]
fn main() {
let s = "Hello, world!";
}
这里 s 的类型是 &str:它是一个指向二进制文件中该特定点的切片(Slice)。这也是字符串字面量不可变的原因;&str 是一个不可变引用。
字符串切片(String Slice)作为参数
知道你可以获取字面量和 String 值的切片(Slice)后,我们对 first_word 有了进一步的改进,那就是它的签名:
fn first_word(s: &String) -> &str {更有经验的 Rustacean 会编写如示例 4-9 所示的签名,因为它允许我们对 &String 值和 &str 值使用同一个函数。
fn first_word(s: &str) -> &str {
    let bytes = s.as_bytes();

    for (i, &item) in bytes.iter().enumerate() {
        if item == b' ' {
            return &s[0..i];
        }
    }

    &s[..]
}

fn main() {
    let my_string = String::from("hello world");

    // `first_word` works on slices of `String`s, whether partial or whole.
    let word = first_word(&my_string[0..6]);
    let word = first_word(&my_string[..]);
    // `first_word` also works on references to `String`s, which are equivalent
    // to whole slices of `String`s.
    let word = first_word(&my_string);

    let my_string_literal = "hello world";

    // `first_word` works on slices of string literals, whether partial or
    // whole.
    let word = first_word(&my_string_literal[0..6]);
    let word = first_word(&my_string_literal[..]);

    // Because string literals *are* string slices already,
    // this works too, without the slice syntax!
    let word = first_word(my_string_literal);
}s 参数的类型改为字符串切片来改进 first_word 函数如果我们有一个字符串切片(String Slice),可以直接传递它。如果我们有一个 String,可以传递 String 的切片或对 String 的引用。这种灵活性利用了解引用强制多态(Deref Coercion)的特性,我们将在第 15 章的“在函数和方法中使用解引用强制多态”部分介绍。
定义一个接受字符串切片(String Slice)而不是 String 引用的函数,使我们的 API 更加通用和有用,同时没有丢失任何功能:
fn first_word(s: &str) -> &str {
    let bytes = s.as_bytes();

    for (i, &item) in bytes.iter().enumerate() {
        if item == b' ' {
            return &s[0..i];
        }
    }

    &s[..]
}

fn main() {
    let my_string = String::from("hello world");

    // `first_word` works on slices of `String`s, whether partial or whole.
    let word = first_word(&my_string[0..6]);
    let word = first_word(&my_string[..]);
    // `first_word` also works on references to `String`s, which are equivalent
    // to whole slices of `String`s.
    let word = first_word(&my_string);

    let my_string_literal = "hello world";

    // `first_word` works on slices of string literals, whether partial or
    // whole.
    let word = first_word(&my_string_literal[0..6]);
    let word = first_word(&my_string_literal[..]);

    // Because string literals *are* string slices already,
    // this works too, without the slice syntax!
    let word = first_word(my_string_literal);
}
其他切片(Slice)
你可以想象,字符串切片(String Slice)是针对字符串的。但也有更通用的切片类型。考虑这个数组:
#![allow(unused)]
fn main() {
let a = [1, 2, 3, 4, 5];
}
就像我们可能想要引用字符串的一部分一样,我们可能想要引用数组的一部分。我们可以这样做:
#![allow(unused)]
fn main() {
let a = [1, 2, 3, 4, 5];

let slice = &a[1..3];

assert_eq!(slice, &[2, 3]);
}
这个切片(Slice)的类型是 &[i32]。它的工作方式与字符串切片相同,通过存储对第一个元素的引用和一个长度。你会在各种其他集合中使用这种切片。当我们谈到第 8 章的向量(Vector)时,我们将详细讨论这些集合。
总结
所有权(Ownership)、借用(Borrowing)和切片(Slice)这些概念确保了 Rust 程序在编译时的内存安全。Rust 语言像其他系统编程语言一样,让你能够控制内存使用。但是,当所有者(Owner)离开作用域时,数据的所有者会自动清理数据,这意味着你不需要为此编写和调试额外的代码。
所有权(Ownership)影响着 Rust 中许多其他部分的工作方式,因此我们将在本书的其余部分进一步讨论这些概念。让我们进入第 5 章,看看如何将数据片段组合到 struct 中。
使用结构体(Struct)组织相关数据
结构体(Struct),或结构(Structure),是一种自定义数据类型,它允许你将多个相关的值打包并命名,组成一个有意义的组合。如果你熟悉面向对象语言,结构体(Struct)就像对象的数据属性。在本章中,我们将比较和对照元组(Tuple)与结构体(Struct),在已有知识的基础上,展示何时使用结构体是更好的数据分组方式。
我们将演示如何定义和实例化结构体(Struct)。我们将讨论如何定义关联函数(Associated Function),特别是称为*方法(Method)*的那种关联函数,以指定与结构体类型相关联的行为。结构体(Struct)和枚举(Enum)(在第 6 章讨论)是在程序领域中创建新类型的基础构件,以充分利用 Rust 的编译时类型检查功能。
定义并实例化结构体
定义和实例化结构体(Struct)
结构体(Struct)与“元组类型”部分讨论的元组(Tuple)类似,两者都包含多个相关的值。与元组一样,结构体的各个部分可以是不同的类型。与元组不同的是,在结构体中你需要为每一段数据命名,以便清楚地表明这些值的含义。添加这些名称意味着结构体比元组更灵活:你不必依赖数据的顺序来指定或访问实例的值。
要定义一个结构体(Struct),我们输入关键字 struct 并为整个结构体命名。结构体的名称应该描述被组合在一起的数据片段的意义。然后,在花括号内,我们定义数据片段的名称和类型,我们称之为字段(Field)。例如,示例 5-1 展示了一个存储用户账户信息的结构体。
struct User {
    active: bool,
    username: String,
    email: String,
    sign_in_count: u64,
}

fn main() {}User 结构体定义在定义结构体之后,我们通过为每个字段指定具体的值来创建该结构体的实例(Instance)。我们通过写出结构体的名称,然后添加包含 key: value 对的花括号来创建实例,其中键是字段的名称,值是我们想要在这些字段中存储的数据。我们不必按照在结构体中声明字段时的相同顺序来指定字段。换句话说,结构体定义就像是该类型的通用模板,而实例则用特定的数据填充该模板来创建该类型的值。例如,我们可以像示例 5-2 那样声明一个特定的用户。
struct User {
    active: bool,
    username: String,
    email: String,
    sign_in_count: u64,
}

fn main() {
    let user1 = User {
        active: true,
        username: String::from("someusername123"),
        email: String::from("someone@example.com"),
        sign_in_count: 1,
    };
}User struct要从结构体中获取特定值,我们使用点号(Dot)表示法。例如,要访问这个用户的电子邮件地址,我们使用 user1.email。如果实例是可变的,我们可以使用点号表示法并赋值给特定字段来改变值。示例 5-3 展示了如何更改可变 User 实例中 email 字段的值。
struct User {
    active: bool,
    username: String,
    email: String,
    sign_in_count: u64,
}

fn main() {
    let mut user1 = User {
        active: true,
        username: String::from("someusername123"),
        email: String::from("someone@example.com"),
        sign_in_count: 1,
    };

    user1.email = String::from("anotheremail@example.com");
}User 实例的 email 字段的值注意,整个实例必须是可变的;Rust 不允许我们只将某些字段标记为可变。与任何表达式一样,我们可以将结构体的新实例构造为函数体中的最后一个表达式,以隐式返回该新实例。
示例 5-4 展示了一个 build_user 函数,它接收给定的 email 和 username 并返回一个 User 实例。active 字段的值为 true,sign_in_count 的值为 1。
struct User {
    active: bool,
    username: String,
    email: String,
    sign_in_count: u64,
}

fn build_user(email: String, username: String) -> User {
    User {
        active: true,
        username: username,
        email: email,
        sign_in_count: 1,
    }
}

fn main() {
    let user1 = build_user(
        String::from("someone@example.com"),
        String::from("someusername123"),
    );
}build_user 函数,它接收 email 和 username 并返回一个 User 实例将函数参数命名为与结构体字段相同的名称是有意义的,但必须重复 email 和 username 字段名称和变量有点繁琐。如果结构体有更多字段,重复每个名称会更加烦人。幸运的是,有一个便捷的简写!
使用字段初始化简写(Field Init Shorthand)
因为在示例 5-4 中参数名称和结构体字段名称完全相同,我们可以使用*字段初始化简写(Field Init Shorthand)*语法重写 build_user,使其行为完全相同,但不需要重复 username 和 email,如示例 5-5 所示。
struct User {
    active: bool,
    username: String,
    email: String,
    sign_in_count: u64,
}

fn build_user(email: String, username: String) -> User {
    User {
        active: true,
        username,
        email,
        sign_in_count: 1,
    }
}

fn main() {
    let user1 = build_user(
        String::from("someone@example.com"),
        String::from("someusername123"),
    );
}build_user 函数,因为 username 和 email 参数与结构体字段同名这里,我们创建了一个新的 User 结构体实例,它有一个名为 email 的字段。我们想将 email 字段的值设置为 build_user 函数的 email 参数的值。因为 email 字段和 email 参数同名,我们只需要写 email 而不是 email: email。
使用结构体更新语法(Struct Update Syntax)创建实例
通常,创建一个新结构体实例是很有用的,它包含另一个同类型实例的大部分值,但改变其中的一部分。你可以使用结构体更新语法(Struct Update Syntax)来实现这一点。
首先,在示例 5-6 中,我们展示了如何以常规方式(不使用更新语法)在 user2 中创建一个新的 User 实例。我们为 email 设置了一个新值,但其他值使用了我们在示例 5-2 中创建的 user1 中的值。
struct User {
    active: bool,
    username: String,
    email: String,
    sign_in_count: u64,
}

fn main() {
    // --snip--

    let user1 = User {
        email: String::from("someone@example.com"),
        username: String::from("someusername123"),
        active: true,
        sign_in_count: 1,
    };

    let user2 = User {
        active: user1.active,
        username: user1.username,
        email: String::from("another@example.com"),
        sign_in_count: user1.sign_in_count,
    };
}user1 的值创建一个新的 User 实例使用结构体更新语法(Struct Update Syntax),我们可以用更少的代码达到相同的效果,如示例 5-7 所示。.. 语法指定了未显式设置的其余字段应与给定实例中的字段具有相同的值。
struct User {
    active: bool,
    username: String,
    email: String,
    sign_in_count: u64,
}

fn main() {
    // --snip--

    let user1 = User {
        email: String::from("someone@example.com"),
        username: String::from("someusername123"),
        active: true,
        sign_in_count: 1,
    };

    let user2 = User {
        email: String::from("another@example.com"),
        ..user1
    };
}User 实例设置新的 email 值,但使用 user1 的其余值示例 5-7 中的代码也在 user2 中创建了一个实例,它的 email 值不同,但 username、active 和 sign_in_count 字段的值与 user1 相同。..user1 必须放在最后,以指定任何剩余字段应从 user1 的对应字段中获取值,但我们可以选择以任何顺序为任意多个字段指定值,而不受结构体定义中字段顺序的限制。
注意,结构体更新语法(Struct Update Syntax)使用 = 就像赋值一样;这是因为它会移动数据,正如我们在“变量与数据交互的方式:移动”部分看到的那样。在这个例子中,创建 user2 后我们不能再使用 user1,因为 user1 的 username 字段中的 String 被移动到了 user2 中。如果我们为 user2 的 email 和 username 都提供了新的 String 值,从而只使用了 user1 中的 active 和 sign_in_count 值,那么 user2 创建后 user1 仍然有效。active 和 sign_in_count 都是实现了 Copy trait 的类型,因此我们在“栈(Stack)上的数据:Copy”部分讨论的行为将适用。在这个例子中,我们仍然可以使用 user1.email,因为它的值没有被移出 user1。
使用元组结构体(Tuple Struct)创建不同类型
Rust 还支持看起来类似于元组(Tuple)的结构体,称为元组结构体(Tuple Struct)。元组结构体具有结构体名称带来的额外含义,但与其字段没有关联的名称;相反,它们只有字段的类型。当你想要给整个元组一个名称并使该元组成为与其他元组不同的类型时,以及当像常规结构体那样命名每个字段会显得冗长或多余时,元组结构体(Tuple Struct)非常有用。
要定义一个元组结构体(Tuple Struct),以 struct 关键字和结构体名称开头,后跟元组中的类型。例如,这里我们定义并使用了两个名为 Color 和 Point 的元组结构体:
struct Color(i32, i32, i32);
struct Point(i32, i32, i32);

fn main() {
    let black = Color(0, 0, 0);
    let origin = Point(0, 0, 0);
}注意,black 和 origin 的值是不同类型,因为它们是不同元组结构体(Tuple Struct)的实例。你定义的每个结构体都是自己的类型,即使结构体内的字段可能具有相同的类型。例如,一个接受 Color 类型参数的函数不能接受 Point 作为参数,即使这两种类型都是由三个 i32 值组成的。除此之外,元组结构体实例与元组类似,你可以将它们解构为各个独立的部分,也可以使用 . 后跟索引来访问单个值。与元组不同,元组结构体在解构时需要你指定结构体的类型。例如,我们写 let Point(x, y, z) = origin; 来将 origin 点中的值解构为名为 x、y 和 z 的变量。
定义类单元结构体(Unit-Like Struct)
你还可以定义没有任何字段的结构体!这些被称为类单元结构体(Unit-Like Struct),因为它们的行为类似于 ()(我们在“元组类型”部分提到的单元类型)。当你需要在某个类型上实现 trait 但又不希望在该类型本身中存储任何数据时,类单元结构体(Unit-Like Struct)非常有用。我们将在第 10 章讨论 trait。下面是一个声明和实例化名为 AlwaysEqual 的类单元结构体的例子:
struct AlwaysEqual;

fn main() {
    let subject = AlwaysEqual;
}
要定义 AlwaysEqual,我们使用 struct 关键字,后跟我们想要的名称,然后是一个分号。不需要花括号或圆括号!然后,我们可以用类似的方式在 subject 变量中获取 AlwaysEqual 的实例:使用我们定义的名称,不需要任何花括号或圆括号。想象一下,稍后我们将为这个类型实现行为,使得 AlwaysEqual 的每个实例总是与任何其他类型的每个实例相等,也许是出于测试目的而需要一个已知的结果。我们不需要任何数据来实现那个行为!你将在第 10 章中看到如何定义 trait 并在任何类型(包括类单元结构体)上实现它们。
Ownership of Struct Data
In the User struct definition in Listing 5-1, we used the owned String
type rather than the &str string slice type. This is a deliberate choice
because we want each instance of this struct to own all of its data and for
that data to be valid for as long as the entire struct is valid.
结构体也可以存储对其他对象所有数据的引用,但要做到这一点需要使用生命周期(Lifetime),这是我们在第 10 章将要讨论的一个 Rust 特性。生命周期(Lifetime)确保结构体引用的数据在结构体存在的期间内始终有效。假设你尝试在结构体中存储引用而不指定生命周期,就像下面 src/main.rs 中的这样;这不会工作:
struct User {
    active: bool,
    username: &str,
    email: &str,
    sign_in_count: u64,
}

fn main() {
    let user1 = User {
        active: true,
        username: "someusername123",
        email: "someone@example.com",
        sign_in_count: 1,
    };
}
编译器会报错,提示需要生命周期(Lifetime)说明符:
$ cargo run
   Compiling structs v0.1.0 (file:///projects/structs)
error[E0106]: missing lifetime specifier
 --> src/main.rs:3:15
  |
3 |     username: &str,
  |               ^ expected named lifetime parameter
  |
help: consider introducing a named lifetime parameter
  |
1 ~ struct User<'a> {
2 |     active: bool,
3 ~     username: &'a str,
  |

error[E0106]: missing lifetime specifier
 --> src/main.rs:4:12
  |
4 |     email: &str,
  |            ^ expected named lifetime parameter
  |
help: consider introducing a named lifetime parameter
  |
1 ~ struct User<'a> {
2 |     active: bool,
3 |     username: &str,
4 ~     email: &'a str,
  |

For more information about this error, try `rustc --explain E0106`.
error: could not compile `structs` (bin "structs") due to 2 previous errors
在第 10 章中,我们将讨论如何修复这些错误,以便你可以在结构体中存储引用,但现在,我们将使用像 String 这样的拥有所有权的类型而不是像 &str 这样的引用来修复此类错误。
使用结构体的示例程序
一个使用结构体(Struct)的示例程序
为了理解何时使用结构体(Struct),让我们编写一个计算矩形面积(Area)的程序。我们将从使用单个变量开始,然后重构程序,直到最终使用结构体。
让我们用 Cargo 创建一个名为 rectangles 的新二进制项目,它将接收以像素为单位指定的矩形的宽度(Width)和高度(Height),并计算矩形的面积。示例 5-8 展示了我们项目中 src/main.rs 的一个简短程序,它正是这样做的。
fn main() {
    let width1 = 30;
    let height1 = 50;

    println!(
        "The area of the rectangle is {} square pixels.",
        area(width1, height1)
    );
}

fn area(width: u32, height: u32) -> u32 {
    width * height
}现在,使用 cargo run 运行这个程序:
$ cargo run
   Compiling rectangles v0.1.0 (file:///projects/rectangles)
    Finished `dev` profile [unoptimized + debuginfo] target(s) in 0.42s
     Running `target/debug/rectangles`
The area of the rectangle is 1500 square pixels.
这段代码通过使用每个维度调用 area 函数成功计算了矩形的面积,但我们还可以做更多来使这段代码清晰易读。
这个问题在 area 的签名中很明显:
fn main() {
    let width1 = 30;
    let height1 = 50;

    println!(
        "The area of the rectangle is {} square pixels.",
        area(width1, height1)
    );
}

fn area(width: u32, height: u32) -> u32 {
    width * height
}
area 函数本应计算一个矩形的面积,但我们编写的函数有两个参数,而且在程序的任何地方都没有明确说明这些参数是相关的。将宽度和高度组合在一起会更易读和更易管理。我们在第 3 章的“元组类型”部分已经讨论过一种实现方式:使用元组(Tuple)。
使用元组(Tuple)重构
示例 5-9 展示了使用元组(Tuple)的另一个版本。
fn main() {
    let rect1 = (30, 50);

    println!(
        "The area of the rectangle is {} square pixels.",
        area(rect1)
    );
}

fn area(dimensions: (u32, u32)) -> u32 {
    dimensions.0 * dimensions.1
}从某方面来说,这个程序更好。元组(Tuple)让我们增加了一些结构,现在我们只传递一个参数。但从另一方面来说,这个版本不够清晰:元组(Tuple)没有命名其元素,所以我们不得不通过索引来访问元组的各个部分,这使得我们的计算不够直观。
混淆宽度和高度对面积计算来说无关紧要,但如果我们想在屏幕上绘制矩形,那就重要了!我们必须记住 width 是元组索引 0,height 是元组索引 1。如果其他人要使用我们的代码,这将更难让他们弄清楚并记住。因为我们没有在代码中传达数据的含义,所以现在更容易引入错误。
使用结构体(Struct)重构
我们使用结构体(Struct)通过标记数据来增加含义。我们可以将目前使用的元组(Tuple)转换为一个结构体,为整体以及各个部分都赋予名称,如示例 5-10 所示。
struct Rectangle {
    width: u32,
    height: u32,
}

fn main() {
    let rect1 = Rectangle {
        width: 30,
        height: 50,
    };

    println!(
        "The area of the rectangle is {} square pixels.",
        area(&rect1)
    );
}

fn area(rectangle: &Rectangle) -> u32 {
    rectangle.width * rectangle.height
}Rectangle 结构体这里,我们定义了一个名为 Rectangle 的结构体。在花括号内,我们将字段定义为 width 和 height,两者类型都是 u32。然后,在 main 中,我们创建了一个特定的 Rectangle 实例,其宽度为 30,高度为 50。
我们的 area 函数现在定义了一个参数,我们将其命名为 rectangle,其类型是 Rectangle 结构体实例的不可变借用。正如第 4 章中提到的,我们想要借用结构体而不是获取它的所有权。这样,main 保留了其所有权,可以继续使用 rect1,这就是我们在函数签名和调用函数时使用 & 的原因。
area 函数访问 Rectangle 实例的 width 和 height 字段(注意,访问借用的结构体实例的字段不会移动字段的值,这就是为什么你经常看到借用结构体的原因)。我们的 area 函数签名现在准确地表达了我们的意图:使用 Rectangle 的 width 和 height 字段计算其面积。这传达了宽度和高度是相互关联的,并且为值提供了描述性名称,而不是使用 0 和 1 这样的元组索引值。这在清晰性上是一个胜利。
使用派生 trait(Derived Trait)增加功能
能够在调试程序时打印 Rectangle 的实例并查看其所有字段的值将非常有用。示例 5-11 尝试使用我们之前章节中用过的 println! 宏。然而,这不会工作。
struct Rectangle {
    width: u32,
    height: u32,
}

fn main() {
    let rect1 = Rectangle {
        width: 30,
        height: 50,
    };

    println!("rect1 is {rect1}");
}Rectangle 实例当我们编译这段代码时,会得到以下核心错误信息:
error[E0277]: `Rectangle` doesn't implement `std::fmt::Display`
println! 宏可以做多种类型的格式化,默认情况下,花括号告诉 println! 使用一种称为 Display 的格式化方式:即直接供最终用户使用的输出。到目前为止我们看到的基本类型默认实现了 Display,因为向用户展示 1 或任何其他基本类型只有一种方式。但对于结构体(Struct),println! 应该以何种方式格式化输出就不那么明确了,因为存在更多的显示可能性:你想要逗号还是不想要?你想要打印花括号吗?应该显示所有字段吗?由于这种歧义,Rust 不会试图猜测我们想要什么,结构体也没有提供 Display 的实现供 println! 和 {} 占位符使用。
如果继续阅读错误信息,我们会发现这个有用的提示:
   |                        |`Rectangle` cannot be formatted with the default formatter
   |                        required by this formatting parameter
让我们试试!println! 宏的调用现在看起来像 println!("rect1 is {rect1:?}");。将说明符 :? 放在花括号内告诉 println! 我们想要使用一种称为 Debug 的输出格式。Debug trait 使我们能够以对开发者有用的方式打印结构体,这样我们就可以在调试代码时看到它的值。
编译修改后的代码。哎呀!我们仍然得到一个错误:
error[E0277]: `Rectangle` doesn't implement `Debug`
但同样,编译器给了我们一个有用的提示:
   |                        required by this formatting parameter
   |
Rust 确实 包含了打印调试信息的功能,但我们需要显式地选择加入,才能使该功能对我们的结构体可用。为此,我们在结构体定义之前添加外部属性 #[derive(Debug)],如示例 5-12 所示。
#[derive(Debug)]
struct Rectangle {
    width: u32,
    height: u32,
}

fn main() {
    let rect1 = Rectangle {
        width: 30,
        height: 50,
    };

    println!("rect1 is {rect1:?}");
}Debug trait 并使用调试格式打印 Rectangle 实例现在当我们运行程序时,不会得到任何错误,我们将看到以下输出:
$ cargo run
   Compiling rectangles v0.1.0 (file:///projects/rectangles)
    Finished `dev` profile [unoptimized + debuginfo] target(s) in 0.48s
     Running `target/debug/rectangles`
rect1 is Rectangle { width: 30, height: 50 }
太好了!虽然它不是最漂亮的输出,但它显示了这个实例的所有字段的值,这在调试时肯定会有帮助。当我们有更大的结构体时,拥有更易读的输出会很有用;在这些情况下,我们可以在 println! 字符串中使用 {:#?} 而不是 {:?}。在这个例子中,使用 {:#?} 风格将输出以下内容:
$ cargo run
   Compiling rectangles v0.1.0 (file:///projects/rectangles)
    Finished `dev` profile [unoptimized + debuginfo] target(s) in 0.48s
     Running `target/debug/rectangles`
rect1 is Rectangle {
    width: 30,
    height: 50,
}
另一种使用 Debug 格式打印值的方法是使用 dbg! 宏,它获取表达式的所有权(与 println! 相反,后者获取引用),打印代码中 dbg! 宏调用所在位置的文件名和行号以及该表达式的结果值,并返回该值的所有权。
注意:调用
dbg!宏会打印到标准错误控制台流(stderr),而println!打印到标准输出控制台流(stdout)。我们将在第 12 章的“将错误信息重定向到标准错误”部分更多地讨论stderr和stdout。
下面是一个示例,我们关心分配给 width 字段的值,以及 rect1 中整个结构体的值:
#[derive(Debug)]
struct Rectangle {
    width: u32,
    height: u32,
}

fn main() {
    let scale = 2;
    let rect1 = Rectangle {
        width: dbg!(30 * scale),
        height: 50,
    };

    dbg!(&rect1);
}
我们可以将 dbg! 放在表达式 30 * scale 周围,由于 dbg! 返回表达式的值的所有权,width 字段将获得与没有 dbg! 调用时相同的值。我们不希望 dbg! 获取 rect1 的所有权,所以我们在下一个调用中使用对 rect1 的引用。以下示例的输出看起来像这样:
$ cargo run
   Compiling rectangles v0.1.0 (file:///projects/rectangles)
    Finished `dev` profile [unoptimized + debuginfo] target(s) in 0.61s
     Running `target/debug/rectangles`
[src/main.rs:10:16] 30 * scale = 60
[src/main.rs:14:5] &rect1 = Rectangle {
    width: 60,
    height: 50,
}
我们可以看到,第一行输出来自 src/main.rs 的第 10 行,我们在那里调试表达式 30 * scale,其结果值为 60(为整数实现的 Debug 格式化只打印它们的值)。src/main.rs 第 14 行的 dbg! 调用输出了 &rect1 的值,即 Rectangle 结构体。这个输出使用了 Rectangle 类型的漂亮 Debug 格式化。当你试图弄清楚代码在做什么时,dbg! 宏真的很有用!
除了 Debug trait 之外,Rust 还提供了许多 trait 供我们与 derive 属性一起使用,这些 trait 可以为我们的自定义类型添加有用的行为。这些 trait 及其行为列在附录 C中。我们将在第 10 章中介绍如何以自定义行为实现这些 trait 以及如何创建自己的 trait。除了 derive 之外,还有许多其他属性;更多信息,请参阅 Rust 参考手册的“属性“部分。
我们的 area 函数非常特定:它只计算矩形的面积。将这个行为更紧密地绑定到我们的 Rectangle 结构体上会很有帮助,因为它不适用于任何其他类型。让我们看看如何通过将 area 函数转换为在 Rectangle 类型上定义的 area 方法来继续重构这段代码。
方法
方法(Methods)
方法(Method)与函数(Function)类似:我们用 fn 关键字和一个名称来声明它们,
它们可以有参数和返回值,并且包含一些在从其他地方调用该方法时运行的代码。
与函数不同的是,方法是在结构体(Struct)(或者枚举(Enum)或 trait 对象(Trait Object))的上下文中定义的,
我们分别在第 6 章和第 18 章中介绍,
并且它们的第一个参数始终是 self,它表示调用该方法的结构体实例。
方法语法(Method Syntax)
让我们将那个以 Rectangle 实例作为参数的 area 函数,改为一个定义在 Rectangle 结构体上的 area 方法,
如示例 5-13 所示。
#[derive(Debug)]
struct Rectangle {
    width: u32,
    height: u32,
}

impl Rectangle {
    fn area(&self) -> u32 {
        self.width * self.height
    }
}

fn main() {
    let rect1 = Rectangle {
        width: 30,
        height: 50,
    };

    println!(
        "The area of the rectangle is {} square pixels.",
        rect1.area()
    );
}Rectangle 结构体上定义一个 area 方法为了在 Rectangle 的上下文中定义这个函数,我们为 Rectangle 启动一个 impl(implementation,实现)块。
这个 impl 块中的所有内容都将与 Rectangle 类型相关联。
然后,我们将 area 函数移到 impl 的花括号内,并将签名和函数体内部的第一个(在这里也是唯一一个)参数改为 self。
在 main 函数中,我们之前调用 area 函数并传入 rect1 作为参数的地方,现在可以改用*方法语法(Method Syntax)*来调用 Rectangle 实例上的 area 方法。
方法语法位于实例之后:我们加上一个点号,后跟方法名称、圆括号以及任何参数。
在 area 的签名中,我们使用 &self 而不是 rectangle: &Rectangle。
&self 实际上是 self: &Self 的简写。在 impl 块中,类型 Self 是该 impl 块所针对的类型的别名。
方法的第一个参数必须是一个名为 self、类型为 Self 的参数,因此 Rust 允许你在第一个参数位置只用 self 这个名字来缩写它。
请注意,我们仍然需要在 self 简写前面使用 & 来表明该方法借用了 Self 实例,就像我们在 rectangle: &Rectangle 中所做的那样。
方法可以获取 self 的所有权(Ownership),像我们这里所做的那样不可变地借用(Borrow)self,或者可变地借用 self,
就像它们对其他任何参数所做的那样。
我们在这里选择 &self 的原因与在函数版本中我们使用 &Rectangle 的原因相同:
我们不希望获取所有权,只是想读取结构体中的数据,而不是写入。如果我们想在该方法所做的事情中更改调用该方法的实例,
我们会使用 &mut self 作为第一个参数。让一个方法仅使用 self 作为第一个参数来获取实例的所有权是很少见的;
这种技术通常是在该方法将 self 转换为其他内容,并且你希望阻止调用方在转换后使用原始实例时使用。
使用方法而不是函数的主要原因,除了提供方法语法和不必在每个方法的签名中重复 self 的类型之外,是为了组织。
我们将对某个类型的实例可以做的所有事情都放在一个 impl 块中,而不是让我们代码的未来使用者在所提供库的各个地方搜索 Rectangle 的功能。
请注意,我们可以选择为方法赋予与结构体字段相同的名称。
例如,我们可以在 Rectangle 上定义一个也名为 width 的方法:
#[derive(Debug)]
struct Rectangle {
    width: u32,
    height: u32,
}

impl Rectangle {
    fn width(&self) -> bool {
        self.width > 0
    }
}

fn main() {
    let rect1 = Rectangle {
        width: 30,
        height: 50,
    };

    if rect1.width() {
        println!("The rectangle has a nonzero width; it is {}", rect1.width);
    }
}
在这里,我们选择让 width 方法在实例的 width 字段的值大于 0 时返回 true,在值为 0 时返回 false:
我们可以在任何目的下在同名方法中使用字段。在 main 中,当我们在 rect1.width 后面跟上括号时,Rust 知道我们指的是方法 width。
当不使用括号时,Rust 知道我们指的是字段 width。
通常(但并非总是),当我们为方法赋予与字段相同的名称时,我们希望它只返回该字段的值,不做任何其他事情。 像这样的方法称为 getter 方法(Getter),Rust 不会像某些其他语言那样为结构体字段自动实现它们。 Getter 方法很有用,因为你可以将字段设为私有(Private)但方法设为公有(Public),从而作为类型公有 API 的一部分启用对该字段的只读访问。 我们将在第 7 章中讨论公有和私有的含义,以及如何将字段或方法指定为公有或私有。
-> 运算符去哪了?(Where’s the -> Operator?)
在 C 和 C++ 中,调用方法时使用两种不同的运算符:如果你直接在对象上调用方法,使用 .;
如果你在指向对象的指针上调用方法并需要先解引用(Dereference)指针,则使用 ->。
换句话说,如果 object 是一个指针,那么 object->something() 类似于 (*object).something()。
Rust 没有与 -> 运算符等效的东西;相反,Rust 有一个称为*自动引用与解引用(Automatic Referencing and Dereferencing)*的功能。
调用方法是 Rust 中少数具有此行为的地方之一。
它的工作原理如下:当你使用 object.something() 调用某个方法时,Rust 会自动添加 &、&mut 或 * 使 object 与该方法的签名匹配。
换句话说,以下两种写法是相同的:
#![allow(unused)]
fn main() {
#[derive(Debug,Copy,Clone)]
struct Point {
    x: f64,
    y: f64,
}

impl Point {
   fn distance(&self, other: &Point) -> f64 {
       let x_squared = f64::powi(other.x - self.x, 2);
       let y_squared = f64::powi(other.y - self.y, 2);

       f64::sqrt(x_squared + y_squared)
   }
}
let p1 = Point { x: 0.0, y: 0.0 };
let p2 = Point { x: 5.0, y: 6.5 };
p1.distance(&p2);
(&p1).distance(&p2);
}
第一种写法看起来要干净得多。这种自动引用行为之所以有效,是因为方法有一个明确的接收者(Receiver)——即 self 的类型。
给定接收者和方法名称,Rust 可以明确地判断出该方法是读取(&self)、修改(&mut self)还是消费(self)。
Rust 对方法接收者进行隐式借用(Borrow)这一事实,是使所有权在实践中具有良好人机工程学特性的一个重要原因。
带有更多参数的方法(Methods with More Parameters)
让我们通过在 Rectangle 结构体上实现第二个方法来练习使用方法。
这一次,我们希望 Rectangle 的一个实例接收另一个 Rectangle 实例作为参数,
如果第二个 Rectangle 能够完全放入 self(第一个 Rectangle)中,则返回 true;否则返回 false。
也就是说,一旦我们定义了 can_hold 方法,我们就能够编写如示例 5-14 所示的程序。
fn main() {
    let rect1 = Rectangle {
        width: 30,
        height: 50,
    };
    let rect2 = Rectangle {
        width: 10,
        height: 40,
    };
    let rect3 = Rectangle {
        width: 60,
        height: 45,
    };

    println!("Can rect1 hold rect2? {}", rect1.can_hold(&rect2));
    println!("Can rect1 hold rect3? {}", rect1.can_hold(&rect3));
}can_hold 方法预期的输出如下所示,因为 rect2 的两个维度都小于 rect1 的维度,但 rect3 比 rect1 宽:
Can rect1 hold rect2? true
Can rect1 hold rect3? false
我们知道我们想要定义一个方法,因此它将位于 impl Rectangle 块中。
方法名将是 can_hold,它将接受另一个 Rectangle 的不可变借用(Immutable Borrow)作为参数。
我们可以通过查看调用该方法的代码来判断参数的类型:
rect1.can_hold(&rect2) 传入了 &rect2,这是对 rect2(一个 Rectangle 实例)的不可变借用。
这是合理的,因为我们只需要读取 rect2(而不是写入,写入意味着我们需要可变借用),
并且我们希望 main 保留 rect2 的所有权,以便在调用 can_hold 方法后可以再次使用它。
can_hold 的返回值将是一个布尔值(Boolean),其实现将分别检查 self 的宽度和高度是否大于另一个 Rectangle 的宽度和高度。
让我们将新的 can_hold 方法添加到示例 5-13 中的 impl 块中,如示例 5-15 所示。
#[derive(Debug)]
struct Rectangle {
width: u32,
height: u32,
}
impl Rectangle {
fn area(&self) -> u32 {
self.width * self.height
}
fn can_hold(&self, other: &Rectangle) -> bool {
self.width > other.width && self.height > other.height
}
}
fn main() {
let rect1 = Rectangle {
width: 30,
height: 50,
};
let rect2 = Rectangle {
width: 10,
height: 40,
};
let rect3 = Rectangle {
width: 60,
height: 45,
};
println!("Can rect1 hold rect2? {}", rect1.can_hold(&rect2));
println!("Can rect1 hold rect3? {}", rect1.can_hold(&rect3));
}Rectangle 上实现 can_hold 方法,该方法接收另一个 Rectangle 实例作为参数当我们使用示例 5-14 中的 main 函数运行此代码时,我们将得到预期的输出。
方法可以接受多个参数,这些参数是在 self 参数之后添加到签名中的,并且这些参数的工作方式与函数中的参数一样。
关联函数(Associated Functions)
在 impl 块中定义的所有函数都称为关联函数(Associated Functions),因为它们与 impl 后面命名的类型相关联。
我们可以定义没有 self 作为第一个参数的关联函数(因此不是方法),因为它们不需要类型的实例来工作。
我们已经使用过一个这样的函数:定义在 String 类型上的 String::from 函数。
不是方法的关联函数通常用作构造函数(Constructor),它们将返回该结构体的新实例。
这些通常被称为 new,但 new 不是一个特殊的名称,也不是内建在语言中的。
例如,我们可以选择提供一个名为 square 的关联函数,它只有一个维度参数,并将其同时用作宽度和高度,
这样就能更容易地创建一个正方形 Rectangle,而不必指定两次相同的值:
文件名:src/main.rs
#[derive(Debug)]
struct Rectangle {
width: u32,
height: u32,
}
impl Rectangle {
fn square(size: u32) -> Self {
Self {
width: size,
height: size,
}
}
}
fn main() {
let sq = Rectangle::square(3);
}返回类型和函数体中的 Self 关键字是 impl 关键字后面出现的类型的别名,在本例中是 Rectangle。
要调用这个关联函数,我们使用结构体名称加上 :: 语法;例如 let sq = Rectangle::square(3);。
这个函数被结构体命名空间(Namespace)化::: 语法既用于关联函数,也用于模块(Module)创建的命名空间。
我们将在第 7 章中讨论模块。
多个 impl 块(Multiple impl Blocks)
每个结构体允许拥有多个 impl 块。例如,示例 5-15 等价于示例 5-16 中所示的代码,其中每个方法都有自己的 impl 块。
#[derive(Debug)]
struct Rectangle {
width: u32,
height: u32,
}
impl Rectangle {
fn area(&self) -> u32 {
self.width * self.height
}
}
impl Rectangle {
fn can_hold(&self, other: &Rectangle) -> bool {
self.width > other.width && self.height > other.height
}
}
fn main() {
let rect1 = Rectangle {
width: 30,
height: 50,
};
let rect2 = Rectangle {
width: 10,
height: 40,
};
let rect3 = Rectangle {
width: 60,
height: 45,
};
println!("Can rect1 hold rect2? {}", rect1.can_hold(&rect2));
println!("Can rect1 hold rect3? {}", rect1.can_hold(&rect3));
}impl 块重写示例 5-15在这里,将这些方法分离到多个 impl 块中没有任何理由,但这是有效的语法。
我们将在第 10 章中看到多个 impl 块有用的情况,届时我们将讨论泛型(Generic)类型和 trait。
总结(Summary)
结构体让你可以创建对你的领域有意义的自定义类型(Custom Type)。
通过使用结构体,你可以将相关联的数据片段保持彼此连接,并为每个片段命名,使你的代码清晰明了。
在 impl 块中,你可以定义与你的类型相关联的函数,而方法是关联函数的一种,让你可以指定结构体实例所具有的行为。
但结构体并不是创建自定义类型的唯一方式:让我们转向 Rust 的枚举(Enum)功能,为你的工具箱再添一件工具。
枚举与模式匹配(Enums and Pattern Matching)
在本章中,我们将研究枚举(Enumeration),也简称为 enum。
枚举允许你通过枚举其可能的变体(Variant)来定义一个类型。
首先,我们将定义并使用一个枚举,以展示枚举如何将含义与数据一起编码。
接下来,我们将探索一个特别有用的枚举,称为 Option,它表示一个值可以是某个东西,也可以什么都没有。
然后,我们将研究 match 表达式中的模式匹配(Pattern Matching)如何让我们轻松地为不同的枚举值运行不同的代码。
最后,我们将介绍 if let 结构,它是另一种方便而简洁的方式来处理代码中的枚举。
定义枚举
定义枚举(Defining an Enum)
结构体(Struct)为你提供了一种将相关字段和数据组合在一起的方式,比如 Rectangle 及其 width 和 height,
而枚举(Enum)则为你提供了一种表示某个值是一组可能取值中的一个的方式。
例如,我们可能想说 Rectangle 是一组可能的形状之一,其中还包括 Circle 和 Triangle。
为此,Rust 允许我们将这些可能性编码为一个枚举。
让我们看一个我们可能需要在代码中表达的场景,并了解为什么在这种情况下枚举比结构体更有用且更合适。 假设我们需要处理 IP 地址。目前,有两种主要的 IP 地址标准:第四版(Version Four)和第六版(Version Six)。 由于这些是我们的程序可能遇到的仅有的 IP 地址可能性,我们可以*枚举(Enumerate)*所有可能的变体(Variant), 这正是“枚举“这个名称的由来。
任何 IP 地址要么是第四版地址,要么是第六版地址,但不能同时是两者。 IP 地址的这一特性使得枚举这种数据结构非常合适,因为枚举值只能是其变体之一。 第四版和第六版地址从根本上说仍然是 IP 地址,因此当代码处理适用于任何一种 IP 地址的情况时,它们应该被视为同一种类型。
我们可以在代码中通过定义一个 IpAddrKind 枚举并列出 IP 地址可能的类型——V4 和 V6——来表达这个概念。
这些就是该枚举的变体(Variant):
enum IpAddrKind {
V4,
V6,
}
fn main() {
let four = IpAddrKind::V4;
let six = IpAddrKind::V6;
route(IpAddrKind::V4);
route(IpAddrKind::V6);
}
fn route(ip_kind: IpAddrKind) {}IpAddrKind 现在是一个自定义数据类型(Custom Data Type),我们可以在代码的其他地方使用它。
枚举值(Enum Values)
我们可以像下面这样创建 IpAddrKind 的两个变体的实例:
enum IpAddrKind {
V4,
V6,
}
fn main() {
let four = IpAddrKind::V4;
let six = IpAddrKind::V6;
route(IpAddrKind::V4);
route(IpAddrKind::V6);
}
fn route(ip_kind: IpAddrKind) {}请注意,枚举的变体被命名空间化(Namespaced)在其标识符之下,我们使用双冒号来分隔两者。
这很有用,因为现在 IpAddrKind::V4 和 IpAddrKind::V6 这两个值都属于同一类型:IpAddrKind。
然后,我们可以例如定义一个接受任何 IpAddrKind 的函数:
enum IpAddrKind {
V4,
V6,
}
fn main() {
let four = IpAddrKind::V4;
let six = IpAddrKind::V6;
route(IpAddrKind::V4);
route(IpAddrKind::V6);
}
fn route(ip_kind: IpAddrKind) {}我们可以使用任一变体调用此函数:
enum IpAddrKind {
V4,
V6,
}
fn main() {
let four = IpAddrKind::V4;
let six = IpAddrKind::V6;
route(IpAddrKind::V4);
route(IpAddrKind::V6);
}
fn route(ip_kind: IpAddrKind) {}使用枚举还有更多优势。进一步思考我们的 IP 地址类型,目前我们没有办法存储实际的 IP 地址数据(Data); 我们只知道它的*类型(Kind)*是什么。鉴于你刚刚在第 5 章中学到了结构体,你可能会倾向于用结构体来解决这个问题, 如示例 6-1 所示。
fn main() {
enum IpAddrKind {
V4,
V6,
}
struct IpAddr {
kind: IpAddrKind,
address: String,
}
let home = IpAddr {
kind: IpAddrKind::V4,
address: String::from("127.0.0.1"),
};
let loopback = IpAddr {
kind: IpAddrKind::V6,
address: String::from("::1"),
};
}struct 存储 IP 地址的数据和 IpAddrKind 变体在这里,我们定义了一个结构体 IpAddr,它有两个字段:一个类型为 IpAddrKind(我们之前定义的枚举)的 kind 字段,
和一个类型为 String 的 address 字段。我们有两个该结构体的实例。
第一个是 home,它的 kind 值为 IpAddrKind::V4,关联的地址数据为 127.0.0.1。
第二个实例是 loopback。它的 kind 值为 IpAddrKind 的另一个变体 V6,并关联了地址 ::1。
我们使用结构体将 kind 和 address 值捆绑在一起,因此现在变体与值相关联了。
然而,仅使用枚举来表示相同的概念更加简洁:与其在结构体中包含枚举,我们可以将数据直接放入每个枚举变体中。
这个新的 IpAddr 枚举定义表示 V4 和 V6 两个变体都将拥有关联的 String 值:
fn main() {
enum IpAddr {
V4(String),
V6(String),
}
let home = IpAddr::V4(String::from("127.0.0.1"));
let loopback = IpAddr::V6(String::from("::1"));
}我们将数据直接附加到枚举的每个变体上,因此不需要额外的结构体。
在这里,也更容易看到枚举工作方式的另一个细节:我们定义的每个枚举变体的名称同时也会变成一个函数,
用于构造该枚举的实例。也就是说,IpAddr::V4() 是一个函数调用,它接受一个 String 参数并返回一个 IpAddr 类型的实例。
作为定义枚举的结果,我们会自动获得这个构造函数。
使用枚举而不是结构体还有另一个优势:每个变体可以拥有不同类型和数量的关联数据。
第四版 IP 地址总是有四个数值分量,其值介于 0 到 255 之间。
如果我们想将 V4 地址存储为四个 u8 值,但仍将 V6 地址表示为一个 String 值,用结构体是做不到的。
枚举可以轻松处理这种情况:
fn main() {
enum IpAddr {
V4(u8, u8, u8, u8),
V6(String),
}
let home = IpAddr::V4(127, 0, 0, 1);
let loopback = IpAddr::V6(String::from("::1"));
}我们已经展示了几种不同的方式来定义数据结构来存储第四版和第六版 IP 地址。
然而,事实证明,存储 IP 地址并编码其类型是如此常见,以至于标准库已经有一个我们可以使用的定义!
让我们看看标准库是如何定义 IpAddr 的。它具有与我们定义和使用的完全相同的枚举和变体,
但它将地址数据以两个不同结构体的形式嵌入到变体中,这两个结构体针对每个变体有不同的定义:
#![allow(unused)]
fn main() {
struct Ipv4Addr {
// --snip--
}
struct Ipv6Addr {
// --snip--
}
enum IpAddr {
V4(Ipv4Addr),
V6(Ipv6Addr),
}
}这段代码说明你可以在枚举变体中放入任何类型的数据:例如字符串、数值类型或结构体。 你甚至可以包含另一个枚举!此外,标准库中的类型通常不会比你想到的要复杂多少。
请注意,尽管标准库中包含 IpAddr 的定义,我们仍然可以创建和使用自己的定义而不会产生冲突,
因为我们尚未将标准库中的定义引入我们自己的作用域(Scope)。我们将在第 7 章中详细讨论将类型引入作用域。
让我们再看看示例 6-2 中的另一个枚举示例:这个枚举的变体中嵌入了多种多样的类型。
enum Message {
Quit,
Move { x: i32, y: i32 },
Write(String),
ChangeColor(i32, i32, i32),
}
fn main() {}Message 枚举,其每个变体存储不同数量和类型的值这个枚举有四个变体,具有不同的类型:
Quit:完全没有关联数据Move:有命名字段(Named Field),就像结构体一样Write:包含一个单独的StringChangeColor:包含三个i32值
定义像示例 6-2 中那样的带有变体的枚举,类似于定义不同类型的结构体定义,
只不过枚举不使用 struct 关键字,而且所有变体都组合在 Message 类型之下。
以下结构体可以持有与前面枚举变体相同的数据:
struct QuitMessage; // unit struct
struct MoveMessage {
x: i32,
y: i32,
}
struct WriteMessage(String); // tuple struct
struct ChangeColorMessage(i32, i32, i32); // tuple struct
fn main() {}但是如果我们使用这些不同的结构体,每个结构体都有自己的类型,那么我们就无法像使用示例 6-2 中定义的
Message 枚举(它是一个单一类型)那样轻松地定义一个函数来接收任何这些类型的消息。
枚举和结构体之间还有一个相似之处:正如我们可以使用 impl 在结构体上定义方法一样,
我们也可以在枚举上定义方法。下面是一个我们可以在 Message 枚举上定义的名为 call 的方法:
fn main() {
enum Message {
Quit,
Move { x: i32, y: i32 },
Write(String),
ChangeColor(i32, i32, i32),
}
impl Message {
fn call(&self) {
// method body would be defined here
}
}
let m = Message::Write(String::from("hello"));
m.call();
}方法体将使用 self 来获取我们调用该方法的值。在这个例子中,我们创建了一个变量 m,
其值为 Message::Write(String::from("hello")),当 m.call() 运行时,self 在 call 方法体中就是这个值。
让我们来看看标准库中另一个非常常见且有用的枚举:Option。
Option 枚举(The Option Enum)
本节对 Option 进行案例研究,它是标准库定义的另一个枚举。
Option 类型编码了这样一种非常常见的场景:某个值可能是某个东西,也可能什么都不是。
例如,如果你请求一个非空列表(List)中的第一个项,你会得到一个值。 如果你请求一个空列表中的第一个项,你会什么也得不到。用类型系统来表达这个概念意味着编译器可以检查你是否处理了所有应该处理的情况; 这一功能可以防止在其他编程语言中极其常见的错误。
编程语言的设计通常被考虑为包含哪些特性,但排除哪些特性也同样重要。 Rust 没有许多其他语言拥有的 null 特性。Null 是一个表示没有值存在的值。 在有 null 的语言中,变量总是可能处于两种状态之一:null 或非 null。
在 2009 年的演讲“Null References: The Billion Dollar Mistake“(空引用:十亿美元的错误)中,null 的发明者 Tony Hoare 这样说:
我将其称为我的十亿美元错误。那时,我正在为一个面向对象语言设计第一个全面的引用类型系统。 我的目标是确保所有引用的使用都是绝对安全的,由编译器自动进行检查。 但我无法抗拒加入空引用的诱惑,仅仅因为它实现起来太容易了。 这导致了无数的错误、漏洞和系统崩溃,在过去四十年中可能造成了价值十亿美元的痛苦和损失。
null 值的问题在于,如果你尝试将 null 值作为非 null 值使用,你会得到某种错误。 由于这种 null 或非 null 的特性无处不在,因此极易犯此类错误。
然而,null 试图表达的概念仍然是有用的:null 是一个因某种原因当前无效或缺失的值。
问题实际上不在于概念,而在于具体的实现。因此,Rust 没有 null,
但它确实有一个可以编码值存在或缺失概念的枚举。这个枚举就是 Option<T>,
它由标准库定义如下:
#![allow(unused)]
fn main() {
enum Option<T> {
None,
Some(T),
}
}Option<T> 枚举非常有用,以至于它甚至被包含在预导入(Prelude)中;你无需显式地将其引入作用域。
它的变体也包含在预导入中:你可以直接使用 Some 和 None 而无需 Option:: 前缀。
Option<T> 枚举仍然只是一个普通的枚举,Some(T) 和 None 仍然是类型 Option<T> 的变体。
<T> 语法是 Rust 的一个我们尚未讨论过的特性。它是一个泛型类型参数(Generic Type Parameter),
我们将在第 10 章中更详细地介绍泛型(Generic)。目前,你只需要知道 <T> 表示 Option 枚举的 Some 变体可以持有任意类型的一个数据,
而每个用于替代 T 的具体类型都会使整个 Option<T> 类型成为一个不同的类型。
以下是一些使用 Option 值来持有数字类型和字符类型的示例:
fn main() {
let some_number = Some(5);
let some_char = Some('e');
let absent_number: Option<i32> = None;
}some_number 的类型是 Option<i32>。some_char 的类型是 Option<char>,这是一个不同的类型。
Rust 可以推断出这些类型,因为我们在 Some 变体中指定了值。对于 absent_number,
Rust 要求我们标注整个 Option 类型:编译器无法仅通过查看 None 值来推断相应的 Some 变体将持有哪种类型。
在这里,我们告诉 Rust 我们打算让 absent_number 的类型为 Option<i32>。
当我们有一个 Some 值时,我们知道存在一个值,并且该值保存在 Some 中。
当我们有一个 None 值时,从某种意义上说,它与 null 含义相同:我们没有有效值。
那么,为什么拥有 Option<T> 比拥有 null 更好呢?
简而言之,因为 Option<T> 和 T(其中 T 可以是任何类型)是不同的类型,编译器不会允许我们将 Option<T> 值当作肯定有效的值来使用。
例如,这段代码无法编译,因为它试图将 i8 与 Option<i8> 相加:
fn main() {
let x: i8 = 5;
let y: Option<i8> = Some(5);
let sum = x + y;
}如果我们运行以上代码的话,那么我们竟会得到以下错误:
$ cargo run
Compiling enums v0.1.0 (file:///projects/enums)
error[E0277]: cannot add `Option<i8>` to `i8`
--> src/main.rs:5:17
|
5 | let sum = x + y;
| ^ no implementation for `i8 + Option<i8>`
|
= help: the trait `Add<Option<i8>>` is not implemented for `i8`
= help: the following other types implement trait `Add<Rhs>`:
`&i8` implements `Add<i8>`
`&i8` implements `Add`
`i8` implements `Add<&i8>`
`i8` implements `Add`
For more information about this error, try `rustc --explain E0277`.
error: could not compile `enums` (bin "enums") due to 1 previous error
实际上,这个错误消息意味着 Rust 不知道如何将 i8 和 Option<i8> 相加,因为它们是不同的类型。
当我们在 Rust 中有一个像 i8 这样的类型的值时,编译器将确保我们始终有一个有效的值。
我们可以放心地继续使用,而不必在使用该值之前检查 null。
只有当我们有一个 Option<i8>(或者我们正在使用的任何类型的值)时,我们才需要担心可能没有值,
并且编译器会确保我们在使用该值之前处理了这种情况。
换句话说,你必须先将 Option<T> 转换为 T,然后才能对其执行 T 的操作。
通常,这有助于捕获 null 最常见的问题之一:假设某个东西不为 null,但实际上它是。
消除错误假定非 null 值的风险有助于你对自己的代码更有信心。
为了拥有一个可能为 null 的值,你必须通过将该值的类型设为 Option<T> 来显式选择加入。
然后,在使用该值时,你必须显式处理该值为 null 的情况。
只要一个值的类型不是 Option<T>,你就可以安全地假定该值不为 null。
这是 Rust 的一个刻意设计决策,旨在限制 null 的普遍性,并增强 Rust 代码的安全性。
那么,当你有一个类型为 Option<T> 的值时,如何从 Some 变体中获取 T 值以便使用该值呢?
Option<T> 枚举拥有大量在各种情况下都有用的方法;你可以在其文档中查看。
熟悉 Option<T> 上的方法将对你的 Rust 之旅极为有益。
一般而言,为了使用 Option<T> 值,你需要有处理每个变体的代码。
你需要一些仅在拥有 Some(T) 值时才会运行的代码,并且该代码可以使用内部的 T。
你需要另一些仅在拥有 None 值时才会运行的代码,而该代码没有可用的 T 值。
match 表达式是一个与枚举一起使用时就恰好能做到这一点的控制流构造(Control Flow Construct):
它将根据枚举的变体来运行不同的代码,并且这些代码可以使用匹配值内部的数据。
match 控制流结构
match 控制流构造(The match Control Flow Construct)
Rust 有一个极其强大的控制流构造(Control Flow Construct)称为 match,它允许你将一个值与一系列模式(Pattern)进行比较,然后根据匹配的模式执行代码。
模式可以由字面量值(Literal Value)、变量名、通配符(Wildcard)和许多其他内容组成;
第 19 章涵盖了所有不同类型的模式及其功能。
match 的强大之处在于模式的表现力以及编译器会确认所有可能的情况都得到了处理。
将 match 表达式想象成一台硬币分拣机:硬币沿着带有各种大小孔洞的轨道滑下,每枚硬币都会从它遇到的第一个适合的孔洞中落下。
类似地,值会依次通过 match 中的每个模式,在值“适合“的第一个模式处,该值落入关联的代码块中并在执行期间被使用。
说到硬币,让我们用 match 以它们为例!我们可以编写一个函数,接收一枚未知的美国硬币,
以类似于计数机器的方式确定它是哪种硬币,并返回其面值(以美分为单位),如示例 6-3 所示。
enum Coin {
Penny,
Nickel,
Dime,
Quarter,
}
fn value_in_cents(coin: Coin) -> u8 {
match coin {
Coin::Penny => 1,
Coin::Nickel => 5,
Coin::Dime => 10,
Coin::Quarter => 25,
}
}
fn main() {}match 表达式让我们分解 value_in_cents 函数中的 match。首先,我们列出 match 关键字,后跟一个表达式,
在本例中是值 coin。这看起来与 if 使用的条件表达式非常相似,但有一个很大的区别:
对于 if,条件需要求值为一个布尔值(Boolean),但在这里它可以是任何类型。
本例中 coin 的类型是我们在第一行定义的 Coin 枚举。
接下来是 match 分支(Arm)。一个分支有两个部分:一个模式和一些代码。
这里的第一个分支有一个模式,即值 Coin::Penny,然后是 => 运算符,它将模式和要运行的代码分隔开。
本例中的代码就是值 1。每个分支用逗号与下一个分支分隔。
当 match 表达式执行时,它会将结果值按顺序与每个分支的模式进行比较。如果一个模式匹配该值,则执行与该模式关联的代码。如果该模式不匹配该值,则继续执行下一个分支,这与硬币分拣机非常相似。我们可以根据需要拥有任意多个分支:在示例 6-3 中,我们的 match 有四个分支。
每个分支关联的代码都是一个表达式(Expression),而匹配分支中表达式的结果值就是整个 match 表达式返回的值。
如果 match 分支代码很短,我们通常不会使用花括号,就像示例 6-3 中每个分支只是返回一个值那样。如果你想在 match 分支中运行多行代码,你必须使用花括号,并且分支后面的逗号是可选的。例如,以下代码在每次使用 Coin::Penny 调用该方法时都会打印“Lucky penny!”,但它仍然返回块的最后一个值 1:
enum Coin {
Penny,
Nickel,
Dime,
Quarter,
}
fn value_in_cents(coin: Coin) -> u8 {
match coin {
Coin::Penny => {
println!("Lucky penny!");
1
}
Coin::Nickel => 5,
Coin::Dime => 10,
Coin::Quarter => 25,
}
}
fn main() {}绑定值的模式(Patterns That Bind to Values)
match 分支的另一个有用特性是它们可以绑定到与模式匹配的值的一部分。这就是我们可以从枚举变体中提取值的方式。
举个例子,让我们修改一个枚举变体,使其内部包含数据。从 1999 年到 2008 年,美国铸造的 25 美分硬币(quarters)在其中一个面印有 50 个州中每个州的不同图案。没有其他硬币拥有州图案,因此只有 25 美分硬币有这个额外值。我们可以通过将 Quarter 变体修改为包含一个存储在其中的 UsState 值来将这些信息添加到我们的 enum 中,我们在示例 6-4 中已经这样做了。
#[derive(Debug)] // so we can inspect the state in a minute
enum UsState {
Alabama,
Alaska,
// --snip--
}
enum Coin {
Penny,
Nickel,
Dime,
Quarter(UsState),
}
fn main() {}Coin 枚举,其中 Quarter 变体还持有一个 UsState 值假设一个朋友正在努力收集全部 50 个州的 25 美分硬币。当我们按硬币类型分类零钱时,我们还会喊出每个 25 美分硬币关联的州名,这样如果朋友还没有这个州的硬币,他们就可以将其添加到收藏中。
在此代码的 match 表达式中,我们向匹配 Coin::Quarter 变体值的模式添加了一个名为 state 的变量。当匹配到 Coin::Quarter 时,state 变量将绑定到该 25 美分硬币的州的值。然后,我们可以在该分支的代码中使用 state,如下所示:
#[derive(Debug)]
enum UsState {
Alabama,
Alaska,
// --snip--
}
enum Coin {
Penny,
Nickel,
Dime,
Quarter(UsState),
}
fn value_in_cents(coin: Coin) -> u8 {
match coin {
Coin::Penny => 1,
Coin::Nickel => 5,
Coin::Dime => 10,
Coin::Quarter(state) => {
println!("State quarter from {state:?}!");
25
}
}
}
fn main() {
value_in_cents(Coin::Quarter(UsState::Alaska));
}如果我们调用 value_in_cents(Coin::Quarter(UsState::Alaska)),coin 将是 Coin::Quarter(UsState::Alaska)。当我们将该值与每个 match 分支进行比较时,直到 Coin::Quarter(state) 之前没有任何分支匹配。此时,state 的绑定将是值 UsState::Alaska。然后我们可以在 println! 表达式中使用该绑定,从而从 Quarter 的 Coin 枚举变体中取出内部的州值。
Option<T> 的 match 模式(The Option<T> match Pattern)
在上一节中,我们想要在使用 Option<T> 时从 Some 中取出内部的 T 值;我们也可以使用 match 来处理 Option<T>,就像我们对 Coin 枚举所做的那样!不再比较硬币,而是比较 Option<T> 的变体,但 match 表达式的工作方式保持不变。
假设我们想编写一个函数,它接收一个 Option<i32>,如果内部有值,则将该值加 1。如果内部没有值,则函数应返回 None 值,并且不尝试执行任何操作。
得益于 match,这个函数非常容易编写,如示例 6-5 所示。
fn main() {
fn plus_one(x: Option<i32>) -> Option<i32> {
match x {
None => None,
Some(i) => Some(i + 1),
}
}
let five = Some(5);
let six = plus_one(five);
let none = plus_one(None);
}Option<i32> 上使用 match 表达式的函数让我们更详细地检查 plus_one 的第一次执行。当我们调用 plus_one(five) 时,plus_one 函数体中的变量 x 将具有值 Some(5)。然后我们将该值与每个 match 分支进行比较:
fn main() {
fn plus_one(x: Option<i32>) -> Option<i32> {
match x {
None => None,
Some(i) => Some(i + 1),
}
}
let five = Some(5);
let six = plus_one(five);
let none = plus_one(None);
}Some(5) 值不匹配模式 None,因此我们继续到下一个分支:
fn main() {
fn plus_one(x: Option<i32>) -> Option<i32> {
match x {
None => None,
Some(i) => Some(i + 1),
}
}
let five = Some(5);
let six = plus_one(five);
let none = plus_one(None);
}Some(5) 匹配 Some(i) 吗?匹配了!我们有相同的变体。i 绑定到 Some 中包含的值,因此 i 的值为 5。然后执行 match 分支中的代码,因此我们将 i 的值加 1,并创建一个新的 Some 值,其中包含我们的总数 6。
现在让我们考虑示例 6-5 中 plus_one 的第二次调用,其中 x 是 None。我们进入 match 并与第一个分支进行比较:
fn main() {
fn plus_one(x: Option<i32>) -> Option<i32> {
match x {
None => None,
Some(i) => Some(i + 1),
}
}
let five = Some(5);
let six = plus_one(five);
let none = plus_one(None);
}匹配了!没有要加的值,因此程序停止并返回 => 右侧的 None 值。因为第一个分支已匹配,不再比较其他分支。
结合使用 match 和枚举在许多情况下都很有用。你会在 Rust 代码中经常看到这种模式:对枚举进行 match,将变量绑定到内部的数据,然后基于它执行代码。一开始可能有点棘手,但一旦你习惯了,你会希望所有语言都有这个特性。它一直是用户的最爱。
match 是穷尽的(Matches Are Exhaustive)
关于 match 还有一个方面需要讨论:分支的模式必须覆盖所有可能性。考虑我们 plus_one 函数的这个版本,它包含一个 bug,无法编译:
fn main() {
fn plus_one(x: Option<i32>) -> Option<i32> {
match x {
Some(i) => Some(i + 1),
}
}
let five = Some(5);
let six = plus_one(five);
let none = plus_one(None);
}我们没有处理 None 的情况,因此这段代码会导致 bug。幸运的是,这是 Rust 能够捕捉到的 bug。如果我们尝试编译这段代码,会得到以下错误:
$ cargo run
Compiling enums v0.1.0 (file:///projects/enums)
error[E0004]: non-exhaustive patterns: `None` not covered
--> src/main.rs:3:15
|
3 | match x {
| ^ pattern `None` not covered
|
note: `Option<i32>` defined here
--> /rustc/1159e78c4747b02ef996e55082b704c09b970588/library/core/src/option.rs:593:1
::: /rustc/1159e78c4747b02ef996e55082b704c09b970588/library/core/src/option.rs:597:5
|
= note: not covered
= note: the matched value is of type `Option<i32>`
help: ensure that all possible cases are being handled by adding a match arm with a wildcard pattern or an explicit pattern as shown
|
4 ~ Some(i) => Some(i + 1),
5 ~ None => todo!(),
|
For more information about this error, try `rustc --explain E0004`.
error: could not compile `enums` (bin "enums") due to 1 previous error
Rust 知道我们没有覆盖所有可能的情况,甚至知道我们忘记了哪个模式!Rust 中的 match 是穷尽的(exhaustive):我们必须覆盖每一种可能性,代码才能有效。特别是在 Option<T> 的情况下,当 Rust 阻止我们忘记显式处理 None 情况时,它保护了我们不会在可能为 null 时假设我们有一个值,从而使之前讨论的十亿美元错误(billion-dollar mistake)变得不可能。
通配模式与 _ 占位符(Catch-All Patterns and the _ Placeholder)
使用枚举,我们还可以对少数特定值执行特殊操作,而对所有其他值执行一个默认操作。假设我们在实现一个游戏,如果掷骰子掷出 3,你的角色不会移动,而是获得一顶漂亮的新帽子。如果掷出 7,你的角色会失去一顶漂亮的帽子。对于所有其他值,你的角色在游戏板上移动相应数量的格子。下面是一个实现该逻辑的 match 表达式,掷骰子的结果是硬编码的而不是随机值,所有其他逻辑由没有函数体的函数表示,因为实际实现它们超出了本例的范围:
fn main() {
let dice_roll = 9;
match dice_roll {
3 => add_fancy_hat(),
7 => remove_fancy_hat(),
other => move_player(other),
}
fn add_fancy_hat() {}
fn remove_fancy_hat() {}
fn move_player(num_spaces: u8) {}
}对于前两个分支,模式是字面量值 3 和 7。对于覆盖所有其他可能值的最后一个分支,模式是我们选择命名为 other 的变量。other 分支运行的代码通过将该变量传递给 move_player 函数来使用它。
这段代码可以编译,尽管我们还没有列出 u8 可以拥有的所有可能值,因为最后一个模式将匹配所有未特别列出的值。这种通配模式满足了 match 必须穷尽的要求。请注意,我们必须将通配分支放在最后,因为模式是按顺序求值的。如果我们把通配分支放在前面,其他分支将永远不会运行,因此如果我们添加位于通配分支之后的分支,Rust 会发出警告!
Rust 也有一种模式,当我们想要通配但不想在通配模式中使用该值时可以使用:_ 是一个特殊模式,它匹配任何值但不会绑定到该值。这告诉 Rust 我们不打算使用该值,因此 Rust 不会警告我们有一个未使用的变量。
让我们修改游戏规则:现在,如果你掷出的数字不是 3 或 7,你必须重新掷。我们不再需要使用通配值,因此我们可以修改代码,使用 _ 代替名为 other 的变量:
fn main() {
let dice_roll = 9;
match dice_roll {
3 => add_fancy_hat(),
7 => remove_fancy_hat(),
_ => reroll(),
}
fn add_fancy_hat() {}
fn remove_fancy_hat() {}
fn reroll() {}
}这个示例也满足了穷尽性要求,因为我们在最后一个分支中显式地忽略了所有其他值;我们没有忘记任何东西。
最后,我们再次修改游戏规则,这样如果你掷出的数字不是 3 或 7,你的回合就不会发生任何事情。我们可以通过使用单元值(unit value)(即我们在“元组类型(The Tuple Type)”章节中提到的空元组类型)作为 _ 分支的代码来表达这一点:
fn main() {
let dice_roll = 9;
match dice_roll {
3 => add_fancy_hat(),
7 => remove_fancy_hat(),
_ => (),
}
fn add_fancy_hat() {}
fn remove_fancy_hat() {}
}在这里,我们显式地告诉 Rust,我们不打算使用任何不匹配前面分支模式的其他值,并且我们不想在这种情况下运行任何代码。
关于模式和匹配的更多内容,我们将在第 19 章中介绍。现在,我们将继续学习 if let 语法,它在 match 表达式略显冗长的情况下可能很有用。
使用 if let 和 let...else 进行简洁的控制流
使用 if let 和 let...else 的简洁控制流(Concise Control Flow with if let and let...else)
if let 语法让你可以将 if 和 let 组合成一种更简洁的方式来处理匹配一种模式的值,同时忽略其余值。考虑示例 6-6 中的程序,它对 config_max 变量中的 Option<u8> 值进行匹配,但只在值为 Some 变体时才执行代码。
fn main() {
let config_max = Some(3u8);
match config_max {
Some(max) => println!("The maximum is configured to be {max}"),
_ => (),
}
}Some 时执行代码的 match 表达式如果值是 Some,我们通过在模式中将值绑定到变量 max 来打印出 Some 变体中的值。我们不想对 None 值做任何处理。为了满足 match 表达式的要求,我们在只处理了一个变体之后必须加上 _ => (),这是烦人的样板代码(Boilerplate Code)。
相反,我们可以使用 if let 以更短的方式编写。以下代码的行为与示例 6-6 中的 match 相同:
fn main() {
let config_max = Some(3u8);
if let Some(max) = config_max {
println!("The maximum is configured to be {max}");
}
}if let 语法接受一个模式和一个表达式,两者用等号分隔。它的工作方式与 match 相同,其中表达式被传递给 match,而模式则是其第一个分支。在这个例子中,模式是 Some(max),max 绑定到 Some 内部的值。然后,我们可以在 if let 块的函数体中使用 max,就像在相应的 match 分支中使用 max 一样。if let 块中的代码只在值匹配该模式时才运行。
使用 if let 意味着更少的输入、更少的缩进和更少的样板代码。但是,你失去了 match 强制要求的穷尽性检查(Exhaustive Checking),该检查能确保你不会忘记处理任何情况。在 match 和 if let 之间进行选择取决于你在特定情况下的操作,以及简洁性的获得是否值得失去穷尽性检查。
换句话说,你可以将 if let 视为 match 的语法糖(Syntax Sugar),它在值匹配一个模式时运行代码,然后忽略所有其他值。
我们可以在 if let 中包含一个 else。与 else 配套的代码块等同于与 if let 和 else 等价的 match 表达式中 _ 分支的代码块。回顾示例 6-4 中的 Coin 枚举定义,其中 Quarter 变体还持有一个 UsState 值。如果我们想统计所有看到的非 25 美分硬币,同时公布 25 美分的州,我们可以使用 match 表达式来实现,如下所示:
#[derive(Debug)]
enum UsState {
Alabama,
Alaska,
// --snip--
}
enum Coin {
Penny,
Nickel,
Dime,
Quarter(UsState),
}
fn main() {
let coin = Coin::Penny;
let mut count = 0;
match coin {
Coin::Quarter(state) => println!("State quarter from {state:?}!"),
_ => count += 1,
}
}或者我们可以使用 if let 和 else 表达式,如下所示:
#[derive(Debug)]
enum UsState {
Alabama,
Alaska,
// --snip--
}
enum Coin {
Penny,
Nickel,
Dime,
Quarter(UsState),
}
fn main() {
let coin = Coin::Penny;
let mut count = 0;
if let Coin::Quarter(state) = coin {
println!("State quarter from {state:?}!");
} else {
count += 1;
}
}使用 let...else 保持在“快乐路径“上(Staying on the “Happy Path” with let...else)
一种常见的模式是当值存在时执行某些计算,否则返回默认值。继续我们带有 UsState 值的硬币示例,如果我们想根据 25 美分硬币上的州的历史年代说一些有趣的话,我们可能会在 UsState 上引入一个方法来检查州的年龄,如下所示:
#[derive(Debug)] // so we can inspect the state in a minute
enum UsState {
Alabama,
Alaska,
// --snip--
}
impl UsState {
fn existed_in(&self, year: u16) -> bool {
match self {
UsState::Alabama => year >= 1819,
UsState::Alaska => year >= 1959,
// -- snip --
}
}
}
enum Coin {
Penny,
Nickel,
Dime,
Quarter(UsState),
}
fn describe_state_quarter(coin: Coin) -> Option<String> {
if let Coin::Quarter(state) = coin {
if state.existed_in(1900) {
Some(format!("{state:?} is pretty old, for America!"))
} else {
Some(format!("{state:?} is relatively new."))
}
} else {
None
}
}
fn main() {
if let Some(desc) = describe_state_quarter(Coin::Quarter(UsState::Alaska)) {
println!("{desc}");
}
}然后,我们可能使用 if let 来匹配硬币的类型,在条件体内引入一个 state 变量,如示例 6-7 所示。
#[derive(Debug)] // so we can inspect the state in a minute
enum UsState {
Alabama,
Alaska,
// --snip--
}
impl UsState {
fn existed_in(&self, year: u16) -> bool {
match self {
UsState::Alabama => year >= 1819,
UsState::Alaska => year >= 1959,
// -- snip --
}
}
}
enum Coin {
Penny,
Nickel,
Dime,
Quarter(UsState),
}
fn describe_state_quarter(coin: Coin) -> Option<String> {
if let Coin::Quarter(state) = coin {
if state.existed_in(1900) {
Some(format!("{state:?} is pretty old, for America!"))
} else {
Some(format!("{state:?} is relatively new."))
}
} else {
None
}
}
fn main() {
if let Some(desc) = describe_state_quarter(Coin::Quarter(UsState::Alaska)) {
println!("{desc}");
}
}if let 内部的条件语句来检查一个州在 1900 年是否存在这样能完成任务,但它将工作推入了 if let 语句的函数体中,如果要完成的工作更复杂,可能很难看清楚顶层分支之间的关系。我们也可以利用表达式会产生值这一事实,要么从 if let 产生 state,要么提前返回,如示例 6-8 所示。(你也可以用 match 实现类似的效果。)
#[derive(Debug)] // so we can inspect the state in a minute
enum UsState {
Alabama,
Alaska,
// --snip--
}
impl UsState {
fn existed_in(&self, year: u16) -> bool {
match self {
UsState::Alabama => year >= 1819,
UsState::Alaska => year >= 1959,
// -- snip --
}
}
}
enum Coin {
Penny,
Nickel,
Dime,
Quarter(UsState),
}
fn describe_state_quarter(coin: Coin) -> Option<String> {
let state = if let Coin::Quarter(state) = coin {
state
} else {
return None;
};
if state.existed_in(1900) {
Some(format!("{state:?} is pretty old, for America!"))
} else {
Some(format!("{state:?} is relatively new."))
}
}
fn main() {
if let Some(desc) = describe_state_quarter(Coin::Quarter(UsState::Alaska)) {
println!("{desc}");
}
}if let 产生一个值或提前返回不过,这种方式也有点难以理解!if let 的一个分支产生一个值,而另一个分支则直接从函数中返回。
为了让这种常见模式更易于表达,Rust 提供了 let...else。let...else 语法在左侧接受一个模式,在右侧接受一个表达式,与 if let 非常相似,但它没有 if 分支,只有 else 分支。如果模式匹配,它会将模式中的值绑定到外部作用域。如果模式不匹配,程序将进入 else 分支,该分支必须从函数中返回。
在示例 6-9 中,你可以看到使用 let...else 代替 if let 时示例 6-8 的效果。
#[derive(Debug)] // so we can inspect the state in a minute
enum UsState {
Alabama,
Alaska,
// --snip--
}
impl UsState {
fn existed_in(&self, year: u16) -> bool {
match self {
UsState::Alabama => year >= 1819,
UsState::Alaska => year >= 1959,
// -- snip --
}
}
}
enum Coin {
Penny,
Nickel,
Dime,
Quarter(UsState),
}
fn describe_state_quarter(coin: Coin) -> Option<String> {
let Coin::Quarter(state) = coin else {
return None;
};
if state.existed_in(1900) {
Some(format!("{state:?} is pretty old, for America!"))
} else {
Some(format!("{state:?} is relatively new."))
}
}
fn main() {
if let Some(desc) = describe_state_quarter(Coin::Quarter(UsState::Alaska)) {
println!("{desc}");
}
}let...else 来澄清函数内部的流程注意,通过这种方式,函数的主体保持在“快乐路径“(Happy Path)上,而不像 if let 那样两个分支具有明显不同的控制流。
如果你遇到程序逻辑过于冗长而无法用 match 表达的情况,请记住 if let 和 let...else 也在你的 Rust 工具箱中。
总结(Summary)
到目前为止,我们已经介绍了如何使用枚举(Enum)来创建自定义类型(Custom Type),这些类型可以是一组枚举值中的一个。我们已经展示了标准库的 Option<T> 类型如何帮助你使用类型系统来防止错误。当枚举值包含数据时,你可以使用 match 或 if let 来提取和使用这些值,具体取决于你需要处理多少种情况。
你的 Rust 程序现在可以使用结构体(Struct)和枚举来表达你所在领域的概念。创建自定义类型在 API 中使用可以确保类型安全:编译器将确保你的函数只获得每个函数所期望的类型的值。
为了向你的用户提供一个组织良好的 API,该 API 使用起来简单明了,并且只暴露你的用户真正需要的内容,现在让我们转向 Rust 的模块(Module)。
使用包(Package)、Crate 和模块(Module)管理不断增长的项目(Managing Growing Projects with Packages, Crates, and Modules)
随着你编写大型程序,组织代码将变得越来越重要。通过对相关功能进行分组,并分隔具有不同特性的代码,你将明确知道在哪里可以找到实现特定功能的代码,以及在哪里更改功能的工作方式。
我们目前编写的程序都放在一个文件中的一个模块中。随着项目增长,你应该将代码组织成多个模块,然后再分成多个文件。一个包(Package)可以包含多个二进制 crate,并可选择包含一个库 crate。随着包的增长,你可以将部分内容提取到单独的 crate 中,使其成为外部依赖。本章将涵盖所有这些技术。对于由一组相互关联且共同演进的包组成的大型项目,Cargo 提供了工作空间(Workspace),我们将在第 14 章的“Cargo 工作空间”中介绍。
我们还将讨论封装(Encapsulation)实现细节,这让你能够在更高层次上重用代码:一旦你实现了一个操作,其他代码可以通过其公共接口(Public Interface)调用你的代码,而无需知道实现的具体工作方式。编写代码的方式决定了哪些部分是供其他代码使用的公共部分,哪些是你保留修改权利的私有实现细节。这是另一种限制你需要记住的细节量的方法。
一个相关的概念是作用域(Scope):代码编写的嵌套上下文中有一组被定义为“在作用域内“的名称。在阅读、编写和编译代码时,程序员和编译器需要知道特定位置的特定名称是指变量、函数、结构体(Struct)、枚举(Enum)、模块(Module)、常量还是其他项,以及该项的含义。你可以创建作用域,并更改哪些名称在作用域内或不在作用域内。你不能在同一个作用域中拥有两个同名的项;有工具可用于解决名称冲突。
Rust 有许多特性,可用于管理代码的组织,包括哪些细节被暴露、哪些细节是私有的,以及程序中每个作用域中有哪些名称。这些特性有时统称为模块系统(Module System),包括:
- 包(Package):一种 Cargo 特性,用于构建、测试和共享 crate
- Crate:生成库(Library)或可执行文件(Executable)的模块树
- 模块(Module)和 use:允许你控制路径(Path)的组织、作用域和私有性(Privacy)
- 路径(Path):命名某个项(Item)的方式,例如结构体、函数或模块
在本章中,我们将涵盖所有这些特性,讨论它们如何交互,并说明如何使用它们来管理作用域。到本章结束时,你应该对模块系统有扎实的理解,并能像专业人士一样处理作用域!
包与 Crate
包(Package)和 Crate(Packages and Crates)
我们将介绍的模块系统的第一部分是包(Package)和 crate。
Crate 是 Rust 编译器在单次处理中考虑的最小代码量。即使你运行 rustc 而不是 cargo,并传递单个源代码文件(正如我们在第 1 章的“Rust 程序基础”中所做的那样),编译器也会将该文件视为一个 crate。Crate 可以包含模块(Module),模块可以定义在其他文件中,并与 crate 一起编译,我们将在接下来的小节中看到。
Crate 有两种形式:二进制 crate(Binary Crate)或库 crate(Library Crate)。二进制 crate 是可以编译为可执行文件的程序,比如命令行程序或服务器。每个二进制 crate 必须有一个名为 main 的函数,定义可执行文件运行时发生什么。到目前为止,我们创建的所有 crate 都是二进制 crate。
库 crate 没有 main 函数,也不会编译为可执行文件。相反,它们定义了旨在与多个项目共享的功能。例如,我们在第 2 章中使用的 rand crate 提供了生成随机数的功能。大多数情况下,当 Rust 程序员说“crate“时,他们指的是库 crate,并且他们将“crate“与通用编程概念中的“库“(Library)混用。
Crate 根(Crate Root)是一个源代码文件,Rust 编译器从它开始,它构成了你的 crate 的根模块(Root Module)(我们将在“使用模块控制作用域和私有性”中深入讲解模块)。
包(Package)是一个或多个 crate 的集合,提供一组功能。一个包包含一个 Cargo.toml 文件,描述如何构建这些 crate。Cargo 本身实际上就是一个包,它包含了我们一直用来构建代码的命令行工具的二进制 crate。Cargo 包还包含一个该二进制 crate 所依赖的库 crate。其他项目可以依赖 Cargo 库 crate,来使用 Cargo 命令行工具所使用的相同逻辑。
一个包可以包含任意多的二进制 crate,但最多只能包含一个库 crate。一个包必须至少包含一个 crate,无论是库 crate 还是二进制 crate。
让我们看看创建包时会发生什么。首先,我们输入命令 cargo new my-project:
$ cargo new my-project
Created binary (application) `my-project` package
$ ls my-project
Cargo.toml
src
$ ls my-project/src
main.rs
运行 cargo new my-project 后,我们使用 ls 来查看 Cargo 创建了什么。在 my-project 目录中,有一个 Cargo.toml 文件,这就是一个包。还有一个 src 目录,其中包含 main.rs。在文本编辑器中打开 Cargo.toml,注意其中没有提到 src/main.rs。Cargo 遵循一个约定,即 src/main.rs 是与包同名的二进制 crate 的 crate 根。同样,Cargo 知道如果包目录中包含 src/lib.rs,则该包包含一个与包同名的库 crate,并且 src/lib.rs 是其 crate 根。Cargo 将 crate 根文件传递给 rustc 来构建库或二进制文件。
在这里,我们有一个只包含 src/main.rs 的包,这意味着它只包含一个名为 my-project 的二进制 crate。如果一个包同时包含 src/main.rs 和 src/lib.rs,则它有两个 crate:一个二进制 crate 和一个库 crate,两者都与包同名。一个包可以通过在 src/bin 目录中放置文件来拥有多个二进制 crate:每个文件都将是一个单独的二进制 crate。
使用模块控制作用域与私有性
使用模块控制作用域和私有性(Control Scope and Privacy with Modules)
在本节中,我们将讨论模块(Module)和模块系统的其他部分,即路径(Path),它允许你命名项(Item);use 关键字,将路径引入作用域;以及 pub 关键字,使项变为公共的。我们还将讨论 as 关键字、外部包(External Package)和全局运算符(Glob Operator)。
模块速查表(Modules Cheat Sheet)
在深入了解模块和路径的细节之前,我们在此提供一个快速参考,介绍模块、路径、use 关键字和 pub 关键字在编译器中的工作方式,以及大多数开发者如何组织他们的代码。我们将在本章中逐一举例说明每条规则,但这里是一个很好的参考位置,用于提醒模块的工作方式。
- 从 crate 根开始:在编译一个 crate 时,编译器首先在 crate 根文件(对于库 crate 通常是 src/lib.rs,对于二进制 crate 通常是 src/main.rs)中寻找要编译的代码。
- 声明模块:在 crate 根文件中,你可以声明新的模块;比如你用
mod garden;声明一个 “garden” 模块。编译器会在以下位置寻找模块的代码:- 内联(Inline),在大括号内取代
mod garden后面的分号 - 在文件 src/garden.rs 中
- 在文件 src/garden/mod.rs 中
- 内联(Inline),在大括号内取代
- 声明子模块(Submodule):在除 crate 根之外的任何文件中,你都可以声明子模块。例如,你可以在 src/garden.rs 中声明
mod vegetables;。编译器会在以父模块命名的目录中寻找子模块的代码,具体在以下位置:- 内联,直接跟在
mod vegetables之后,在大括号内而不是分号 - 在文件 src/garden/vegetables.rs 中
- 在文件 src/garden/vegetables/mod.rs 中
- 内联,直接跟在
- 模块中代码的路径:一旦一个模块成为你的 crate 的一部分,只要私有性规则允许,你可以使用代码的路径从该 crate 的任何其他位置引用该模块中的代码。例如,garden vegetables 模块中的
Asparagus类型将位于crate::garden::vegetables::Asparagus。 - 私有 vs. 公共:默认情况下,模块中的代码对其父模块是私有的。要使一个模块变为公共的,用
pub mod而不是mod来声明它。要使公共模块中的项也变为公共的,在其声明前使用pub。 use关键字:在一个作用域内,use关键字创建项的快捷方式,以减少长路径的重复。在任何可以引用crate::garden::vegetables::Asparagus的作用域中,你可以用use crate::garden::vegetables::Asparagus;创建一个快捷方式,从此只需写Asparagus即可在该作用域中使用该类型。
在这里,我们创建一个名为 backyard 的二进制 crate 来说明这些规则。该 crate 的目录(同样命名为 backyard)包含以下文件和目录:
backyard
├── Cargo.lock
├── Cargo.toml
└── src
├── garden
│ └── vegetables.rs
├── garden.rs
└── main.rs
本例中的 crate 根文件是 src/main.rs,其内容如下:
use crate::garden::vegetables::Asparagus;
pub mod garden;
fn main() {
let plant = Asparagus {};
println!("I'm growing {plant:?}!");
}pub mod garden; 这一行告诉编译器包含在 src/garden.rs 中找到的代码,该文件内容为:
pub mod vegetables;在这里,pub mod vegetables; 表示 src/garden/vegetables.rs 中的代码也被包含进来。该代码为:
#[derive(Debug)]
pub struct Asparagus {}现在让我们深入这些规则的细节并实际演示!
在模块中对相关代码进行分组(Grouping Related Code in Modules)
模块(Module)让我们在 crate 内组织代码,以提高可读性并便于重用。模块还允许我们控制项的私有性(Privacy),因为模块内的代码默认是私有的。私有项是内部实现细节,不可供外部使用。我们可以选择将模块及其内部的项设为公共的,从而将其暴露出来,允许外部代码使用和依赖它们。
举个例子,让我们编写一个提供餐厅功能的库 crate。我们将定义函数的签名(Signature),但函数体留空,以便专注于代码的组织而不是餐厅的实现。
在餐饮业中,餐厅的某些部分被称为前厅(Front of House),其他部分被称为后厨(Back of House)。前厅是顾客所在的地方;包括主人安排顾客就座、服务员接单和收款以及调酒师制作饮品的地方。后厨是厨师和烹饪人员在厨房工作、洗碗工清洁以及经理进行行政管理工作的地方。
为了以这种方式构建我们的 crate,我们可以将其函数组织到嵌套模块中。运行 cargo new restaurant --lib 创建一个名为 restaurant 的新库。然后将示例 7-1 中的代码输入到 src/lib.rs 中,以定义一些模块和函数签名;这段代码是前厅部分。
mod front_of_house {
mod hosting {
fn add_to_waitlist() {}
fn seat_at_table() {}
}
mod serving {
fn take_order() {}
fn serve_order() {}
fn take_payment() {}
}
}front_of_house 模块,其中包含其他模块,这些模块又包含函数我们使用 mod 关键字后跟模块名(在本例中为 front_of_house)来定义一个模块。模块体则放在大括号内。在模块内部,我们可以放置其他模块,就像本例中的 hosting 和 serving 模块。模块还可以容纳其他项的定义,例如结构体(Struct)、枚举(Enum)、常量(Constant)、特质(Trait),以及如示例 7-1 中的函数。
通过使用模块,我们可以将相关的定义组合在一起,并说明它们为何相关。使用此代码的程序员可以基于分组来浏览代码,而不必通读所有定义,从而更容易找到与他们相关的定义。向此代码添加新功能的程序员知道将代码放在哪里以保持程序的组织有序。
之前,我们提到 src/main.rs 和 src/lib.rs 被称为 crate 根(Crate Root)。这样命名的原因是,这两个文件中任何一个的内容会在 crate 模块结构的根部形成一个名为 crate 的模块,该结构被称为模块树(Module Tree)。
示例 7-2 展示了示例 7-1 中结构的模块树。
crate
└── front_of_house
├── hosting
│ ├── add_to_waitlist
│ └── seat_at_table
└── serving
├── take_order
├── serve_order
└── take_payment
这棵树展示了某些模块如何嵌套在其他模块内部;例如,hosting 嵌套在 front_of_house 内部。该树还显示某些模块是兄弟模块(Sibling),这意味着它们定义在同一个模块中;hosting 和 serving 是定义在 front_of_house 内部的兄弟模块。如果模块 A 包含在模块 B 内部,我们说模块 A 是模块 B 的子模块(Child),而模块 B 是模块 A 的父模块(Parent)。请注意,整个模块树都根植于名为 crate 的隐式模块之下。
模块树可能会让你想起计算机上文件系统的目录树;这是一个非常贴切的类比!就像文件系统中的目录一样,你使用模块来组织代码。就像目录中的文件一样,我们需要一种方法来找到我们的模块。
引用模块树中项的方式
引用模块树中项的路径(Paths for Referring to an Item in the Module Tree)
为了告诉 Rust 在模块树中的何处找到某个项(Item),我们使用路径,就像在文件系统中导航时使用路径一样。要调用一个函数,我们需要知道它的路径。
路径有两种形式:
- 绝对路径(Absolute Path)是从 crate 根开始的完整路径;对于来自外部 crate 的代码,绝对路径以 crate 名称开头,对于来自当前 crate 的代码,它以字面量
crate开头。 - 相对路径(Relative Path)从当前模块开始,使用
self、super或当前模块中的标识符。
绝对路径和相对路径后都跟着一个或多个由双冒号(::)分隔的标识符。
回到示例 7-1,假设我们要调用 add_to_waitlist 函数。这等同于问:add_to_waitlist 函数的路径是什么?示例 7-3 包含了示例 7-1,但删除了一些模块和函数。
我们将展示两种方式,从 crate 根中定义的新函数 eat_at_restaurant 调用 add_to_waitlist 函数。这些路径是正确的,但仍然存在另一个问题,会阻止该示例按原样编译。我们稍后会解释原因。
eat_at_restaurant 函数是我们库 crate 公共 API(Public API)的一部分,因此我们使用 pub 关键字标记它。在“使用 pub 关键字暴露路径”一节中,我们将更详细地介绍 pub。
mod front_of_house {
mod hosting {
fn add_to_waitlist() {}
}
}
pub fn eat_at_restaurant() {
// Absolute path
crate::front_of_house::hosting::add_to_waitlist();
// Relative path
front_of_house::hosting::add_to_waitlist();
}add_to_waitlist 函数我们在 eat_at_restaurant 中第一次调用 add_to_waitlist 函数时,使用了绝对路径。add_to_waitlist 函数与 eat_at_restaurant 定义在同一个 crate 中,这意味着我们可以使用 crate 关键字来开始一个绝对路径。然后我们依次包含每个连续的模块,直到到达 add_to_waitlist。你可以想象一个具有相同结构的文件系统:我们会指定路径 /front_of_house/hosting/add_to_waitlist 来运行 add_to_waitlist 程序;使用 crate 名称从 crate 根开始,就像在 shell 中使用 / 从文件系统根开始一样。
我们在 eat_at_restaurant 中第二次调用 add_to_waitlist 时,使用了相对路径。路径以 front_of_house 开头,这是与 eat_at_restaurant 定义在同一模块树级别的模块名称。这里的文件系统等价物是使用路径 front_of_house/hosting/add_to_waitlist。以模块名开头意味着该路径是相对的。
选择使用相对路径还是绝对路径是一个基于项目做出的决定,取决于你是否更可能将项的定义代码与使用该项的代码分开移动还是一起移动。例如,如果我们将 front_of_house 模块和 eat_at_restaurant 函数移动到一个名为 customer_experience 的模块中,我们需要更新到 add_to_waitlist 的绝对路径,但相对路径仍然有效。但是,如果我们将 eat_at_restaurant 函数单独移动到一个名为 dining 的模块中,到 add_to_waitlist 调用的绝对路径将保持不变,但相对路径需要更新。我们通常倾向于指定绝对路径,因为我们更有可能希望彼此独立地移动代码定义和项调用。
让我们尝试编译示例 7-3,找出为什么它还不能编译!我们得到的错误如示例 7-4 所示。
$ cargo build
Compiling restaurant v0.1.0 (file:///projects/restaurant)
error[E0603]: module `hosting` is private
--> src/lib.rs:9:28
|
9 | crate::front_of_house::hosting::add_to_waitlist();
| ^^^^^^^ --------------- function `add_to_waitlist` is not publicly re-exported
| |
| private module
|
note: the module `hosting` is defined here
--> src/lib.rs:2:5
|
2 | mod hosting {
| ^^^^^^^^^^^
error[E0603]: module `hosting` is private
--> src/lib.rs:12:21
|
12 | front_of_house::hosting::add_to_waitlist();
| ^^^^^^^ --------------- function `add_to_waitlist` is not publicly re-exported
| |
| private module
|
note: the module `hosting` is defined here
--> src/lib.rs:2:5
|
2 | mod hosting {
| ^^^^^^^^^^^
For more information about this error, try `rustc --explain E0603`.
error: could not compile `restaurant` (lib) due to 2 previous errors
错误消息说 hosting 模块是私有的。换句话说,我们为 hosting 模块和 add_to_waitlist 函数使用了正确的路径,但 Rust 不允许我们使用它们,因为它无法访问私有部分。在 Rust 中,所有项(函数、方法、结构体、枚举、模块和常量)默认情况下对其父模块是私有的。如果你想让函数或结构体等项变为私有的,就把它放在一个模块中。
父模块中的项不能使用子模块中的私有项,但子模块中的项可以使用其祖先模块中的项。这是因为子模块包装并隐藏了它们的实现细节,但子模块可以看到它们定义所在的上下文。继续我们的比喻,可以将私有性规则想象成餐厅的后勤办公室:那里发生的事情对餐厅顾客来说是私有的,但办公室经理可以看到和做他们经营的餐厅中的一切。
Rust 选择让模块系统以这种方式运行,这样隐藏内部实现细节就是默认行为。这样,你就知道内部代码的哪部分可以在不破坏外部代码的情况下更改。但是,Rust 也赋予你使用 pub 关键字将子模块代码的内部部分暴露给外部祖先模块的能力。
使用 pub 关键字暴露路径(Exposing Paths with the pub Keyword)
让我们回到示例 7-4 中的错误,它告诉我们 hosting 模块是私有的。我们希望父模块中的 eat_at_restaurant 函数能够访问子模块中的 add_to_waitlist 函数,因此我们用 pub 关键字标记 hosting 模块,如示例 7-5 所示。
// ANCHOR: here
mod front_of_house {
pub mod hosting {
fn add_to_waitlist() {}
}
}
// -- snip --
// ANCHOR_END: here
pub fn eat_at_restaurant() {
// Absolute path
crate::front_of_house::hosting::add_to_waitlist();
// Relative path
front_of_house::hosting::add_to_waitlist();
}hosting 模块声明为 pub 使其可从 eat_at_restaurant 使用不幸的是,示例 7-5 中的代码仍然会导致错误,如示例 7-6 所示。
$ cargo build
Compiling restaurant v0.1.0 (file:///projects/restaurant)
error[E0603]: function `add_to_waitlist` is private
--> src/lib.rs:10:37
|
10 | crate::front_of_house::hosting::add_to_waitlist();
| ^^^^^^^^^^^^^^^ private function
|
note: the function `add_to_waitlist` is defined here
--> src/lib.rs:3:9
|
3 | fn add_to_waitlist() {}
| ^^^^^^^^^^^^^^^^^^^^
error[E0603]: function `add_to_waitlist` is private
--> src/lib.rs:13:30
|
13 | front_of_house::hosting::add_to_waitlist();
| ^^^^^^^^^^^^^^^ private function
|
note: the function `add_to_waitlist` is defined here
--> src/lib.rs:3:9
|
3 | fn add_to_waitlist() {}
| ^^^^^^^^^^^^^^^^^^^^
For more information about this error, try `rustc --explain E0603`.
error: could not compile `restaurant` (lib) due to 2 previous errors
发生了什么?在 mod hosting 前面添加 pub 关键字使模块变为公共的。通过这次更改,如果我们可以访问 front_of_house,我们就可以访问 hosting。但 hosting 的内容仍然是私有的;将模块设为公共的并不会使其内容变为公共的。模块上的 pub 关键字只允许其祖先模块中的代码引用它,而不能访问其内部代码。因为模块只是一些容器;仅仅将模块设为公共的,并不能做什么。你需要进一步选择将模块中的一个或多个项也设为公共的。
示例 7-6 中的错误说 add_to_waitlist 函数是私有的。私有性规则适用于结构体、枚举、函数和方法以及模块。
让我们也通过在 add_to_waitlist 函数的定义前添加 pub 关键字来使其变为公共的,如示例 7-7 所示。
mod front_of_house {
pub mod hosting {
pub fn add_to_waitlist() {}
}
}
// -- snip --
pub fn eat_at_restaurant() {
// Absolute path
crate::front_of_house::hosting::add_to_waitlist();
// Relative path
front_of_house::hosting::add_to_waitlist();
}mod hosting 和 fn add_to_waitlist 前添加 pub 关键字让我们可以从 eat_at_restaurant 调用该函数现在代码可以编译了!要了解为什么添加 pub 关键字让我们能在 eat_at_restaurant 中根据私有性规则使用这些路径,让我们看一下绝对路径和相对路径。
在绝对路径中,我们从 crate 开始,即 crate 模块树的根。front_of_house 模块定义在 crate 根中。虽然 front_of_house 不是公共的,但由于 eat_at_restaurant 函数与 front_of_house 定义在同一个模块中(即 eat_at_restaurant 和 front_of_house 是兄弟模块),我们可以从 eat_at_restaurant 引用 front_of_house。接下来是标记为 pub 的 hosting 模块。我们可以访问 hosting 的父模块,所以我们可以访问 hosting。最后,add_to_waitlist 函数标记为 pub,并且我们可以访问它的父模块,因此这个函数调用可以正常工作!
在相对路径中,逻辑与绝对路径相同,只是第一步不同:路径不是从 crate 根开始,而是从 front_of_house 开始。front_of_house 模块与 eat_at_restaurant 定义在同一个模块中,所以从定义 eat_at_restaurant 的模块开始的相对路径可以正常工作。然后,因为 hosting 和 add_to_waitlist 都标记为 pub,路径的其余部分也可以正常工作,这个函数调用是有效的!
如果你计划共享你的库 crate,以便其他项目可以使用你的代码,那么你的公共 API 就是你与 crate 用户之间的契约,决定了他们如何与你的代码交互。管理公共 API 更改有许多考虑因素,以使人们更容易依赖你的 crate。这些考虑因素超出了本书的范围;如果你对此主题感兴趣,请参阅 Rust API 指南。
包含二进制和库的包的最佳实践(Best Practices for Packages with a Binary and a Library)
我们提到过,一个包可以同时包含一个 src/main.rs 二进制 crate 根和一个 src/lib.rs 库 crate 根,并且两个 crate 默认都具有包的名称。通常,这种同时包含库和二进制 crate 模式的包,其二进制 crate 中只包含足够的代码来启动一个可执行文件,该文件调用库 crate 中定义的代码。这让其他项目可以从该包提供的大部分功能中受益,因为库 crate 的代码可以被共享。
模块树应该定义在 src/lib.rs 中。然后,任何公共项都可以通过以包名开头的路径在二进制 crate 中使用。二进制 crate 成为库 crate 的用户,就像完全外部的 crate 使用库 crate 一样:它只能使用公共 API。这有助于你设计一个好的 API;你不仅是作者,同时也是客户!
在第 12 章中,我们将通过一个命令行程序来演示这种组织实践,该程序将同时包含二进制 crate 和库 crate。
使用 super 开始相对路径(Starting Relative Paths with super)
我们可以通过在路径开头使用 super 来构造从父模块开始的相对路径,而不是从当前模块或 crate 根开始。这就像用 .. 语法开始文件系统路径,表示转到父目录。使用 super 允许我们引用我们知道在父模块中的项,当模块与父模块紧密相关但父模块将来可能被移动到模块树的其他位置时,这可以使重新排列模块树更容易。
考虑示例 7-8 中的代码,该代码模拟了厨师修正错误订单并亲自将其带给顾客的情况。定义在 back_of_house 模块中的 fix_incorrect_order 函数通过指定以 super 开头的路径来调用定义在父模块中的 deliver_order 函数。
fn deliver_order() {}
mod back_of_house {
fn fix_incorrect_order() {
cook_order();
super::deliver_order();
}
fn cook_order() {}
}super 开头的相对路径调用函数fix_incorrect_order 函数在 back_of_house 模块中,因此我们可以使用 super 转到 back_of_house 的父模块,在本例中即 crate,即根模块。从那里,我们寻找 deliver_order 并找到了它。成功!我们认为 back_of_house 模块和 deliver_order 函数可能保持彼此相同的关系,并且在我们决定重新组织 crate 的模块树时可能会一起移动。因此,我们使用了 super,这样如果此代码被移动到不同的模块,将来需要更新的位置就更少。
使结构体和枚举变为公共的(Making Structs and Enums Public)
我们也可以使用 pub 将结构体和枚举指定为公共的,但在结构体和枚举上使用 pub 有一些额外的细节。如果我们在结构体定义前使用 pub,我们将结构体变为公共的,但结构体的字段仍然是私有的。我们可以根据具体情况决定每个字段是否公共。在示例 7-9 中,我们定义了一个公共的 back_of_house::Breakfast 结构体,其中包含一个公共的 toast 字段和一个私有的 seasonal_fruit 字段。这模拟了餐厅中顾客可以选择餐点附带的面包类型,但厨师根据当季和库存情况决定搭配餐点的水果的情况。可用的水果变化很快,因此顾客不能选择水果,甚至看不到他们会得到什么水果。
mod back_of_house {
pub struct Breakfast {
pub toast: String,
seasonal_fruit: String,
}
impl Breakfast {
pub fn summer(toast: &str) -> Breakfast {
Breakfast {
toast: String::from(toast),
seasonal_fruit: String::from("peaches"),
}
}
}
}
pub fn eat_at_restaurant() {
// Order a breakfast in the summer with Rye toast.
let mut meal = back_of_house::Breakfast::summer("Rye");
// Change our mind about what bread we'd like.
meal.toast = String::from("Wheat");
println!("I'd like {} toast please", meal.toast);
// The next line won't compile if we uncomment it; we're not allowed
// to see or modify the seasonal fruit that comes with the meal.
// meal.seasonal_fruit = String::from("blueberries");
}因为 back_of_house::Breakfast 结构体中的 toast 字段是公共的,所以在 eat_at_restaurant 中,我们可以使用点号表示法(Dot Notation)来读写 toast 字段。请注意,我们不能在 eat_at_restaurant 中使用 seasonal_fruit 字段,因为 seasonal_fruit 是私有的。尝试取消注释修改 seasonal_fruit 字段值的那行代码,看看你会得到什么错误!
另外,请注意,因为 back_of_house::Breakfast 有一个私有字段,该结构体需要提供一个公共关联函数(Associated Function)来构造 Breakfast 的实例(我们在这里将其命名为 summer)。如果 Breakfast 没有这样的函数,我们就无法在 eat_at_restaurant 中创建 Breakfast 的实例,因为我们无法在 eat_at_restaurant 中设置私有字段 seasonal_fruit 的值。
相比之下,如果我们将一个枚举变为公共的,那么它的所有变体会自动变为公共的。我们只需要在 enum 关键字之前加上 pub,如示例 7-10 所示。
mod back_of_house {
pub enum Appetizer {
Soup,
Salad,
}
}
pub fn eat_at_restaurant() {
let order1 = back_of_house::Appetizer::Soup;
let order2 = back_of_house::Appetizer::Salad;
}因为我们将 Appetizer 枚举设为公共的,所以我们可以在 eat_at_restaurant 中使用 Soup 和 Salad 变体。
除非枚举的变体是公共的,否则枚举并不是很有用;在每种情况下都必须为所有枚举变体添加 pub 注解是很烦人的,因此枚举变体默认是公共的。结构体在其字段不是公共的情况下通常也是有用的,因此结构体字段遵循默认情况下所有内容都是私有的通用规则,除非用 pub 注解。
还有一个涉及 pub 的情况我们尚未涵盖,那就是我们最后一个模块系统特性:use 关键字。我们将首先单独介绍 use,然后展示如何结合使用 pub 和 use。
使用 use 关键字将路径引入作用域
使用 use 关键字将路径引入作用域(Bringing Paths into Scope with the use Keyword)
必须写出完整的路径来调用函数可能会让人感到不便和重复。在示例 7-7 中,无论我们选择绝对路径还是相对路径来访问 add_to_waitlist 函数,每次我们想要调用 add_to_waitlist 时,都必须同时指定 front_of_house 和 hosting。幸运的是,有一种简化此过程的方法:我们可以使用 use 关键字一次性创建一条路径的快捷方式,然后在作用域中的其他地方使用较短的名称。
在示例 7-11 中,我们将 crate::front_of_house::hosting 模块引入 eat_at_restaurant 函数的作用域中,这样我们只需指定 hosting::add_to_waitlist 即可在 eat_at_restaurant 中调用 add_to_waitlist 函数。
mod front_of_house {
pub mod hosting {
pub fn add_to_waitlist() {}
}
}
use crate::front_of_house::hosting;
pub fn eat_at_restaurant() {
hosting::add_to_waitlist();
}use 将模块引入作用域在作用域中添加 use 和路径,类似于在文件系统中创建符号链接(Symbolic Link)。通过在 crate 根中添加 use crate::front_of_house::hosting,hosting 现在是该作用域中的有效名称,就好像 hosting 模块已定义在 crate 根中一样。通过 use 引入作用域的路径也会像其他任何路径一样检查私有性。
请注意,use 只为其所在的特定作用域创建快捷方式。示例 7-12 将 eat_at_restaurant 函数移动到一个名为 customer 的新子模块中,该模块与 use 语句处于不同的作用域,因此函数体将无法编译。
mod front_of_house {
pub mod hosting {
pub fn add_to_waitlist() {}
}
}
use crate::front_of_house::hosting;
mod customer {
pub fn eat_at_restaurant() {
hosting::add_to_waitlist();
}
}use 语句仅适用于其所在的作用域编译器错误表明该快捷方式不再适用于 customer 模块:
$ cargo build
Compiling restaurant v0.1.0 (file:///projects/restaurant)
error[E0433]: failed to resolve: use of unresolved module or unlinked crate `hosting`
--> src/lib.rs:11:9
|
11 | hosting::add_to_waitlist();
| ^^^^^^^ use of unresolved module or unlinked crate `hosting`
|
= help: if you wanted to use a crate named `hosting`, use `cargo add hosting` to add it to your `Cargo.toml`
help: consider importing this module through its public re-export
|
10 + use crate::hosting;
|
warning: unused import: `crate::front_of_house::hosting`
--> src/lib.rs:7:5
|
7 | use crate::front_of_house::hosting;
| ^^^^^^^^^^^^^^^^^^^^^^^^^^^^^^
|
= note: `#[warn(unused_imports)]` on by default
For more information about this error, try `rustc --explain E0433`.
warning: `restaurant` (lib) generated 1 warning
error: could not compile `restaurant` (lib) due to 1 previous error; 1 warning emitted
请注意,还有一个警告表明 use 在其作用域中不再被使用!要解决此问题,请将 use 也移动到 customer 模块中,或者在子模块 customer 中使用 super::hosting 引用父模块中的快捷方式。
创建惯用的 use 路径(Creating Idiomatic use Paths)
在示例 7-11 中,你可能想知道为什么我们指定 use crate::front_of_house::hosting,然后在 eat_at_restaurant 中调用 hosting::add_to_waitlist,而不是将 use 路径一直指定到 add_to_waitlist 函数以实现相同的结果,如示例 7-13 所示。
mod front_of_house {
pub mod hosting {
pub fn add_to_waitlist() {}
}
}
use crate::front_of_house::hosting::add_to_waitlist;
pub fn eat_at_restaurant() {
add_to_waitlist();
}use 将 add_to_waitlist 函数引入作用域,这是不惯用的(unidiomatic)做法虽然示例 7-11 和示例 7-13 完成了相同的任务,但示例 7-11 是使用 use 将函数引入作用域的惯用(Idiomatic)方式。使用 use 将函数的父模块引入作用域,意味着我们在调用函数时必须指定父模块。在调用函数时指定父模块,清楚地表明该函数不是本地定义的,同时最大限度地减少了对完整路径的重复。而示例 7-13 中的代码则不清楚 add_to_waitlist 是在哪里定义的。
另一方面,当使用 use 引入结构体(Struct)、枚举(Enum)和其他项时,指定完整路径是惯用的做法。示例 7-14 展示了将标准库的 HashMap 结构体引入二进制 crate 作用域的惯用方式。
use std::collections::HashMap;
fn main() {
let mut map = HashMap::new();
map.insert(1, 2);
}HashMap 引入作用域这种惯用做法背后没有强有力的理由:它只是一种逐渐形成的约定,人们已经习惯了以这种方式阅读和编写 Rust 代码。
这种惯用做法的例外是,如果我们使用 use 语句将两个同名的项引入作用域,因为 Rust 不允许这样做。示例 7-15 展示了如何将两个具有相同名称但父模块不同的 Result 类型引入作用域,以及如何引用它们。
use std::fmt;
use std::io;
fn function1() -> fmt::Result {
// --snip--
Ok(())
}
fn function2() -> io::Result<()> {
// --snip--
Ok(())
}如你所见,使用父模块可以区分两个 Result 类型。如果我们改为指定 use std::fmt::Result 和 use std::io::Result,我们将在同一作用域中有两个 Result 类型,当我们使用 Result 时,Rust 将不知道我们指的是哪一个。
使用 as 关键字提供新名称(Providing New Names with the as Keyword)
使用 use 将两个同名的类型引入同一作用域时,还有另一种解决方案:在路径之后,我们可以指定 as 和该类型的一个新的本地名称,即别名(Alias)。示例 7-16 展示了另一种编写示例 7-15 中代码的方式,通过使用 as 重命名两个 Result 类型中的一个。
use std::fmt::Result;
use std::io::Result as IoResult;
fn function1() -> Result {
// --snip--
Ok(())
}
fn function2() -> IoResult<()> {
// --snip--
Ok(())
}as 关键字在类型引入作用域时对其进行重命名在第二个 use 语句中,我们为 std::io::Result 类型选择了新名称 IoResult,这不会与我们从 std::fmt 引入作用域的 Result 产生冲突。示例 7-15 和示例 7-16 都被认为是惯用的,因此你可以自行选择!
使用 pub use 重新导出名称(Re-exporting Names with pub use)
当我们使用 use 关键字将名称引入作用域时,该名称在我们导入它的作用域中是私有的。为了使该作用域之外的代码能够引用该名称,就好像它已定义在该作用域中一样,我们可以结合使用 pub 和 use。这种技术称为重新导出(Re-exporting),因为我们将一个项引入作用域,同时也使该项可供其他代码引入它们的作用域。
示例 7-17 展示了示例 7-11 中的代码,其中根模块中的 use 已更改为 pub use。
mod front_of_house {
pub mod hosting {
pub fn add_to_waitlist() {}
}
}
pub use crate::front_of_house::hosting;
pub fn eat_at_restaurant() {
hosting::add_to_waitlist();
}pub use 使某个名称可由任何代码从新作用域中使用在此更改之前,外部代码必须使用路径 restaurant::front_of_house::hosting::add_to_waitlist() 来调用 add_to_waitlist 函数,这还需要将 front_of_house 模块标记为 pub。现在,由于此 pub use 已从根模块重新导出了 hosting 模块,外部代码可以改用路径 restaurant::hosting::add_to_waitlist()。
当代码的内部结构与调用你的代码的程序员对领域的思考方式不同时,重新导出非常有用。例如,在这个餐厅比喻中,经营餐厅的人会想到“前厅“和“后厨“。但光顾餐厅的顾客可能不会以这些术语来看待餐厅的各个部分。通过 pub use,我们可以用一种结构编写代码,但暴露另一种结构。这样做使得我们的库对编写库的程序员和调用库的程序员来说都组织得井井有条。我们将在第 14 章的“导出便捷的公共 API”中再看一个 pub use 的示例,以及它如何影响 crate 的文档。
使用外部包(Using External Packages)
在第 2 章中,我们编写了一个猜谜游戏项目,该项目使用了一个名为 rand 的外部包(External Package)来获取随机数。为了在我们的项目中使用 rand,我们在 Cargo.toml 中添加了以下行:
rand = "0.8.5"
在 Cargo.toml 中将 rand 添加为依赖项(Dependency)会告诉 Cargo 从 crates.io 下载 rand 包及其任何依赖项,并使 rand 可用于我们的项目。
然后,为了将 rand 定义引入我们包的作用域,我们添加了一个以 crate 名称 rand 开头的 use 行,并列出了我们想要引入作用域的项。回想一下,在第 2 章的“生成随机数”中,我们将 Rng 特质(Trait)引入作用域,并调用了 rand::thread_rng 函数:
use std::io;
use rand::Rng;
fn main() {
println!("Guess the number!");
let secret_number = rand::thread_rng().gen_range(1..=100);
println!("The secret number is: {secret_number}");
println!("Please input your guess.");
let mut guess = String::new();
io::stdin()
.read_line(&mut guess)
.expect("Failed to read line");
println!("You guessed: {guess}");
}Rust 社区的成员在 crates.io 上提供了许多包,将其中任何一个引入你的包都涉及相同的步骤:在你的包的 Cargo.toml 文件中列出它们,并使用 use 将其 crate 中的项引入作用域。
请注意,标准库 std 也是一个相对于我们包的外部 crate。因为标准库随 Rust 语言一起发布,我们不需要更改 Cargo.toml 来包含 std。但我们确实需要使用 use 来引用它,以将那里的项引入我们包的作用域。例如,对于 HashMap,我们将使用以下行:
#![allow(unused)]
fn main() {
use std::collections::HashMap;
}这是一个以标准库 crate 名称 std 开头的绝对路径。
使用嵌套路径整理 use 列表(Using Nested Paths to Clean Up use Lists)
如果我们使用定义在同一个 crate 或同一个模块中的多个项,将每个项列在单独的一行上会占用文件中大量的垂直空间。例如,我们在示例 2-4 的猜谜游戏中的这两个 use 语句将项从 std 引入作用域:
use rand::Rng;
// --snip--
use std::cmp::Ordering;
use std::io;
// --snip--
fn main() {
println!("Guess the number!");
let secret_number = rand::thread_rng().gen_range(1..=100);
println!("The secret number is: {secret_number}");
println!("Please input your guess.");
let mut guess = String::new();
io::stdin()
.read_line(&mut guess)
.expect("Failed to read line");
println!("You guessed: {guess}");
match guess.cmp(&secret_number) {
Ordering::Less => println!("Too small!"),
Ordering::Greater => println!("Too big!"),
Ordering::Equal => println!("You win!"),
}
}相反,我们可以使用嵌套路径(Nested Path)将相同的项在一行中引入作用域。我们通过指定路径的公共部分,后跟两个冒号,然后在大括号中列出路径中不同的部分来实现,如示例 7-18 所示。
use rand::Rng;
// --snip--
use std::{cmp::Ordering, io};
// --snip--
fn main() {
println!("Guess the number!");
let secret_number = rand::thread_rng().gen_range(1..=100);
println!("The secret number is: {secret_number}");
println!("Please input your guess.");
let mut guess = String::new();
io::stdin()
.read_line(&mut guess)
.expect("Failed to read line");
let guess: u32 = guess.trim().parse().expect("Please type a number!");
println!("You guessed: {guess}");
match guess.cmp(&secret_number) {
Ordering::Less => println!("Too small!"),
Ordering::Greater => println!("Too big!"),
Ordering::Equal => println!("You win!"),
}
}在较大的程序中,使用嵌套路径将许多来自相同 crate 或模块的项引入作用域,可以大大减少所需的单独 use 语句数量!
我们可以在路径的任何级别使用嵌套路径,这在组合两个共享子路径的 use 语句时非常有用。例如,示例 7-19 展示了两个 use 语句:一个将 std::io 引入作用域,另一个将 std::io::Write 引入作用域。
use std::io;
use std::io::Write;use 语句,其中一个路径是另一个的子路径这两个路径的公共部分是 std::io,这也是第一个路径的完整内容。要将这两个路径合并为一个 use 语句,我们可以在嵌套路径中使用 self,如示例 7-20 所示。
use std::io::{self, Write};use 语句此行将 std::io 和 std::io::Write 引入作用域。
使用全局运算符导入项(Importing Items with the Glob Operator)
如果我们想将某个路径中定义的所有公共项引入作用域,可以指定该路径后跟 * 全局运算符(Glob Operator):
#![allow(unused)]
fn main() {
use std::collections::*;
}这个 use 语句将 std::collections 中定义的所有公共项引入当前作用域。使用全局运算符时要小心!全局运算符可能会使人更难分辨哪些名称在作用域中,以及程序中使用的某个名称是在哪里定义的。此外,如果依赖项更改了其定义,你导入的内容也会随之改变,这可能会在升级依赖项时导致编译器错误,例如依赖项添加了一个与你在同一作用域中的定义同名的定义。
全局运算符通常用于测试,将测试对象的所有内容引入 tests 模块;我们将在第 11 章的“如何编写测试”中讨论这一点。全局运算符有时也作为预导入模式(Prelude Pattern)的一部分使用:请参阅标准库文档了解更多关于该模式的信息。
将模块拆分为不同文件
将模块分离到不同文件中(Separating Modules into Different Files)
到目前为止,本章中的所有示例都在一个文件中定义了多个模块。当模块变得很大时,你可能希望将其定义移到单独的文件中,以使代码更容易浏览。
例如,让我们从示例 7-17 中包含多个餐厅模块的代码开始。我们将模块提取到文件中,而不是将所有模块定义在 crate 根文件中。在本例中,crate 根文件是 src/lib.rs,但此过程也适用于 crate 根文件为 src/main.rs 的二进制 crate。
首先,我们将 front_of_house 模块提取到自己的文件中。删除 front_of_house 模块大括号内的代码,只保留 mod front_of_house; 声明,这样 src/lib.rs 包含示例 7-21 中所示的代码。请注意,在我们创建示例 7-22 中的 src/front_of_house.rs 文件之前,这段代码不会编译。
mod front_of_house;
pub use crate::front_of_house::hosting;
pub fn eat_at_restaurant() {
hosting::add_to_waitlist();
}front_of_house 模块,其函数体将在 src/front_of_house.rs 中接下来,将原来在大括号内的代码放入一个名为 src/front_of_house.rs 的新文件中,如示例 7-22 所示。编译器知道要在此文件中查找,因为它在 crate 根中遇到了名为 front_of_house 的模块声明。
pub mod hosting {
pub fn add_to_waitlist() {}
}front_of_house 模块内部的定义请注意,你只需要在模块树中一次使用 mod 声明来加载一个文件。一旦编译器知道该文件是项目的一部分(并且因为 mod 语句的位置而知道代码在模块树中的位置),项目中的其他文件应使用指向其声明位置的路径来引用该已加载文件的代码,如“引用模块树中项的路径”一节所述。换句话说,mod 不是你在其他编程语言中可能见过的“include“操作。
接下来,我们将 hosting 模块提取到自己的文件中。这个过程略有不同,因为 hosting 是 front_of_house 的子模块,而不是根模块的子模块。我们将 hosting 的文件放在一个以其在模块树中的祖先命名的新目录中,在本例中为 src/front_of_house。
要开始移动 hosting,我们将 src/front_of_house.rs 更改为仅包含 hosting 模块的声明:
pub mod hosting;然后,我们创建一个 src/front_of_house 目录和一个 hosting.rs 文件,以包含 hosting 模块中的定义:
pub fn add_to_waitlist() {}如果我们将 hosting.rs 放在 src 目录中,编译器会期望 hosting.rs 中的代码位于 crate 根中声明的 hosting 模块中,而不是作为 front_of_house 模块的子模块声明。编译器用于检查哪些文件对应哪些模块代码的规则,意味着目录和文件与模块树更加匹配。
替代文件路径(Alternate File Paths)
到目前为止,我们已经介绍了 Rust 编译器使用的最惯用的文件路径,但 Rust 也支持一种较旧风格的文件路径。对于在 crate 根中声明的名为 front_of_house 的模块,编译器会在以下位置查找模块的代码:
- src/front_of_house.rs(我们介绍的方式)
- src/front_of_house/mod.rs(较旧的风格,仍支持)
对于作为 front_of_house 子模块的名为 hosting 的模块,编译器会在以下位置查找模块的代码:
- src/front_of_house/hosting.rs(我们介绍的方式)
- src/front_of_house/hosting/mod.rs(较旧的风格,仍支持)
如果你对同一个模块同时使用两种风格,将会收到编译器错误。在同一项目中对不同模块混合使用两种风格是允许的,但可能会让浏览你的项目的人感到困惑。
使用名为 mod.rs 的文件风格的主要缺点是,你的项目可能最终会有许多名为 mod.rs 的文件,当你在编辑器中同时打开它们时可能会造成混淆。
我们已将每个模块的代码移动到单独的文件中,而模块树保持不变。eat_at_restaurant 中的函数调用将无需任何修改即可正常工作,即使定义位于不同的文件中。这种技术让你可以在模块大小增长时将其移动到新文件中。
请注意,src/lib.rs 中的 pub use crate::front_of_house::hosting 语句也没有改变,use 也对哪些文件被编译为 crate 的一部分没有任何影响。mod 关键字声明模块,Rust 在与模块同名的文件中查找该模块中的代码。
总结(Summary)
Rust 允许你将一个包(Package)拆分为多个 crate,并将一个 crate 拆分为多个模块(Module),以便你可以从一个模块引用另一个模块中定义的项(Item)。你可以通过指定绝对路径或相对路径来实现这一点。这些路径可以通过 use 语句引入作用域,这样你可以在该作用域中多次使用该项时使用更短的路径。模块代码默认是私有的,但你可以通过添加 pub 关键字使定义变为公共的。
在下一章中,我们将介绍标准库中的一些集合(Collection)数据结构,你可以在组织良好的代码中使用它们。
常见集合(Common Collections)
Rust 的标准库包含一系列非常有用的数据结构,称为集合(collections)。大多数其他数据类型代表一个特定的值,但集合可以包含多个值。与内置的数组(array)和元组(tuple)类型不同,这些集合所指向的数据存储在堆(heap)上,这意味着数据量不需要在编译时确定,可以在程序运行时增长或缩小。每种集合都有不同的能力和开销,根据当前情况选择合适的一种是你需要随着时间培养的技能。在本章中,我们将讨论 Rust 程序中经常使用的三种集合:
- 向量(vector) 允许你存储可变数量的连续值。
- 字符串(string) 是字符的集合。我们之前已经提到过
String类型,但在本章中,我们将深入讨论它。 - 哈希映射(hash map) 允许你将一个值与特定的键(key)关联起来。它是一种更通用的数据结构——映射(map)——的具体实现。
要了解标准库提供的其他类型的集合,请查阅文档。
我们将讨论如何创建和更新向量(vector)、字符串(string)和哈希映射(hash map),以及它们各自的特点。
使用 Vector 存储列表
使用向量(Vector)存储值列表
我们要介绍的第一个集合类型是 Vec<T>,也称为向量(vector)。向量允许你在一个数据结构中存储多个值,这些值在内存中连续排列。向量只能存储相同类型的值。当你有一列项目(例如文件中的文本行或购物车中商品的价格)时,它们非常有用。
创建新向量
要创建一个新的空向量,我们调用 Vec::new 函数,如示例 8-1 所示。
fn main() {
let v: Vec<i32> = Vec::new();
}i32 类型的值注意,我们在这里添加了类型注解。因为我们没有向这个向量插入任何值,Rust 不知道我们打算存储什么类型的元素。这是一个重要的点。向量是使用泛型(generics)实现的;我们将在第 10 章介绍如何在自定义类型中使用泛型。现在,只需要知道标准库提供的 Vec<T> 类型可以持有任何类型。当我们创建一个持有特定类型的向量时,可以在尖括号中指定该类型。在示例 8-1 中,我们告诉 Rust v 中的 Vec<T> 将持有 i32 类型的元素。
更常见的情况是,你会使用初始值创建一个 Vec<T>,Rust 会推断出你想要存储的值类型,因此你很少需要做这种类型注解。Rust 方便地提供了 vec! 宏,它会创建一个包含你给定值的新向量。示例 8-2 创建了一个新的 Vec<i32>,其中包含值 1、2 和 3。整数类型是 i32,因为它是默认的整数类型,正如我们在第 3 章的“数据类型”部分所讨论的那样。
fn main() {
let v = vec![1, 2, 3];
}因为我们给出了初始的 i32 值,Rust 可以推断出 v 的类型是 Vec<i32>,因此类型注解不是必需的。接下来,我们将看看如何修改一个向量。
更新向量
要创建一个向量然后向其中添加元素,我们可以使用 push 方法,如示例 8-3 所示。
fn main() {
let mut v = Vec::new();
v.push(5);
v.push(6);
v.push(7);
v.push(8);
}push 方法向向量添加值与任何变量一样,如果我们想要更改它的值,需要使用 mut 关键字使其可变,如第 3 章所述。我们放入其中的数字都是 i32 类型,Rust 从数据中推断出这一点,因此我们不需要 Vec<i32> 注解。
读取向量的元素
有两种方法可以引用向量中存储的值:通过索引(indexing)或使用 get 方法。在以下示例中,我们注释了这些函数返回的值的类型,以便更清晰。
示例 8-4 展示了访问向量中值的两种方法:索引语法和 get 方法。
fn main() {
let v = vec![1, 2, 3, 4, 5];
let third: &i32 = &v[2];
println!("The third element is {third}");
let third: Option<&i32> = v.get(2);
match third {
Some(third) => println!("The third element is {third}"),
None => println!("There is no third element."),
}
}get 方法访问向量中的元素这里有几个细节需要注意。我们使用索引值 2 来获取第三个元素,因为向量是按数字索引的,从零开始。使用 & 和 [] 会给我们一个指向索引处元素的引用。当我们使用 get 方法并将索引作为参数传入时,会得到一个 Option<&T>,我们可以与 match 配合使用。
Rust 提供了这两种引用元素的方式,以便你可以选择程序在尝试使用超出现有元素范围的索引值时的行为。举个例子,让我们看看当有一个包含五个元素的向量,然后尝试使用每种技术访问索引 100 处的元素时会发生什么,如示例 8-5 所示。
fn main() {
let v = vec![1, 2, 3, 4, 5];
let does_not_exist = &v[100];
let does_not_exist = v.get(100);
}当我们运行这段代码时,第一个 [] 方法会导致程序 panic,因为它引用了一个不存在的元素。当你希望在尝试访问向量末尾之后的元素时程序崩溃,这种方法最合适。
当向 get 方法传递一个超出向量范围的索引时,它返回 None 而不会 panic。如果在正常情况下的某些操作偶尔会访问超出向量范围的元素,你会使用这种方法。然后你的代码将包含处理 Some(&element) 或 None 的逻辑,如第 6 章所述。例如,索引可能来自用户输入的数字。如果他们不小心输入了一个太大的数字,程序得到了 None 值,你可以告诉用户当前向量中有多少项,并给他们另一次输入有效值的机会。这比因为一个输入错误就让程序崩溃要更加用户友好!
当程序拥有有效引用时,借用检查器(borrow checker)会强制执行所有权和借用规则(涵盖在第 4 章),以确保该引用以及对向量内容的任何其他引用保持有效。回忆一下那条规则——你不能在同一个作用域中同时拥有可变引用和不可变引用。这条规则适用于示例 8-6,其中我们持有一个指向向量第一个元素的不可变引用,并尝试在末尾添加一个元素。如果我们后来还尝试在该函数中引用那个元素,这个程序将无法运行。
fn main() {
let mut v = vec![1, 2, 3, 4, 5];
let first = &v[0];
v.push(6);
println!("The first element is: {first}");
}编译这段代码将导致以下错误:
$ cargo run
Compiling collections v0.1.0 (file:///projects/collections)
error[E0502]: cannot borrow `v` as mutable because it is also borrowed as immutable
--> src/main.rs:6:5
|
4 | let first = &v[0];
| - immutable borrow occurs here
5 |
6 | v.push(6);
| ^^^^^^^^^ mutable borrow occurs here
7 |
8 | println!("The first element is: {first}");
| ----- immutable borrow later used here
For more information about this error, try `rustc --explain E0502`.
error: could not compile `collections` (bin "collections") due to 1 previous error
示例 8-6 中的代码看起来似乎是可行的:为什么对第一个元素的引用会关心向量末尾的变化?这个错误是由于向量的工作方式造成的:因为向量将值在内存中连续排列,所以如果在向量当前存储的位置没有足够的空间把所有元素连续放置,那么向末尾添加一个新元素可能需要分配新的内存并将旧元素复制到新空间。在这种情况下,对第一个元素的引用就会指向已释放的内存。借用规则防止程序陷入这种境地。
注意:有关
Vec<T>类型实现细节的更多信息,请参阅“Rustonomicon”。
遍历向量中的值
要依次访问向量中的每个元素,我们可以遍历所有元素,而不是逐次使用索引访问。示例 8-7 展示了如何使用 for 循环获取 i32 值向量中每个元素的不可变引用并打印它们。
fn main() {
let v = vec![100, 32, 57];
for i in &v {
println!("{i}");
}
}for 循环遍历向量中的元素来打印每个元素我们还可以遍历可变向量中每个元素的可变引用,以便对所有元素进行更改。示例 8-8 中的 for 循环将为每个元素加上 50。
fn main() {
let mut v = vec![100, 32, 57];
for i in &mut v {
*i += 50;
}
}要更改可变引用所指向的值,我们必须使用 * 解引用运算符(dereference operator)来获取 i 中的值,然后才能使用 += 运算符。我们将在第 15 章的“跟随引用到值”部分进一步讨论解引用运算符。
由于借用检查器的规则,遍历向量(无论是不可变地还是可变地)是安全的。如果我们在示例 8-7 和示例 8-8 的 for 循环体中尝试插入或删除元素,我们会得到与示例 8-6 类似的编译器错误。 for 循环持有的对向量的引用会阻止对整个向量进行同时修改。
使用枚举存储多种类型
向量只能存储相同类型的值。这可能不太方便;确实有些用例需要存储不同类型值的列表。幸运的是,枚举的变体(variant)是在同一枚举类型下定义的,所以当我们需要一种类型来表示不同类型的元素时,我们可以定义并使用一个枚举!
例如,假设我们想要从电子表格中的一行获取值,该行中有些列包含整数,有些包含浮点数,还有些包含字符串。我们可以定义一个枚举,其变体将持有不同的值类型,并且所有枚举变体都将被视为相同类型:即该枚举的类型。然后,我们可以创建一个持有该枚举的向量,从而最终持有不同的类型。我们在示例 8-9 中演示了这一点。
fn main() {
enum SpreadsheetCell {
Int(i32),
Float(f64),
Text(String),
}
let row = vec![
SpreadsheetCell::Int(3),
SpreadsheetCell::Text(String::from("blue")),
SpreadsheetCell::Float(10.12),
];
}Rust 需要在编译时知道向量中将包含哪些类型,以便它确切地知道需要在堆上分配多少内存来存储每个元素。我们还必须明确说明该向量中允许哪些类型。如果 Rust 允许一个向量持有任意类型,那么其中一种或多种类型可能会在对向量元素执行的操作中引发错误。使用枚举加 match 表达式意味着 Rust 会在编译时确保每个可能的情况都得到处理,如第 6 章所述。
如果你在编译时不知道程序运行时将存储在向量中的类型的完整集合,枚举技术就不起作用。相反,你可以使用 trait 对象(trait object),我们将在第 18 章中介绍。
现在我们已经讨论了一些使用向量的最常用方法,请务必查阅API 文档以了解标准库在 Vec<T> 上定义的所有有用的方法。例如,除了 push 之外,还有一个 pop 方法用于移除并返回最后一个元素。
释放向量即释放其元素
与任何其他 struct 一样,向量在其超出作用域时被释放,如示例 8-10 所示。
fn main() {
{
let v = vec![1, 2, 3, 4];
// do stuff with v
} // <- v goes out of scope and is freed here
}当向量被释放时,其所有内容也被释放,这意味着它持有的整数将被清理掉。借用检查器确保对向量内容的任何引用只在向量本身有效时使用。
接下来让我们讨论下一种集合类型:String!
使用字符串存储 UTF-8 编码文本
使用字符串(String)存储 UTF-8 编码的文本
我们在第 4 章讨论过字符串,但现在我们将更深入地研究它们。新 Rustaceans(Rust 初学者)经常在字符串问题上卡住,这是由于三个原因共同造成的:Rust 倾向于暴露可能的错误、字符串是一种比许多程序员所认为的更复杂的数据结构,以及 UTF-8。这些因素结合在一起,使得来自其他编程语言的人会感到困难。
我们在集合的语境下讨论字符串,因为字符串是作为字节集合实现的,再加上一些方法,用于在这些字节被解释为文本时提供有用的功能。在本节中,我们将讨论 String 上所有集合类型都具有的操作,例如创建、更新和读取。我们还将讨论 String 与其他集合的不同之处,即:由于人和计算机对 String 数据的解释方式不同,对 String 进行索引变得复杂。
定义字符串
我们首先定义一下术语*字符串(string)*的含义。Rust 核心语言中只有一种字符串类型,那就是字符串切片(string slice)str,通常以其借用形式 &str 出现。在第 4 章中,我们讨论过字符串切片,它是对存储在其他位置的某些 UTF-8 编码字符串数据的引用。例如,字符串字面量(string literal)存储在程序的二进制文件中,因此是字符串切片。
String 类型由 Rust 的标准库提供,而非核心语言内置,它是一种可增长的、可变的、拥有的、UTF-8 编码的字符串类型。当 Rustaceans 在 Rust 中提到“字符串“时,他们可能指的是 String 或字符串切片 &str 类型,而不仅仅是其中一种。尽管本节主要讨论 String,但两种类型在 Rust 标准库中都大量使用,并且 String 和字符串切片都是 UTF-8 编码的。
创建新字符串
Vec<T> 可用的许多操作同样适用于 String,因为 String 实际上是围绕一个字节向量(vector of bytes)实现的包装器,并带有一些额外的保证、限制和功能。一个对 Vec<T> 和 String 工作方式相同的函数的例子是用于创建实例的 new 函数,如示例 8-11 所示。
fn main() {
let mut s = String::new();
}String这一行创建了一个名为 s 的新空字符串,然后我们可以向其中加载数据。通常,我们会有一些初始数据,希望用这些数据来初始化字符串。为此,我们使用 to_string 方法,该方法适用于任何实现了 Display trait 的类型,就像字符串字面量那样。示例 8-12 展示了两个例子。
fn main() {
let data = "initial contents";
let s = data.to_string();
// The method also works on a literal directly:
let s = "initial contents".to_string();
}to_string 方法从字符串字面量创建 String这段代码创建了一个包含 initial contents 的字符串。
我们也可以使用 String::from 函数从字符串字面量创建 String。示例 8-13 中的代码与使用 to_string 的示例 8-12 中的代码是等价的。
fn main() {
let s = String::from("initial contents");
}String::from 函数从字符串字面量创建 String因为字符串用途广泛,所以我们可以使用许多不同的通用 API 来处理字符串,这为我们提供了大量选择。其中一些可能看起来是多余的,但它们都有各自的用武之地!在这种情况下,String::from 和 to_string 做的是同一件事,所以选择哪一个取决于风格和可读性。
请记住,字符串是 UTF-8 编码的,因此我们可以在其中包含任何正确编码的数据,如示例 8-14 所示。
fn main() {
let hello = String::from("السلام عليكم");
let hello = String::from("Dobrý den");
let hello = String::from("Hello");
let hello = String::from("שלום");
let hello = String::from("नमस्ते");
let hello = String::from("こんにちは");
let hello = String::from("안녕하세요");
let hello = String::from("你好");
let hello = String::from("Olá");
let hello = String::from("Здравствуйте");
let hello = String::from("Hola");
}所有这些都是有效的 String 值。
更新字符串
String 可以增大其大小,其内容也可以改变,就像 Vec<T> 一样,如果你向其中推入更多数据的话。此外,你可以方便地使用 + 运算符或 format! 宏来拼接 String 值。
使用 push_str 或 push 追加
我们可以使用 push_str 方法来追加一个字符串切片,从而使 String 增长,如示例 8-15 所示。
fn main() {
let mut s = String::from("foo");
s.push_str("bar");
}push_str 方法向 String 追加字符串切片经过这两行之后,s 将包含 foobar。push_str 方法接受一个字符串切片,因为我们不一定需要获取参数的所有权。例如,在示例 8-16 的代码中,我们希望将 s2 的内容追加到 s1 之后,仍然能够使用 s2。
fn main() {
let mut s1 = String::from("foo");
let s2 = "bar";
s1.push_str(s2);
println!("s2 is {s2}");
}String 后继续使用它如果 push_str 方法获取了 s2 的所有权,我们就无法在最后一行打印它的值了。然而,这段代码正如我们所期望的那样工作!
push 方法接受单个字符作为参数,并将其添加到 String 中。示例 8-17 使用 push 方法向 String 添加字母 l。
fn main() {
let mut s = String::from("lo");
s.push('l');
}push 向 String 值添加一个字符结果,s 将包含 lol。
使用 + 或 format! 进行拼接
通常,你会想要合并两个现有的字符串。一种方法是使用 + 运算符,如示例 8-18 所示。
fn main() {
let s1 = String::from("Hello, ");
let s2 = String::from("world!");
let s3 = s1 + &s2; // note s1 has been moved here and can no longer be used
}+ 运算符将两个 String 值合并为一个新的 String 值字符串 s3 将包含 Hello, world!。s1 在加法之后不再有效的原因,以及我们使用 s2 的引用的原因,与使用 + 运算符时调用的方法的签名有关。+ 运算符使用了 add 方法,其签名大致如下:
fn add(self, s: &str) -> String {在标准库中,你会看到 add 是通过泛型和关联类型(associated types)定义的。这里我们替换成了具体类型,也就是当我们将 String 值传入该方法时实际发生的情况。我们将在第 10 章讨论泛型。这个签名为我们提供了理解 + 运算符棘手之处所需的线索。
首先,s2 带有 &,意味着我们是将第二个字符串的引用添加到第一个字符串。这是因为 add 函数中的 s 参数:我们只能将字符串切片添加到 String;不能将两个 String 值相加。但是等等——&s2 的类型是 &String,而不是 add 第二个参数所指定的 &str。那么,为什么示例 8-18 能编译通过呢?
我们能够在调用 add 时使用 &s2 的原因是编译器可以将 &String 参数强制转换为 &str。当我们调用 add 方法时,Rust 使用了解引用强制多态(deref coercion),在这里它将 &s2 转换为 &s2[..]。我们将在第 15 章更深入地讨论解引用强制多态。因为 add 不获取 s 参数的所有权,所以 s2 在此操作之后仍然是有效的 String。
其次,我们在签名中可以看到 add 获取了 self 的所有权,因为 self 没有 &。这意味着示例 8-18 中的 s1 将被移入 add 调用中,并在那之后不再有效。因此,尽管 let s3 = s1 + &s2; 看起来像是会复制两个字符串并创建一个新的字符串,但实际上这个语句获取了 s1 的所有权,追加了 s2 内容的副本,然后返回结果的所有权。换句话说,它看起来像是在做大量的拷贝,但实际上并非如此;实现比复制更加高效。
如果我们需要拼接多个字符串,+ 运算符的行为将变得笨拙:
fn main() {
let s1 = String::from("tic");
let s2 = String::from("tac");
let s3 = String::from("toe");
let s = s1 + "-" + &s2 + "-" + &s3;
}此时,s 将是 tic-tac-toe。有了所有这些 + 和 " 字符,很难看清楚发生了什么。对于更复杂的字符串组合,我们可以改用 format! 宏:
fn main() {
let s1 = String::from("tic");
let s2 = String::from("tac");
let s3 = String::from("toe");
let s = format!("{s1}-{s2}-{s3}");
}这段代码也将 s 设置为 tic-tac-toe。format! 宏的工作方式类似于 println!,但它不是将输出打印到屏幕,而是返回一个包含内容的 String。使用 format! 的代码版本更易于阅读,并且 format! 宏生成的代码使用的是引用,因此该调用不会获取任何参数的所有权。
索引字符串
在许多其他编程语言中,通过索引引用字符串中的单个字符是一种有效且常见的操作。然而,如果你尝试在 Rust 中使用索引语法访问 String 的部分内容,你将得到一个错误。考虑示例 8-19 中无效的代码。
fn main() {
let s1 = String::from("hi");
let h = s1[0];
}String 使用索引语法这段代码将导致以下错误:
$ cargo run
Compiling collections v0.1.0 (file:///projects/collections)
error[E0277]: the type `str` cannot be indexed by `{integer}`
--> src/main.rs:3:16
|
3 | let h = s1[0];
| ^ string indices are ranges of `usize`
|
= help: the trait `SliceIndex<str>` is not implemented for `{integer}`
= note: you can use `.chars().nth()` or `.bytes().nth()`
for more information, see chapter 8 in The Book: <https://doc.rust-lang.org/book/ch08-02-strings.html#indexing-into-strings>
= help: the following other types implement trait `SliceIndex<T>`:
`usize` implements `SliceIndex<ByteStr>`
`usize` implements `SliceIndex<[T]>`
= note: required for `String` to implement `Index<{integer}>`
For more information about this error, try `rustc --explain E0277`.
error: could not compile `collections` (bin "collections") due to 1 previous error
错误说明了一切:Rust 字符串不支持索引。但为什么不支持呢?要回答这个问题,我们需要讨论 Rust 如何在内存中存储字符串。
内部表示
String 是对 Vec<u8> 的包装。让我们看看示例 8-14 中一些正确编码的 UTF-8 示例字符串。首先是这个:
fn main() {
let hello = String::from("السلام عليكم");
let hello = String::from("Dobrý den");
let hello = String::from("Hello");
let hello = String::from("שלום");
let hello = String::from("नमस्ते");
let hello = String::from("こんにちは");
let hello = String::from("안녕하세요");
let hello = String::from("你好");
let hello = String::from("Olá");
let hello = String::from("Здравствуйте");
let hello = String::from("Hola");
}在这种情况下,len 将是 4,这意味着存储字符串 "Hola" 的向量长度为 4 字节。这些字母每个在用 UTF-8 编码时占用 1 字节。然而,下面这一行可能会让你感到惊讶(注意,这个字符串以大写西里尔字母 Ze 开头,而不是数字 3):
fn main() {
let hello = String::from("السلام عليكم");
let hello = String::from("Dobrý den");
let hello = String::from("Hello");
let hello = String::from("שלום");
let hello = String::from("नमस्ते");
let hello = String::from("こんにちは");
let hello = String::from("안녕하세요");
let hello = String::from("你好");
let hello = String::from("Olá");
let hello = String::from("Здравствуйте");
let hello = String::from("Hola");
}如果有人问你该字符串有多长,你可能会说 12。实际上,Rust 的答案是 24:这是用 UTF-8 编码“Здравствуйте“所需的字节数,因为该字符串中的每个 Unicode 标量值(Unicode scalar value)占用 2 字节的存储空间。因此,对字符串字节的索引并不总是与有效的 Unicode 标量值对应。为了说明这一点,请考虑以下无效的 Rust 代码:
let hello = "Здравствуйте";
let answer = &hello[0];你已经知道 answer 不会是 З,即第一个字母。在用 UTF-8 编码时,З 的第一个字节是 208,第二个字节是 151,所以看起来 answer 实际上应该是 208,但 208 本身并不是一个有效的字符。返回 208 很可能不是用户想要的结果,当他们要求该字符串的第一个字母时;然而,这是 Rust 在字节索引 0 处所拥有的唯一数据。用户通常不希望返回字节值,即使字符串只包含拉丁字母也是如此:如果 &"hi"[0] 是返回字节值的有效代码,它将返回 104,而不是 h。
因此,答案是:为了避免返回意外值并可能导致无法立即发现的 bug,Rust 根本不会编译这段代码,并在开发过程的早期就防止误解。
字节、标量值和字素簇(Grapheme Cluster)
关于 UTF-8 的另一点是,从 Rust 的角度来看,实际上有三种相关的方式来看待字符串:作为字节(bytes)、作为标量值(scalar values)和作为字素簇(grapheme clusters,最接近我们所说的字母的概念)。
如果我们看看用天城文书写的印地语单词“नमस्ते“,它存储为如下所示的 u8 值向量:
[224, 164, 168, 224, 164, 174, 224, 164, 184, 224, 165, 141, 224, 164, 164,
224, 165, 135]
这是 18 个字节,也是计算机最终存储这些数据的方式。如果我们将其视为 Unicode 标量值——也就是 Rust 的 char 类型——这些字节看起来像这样:
['न', 'म', 'स', '्', 'त', 'े']
这里有六个 char 值,但第四个和第六个不是字母:它们是变音符号(diacritics),单独存在没有意义。最后,如果我们将其视为字素簇,就会得到人们所说的组成这个印地语单词的四个字母:
["न", "म", "स्", "ते"]
Rust 提供了不同的方式来解释计算机存储的原始字符串数据,以便每个程序可以选择它需要的解释方式,无论数据使用的是哪种人类语言。
Rust 不允许我们对 String 进行索引以获取字符的最后一个原因是,索引操作应该始终是常数时间(O(1))。但是,对于 String 来说,无法保证这种性能,因为 Rust 必须从头遍历内容直到索引位置,以确定有多少有效字符。
切片字符串
对字符串进行索引通常不是一个好主意,因为不清楚字符串索引操作的返回类型应该是什么:一个字节值、一个字符、一个字素簇还是一个字符串切片。因此,如果你确实需要使用索引来创建字符串切片,Rust 要求你更具体一些。
与其使用带有单个数字的 [] 进行索引,不如使用带有范围的 [] 来创建包含特定字节的字符串切片:
#![allow(unused)]
fn main() {
let hello = "Здравствуйте";
let s = &hello[0..4];
}在这里,s 将是一个 &str,包含字符串的前 4 个字节。之前,我们提到每个字符是 2 个字节,这意味着 s 将是 Зд。
如果我们尝试切割一个字符的部分字节,比如 &hello[0..1],Rust 会在运行时 panic,就像在向量中访问了无效索引一样:
$ cargo run
Compiling collections v0.1.0 (file:///projects/collections)
Finished `dev` profile [unoptimized + debuginfo] target(s) in 0.43s
Running `target/debug/collections`
thread 'main' panicked at src/main.rs:4:19:
byte index 1 is not a char boundary; it is inside 'З' (bytes 0..2) of `Здравствуйте`
note: run with `RUST_BACKTRACE=1` environment variable to display a backtrace
在创建带有范围的字符串切片时应谨慎,因为这可能会导致程序崩溃。
遍历字符串
操作字符串片段的最佳方式是明确你想要的是字符还是字节。对于单个 Unicode 标量值,使用 chars 方法。对“Зд“调用 chars 会将它们分离并返回两个 char 类型的值,你可以遍历结果来访问每个元素:
#![allow(unused)]
fn main() {
for c in "Зд".chars() {
println!("{c}");
}
}这段代码将打印以下内容:
З
д
另外,bytes 方法返回每个原始字节,这可能适用于你的特定领域:
#![allow(unused)]
fn main() {
for b in "Зд".bytes() {
println!("{b}");
}
}这段代码将打印组成该字符串的 4 个字节:
208
151
208
180
但请务必记住,有效的 Unicode 标量值可能由超过 1 个字节组成。
从字符串中获取字素簇(如天城文脚本那样)是复杂的,因此标准库不提供此功能。如果这是你需要的功能,可以在 crates.io 上找到相关的 crate。
处理字符串的复杂性
总而言之,字符串是复杂的。不同的编程语言对于如何向程序员呈现这种复杂性做出了不同的选择。Rust 选择了让所有 Rust 程序的默认行为是正确处理 String 数据,这意味着程序员需要提前更多地思考如何处理 UTF-8 数据。这种权衡暴露了比其他编程语言更多的字符串复杂性,但它防止了你在开发生命周期的后期处理涉及非 ASCII 字符的错误。
好消息是,标准库提供了大量基于 String 和 &str 类型构建的功能,以帮助正确处理这些复杂情况。请务必查阅文档,了解有用的方法,例如用于在字符串中搜索的 contains 和用于将字符串的一部分替换为另一个字符串的 replace。
接下来让我们转向稍微不那么复杂的东西:哈希映射(hash maps)!
使用哈希映射存储键值对
在哈希映射(Hash Map)中存储键与值的关联
我们最后一个常见的集合是哈希映射(hash map)。HashMap<K, V> 类型使用*哈希函数(hashing function)*存储类型 K 的键到类型 V 的值的映射,该函数决定了它如何将这些键和值放入内存。许多编程语言都支持这种数据结构,但它们通常使用不同的名称,例如 hash、map、object、hash table、dictionary 或 associative array,仅举几例。
当你想要查找数据时,不是像向量那样使用索引,而是使用可以是任何类型的键,这时哈希映射就很有用。例如,在一个游戏中,你可以使用哈希映射来跟踪每个队伍的得分,其中每个键是队伍名称,值是每个队伍的得分。给定队伍名称,你可以检索其得分。
我们将在本节中介绍哈希映射的基本 API,但标准库在 HashMap<K, V> 上定义的函数中隐藏着更多好东西。和往常一样,请查阅标准库文档了解更多信息。
创建新哈希映射
创建空哈希映射的一种方法是使用 new,并使用 insert 添加元素。在示例 8-20 中,我们跟踪两个队伍(名为 Blue 和 Yellow)的得分。Blue 队从 10 分开始,Yellow 队从 50 分开始。
fn main() {
use std::collections::HashMap;
let mut scores = HashMap::new();
scores.insert(String::from("Blue"), 10);
scores.insert(String::from("Yellow"), 50);
}注意,我们首先需要 use 标准库 collections 部分中的 HashMap。在我们的三种常见集合中,这是最不常用的,因此它没有被自动包含在 prelude(预导入)中。哈希映射从标准库获得的支持也较少;例如,没有内置的宏来构造它们。
与向量一样,哈希映射将其数据存储在堆上。这个 HashMap 的键是 String 类型,值是 i32 类型。与向量一样,哈希映射是同质的:所有键必须具有相同的类型,所有值必须具有相同的类型。
访问哈希映射中的值
我们可以通过将键提供给 get 方法来从哈希映射中获取值,如示例 8-21 所示。
fn main() {
use std::collections::HashMap;
let mut scores = HashMap::new();
scores.insert(String::from("Blue"), 10);
scores.insert(String::from("Yellow"), 50);
let team_name = String::from("Blue");
let score = scores.get(&team_name).copied().unwrap_or(0);
}在这里,score 将具有与 Blue 队关联的值,结果将是 10。get 方法返回一个 Option<&V>;如果哈希映射中没有该键对应的值,get 将返回 None。该程序通过调用 copied 来获得 Option<i32>(而不是 Option<&i32>),然后调用 unwrap_or 在 scores 中没有该键条目时将 score 设置为 0,以此方式处理 Option。
我们可以像处理向量一样,使用 for 循环以类似的方式遍历哈希映射中的每个键值对:
fn main() {
use std::collections::HashMap;
let mut scores = HashMap::new();
scores.insert(String::from("Blue"), 10);
scores.insert(String::from("Yellow"), 50);
for (key, value) in &scores {
println!("{key}: {value}");
}
}这段代码将以任意顺序打印每个键值对:
Yellow: 50
Blue: 10
哈希映射与所有权管理
对于实现了 Copy trait 的类型(如 i32),值会被复制到哈希映射中。对于拥有所有权的值(如 String),值将被移动,哈希映射将成为这些值的所有者,如示例 8-22 所示。
fn main() {
use std::collections::HashMap;
let field_name = String::from("Favorite color");
let field_value = String::from("Blue");
let mut map = HashMap::new();
map.insert(field_name, field_value);
// field_name and field_value are invalid at this point, try using them and
// see what compiler error you get!
}在变量 field_name 和 field_value 通过调用 insert 被移动到哈希映射中之后,我们无法再使用它们。
如果我们向哈希映射插入值的引用,这些值不会被移动到哈希映射中。引用所指向的值必须至少在哈希映射有效的整个期间内都有效。我们将在第 10 章的“使用生命周期(Lifetime)验证引用”中进一步讨论这些问题。
更新哈希映射
尽管键值对的数量是可以增长的,但每个唯一的键一次只能关联一个值(但反之则不然:例如,Blue 队和 Yellow 队都可以在 scores 哈希映射中存储值 10)。
当你想要更改哈希映射中的数据时,你必须决定如何处理键已有关联值的情况。你可以用新值替换旧值,完全忽略旧值。你可以保留旧值而忽略新值,仅在键尚未有关联值时添加新值。或者你可以合并旧值和新值。让我们看看如何实现每种情况!
覆盖一个值
如果我们向哈希映射插入一个键和一个值,然后又用不同的值插入同一个键,则该键关联的值将被替换。尽管示例 8-23 中的代码调用了两次 insert,但哈希映射只会包含一个键值对,因为我们两次插入的都是 Blue 队键的值。
fn main() {
use std::collections::HashMap;
let mut scores = HashMap::new();
scores.insert(String::from("Blue"), 10);
scores.insert(String::from("Blue"), 25);
println!("{scores:?}");
}这段代码将打印 {"Blue": 25}。原来的值 10 已被覆盖。
仅在键不存在时添加键和值
通常需要检查哈希映射中是否已存在某个特定键及其值,然后执行以下操作:如果该键存在于哈希映射中,则保留现有值不变;如果该键不存在,则插入它及其值。
哈希映射有一个特殊的 API 用于此,称为 entry,它将要检查的键作为参数。entry 方法的返回值是一个名为 Entry 的枚举,它表示一个可能存在也可能不存在的值。假设我们想检查 Yellow 队键是否已有关联值。如果没有,我们想插入值 50;对于 Blue 队也是如此。使用 entry API,代码如示例 8-24 所示。
fn main() {
use std::collections::HashMap;
let mut scores = HashMap::new();
scores.insert(String::from("Blue"), 10);
scores.entry(String::from("Yellow")).or_insert(50);
scores.entry(String::from("Blue")).or_insert(50);
println!("{scores:?}");
}entry 方法仅在键尚未关联值时插入Entry 上的 or_insert 方法被定义为:如果键存在,则返回对应 Entry 键的值的可变引用;如果不存在,则将参数作为该键的新值插入,并返回新值的可变引用。这种技术比我们自己编写逻辑要简洁得多,此外,它与借用检查器的配合也更好。
运行示例 8-24 中的代码将打印 {"Yellow": 50, "Blue": 10}。第一次调用 entry 将为 Yellow 队插入键与值 50,因为 Yellow 队还没有值。第二次调用 entry 不会更改哈希映射,因为 Blue 队已经有值 10。
基于旧值更新值
哈希映射的另一个常见用例是查找键的值,然后根据旧值更新它。例如,示例 8-25 显示了统计每个单词在文本中出现次数的代码。我们使用一个以单词为键的哈希映射,并递增值以跟踪我们看到该单词的次数。如果我们是第一次看到某个单词,我们会先插入值 0。
fn main() {
use std::collections::HashMap;
let text = "hello world wonderful world";
let mut map = HashMap::new();
for word in text.split_whitespace() {
let count = map.entry(word).or_insert(0);
*count += 1;
}
println!("{map:?}");
}这段代码将打印 {"world": 2, "hello": 1, "wonderful": 1}。你可能会看到相同的键值对以不同的顺序打印:回想一下“访问哈希映射中的值”,遍历哈希映射是以任意顺序进行的。
split_whitespace 方法返回一个迭代器,遍历 text 中以空白分隔的子切片。or_insert 方法返回指定键的值的可变引用(&mut V)。在这里,我们将该可变引用存储在 count 变量中,因此为了给该值赋值,我们必须首先使用星号(*)解引用 count。可变引用在 for 循环结束时超出作用域,因此所有这些更改都是安全的,并且为借用规则所允许。
哈希函数
默认情况下,HashMap 使用一种名为 SipHash 的哈希函数,它可以抵抗涉及哈希表的拒绝服务(DoS)攻击1。这不是可用的最快的哈希算法,但为了更好的安全性而降低性能,这种权衡是值得的。如果你对你的代码进行了性能分析,发现默认哈希函数对你的目的来说太慢,你可以通过指定一个不同的 hasher(哈希器)来切换到另一个函数。hasher 是一个实现了 BuildHasher trait 的类型。我们将在第 10 章讨论 trait 以及如何实现它们。你不一定需要从头开始实现自己的 hasher;crates.io 上有其他 Rust 用户共享的库,它们提供了实现许多常见哈希算法的 hasher。
总结
当你需要存储、访问和修改数据时,向量(vector)、字符串(string)和哈希映射(hash map)将在程序中提供所需的大量功能。以下是一些你现在应该能够解决的练习:
- 给定一个整数列表,使用向量并返回该列表的中位数(排序后中间位置的值)和众数(出现频率最高的值;哈希映射在这里很有帮助)。
- 将字符串转换为 Pig Latin(儿童黑话)。每个单词的第一个辅音(consonant)移到单词末尾,并加上 ay,因此 first 变成 irst-fay。以元音(vowel)开头的单词在末尾加上 hay(apple 变成 apple-hay)。请记住 UTF-8 编码的细节!
- 使用哈希映射和向量,创建一个文本界面,允许用户向公司的某个部门添加员工姓名;例如,“Add Sally to Engineering“或“Add Amir to Sales”。然后,让用户检索某个部门的所有人员列表,或按部门检索公司的所有人员列表,并按键排序。
标准库 API 文档描述了向量、字符串和哈希映射具有的方法,这些方法对这些练习会有帮助!
我们正在进入更复杂的程序,其中操作可能会失败,因此现在是讨论错误处理的好时机。我们接下来将进行讨论!
错误处理(Error Handling)
错误是软件中不可避免的事实,因此 Rust 提供了许多功能来处理出错的情况。在许多情况下,Rust 要求你承认错误的可能性,并在代码编译之前采取一些行动。这一要求通过确保你在将代码部署到生产环境之前发现错误并适当处理它们,从而使你的程序更加健壮!
Rust 将错误分为两大类:可恢复的(recoverable)错误和不可恢复的(unrecoverable)错误。对于可恢复的错误,例如文件未找到错误,我们可能只想向用户报告问题并重试操作。不可恢复的错误总是 bug 的症状,例如试图访问数组末尾之后的位置,因此我们希望立即停止程序。
大多数语言不区分这两种错误,而是使用异常(exceptions)等机制以相同的方式处理它们。Rust 没有异常。相反,它有针对可恢复错误的 Result<T, E> 类型,以及当程序遇到不可恢复错误时停止执行的 panic! 宏。本章先介绍调用 panic!,然后讨论返回 Result<T, E> 值。此外,我们还将探讨在决定是尝试从错误中恢复还是停止执行时需要考虑的因素。
不可恢复的错误与 panic!
使用 panic! 的不可恢复错误
有时候你的代码中会发生糟糕的事情,而你对此无能为力。在这些情况下,Rust 提供了 panic! 宏。实际上有两种方式导致 panic:执行一个会导致我们的代码 panic 的操作(例如访问数组末尾之后的位置),或者显式调用 panic! 宏。在这两种情况下,我们都会导致程序中出现 panic。默认情况下,这些 panic 会打印一条失败消息,展开(unwind)、清理栈并退出。通过环境变量,你也可以让 Rust 在发生 panic 时显示调用栈,以便更容易地追踪 panic 的来源。
关于 panic 时的栈展开与终止
默认情况下,当 panic 发生时,程序开始展开(unwinding),这意味着 Rust 会回退栈并清理它遇到的每个函数中的数据。然而,回退和清理是大量的工作。因此,Rust 允许你选择另一种方式:立即终止(aborting),即不进行清理就结束程序。
程序使用的内存随后需要由操作系统来清理。如果在你的项目中你希望使生成的二进制文件尽可能小,你可以通过在 Cargo.toml 文件的适当 [profile] 部分添加 panic = 'abort',来让 panic 时从展开切换为终止。例如,如果你希望在发布模式下 panic 时终止,请添加以下内容:
[profile.release]
panic = 'abort'
让我们在一个简单的程序中尝试调用 panic!:
fn main() {
panic!("crash and burn");
}当你运行这个程序时,你会看到类似这样的输出:
$ cargo run
Compiling panic v0.1.0 (file:///projects/panic)
Finished `dev` profile [unoptimized + debuginfo] target(s) in 0.25s
Running `target/debug/panic`
thread 'main' panicked at src/main.rs:2:5:
crash and burn
note: run with `RUST_BACKTRACE=1` environment variable to display a backtrace
对 panic! 的调用导致了最后两行中包含的错误消息。第一行显示了我们的 panic 消息以及 panic 发生位置在源代码中的位置:src/main.rs:2:5 表示它是 src/main.rs 文件的第二行、第五个字符。
在这种情况下,所指出的行是我们代码的一部分,如果去查看那一行,我们会看到 panic! 宏调用。在其他情况下,panic! 调用可能在我们代码所调用的代码中,错误消息报告的文件名和行号将是调用 panic! 宏的其他人的代码,而不是最终导致 panic! 调用的我们自己的代码行。
我们可以使用 panic! 调用来源函数的回溯(backtrace)来找出导致问题的代码部分。为了理解如何使用 panic! 回溯,让我们来看另一个例子,看看当 panic! 调用来自库(由于我们代码中的 bug)而不是我们的代码直接调用宏时是什么样子。示例 9-1 中的代码尝试访问向量中超出有效索引范围的索引。
fn main() {
let v = vec![1, 2, 3];
v[99];
}panic! 的调用在这里,我们试图访问向量的第 100 个元素(因为索引从零开始,实际上是索引 99),但向量只有三个元素。在这种情况下,Rust 会 panic。使用 [] 应该返回一个元素,但如果你传递了一个无效的索引,Rust 无法返回任何正确的元素。
在 C 中,尝试读取数据结构末尾之后的内存是未定义行为(undefined behavior)。你可能会得到内存中对应于该数据结构中该元素位置的值,即使该内存不属于该数据结构。这被称为缓冲区过度读取(buffer overread),如果攻击者能够操纵索引以读取存储在该数据结构之后的不应被允许读取的数据,则可能导致安全漏洞。
为了保护你的程序免受此类漏洞的侵害,如果你尝试读取不存在的索引处的元素,Rust 将停止执行并拒绝继续。让我们试一下看看:
$ cargo run
Compiling panic v0.1.0 (file:///projects/panic)
Finished `dev` profile [unoptimized + debuginfo] target(s) in 0.27s
Running `target/debug/panic`
thread 'main' panicked at src/main.rs:4:6:
index out of bounds: the len is 3 but the index is 99
note: run with `RUST_BACKTRACE=1` environment variable to display a backtrace
这个错误指向了 main.rs 的第 4 行,我们在那里尝试访问 v 中索引为 99 的元素。
note: 这一行告诉我们,我们可以设置 RUST_BACKTRACE 环境变量来获取一个回溯,精确地追踪到导致错误的原因。回溯(backtrace) 是一个列表,列出了到达此点所调用的所有函数。Rust 中的回溯与其他语言中的工作方式相同:阅读回溯的关键是从顶部开始,一直读到你看自己所写的文件。那就是问题起源的地方。该位置之上的行是你的代码所调用的代码;之下的行是调用你代码的代码。这些前后的行可能包括 Rust 核心代码、标准库代码或你正在使用的 crate。让我们尝试通过将 RUST_BACKTRACE 环境变量设置为除 0 之外的任何值来获取回溯。示例 9-2 显示了你将看到的类似输出。
$ RUST_BACKTRACE=1 cargo run
thread 'main' panicked at src/main.rs:4:6:
index out of bounds: the len is 3 but the index is 99
stack backtrace:
0: rust_begin_unwind
at /rustc/4d91de4e48198da2e33413efdcd9cd2cc0c46688/library/std/src/panicking.rs:692:5
1: core::panicking::panic_fmt
at /rustc/4d91de4e48198da2e33413efdcd9cd2cc0c46688/library/core/src/panicking.rs:75:14
2: core::panicking::panic_bounds_check
at /rustc/4d91de4e48198da2e33413efdcd9cd2cc0c46688/library/core/src/panicking.rs:273:5
3: <usize as core::slice::index::SliceIndex<[T]>>::index
at file:///home/.rustup/toolchains/1.85/lib/rustlib/src/rust/library/core/src/slice/index.rs:274:10
4: core::slice::index::<impl core::ops::index::Index<I> for [T]>::index
at file:///home/.rustup/toolchains/1.85/lib/rustlib/src/rust/library/core/src/slice/index.rs:16:9
5: <alloc::vec::Vec<T,A> as core::ops::index::Index<I>>::index
at file:///home/.rustup/toolchains/1.85/lib/rustlib/src/rust/library/alloc/src/vec/mod.rs:3361:9
6: panic::main
at ./src/main.rs:4:6
7: core::ops::function::FnOnce::call_once
at file:///home/.rustup/toolchains/1.85/lib/rustlib/src/rust/library/core/src/ops/function.rs:250:5
note: Some details are omitted, run with `RUST_BACKTRACE=full` for a verbose backtrace.
panic! 的调用生成的回溯,在设置了环境变量 RUST_BACKTRACE 时显示输出真多!你看到的确切输出可能因你的操作系统和 Rust 版本而异。为了获取具有此信息的回溯,必须启用调试符号(debug symbols)。在使用 cargo build 或 cargo run 而不带 --release 标志时,默认情况下启用调试符号,正如我们这里所做的那样。
在示例 9-2 的输出中,回溯的第 6 行指向了我们项目中导致问题的行:src/main.rs 的第 4 行。如果我们不希望程序 panic,我们应该从第一个提到我们写的文件的位置开始调查。在示例 9-1 中,我们故意编写了会导致 panic 的代码,修复 panic 的方法是不要请求超出向量索引范围的元素。将来当你的代码 panic 时,你需要找出代码使用了什么值执行了什么操作导致了 panic,以及代码应该怎么做。
我们将在本章后面的“是 panic! 还是不 panic!”部分回到 panic! 以及我们在处理错误情况时应该和不应该使用 panic! 的讨论。接下来,我们将看看如何使用 Result 从错误中恢复。
可恢复的错误与 Result
使用 Result 的可恢复错误
大多数错误并不严重到需要程序完全停止。有时当函数失败时,是由于一个你可以轻松解释并做出反应的原因。例如,如果你尝试打开一个文件,但由于文件不存在而失败,你可能想要创建文件而不是终止进程。
回想一下第 2 章中“使用 Result 处理潜在失败”部分,Result 枚举被定义为有两个变体(variant),Ok 和 Err,如下所示:
#![allow(unused)]
fn main() {
enum Result<T, E> {
Ok(T),
Err(E),
}
}T 和 E 是泛型类型参数(generic type parameters):我们将在第 10 章更详细地讨论泛型。你现在需要知道的是,T 表示在成功情况下 Ok 变体中将返回的值的类型,而 E 表示在失败情况下 Err 变体中将返回的错误类型。由于 Result 具有这些泛型类型参数,我们可以在许多不同的情况下使用 Result 类型及其上定义的函数,这些情况下我们想要返回的成功值和错误值可能不同。
让我们调用一个返回 Result 值的函数,因为该函数可能会失败。在示例 9-3 中,我们尝试打开一个文件。
use std::fs::File;
fn main() {
let greeting_file_result = File::open("hello.txt");
}File::open 的返回类型是 Result<T, E>。泛型参数 T 已被 File::open 的实现填充为成功值的类型,即 std::fs::File,这是一个文件句柄(file handle)。错误值中使用的 E 的类型是 std::io::Error。这个返回类型意味着对 File::open 的调用可能成功并返回一个我们可以读取或写入的文件句柄。该函数调用也可能失败:例如,文件可能不存在,或者我们可能没有权限访问该文件。File::open 函数需要有一种方式来告诉我们它是否成功或失败,同时给我们文件句柄或错误信息。这正是 Result 枚举所传达的信息。
在 File::open 成功的情况下,变量 greeting_file_result 中的值将是一个包含文件句柄的 Ok 实例。在失败的情况下,greeting_file_result 中的值将是一个包含更多错误信息的 Err 实例。
我们需要向示例 9-3 中的代码添加一些内容,以根据 File::open 返回的值执行不同的操作。示例 9-4 展示了一种使用基本工具——我们在第 6 章讨论过的 match 表达式——来处理 Result 的方法。
use std::fs::File;
fn main() {
let greeting_file_result = File::open("hello.txt");
let greeting_file = match greeting_file_result {
Ok(file) => file,
Err(error) => panic!("Problem opening the file: {error:?}"),
};
}match 表达式处理可能返回的 Result 变体请注意,与 Option 枚举一样,Result 枚举及其变体已由 prelude(预导入)引入作用域,因此我们不需要在 match 分支中的 Ok 和 Err 变体前指定 Result::。
当结果是 Ok 时,这段代码将返回 Ok 变体中的内部 file 值,然后我们将该文件句柄值赋给变量 greeting_file。在 match 之后,我们可以使用文件句柄进行读取或写入。
match 的另一个分支处理我们从 File::open 得到 Err 值的情况。在这个例子中,我们选择了调用 panic! 宏。如果当前目录中没有名为 hello.txt 的文件,并且我们运行这段代码,我们将看到来自 panic! 宏的以下输出:
$ cargo run
Compiling error-handling v0.1.0 (file:///projects/error-handling)
Finished `dev` profile [unoptimized + debuginfo] target(s) in 0.73s
Running `target/debug/error-handling`
thread 'main' panicked at src/main.rs:8:23:
Problem opening the file: Os { code: 2, kind: NotFound, message: "No such file or directory" }
note: run with `RUST_BACKTRACE=1` environment variable to display a backtrace
和往常一样,这个输出准确地告诉我们出了什么问题。
对不同错误进行匹配
示例 9-4 中的代码无论 File::open 失败的原因是什么,都会 panic!。然而,我们想针对不同的失败原因采取不同的操作。如果 File::open 因为文件不存在而失败,我们希望创建该文件并返回新文件的句柄。如果 File::open 因任何其他原因失败——例如,因为我们没有打开文件的权限——我们仍然希望代码像示例 9-4 中那样 panic!。为此,我们添加一个内部的 match 表达式,如示例 9-5 所示。
use std::fs::File;
use std::io::ErrorKind;
fn main() {
let greeting_file_result = File::open("hello.txt");
let greeting_file = match greeting_file_result {
Ok(file) => file,
Err(error) => match error.kind() {
ErrorKind::NotFound => match File::create("hello.txt") {
Ok(fc) => fc,
Err(e) => panic!("Problem creating the file: {e:?}"),
},
_ => {
panic!("Problem opening the file: {error:?}");
}
},
};
}File::open 在 Err 变体内部返回的值的类型是 io::Error,这是标准库提供的一个结构体。这个结构体有一个方法 kind,我们可以调用它来获取一个 io::ErrorKind 值。io::ErrorKind 枚举由标准库提供,其变体表示可能由 io 操作导致的各种错误类型。我们想要使用的变体是 ErrorKind::NotFound,它表示我们试图打开的文件尚不存在。因此,我们在 greeting_file_result 上进行匹配,但我们还在 error.kind() 上进行内部匹配。
我们在内部匹配中想要检查的条件是 error.kind() 返回的值是否是 ErrorKind 枚举的 NotFound 变体。如果是,我们尝试用 File::create 创建文件。然而,因为 File::create 也可能失败,所以我们需要内部 match 表达式中的第二个分支。当文件无法创建时,会打印不同的错误消息。外部 match 的第二个分支保持不变,因此除了文件缺失错误之外,任何其他错误都会导致程序 panic。
使用 match 处理 Result<T, E> 的替代方案
那是很多的 match!match 表达式非常有用,但也非常原始。在第 13 章中,你将学习闭包(closures),它们与 Result<T, E> 上定义的许多方法一起使用。在处理代码中的 Result<T, E> 值时,这些方法可能比使用 match 更简洁。
例如,以下是另一种编写与示例 9-5 相同逻辑的方式,这次使用闭包和 unwrap_or_else 方法:
use std::fs::File;
use std::io::ErrorKind;
fn main() {
let greeting_file = File::open("hello.txt").unwrap_or_else(|error| {
if error.kind() == ErrorKind::NotFound {
File::create("hello.txt").unwrap_or_else(|error| {
panic!("Problem creating the file: {error:?}");
})
} else {
panic!("Problem opening the file: {error:?}");
}
});
}尽管这段代码与示例 9-5 具有相同的行为,但它不包含任何 match 表达式,并且阅读起来更清晰。在你阅读完第 13 章后,请回到这个例子,并在标准库文档中查阅 unwrap_or_else 方法。在处理错误时,还有更多这样的方法可以清理庞大、嵌套的 match 表达式。
错误时 panic 的快捷方式
使用 match 效果很好,但它可能有点冗长,并且不一定能很好地传达意图。Result<T, E> 类型上定义了许多辅助方法,用于执行各种更具体的任务。unwrap 方法是一个快捷方式方法,其实现方式与我们写在示例 9-4 中的 match 表达式类似。如果 Result 值是 Ok 变体,unwrap 将返回 Ok 内部的值。如果 Result 是 Err 变体,unwrap 将为我们调用 panic! 宏。以下是 unwrap 在行动中的示例:
use std::fs::File;
fn main() {
let greeting_file = File::open("hello.txt").unwrap();
}如果我们没有 hello.txt 文件就运行这段代码,我们将看到来自 unwrap 方法调用的 panic! 的错误消息:
thread 'main' panicked at src/main.rs:4:49:
called `Result::unwrap()` on an `Err` value: Os { code: 2, kind: NotFound, message: "No such file or directory" }
类似地,expect 方法让我们也可以选择 panic! 的错误消息。使用 expect 而不是 unwrap 并提供良好的错误消息可以传达你的意图,并使追踪 panic 的来源更容易。expect 的语法如下所示:
use std::fs::File;
fn main() {
let greeting_file = File::open("hello.txt")
.expect("hello.txt should be included in this project");
}我们使用 expect 的方式与 unwrap 相同:返回文件句柄或调用 panic! 宏。expect 在其调用 panic! 时使用的错误消息将是我们传递给 expect 的参数,而不是 unwrap 使用的默认 panic! 消息。以下是它的样子:
thread 'main' panicked at src/main.rs:5:10:
hello.txt should be included in this project: Os { code: 2, kind: NotFound, message: "No such file or directory" }
在生产质量的代码中,大多数 Rustaceans 选择 expect 而不是 unwrap,并提供更多关于为什么该操作预期总是成功的上下文。这样,如果你的假设被证明是错误的,你在调试时就有更多信息可以使用。
传播错误
当函数的实现调用可能失败的内容时,你可以不在此函数内部处理错误,而是将错误返回给调用代码,以便它可以决定该怎么做。这被称为*传播(propagating)*错误,并赋予调用代码更多的控制权,因为调用代码可能拥有更多信息或逻辑来决定应如何处理错误,而不是在你的代码上下文中可用。
例如,示例 9-6 显示了一个从文件读取用户名的函数。如果文件不存在或无法读取,此函数将把这些错误返回给调用它的代码。
#![allow(unused)]
fn main() {
use std::fs::File;
use std::io::{self, Read};
fn read_username_from_file() -> Result<String, io::Error> {
let username_file_result = File::open("hello.txt");
let mut username_file = match username_file_result {
Ok(file) => file,
Err(e) => return Err(e),
};
let mut username = String::new();
match username_file.read_to_string(&mut username) {
Ok(_) => Ok(username),
Err(e) => Err(e),
}
}
}match 将错误返回给调用代码的函数这个函数可以用更简短的方式编写,但我们先手动做很多工作来探索错误处理;最后,我们将展示更简短的方式。首先看看函数的返回类型:Result<String, io::Error>。这意味着该函数返回一个 Result<T, E> 类型的值,其中泛型参数 T 已被具体类型 String 填充,泛型类型 E 已被具体类型 io::Error 填充。
如果此函数成功且没有任何问题,调用此函数的代码将收到一个包含 String 的 Ok 值——即此函数从文件中读取的 username。如果此函数遇到任何问题,调用代码将收到一个包含 io::Error 实例的 Err 值,其中包含有关问题所在的更多信息。我们选择 io::Error 作为此函数的返回类型,因为碰巧我们在此函数体中调用的两个可能失败的操作返回的错误值的类型都是它:File::open 函数和 read_to_string 方法。
函数体首先调用 File::open 函数。然后,我们使用 match 处理 Result 值,类似于示例 9-4 中的 match。如果 File::open 成功,模式变量 file 中的文件句柄成为可变变量 username_file 中的值,函数继续执行。在 Err 情况下,我们不调用 panic!,而是使用 return 关键字从函数中提前返回,并将 File::open 中的错误值(现在在模式变量 e 中)作为此函数的错误值传回给调用代码。
因此,如果在 username_file 中有一个文件句柄,则该函数在变量 username 中创建一个新的 String,并调用 username_file 中文件句柄上的 read_to_string 方法,将文件内容读入 username。read_to_string 方法也返回一个 Result,因为它可能失败,即使 File::open 成功了。所以,我们需要另一个 match 来处理那个 Result:如果 read_to_string 成功,那么我们的函数成功了,我们返回文件中的用户名(现在在 username 中),包裹在 Ok 中。如果 read_to_string 失败,我们以与处理 File::open 返回值的 match 中相同的错误值返回方式返回错误值。然而,我们不需要显式写出 return,因为这是函数中的最后一个表达式。
调用此代码的代码将随后处理得到包含用户名的 Ok 值或包含 io::Error 的 Err 值。由调用代码决定如何处理这些值。如果调用代码得到 Err 值,它可以调用 panic! 并使程序崩溃,使用默认用户名,或者从文件以外的其他地方查找用户名,等等。我们没有足够的信息知道调用代码实际想做什么,因此我们将所有成功或错误信息向上传播以供其适当处理。
这种错误传播模式在 Rust 中非常常见,以至于 Rust 提供了问号运算符 ? 来使其更容易。
? 运算符快捷方式
示例 9-7 展示了 read_username_from_file 的一个实现,它具有与示例 9-6 相同的功能,但此实现使用了 ? 运算符。
#![allow(unused)]
fn main() {
use std::fs::File;
use std::io::{self, Read};
fn read_username_from_file() -> Result<String, io::Error> {
let mut username_file = File::open("hello.txt")?;
let mut username = String::new();
username_file.read_to_string(&mut username)?;
Ok(username)
}
}? 运算符将错误返回给调用代码的函数放在 Result 值后面的 ? 被定义为与我们在示例 9-6 中定义的用于处理 Result 值的 match 表达式几乎完全相同的方式工作。如果 Result 的值是 Ok,Ok 内部的值将从此表达式返回,程序继续执行。如果值是 Err,Err 将像我们使用了 return 关键字一样从整个函数返回,从而将错误值传播给调用代码。
示例 9-6 中的 match 表达式与 ? 运算符之间有一个区别:对其调用 ? 运算符的错误值会通过标准库中 From trait 定义的 from 函数,该函数用于将值从一种类型转换为另一种类型。当 ? 运算符调用 from 函数时,接收到的错误类型会被转换为当前函数返回类型中定义的错误类型。当一个函数返回一种错误类型来表示函数可能失败的所有方式时,即使某些部分可能因多种不同原因而失败,这非常有用。
例如,我们可以将示例 9-7 中的 read_username_from_file 函数改为返回我们定义的自定义错误类型 OurError。如果我们还定义了 impl From<io::Error> for OurError 来从 io::Error 构造一个 OurError 实例,那么 read_username_from_file 函数体中的 ? 运算符调用将调用 from 并转换错误类型,而无需向函数添加任何额外的代码。
在示例 9-7 的上下文中,File::open 调用末尾的 ? 将返回 Ok 内部的值给变量 username_file。如果发生错误,? 运算符将从整个函数提前返回,并将任何 Err 值交给调用代码。同样的情况也适用于 read_to_string 调用末尾的 ?。
? 运算符消除了大量样板代码,并使此函数的实现更简单。我们甚至可以通过在 ? 之后立即链式调用方法进一步缩短这段代码,如示例 9-8 所示。
#![allow(unused)]
fn main() {
use std::fs::File;
use std::io::{self, Read};
fn read_username_from_file() -> Result<String, io::Error> {
let mut username = String::new();
File::open("hello.txt")?.read_to_string(&mut username)?;
Ok(username)
}
}? 运算符之后链式调用方法我们将 username 中新 String 的创建移到了函数的开头;这部分没有改变。我们没有创建变量 username_file,而是将对 read_to_string 的调用直接链式接到 File::open("hello.txt")? 的结果上。我们仍然在 read_to_string 调用的末尾有一个 ?,并且当 File::open 和 read_to_string 都成功而不是返回错误时,我们仍然返回一个包含 username 的 Ok 值。功能再次与示例 9-6 和示例 9-7 相同;这只是另一种更符合人体工程学(ergonomic)的编写方式。
示例 9-9 展示了使用 fs::read_to_string 使这段代码更简短的一种方式。
#![allow(unused)]
fn main() {
use std::fs;
use std::io;
fn read_username_from_file() -> Result<String, io::Error> {
fs::read_to_string("hello.txt")
}
}fs::read_to_string 代替打开然后读取文件将文件读入字符串是一个相当常见的操作,因此标准库提供了方便的 fs::read_to_string 函数,它打开文件、创建新的 String、读取文件内容、将内容放入该 String 并返回它。当然,使用 fs::read_to_string 没有给我们解释所有错误处理的机会,所以我们先用了较长的写法。
在哪里可以使用 ? 运算符
? 运算符只能用于返回类型与 ? 所使用的值兼容的函数中。这是因为 ? 运算符被定义为从函数中提前返回一个值,方式与我们在示例 9-6 中定义的 match 表达式相同。在示例 9-6 中,match 使用了一个 Result 值,并且提前返回的分支返回了一个 Err(e) 值。函数的返回类型必须是一个 Result,以便与这个 return 兼容。
在示例 9-10 中,让我们看看如果在返回类型与我们使用 ? 的值的类型不兼容的 main 函数中使用 ? 运算符,会得到什么错误。
use std::fs::File;
fn main() {
let greeting_file = File::open("hello.txt")?;
}() 的 main 函数中使用 ? 将无法编译这段代码打开一个文件,这可能会失败。? 运算符跟在 File::open 返回的 Result 值后面,但这个 main 函数的返回类型是 (),而不是 Result。当我们编译这段代码时,会得到以下错误消息:
$ cargo run
Compiling error-handling v0.1.0 (file:///projects/error-handling)
error[E0277]: the `?` operator can only be used in a function that returns `Result` or `Option` (or another type that implements `FromResidual`)
--> src/main.rs:4:48
|
3 | fn main() {
| --------- this function should return `Result` or `Option` to accept `?`
4 | let greeting_file = File::open("hello.txt")?;
| ^ cannot use the `?` operator in a function that returns `()`
|
help: consider adding return type
|
3 ~ fn main() -> Result<(), Box<dyn std::error::Error>> {
4 | let greeting_file = File::open("hello.txt")?;
5 + Ok(())
|
For more information about this error, try `rustc --explain E0277`.
error: could not compile `error-handling` (bin "error-handling") due to 1 previous error
这个错误指出,我们只能在返回 Result、Option 或另一个实现了 FromResidual 的类型的函数中使用 ? 运算符。
要修复这个错误,你有两个选择。一种选择是更改函数的返回类型,使其与你使用 ? 运算符的值兼容,只要没有限制阻止你这样做。另一种选择是使用 match 或 Result<T, E> 方法之一以适当的任何方式处理 Result<T, E>。
错误消息还提到 ? 也可以与 Option<T> 值一起使用。与在 Result 上使用 ? 一样,你只能在返回 Option 的函数中对 Option 使用 ?。对 Option<T> 调用 ? 运算符时的行为与对 Result<T, E> 调用时的行为类似:如果值是 None,则 None 会在该点从函数中提前返回。如果值是 Some,Some 内部的值就是表达式的结果值,函数继续执行。示例 9-11 有一个函数的示例,该函数找到给定文本中第一行的最后一个字符。
fn last_char_of_first_line(text: &str) -> Option<char> {
text.lines().next()?.chars().last()
}
fn main() {
assert_eq!(
last_char_of_first_line("Hello, world\nHow are you today?"),
Some('d')
);
assert_eq!(last_char_of_first_line(""), None);
assert_eq!(last_char_of_first_line("\nhi"), None);
}Option<T> 值上使用 ? 运算符此函数返回 Option<char>,因为可能存在字符,但也可能没有。这段代码接受 text 字符串切片参数,并在其上调用 lines 方法,该方法返回字符串中各行的一个迭代器(iterator)。因为这个函数想要检查第一行,它调用迭代器上的 next 来获取迭代器中的第一个值。如果 text 是空字符串,对 next 的调用将返回 None,在这种情况下我们使用 ? 停止并从 last_char_of_first_line 返回 None。如果 text 不是空字符串,next 将返回一个包含 text 中第一行字符串切片的 Some 值。
? 提取出字符串切片,我们可以在该字符串切片上调用 chars 来获取其字符的迭代器。我们对第一行中的最后一个字符感兴趣,所以我们调用 last 来返回迭代器中的最后一个元素。这是一个 Option,因为第一行可能是空字符串;例如,如果 text 以空行开头但其他行有字符,比如 "\nhi"。然而,如果第一行有最后一个字符,它将在 Some 变体中返回。中间的 ? 运算符给了我们一种简洁的方式来表达这个逻辑,允许我们在一行中实现该函数。如果我们不能在 Option 上使用 ? 运算符,我们就必须使用更多的方法调用或一个 match 表达式来实现这个逻辑。
请注意,你可以在返回 Result 的函数中对 Result 使用 ? 运算符,也可以在返回 Option 的函数中对 Option 使用 ? 运算符,但不能混合使用。? 运算符不会自动将 Result 转换为 Option,反之亦然;在这些情况下,你可以使用诸如 Result 上的 ok 方法或 Option 上的 ok_or 方法来显式地进行转换。
到目前为止,我们使用的所有 main 函数都返回 ()。main 函数是特殊的,因为它是可执行程序的入口点和出口点,并且对于程序按预期行为运行,其返回类型有哪些限制。
幸运的是,main 也可以返回 Result<(), E>。示例 9-12 有来自示例 9-10 的代码,但我们将 main 的返回类型更改为 Result<(), Box<dyn Error>>,并在末尾添加了一个返回值 Ok(())。这段代码现在可以编译了。
use std::error::Error;
use std::fs::File;
fn main() -> Result<(), Box<dyn Error>> {
let greeting_file = File::open("hello.txt")?;
Ok(())
}main 改为返回 Result<(), E> 允许在 Result 值上使用 ? 运算符Box<dyn Error> 类型是一个 trait 对象(trait object),我们将在第 18 章的“使用 Trait 对象来抽象共享行为”中讨论。现在,你可以将 Box<dyn Error> 理解为“任何类型的错误“。在错误类型为 Box<dyn Error> 的 main 函数中对 Result 值使用 ? 是允许的,因为它允许任何 Err 值被提前返回。尽管这个 main 函数体只会返回 std::io::Error 类型的错误,但通过指定 Box<dyn Error>,即使向 main 函数体添加了返回其他错误的更多代码,此签名也仍然正确。
当 main 函数返回 Result<(), E> 时,如果 main 返回 Ok(()),可执行文件将以值 0 退出;如果 main 返回 Err 值,则以非零值退出。用 C 编写的可执行文件在退出时返回整数:成功退出的程序返回整数 0,出现错误的程序返回某个非 0 的整数。Rust 也从可执行文件返回整数以与此约定兼容。
main 函数可以返回任何实现了 std::process::Termination trait 的类型,该 trait 包含一个返回 ExitCode 的函数 report。请查阅标准库文档以获取有关为你自己的类型实现 Termination trait 的更多信息。
既然我们已经讨论了调用 panic! 或返回 Result 的细节,让我们回到在哪些情况下应该和不应该使用哪种方法的话题。
使用 panic! 还是不使用 panic!
是 panic! 还是不 panic!
那么,你如何决定何时应该调用 panic! 以及何时应该返回 Result?当代码 panic 时,就没有办法恢复了。你可以为任何错误情况调用 panic!,无论是否有恢复的可能,但这样做你就代表调用代码做出了一种情况不可恢复的决定。当你选择返回 Result 值时,你给了调用代码选择权。调用代码可以选择以其情况相适应的方式尝试恢复,或者也可以决定此情况下的 Err 值不可恢复,因此它可以调用 panic! 并将你的可恢复错误变为不可恢复错误。因此,在定义可能失败的函数时,返回 Result 是一个好的默认选择。
在示例、原型代码和测试等情况下,编写 panic 的代码比返回 Result 更合适。让我们探讨原因,然后讨论编译器无法判断失败是不可能的,但作为人类的你可以判断的情况。本章最后将以一些关于如何在库代码中决定是否 panic 的通用指南作为总结。
示例、原型代码和测试
当你编写示例来阐述某个概念时,包含健壮的错误处理代码可能会使示例不够清晰。在示例中,人们理解对 unwrap 等可能 panic 的方法的调用是一个占位符,代表你希望应用程序处理错误的方式,这取决于其余代码正在做什么。
类似地,unwrap 和 expect 方法在原型设计阶段非常方便,当你尚未准备好决定如何处理错误时。它们会在你的代码中留下清晰的标记,以便你准备好使程序更健壮时进行处理。
如果测试中的方法调用失败,你希望整个测试失败,即使该方法不是被测试的功能。因为 panic! 是测试被标记为失败的方式,所以调用 unwrap 或 expect 正是应该发生的事情。
当你比编译器拥有更多信息时
当你拥有一些其他逻辑确保 Result 将具有 Ok 值,但编译器不理解该逻辑时,调用 expect 也是合适的。你仍然有一个需要处理的 Result 值:无论你调用的是什么操作,通常仍然存在失败的可能性,即使在你的特定情况下逻辑上不可能。如果你可以通过手动检查代码来确定永远不会出现 Err 变体,那么完全可以调用 expect,并在参数文本中记录你认为永远不会出现 Err 变体的原因。以下是一个例子:
fn main() {
use std::net::IpAddr;
let home: IpAddr = "127.0.0.1"
.parse()
.expect("Hardcoded IP address should be valid");
}我们通过解析一个硬编码的字符串来创建 IpAddr 实例。我们可以看到 127.0.0.1 是一个有效的 IP 地址,因此在这里使用 expect 是可以接受的。然而,拥有一个 hardcoded(硬编码的)、有效的字符串并不会改变 parse 方法的返回类型:我们仍然得到一个 Result 值,编译器仍然会让我们处理这个 Result,就好像 Err 变体有可能发生一样,因为编译器不够聪明,无法看出这个字符串始终是一个有效的 IP 地址。如果 IP 地址字符串来自用户而不是 hardcoded 在程序中,因此确实有失败的可能性,我们肯定会希望以更健壮的方式处理 Result。提及该 IP 地址是 hardcoded 这一假设会提示我们,如果将来需要从其他来源获取 IP 地址,我们应当将 expect 改为更好的错误处理代码。
错误处理指南
当你的代码有可能最终处于不良状态(bad state)时,建议让代码 panic。在此上下文中,不良状态是指某些假设、保证、契约(contract)或不变式(invariant)被破坏的情况,例如当无效值、矛盾值或缺失值被传递给您的代码时——再加上以下一个或多个条件:
- 不良状态是出乎意料的,而不是偶尔可能发生的事情(例如用户以错误格式输入数据)。
- 此点之后的代码需要依赖不处于此不良状态,而不是在每一步都检查问题。
- 没有很好的方法将此信息编码到你所使用的类型中。我们将在第 18 章的“将状态和行为编码为类型”中举例说明我们的意思。
如果有人调用你的代码并传入无意义的值,最好尽可能返回一个错误,以便库的用户可以决定他们在那种情况下想要做什么。然而,在继续执行可能不安全或有害的情况下,最好的选择可能是调用 panic! 并提醒使用你的库的人注意他们代码中的 bug,以便他们在开发过程中修复它。类似地,如果你调用了无法控制的外部代码,并且它返回了你无法修复的无效状态,那么 panic! 通常是合适的。
然而,当失败是可预期的时候,返回 Result 比调用 panic! 更合适。例如,解析器接收到格式错误的数据,或 HTTP 请求返回表示已达到速率限制的状态。在这些情况下,返回 Result 表明失败是一种预期可能性,调用代码必须决定如何处理。
当你的代码执行的操作在使用无效值调用时可能使用户面临风险时,你的代码应首先验证值的有效性,如果值无效则 panic。这主要是出于安全原因:尝试对无效数据进行操作可能会使你的代码暴露于漏洞中。这是标准库在你尝试越界内存访问时会调用 panic! 的主要原因:尝试访问不属于当前数据结构的内存是一个常见的安全问题。函数通常有契约(contracts):只有在输入满足特定要求时,它们的行为才有保证。在违反契约时 panic 是有意义的,因为契约违规总是表明调用方的 bug,并且这不是你希望调用代码必须显式处理的那种错误。实际上,调用代码没有合理的方式可以恢复;调用方的程序员需要修复代码。函数的契约,特别是当违规会导致 panic 时,应在函数的 API 文档中加以说明。
然而,在所有函数中进行大量的错误检查会显得冗长且烦人。幸运的是,你可以利用 Rust 的类型系统(以及编译器进行的类型检查)为你完成许多检查。如果你的函数有一个特定类型的参数,你可以继续执行代码的逻辑,知道编译器已经确保你拥有一个有效值。例如,如果你使用的是某个类型而不是 Option,你的程序期望拥有某个值而不是什么也没有。然后你的代码就不必处理 Some 和 None 变体的两种情况:它只有一个明确有值的情况。试图将 nothing 传递给函数的代码甚至无法编译,因此你的函数不必在运行时检查这种情况。另一个例子是使用无符号整数类型(如 u32),它确保参数永远不会是负数。
用于验证的自定义类型
让我们将使用 Rust 的类型系统确保我们拥有有效值的想法再推进一步,看看如何创建一个用于验证的自定义类型。回想一下第 2 章中的猜数字游戏,其中我们的代码要求用户猜测一个介于 1 和 100 之间的数字。在与秘密数字进行比较之前,我们从未验证用户的猜测是否在这两个数字之间;我们只验证了猜测是正数。在这种情况下,后果并不严重:我们输出“太大了“或“太小了“仍然会是正确的。但是,引导用户进行有效猜测,并在用户猜测超出范围的数字与例如用户输入字母等情况下表现出不同的行为,将是一个有用的增强。
一种方法是将猜测解析为 i32 而不是仅 u32,以允许潜在负数,然后添加检查数字是否在范围内,如下所示:
use rand::Rng;
use std::cmp::Ordering;
use std::io;
fn main() {
println!("Guess the number!");
let secret_number = rand::thread_rng().gen_range(1..=100);
loop {
// --snip--
println!("Please input your guess.");
let mut guess = String::new();
io::stdin()
.read_line(&mut guess)
.expect("Failed to read line");
let guess: i32 = match guess.trim().parse() {
Ok(num) => num,
Err(_) => continue,
};
if guess < 1 || guess > 100 {
println!("The secret number will be between 1 and 100.");
continue;
}
match guess.cmp(&secret_number) {
// --snip--
Ordering::Less => println!("Too small!"),
Ordering::Greater => println!("Too big!"),
Ordering::Equal => {
println!("You win!");
break;
}
}
}
}if 表达式检查我们的值是否超出范围,告诉用户问题所在,并调用 continue 开始循环的下一次迭代并请求另一个猜测。在 if 表达式之后,我们可以继续进行 guess 与秘密数字之间的比较,因为我们知道 guess 介于 1 和 100 之间。
然而,这不是一个理想的解决方案:如果程序只能在 1 到 100 之间的值上运行是绝对关键的,并且有许多具有此要求的函数,那么在每一个函数中都进行这样的检查会非常繁琐(并且可能影响性能)。
相反,我们可以创建一个专用模块中的新类型,并将验证放在一个函数中以创建该类型的实例,而不是到处重复验证。这样,函数在其签名中使用新类型并自信地使用它们接收的值是安全的。示例 9-13 展示了一种定义 Guess 类型的方法,该类型仅在 new 函数接收到 1 到 100 之间的值时才创建 Guess 实例。
#![allow(unused)]
fn main() {
pub struct Guess {
value: i32,
}
impl Guess {
pub fn new(value: i32) -> Guess {
if value < 1 || value > 100 {
panic!("Guess value must be between 1 and 100, got {value}.");
}
Guess { value }
}
pub fn value(&self) -> i32 {
self.value
}
}
}Guess 类型请注意,src/guessing_game.rs 中的这段代码依赖于在 src/lib.rs 中添加一个模块声明 mod guessing_game;,我们这里没有展示。在这个新模块的文件中,我们定义了一个名为 Guess 的结构体,它具有一个名为 value 的字段,该字段持有一个 i32。这就是数字将被存储的地方。
然后,我们在 Guess 上实现了一个名为 new 的关联函数(associated function),用于创建 Guess 值的实例。new 函数被定义为一个参数 value(类型为 i32),并返回一个 Guess。new 函数体中的代码测试 value 以确保它在 1 到 100 之间。如果 value 未通过此测试,我们调用 panic!,这将提醒编写调用代码的程序员他们有一个需要修复的 bug,因为创建一个 value 超出此范围的 Guess 将违反 Guess::new 所依赖的契约。Guess::new 可能 panic 的条件应该在其公共 API 文档中讨论;我们将在第 14 章中介绍在 API 文档中标示可能发生 panic! 的文档约定。如果 value 通过了测试,我们创建一个新的 Guess,其 value 字段设置为 value 参数,并返回 Guess。
接下来,我们实现一个名为 value 的方法,它借用 self,没有其他参数,并返回一个 i32。这种方法有时被称为getter(获取器),因为其目的是从其字段中获取某些数据并返回它。这个公共方法是必要的,因为 Guess 结构体的 value 字段是私有的。value 字段是私有的这一点很重要,这样使用 Guess 结构体的代码就不允许直接设置 value:guessing_game 模块外部的代码必须使用 Guess::new 函数来创建 Guess 的实例,从而确保 Guess 的 value 不可能没有被 Guess::new 函数中的条件检查过。
一个具有参数或仅返回 1 到 100 之间的数字的函数,可以在其签名中声明它接受或返回一个 Guess 而不是 i32,并且不需要在其函数体中进行任何额外的检查。
总结
Rust 的错误处理功能旨在帮助你编写更健壮的代码。panic! 宏表示你的程序处于无法处理的状态,并让你通知进程停止,而不是试图使用无效或不正确的值继续执行。Result 枚举利用 Rust 的类型系统来指示操作可能以你的代码可以恢复的方式失败。你可以使用 Result 来通知调用你代码的代码也需要处理潜在的成功或失败。在适当的情况下使用 panic! 和 Result 将使你的代码在面对不可避免的问题时更加可靠。
现在你已经看到了标准库使用泛型与 Option 和 Result 枚举的有用方式,我们将讨论泛型的工作原理以及如何在你的代码中使用它们。
泛型类型、Trait 和生命周期(Generic Types, Traits, and Lifetimes)
每种编程语言都有有效处理概念重复的工具。在 Rust 中,其中一种工具是泛型(generics):具体类型或其他属性的抽象替代物。我们可以在编译和运行代码时不知道具体内容的情况下,表达泛型的行为或它们与其他泛型的关联方式。
函数可以接受某种泛型类型的参数,而不是像 i32 或 String 这样的具体类型,就像它们接受具有未知值的参数以在多个具体值上运行相同的代码一样。事实上,我们已经在第 6 章中使用过 Option<T>,在第 8 章中使用过 Vec<T> 和 HashMap<K, V>,在第 9 章中使用过 Result<T, E>。在本章中,你将探索如何使用泛型定义自己的类型、函数和方法!
首先,我们将回顾如何提取一个函数来减少代码重复。然后,我们将使用相同的技术,从两个仅在参数类型上不同的函数中制作一个泛型函数。我们还将解释如何在结构体(struct)和枚举(enum)定义中使用泛型类型。
然后,你将学习如何使用 trait(特质)以泛型方式定义行为。你可以将 trait 与泛型类型结合使用,以约束泛型类型仅接受具有特定行为的类型,而不是任何类型。
最后,我们将讨论生命周期(lifetimes):一种泛型变体,它为编译器提供有关引用之间如何相互关联的信息。生命周期允许我们给编译器提供关于借用值的足够信息,以便它能够确保引用在更多情况下比没有我们的帮助时更有效。
通过提取函数消除重复
泛型允许我们用代表多种类型的占位符替换特定类型,以消除代码重复。在深入泛型语法之前,让我们首先看看如何通过提取一个函数来消除重复,这种方式不涉及泛型类型,而是用代表多个值的占位符替换特定值。然后,我们将应用相同的技术来提取一个泛型函数!通过了解如何识别可以提取到函数中的重复代码,你将开始识别可以使用泛型的重复代码。
我们从示例 10-1 中的简短程序开始,该程序查找列表中的最大数字。
fn main() {
let number_list = vec![34, 50, 25, 100, 65];
let mut largest = &number_list[0];
for number in &number_list {
if number > largest {
largest = number;
}
}
println!("The largest number is {largest}");
assert_eq!(*largest, 100);
}我们将一个整数列表存储在变量 number_list 中,并将指向列表中第一个数字的引用放在名为 largest 的变量中。然后,我们遍历列表中的所有数字,如果当前数字大于存储在 largest 中的数字,我们就替换该变量中的引用。然而,如果当前数字小于或等于迄今为止看到的最大数字,则变量不变,代码继续处理列表中的下一个数字。在考虑了列表中的所有数字之后,largest 应该指向最大的数字,在本例中为 100。
现在我们的任务是在两个不同的数字列表中找到最大的数字。为此,我们可以选择复制示例 10-1 中的代码,并在程序中的两个不同位置使用相同的逻辑,如示例 10-2 所示。
fn main() {
let number_list = vec![34, 50, 25, 100, 65];
let mut largest = &number_list[0];
for number in &number_list {
if number > largest {
largest = number;
}
}
println!("The largest number is {largest}");
let number_list = vec![102, 34, 6000, 89, 54, 2, 43, 8];
let mut largest = &number_list[0];
for number in &number_list {
if number > largest {
largest = number;
}
}
println!("The largest number is {largest}");
}尽管这段代码可以工作,但复制代码既繁琐又容易出错。当我们想要更改代码时,还必须记住在多个地方更新它。
为了消除这种重复,我们将通过定义一个函数来创建一种抽象,该函数对作为参数传入的任何整数列表进行操作。这个解决方案使我们的代码更清晰,并让我们抽象地表达在列表中查找最大数字的概念。
在示例 10-3 中,我们将查找最大数字的代码提取到一个名为 largest 的函数中。然后,我们调用该函数来查找示例 10-2 中两个列表的最大数字。我们也可以在将来可能拥有的任何其他 i32 值列表上使用该函数。
fn largest(list: &[i32]) -> &i32 {
let mut largest = &list[0];
for item in list {
if item > largest {
largest = item;
}
}
largest
}
fn main() {
let number_list = vec![34, 50, 25, 100, 65];
let result = largest(&number_list);
println!("The largest number is {result}");
assert_eq!(*result, 100);
let number_list = vec![102, 34, 6000, 89, 54, 2, 43, 8];
let result = largest(&number_list);
println!("The largest number is {result}");
assert_eq!(*result, 6000);
}largest 函数有一个名为 list 的参数,它表示我们可能传入函数的任何具体 i32 值切片。因此,当我们调用该函数时,代码会在我们传入的具体值上运行。
总之,以下是我们将代码从示例 10-2 更改为示例 10-3 所采取的步骤:
- 识别重复代码。
- 将重复代码提取到函数体中,并在函数签名中指定该代码的输入和返回值。
- 更新两个重复代码实例以调用该函数而不是使用重复代码。
接下来,我们将使用相同的步骤与泛型一起减少代码重复。就像函数体可以对抽象的 list 而不是特定值进行操作一样,泛型允许代码对抽象类型进行操作。
例如,假设我们有两个函数:一个在 i32 值的切片中查找最大项,另一个在 char 值的切片中查找最大项。我们如何消除这种重复?让我们来找出答案!
泛型数据类型
泛型数据类型(Generic Data Types)
我们使用泛型来创建函数签名或结构体等项的定义,然后我们可以将这些定义用于许多不同的具体数据类型。让我们首先看看如何使用泛型定义函数、结构体、枚举和方法。然后,我们将讨论泛型如何影响代码性能。
在函数定义中
在定义使用泛型的函数时,我们将泛型放在函数签名中通常指定参数和返回值数据类型的位置。这样做使我们的代码更灵活,为函数的调用者提供更多功能,同时防止代码重复。
继续我们的 largest 函数,示例 10-4 展示了两个都在切片中查找最大值的函数。然后,我们将它们合并为一个使用泛型的函数。
fn largest_i32(list: &[i32]) -> &i32 {
let mut largest = &list[0];
for item in list {
if item > largest {
largest = item;
}
}
largest
}
fn largest_char(list: &[char]) -> &char {
let mut largest = &list[0];
for item in list {
if item > largest {
largest = item;
}
}
largest
}
fn main() {
let number_list = vec![34, 50, 25, 100, 65];
let result = largest_i32(&number_list);
println!("The largest number is {result}");
assert_eq!(*result, 100);
let char_list = vec!['y', 'm', 'a', 'q'];
let result = largest_char(&char_list);
println!("The largest char is {result}");
assert_eq!(*result, 'y');
}largest_i32 函数是我们在示例 10-3 中提取的函数,用于在切片中查找最大的 i32。largest_char 函数用于在切片中查找最大的 char。函数体具有相同的代码,因此让我们通过在一个函数中引入泛型类型参数来消除重复。
要参数化新函数中的类型,我们需要命名类型参数,就像我们对函数的值参数所做的那样。你可以使用任何标识符作为类型参数名称。但我们将使用 T,因为按照惯例,Rust 中的类型参数名称很短,通常只有一个字母,并且 Rust 的类型命名约定是 UpperCamelCase。作为 type 的缩写,T 是大多数 Rust 程序员的默认选择。
当我们在函数体中使用参数时,必须在签名中声明参数名称,以便编译器知道该名称的含义。类似地,当我们在函数签名中使用类型参数名称时,必须在使用它之前声明类型参数名称。要定义泛型 largest 函数,我们将类型名称声明放在尖括号 <> 中,位于函数名称和参数列表之间,如下所示:
fn largest<T>(list: &[T]) -> &T {我们将这个定义解读为:“函数 largest 在某种类型 T 上是泛型的。“这个函数有一个名为 list 的参数,它是类型 T 的值的切片。largest 函数将返回对相同类型 T 的值的引用。
示例 10-5 展示了在其签名中使用泛型数据类型的组合 largest 函数定义。该清单还展示了如何使用 i32 值切片或 char 值切片调用该函数。请注意,这段代码还不能编译。
fn largest<T>(list: &[T]) -> &T {
let mut largest = &list[0];
for item in list {
if item > largest {
largest = item;
}
}
largest
}
fn main() {
let number_list = vec![34, 50, 25, 100, 65];
let result = largest(&number_list);
println!("The largest number is {result}");
let char_list = vec!['y', 'm', 'a', 'q'];
let result = largest(&char_list);
println!("The largest char is {result}");
}largest 函数;这段代码还不能编译如果我们现在编译这段代码,将得到以下错误:
$ cargo run
Compiling chapter10 v0.1.0 (file:///projects/chapter10)
error[E0369]: binary operation `>` cannot be applied to type `&T`
--> src/main.rs:5:17
|
5 | if item > largest {
| ---- ^ ------- &T
| |
| &T
|
help: consider restricting type parameter `T` with trait `PartialOrd`
|
1 | fn largest<T: std::cmp::PartialOrd>(list: &[T]) -> &T {
| ++++++++++++++++++++++
For more information about this error, try `rustc --explain E0369`.
error: could not compile `chapter10` (bin "chapter10") due to 1 previous error
帮助文本提到了 std::cmp::PartialOrd,这是一个 trait,我们将在下一节讨论 trait。现在,要知道这个错误表明 largest 的函数体对于 T 可能的所有类型不能都工作。因为我们在函数体中想要比较 T 类型的值,我们只能使用其值可以排序的类型。为了启用比较,标准库提供了 std::cmp::PartialOrd trait,你可以在类型上实现它(有关此 trait 的更多信息,请参见附录 C)。要修复示例 10-5,我们可以遵循帮助文本的建议,将 T 的有效类型限制为仅实现了 PartialOrd 的类型。然后该清单将编译,因为标准库在 i32 和 char 上都实现了 PartialOrd。
在结构体定义中
我们也可以使用 <> 语法定义结构体,在一个或多个字段中使用泛型类型参数。示例 10-6 定义了一个 Point<T> 结构体,用于保存任何类型的 x 和 y 坐标值。
struct Point<T> {
x: T,
y: T,
}
fn main() {
let integer = Point { x: 5, y: 10 };
let float = Point { x: 1.0, y: 4.0 };
}T 的 x 和 y 值的 Point<T> 结构体在结构体定义中使用泛型的语法与在函数定义中使用的语法类似。首先,我们在结构体名称之后立即在尖括号内声明类型参数的名称。然后,我们在结构体定义中原本会指定具体数据类型的地方使用泛型类型。
请注意,因为我们只使用了一个泛型类型来定义 Point<T>,所以这个定义表明 Point<T> 结构体在某种类型 T 上是泛型的,并且字段 x 和 y 都是相同的类型,无论该类型可能是什么。如果我们创建一个具有不同类型的值的 Point<T> 实例,如示例 10-7 所示,我们的代码将无法编译。
struct Point<T> {
x: T,
y: T,
}
fn main() {
let wont_work = Point { x: 5, y: 4.0 };
}x 和 y 必须是相同类型,因为它们都具有相同的泛型数据类型 T在这个例子中,当我们将整数值 5 赋给 x 时,我们让编译器知道泛型类型 T 对于这个 Point<T> 实例将是整数。然后,当我们为 y 指定 4.0(我们已经定义它与 x 具有相同的类型)时,我们将得到一个类型不匹配错误,如下所示:
$ cargo run
Compiling chapter10 v0.1.0 (file:///projects/chapter10)
error[E0308]: mismatched types
--> src/main.rs:7:38
|
7 | let wont_work = Point { x: 5, y: 4.0 };
| ^^^ expected integer, found floating-point number
For more information about this error, try `rustc --explain E0308`.
error: could not compile `chapter10` (bin "chapter10") due to 1 previous error
要定义一个 Point 结构体,其中 x 和 y 都是泛型但可能具有不同的类型,我们可以使用多个泛型类型参数。例如,在示例 10-8 中,我们将 Point 的定义改为在类型 T 和 U 上是泛型的,其中 x 是类型 T,y 是类型 U。
struct Point<T, U> {
x: T,
y: U,
}
fn main() {
let both_integer = Point { x: 5, y: 10 };
let both_float = Point { x: 1.0, y: 4.0 };
let integer_and_float = Point { x: 5, y: 4.0 };
}Point<T, U>,使得 x 和 y 可以是不同类型的值现在所示的所有 Point 实例都是允许的!你可以在定义中使用任意多个泛型类型参数,但使用多个会使你的代码难以阅读。如果你发现代码中需要大量泛型类型,可能表明你的代码需要重组为更小的部分。
在枚举定义中
与结构体一样,我们可以定义枚举在其变体中持有泛型数据类型。让我们再看一下标准库提供的 Option<T> 枚举,我们在第 6 章中使用过它:
#![allow(unused)]
fn main() {
enum Option<T> {
Some(T),
None,
}
}这个定义现在对你来说应该更有意义了。如你所见,Option<T> 枚举在类型 T 上是泛型的,并且有两个变体:Some,它持有一个类型 T 的值,以及 None 变体,它不持有任何值。通过使用 Option<T> 枚举,我们可以表达可选值的抽象概念,并且因为 Option<T> 是泛型的,无论可选值的类型是什么,我们都可以使用这个抽象。
枚举也可以使用多个泛型类型。我们在第 9 章中使用的 Result 枚举的定义就是一个例子:
#![allow(unused)]
fn main() {
enum Result<T, E> {
Ok(T),
Err(E),
}
}Result 枚举在两种类型 T 和 E 上是泛型的,并且有两个变体:Ok,它持有一个类型 T 的值,以及 Err,它持有一个类型 E 的值。这个定义使得在有一个可能成功(返回某种类型 T 的值)或失败(返回某种类型 E 的错误)的操作的任何地方使用 Result 枚举都很方便。实际上,这就是我们在示例 9-3 中打开文件时使用的,其中 T 被填充为类型 std::fs::File(当文件成功打开时),而 E 被填充为类型 std::io::Error(当打开文件出现问题时)。
当你在代码中识别出多个结构体或枚举定义仅在它们持有的值类型上有所不同时,你可以通过使用泛型类型来避免重复。
在方法定义中
我们可以在结构体和枚举上实现方法(就像我们在第 5 章中所做的那样),并在它们的定义中使用泛型类型。示例 10-9 显示了我们之前在示例 10-6 中定义的 Point<T> 结构体,以及在它上面实现的名为 x 的方法。
struct Point<T> {
x: T,
y: T,
}
impl<T> Point<T> {
fn x(&self) -> &T {
&self.x
}
}
fn main() {
let p = Point { x: 5, y: 10 };
println!("p.x = {}", p.x());
}Point<T> 结构体上实现一个名为 x 的方法,该方法将返回对类型为 T 的 x 字段的引用在这里,我们在 Point<T> 上定义了一个名为 x 的方法,它返回对字段 x 中数据的引用。
注意,我们必须在 impl 之后立即声明 T,以便我们可以使用 T 来指定我们正在为类型 Point<T> 实现方法。通过在 impl 之后将 T 声明为泛型类型,Rust 可以识别 Point 中尖括号内的类型是泛型类型而不是具体类型。我们可以为这个泛型参数选择与结构体定义中声明的泛型参数不同的名称,但使用相同的名称是惯例。如果你在声明了泛型类型的 impl 中编写方法,那么无论最终用哪种具体类型替换泛型类型,该方法都将在该类型的任何实例上定义。
我们也可以在定义类型上的方法时指定对泛型类型的约束。例如,我们可以仅在 Point<f32> 实例上实现方法,而不是在任何泛型类型的 Point<T> 实例上实现。在示例 10-10 中,我们使用了具体类型 f32,意味着我们在 impl 之后没有声明任何类型。
struct Point<T> {
x: T,
y: T,
}
impl<T> Point<T> {
fn x(&self) -> &T {
&self.x
}
}
impl Point<f32> {
fn distance_from_origin(&self) -> f32 {
(self.x.powi(2) + self.y.powi(2)).sqrt()
}
}
fn main() {
let p = Point { x: 5, y: 10 };
println!("p.x = {}", p.x());
}T 的特定具体类型的结构体的 impl 块这段代码意味着类型 Point<f32> 将有一个 distance_from_origin 方法;其他 T 不是 f32 类型的 Point<T> 实例将没有此方法定义。该方法测量我们的点距离坐标 (0.0, 0.0) 处的点有多远,并使用仅适用于浮点类型的数学运算。
结构体定义中的泛型类型参数并不总是与你在此结构体的方法签名中使用的相同。示例 10-11 为 Point 结构体使用泛型类型 X1 和 Y1,为 mixup 方法签名使用 X2 和 Y2,以使示例更清晰。该方法创建一个新的 Point 实例,其 x 值来自 self 的 Point(类型为 X1),y 值来自传入的 Point(类型为 Y2)。
struct Point<X1, Y1> {
x: X1,
y: Y1,
}
impl<X1, Y1> Point<X1, Y1> {
fn mixup<X2, Y2>(self, other: Point<X2, Y2>) -> Point<X1, Y2> {
Point {
x: self.x,
y: other.y,
}
}
}
fn main() {
let p1 = Point { x: 5, y: 10.4 };
let p2 = Point { x: "Hello", y: 'c' };
let p3 = p1.mixup(p2);
println!("p3.x = {}, p3.y = {}", p3.x, p3.y);
}在 main 中,我们定义了一个 Point,其 x 为 i32(值为 5),y 为 f64(值为 10.4)。p2 变量是一个 Point 结构体,其 x 为字符串切片(值为 "Hello"),y 为 char(值为 c)。在 p1 上调用 mixup 并传入参数 p2 得到 p3,其 x 将为 i32,因为 x 来自 p1。p3 变量的 y 将为 char,因为 y 来自 p2。println! 宏调用将打印 p3.x = 5, p3.y = c。
此示例的目的是展示一种情况,其中一些泛型参数用 impl 声明,另一些用方法定义声明。在这里,泛型参数 X1 和 Y1 在 impl 之后声明,因为它们与结构体定义相关。泛型参数 X2 和 Y2 在 fn mixup 之后声明,因为它们仅与方法相关。
使用泛型的代码的性能
你可能想知道使用泛型类型参数是否会产生运行时开销。好消息是,使用泛型类型不会使你的程序比使用具体类型时运行得更慢。
Rust 通过在编译时对使用泛型的代码执行单态化(monomorphization)来实现这一点。*单态化(Monomorphization)*是通过填充编译时使用的具体类型,将泛型代码转换为特定代码的过程。在这个过程中,编译器执行与我们创建示例 10-5 中的泛型函数时使用的步骤相反的操作:编译器查看调用泛型代码的所有位置,并为调用泛型代码的具体类型生成代码。
让我们通过使用标准库的泛型 Option<T> 枚举来看看这是如何工作的:
#![allow(unused)]
fn main() {
let integer = Some(5);
let float = Some(5.0);
}当 Rust 编译这段代码时,它会执行单态化。在这个过程中,编译器读取在 Option<T> 实例中使用的值,并识别出两种 Option<T>:一种是 i32,另一种是 f64。因此,它将 Option<T> 的泛型定义扩展为两个专门针对 i32 和 f64 的定义,从而用特化的定义替换了泛型定义。
单态化后的代码版本类似于以下内容(编译器使用的名称与我们在这里用来说明问题的名称不同):
enum Option_i32 {
Some(i32),
None,
}
enum Option_f64 {
Some(f64),
None,
}
fn main() {
let integer = Option_i32::Some(5);
let float = Option_f64::Some(5.0);
}泛型 Option<T> 被替换为由编译器创建的特定定义。因为 Rust 将泛型代码编译为在每个实例中指定了类型的代码,所以使用泛型不会产生运行时开销。当代码运行时,它的执行方式与我们手动复制每个定义时完全相同。单态化过程使 Rust 的泛型在运行时极为高效。
使用 Trait 定义共享行为
使用 Trait 定义共享行为(Shared Behavior)
trait 定义了一个特定类型所具有的、并可以与其它类型共享的功能。我们可以使用 trait 以抽象的方式定义共享行为。我们可以使用 trait 约束(trait bounds) 来指定泛型类型可以是任何具有特定行为的类型。
注意:Trait 类似于其他语言中通常称为 接口(interfaces) 的功能,尽管有一些差异。
定义 Trait
一个类型的行为包括我们可以对该类型调用的方法。如果我们能在所有这些类型上调用相同的方法,则不同类型共享相同的行为。Trait 定义是一种将方法签名组合在一起的方法,用于定义实现某个目的所需的一组行为。
例如,假设我们有多个结构体,它们持有各种类型和数量的文本:一个 NewsArticle 结构体,持有特定地点存档的新闻报道;一个 SocialPost,最多可以有 280 个字符,并带有元数据,指示它是新帖子、转发还是对另一帖子的回复。
我们想要创建一个名为 aggregator 的媒体聚合器库 crate,它可以显示可能存储在 NewsArticle 或 SocialPost 实例中的数据的摘要。为此,我们需要每个类型的摘要,我们将通过在实例上调用 summarize 方法来请求该摘要。示例 10-12 定义了一个公共的 Summary trait,它表达了这种行为。
pub trait Summary {
fn summarize(&self) -> String;
}Summary trait,由 summarize 方法提供的行为组成在这里,我们使用 trait 关键字声明了一个 trait,然后是 trait 的名称,在本例中是 Summary。我们还声明了这个 trait 为 pub,以便依赖此 crate 的其他 crate 也可以使用这个 trait,我们将在几个示例中看到这一点。在花括号内,我们声明了方法签名,这些签名描述了实现此 trait 的类型的行为,在本例中是 fn summarize(&self) -> String。
在方法签名之后,我们不提供花括号内的实现,而是使用分号。实现此 trait 的每个类型必须为方法体提供自己的自定义行为。编译器将强制执行:任何具有 Summary trait 的类型都必须完全按照此签名定义 summarize 方法。
一个 trait 在其主体中可以拥有多个方法:方法签名每行列出一个,每行以分号结束。
在类型上实现 Trait
现在我们已经定义了 Summary trait 方法的期望签名,我们可以在媒体聚合器中的类型上实现它。示例 10-13 展示了在 NewsArticle 结构体上 Summary trait 的实现,它使用 headline、author 和 location 来创建 summarize 的返回值。对于 SocialPost 结构体,我们将 summarize 定义为用户名后接帖子的全文,假设帖子内容已经限制在 280 个字符以内。
pub trait Summary {
fn summarize(&self) -> String;
}
pub struct NewsArticle {
pub headline: String,
pub location: String,
pub author: String,
pub content: String,
}
impl Summary for NewsArticle {
fn summarize(&self) -> String {
format!("{}, by {} ({})", self.headline, self.author, self.location)
}
}
pub struct SocialPost {
pub username: String,
pub content: String,
pub reply: bool,
pub repost: bool,
}
impl Summary for SocialPost {
fn summarize(&self) -> String {
format!("{}: {}", self.username, self.content)
}
}NewsArticle 和 SocialPost 类型上实现 Summary trait在类型上实现 trait 类似于实现常规方法。区别在于,在 impl 之后,我们放入要实现的 trait 名称,然后使用 for 关键字,然后指定要为其实现 trait 的类型名称。在 impl 块内,我们放入 trait 定义已经定义的方法签名。不在每个签名后加分号,而是使用花括号并填充方法体,其中包含我们希望 trait 的方法为该特定类型具有的特定行为。
现在库已经在 NewsArticle 和 SocialPost 上实现了 Summary trait,crate 的用户可以像调用常规方法一样在 NewsArticle 和 SocialPost 实例上调用 trait 方法。唯一的区别是用户必须将 trait 与类型一起引入作用域。以下是一个二进制 crate 如何使用我们的 aggregator 库 crate 的示例:
use aggregator::{SocialPost, Summary};
fn main() {
let post = SocialPost {
username: String::from("horse_ebooks"),
content: String::from(
"of course, as you probably already know, people",
),
reply: false,
repost: false,
};
println!("1 new post: {}", post.summarize());
}这段代码打印 1 new post: horse_ebooks: of course, as you probably already know, people。
依赖于 aggregator crate 的其他 crate 也可以将 Summary trait 引入作用域,以在其自己的类型上实现 Summary。需要注意的一个限制是,只有当 trait 或类型(或两者)对于我们的 crate 是本地(local)的时候,我们才能在类型上实现 trait。例如,我们可以在自定义类型 SocialPost 上实现标准库 trait(如 Display),作为 aggregator crate 功能的一部分,因为类型 SocialPost 对于我们的 aggregator crate 是本地的。我们也可以在 aggregator crate 中的 Vec<T> 上实现 Summary,因为 trait Summary 对于我们的 aggregator crate 是本地的。
但我们不能对外部类型实现外部 trait。例如,我们不能在 aggregator crate 中的 Vec<T> 上实现 Display trait,因为 Display 和 Vec<T> 都在标准库中定义,而不是 aggregator crate 本地的。此限制是属于称为 连贯性(coherence) 的属性,更具体地说是 孤儿规则(orphan rule),之所以如此命名是因为父类型不存在。此规则确保其他人的代码不会破坏你的代码,反之亦然。如果没有这条规则,两个 crate 可以为同一类型实现相同的 trait,而 Rust 将不知道使用哪个实现。
使用默认实现
有时,为 trait 中的部分或全部方法提供默认行为是很有用的,而不是要求在每个类型上实现所有方法。然后,当我们在特定类型上实现 trait 时,我们可以保留或覆盖每个方法的默认行为。
在示例 10-14 中,我们为 Summary trait 的 summarize 方法指定了默认字符串,而不是像在示例 10-12 中那样仅定义方法签名。
pub trait Summary {
fn summarize(&self) -> String {
String::from("(Read more...)")
}
}
pub struct NewsArticle {
pub headline: String,
pub location: String,
pub author: String,
pub content: String,
}
impl Summary for NewsArticle {}
pub struct SocialPost {
pub username: String,
pub content: String,
pub reply: bool,
pub repost: bool,
}
impl Summary for SocialPost {
fn summarize(&self) -> String {
format!("{}: {}", self.username, self.content)
}
}summarize 方法默认实现的 Summary trait要使用默认实现来摘要 NewsArticle 实例,我们指定一个空的 impl 块,其中包含 impl Summary for NewsArticle {}。
尽管我们不再直接在 NewsArticle 上定义 summarize 方法,但我们提供了一个默认实现,并指定 NewsArticle 实现了 Summary trait。因此,我们仍然可以在 NewsArticle 实例上调用 summarize 方法,如下所示:
use aggregator::{self, NewsArticle, Summary};
fn main() {
let article = NewsArticle {
headline: String::from("Penguins win the Stanley Cup Championship!"),
location: String::from("Pittsburgh, PA, USA"),
author: String::from("Iceburgh"),
content: String::from(
"The Pittsburgh Penguins once again are the best \
hockey team in the NHL.",
),
};
println!("New article available! {}", article.summarize());
}这段代码打印 New article available! (Read more...)。
创建默认实现不要求我们对示例 10-13 中 SocialPost 上的 Summary 实现进行任何更改。原因是覆盖默认实现的语法与实现没有默认实现的 trait 方法的语法相同。
默认实现可以调用同一 trait 中的其他方法,即使这些其他方法没有默认实现。这样,trait 可以提供大量有用的功能,并且只要求实现者指定其中的一小部分。例如,我们可以定义 Summary trait 有一个需要实现的 summarize_author 方法,然后定义一个 summarize 方法,该方法具有调用 summarize_author 方法的默认实现:
pub trait Summary {
fn summarize_author(&self) -> String;
fn summarize(&self) -> String {
format!("(Read more from {}...)", self.summarize_author())
}
}
pub struct SocialPost {
pub username: String,
pub content: String,
pub reply: bool,
pub repost: bool,
}
impl Summary for SocialPost {
fn summarize_author(&self) -> String {
format!("@{}", self.username)
}
}要使用此版本的 Summary,我们只需要在类型上实现 trait 时定义 summarize_author:
pub trait Summary {
fn summarize_author(&self) -> String;
fn summarize(&self) -> String {
format!("(Read more from {}...)", self.summarize_author())
}
}
pub struct SocialPost {
pub username: String,
pub content: String,
pub reply: bool,
pub repost: bool,
}
impl Summary for SocialPost {
fn summarize_author(&self) -> String {
format!("@{}", self.username)
}
}在定义了 summarize_author 之后,我们可以对 SocialPost 结构体的实例调用 summarize,并且 summarize 的默认实现将调用我们提供的 summarize_author 的定义。因为我们实现了 summarize_author,Summary trait 给了我们 summarize 方法的行为,而不需要我们再写任何代码。这就是它的样子:
use aggregator::{self, SocialPost, Summary};
fn main() {
let post = SocialPost {
username: String::from("horse_ebooks"),
content: String::from(
"of course, as you probably already know, people",
),
reply: false,
repost: false,
};
println!("1 new post: {}", post.summarize());
}这段代码打印 1 new post: (Read more from @horse_ebooks...)。
请注意,无法从同一方法的覆盖实现中调用默认实现。
将 Trait 用作参数
现在你已经知道如何定义和实现 trait,我们可以探讨如何使用 trait 来定义接受许多不同类型参数的函数。我们将使用在示例 10-13 中 NewsArticle 和 SocialPost 类型上实现的 Summary trait,来定义一个 notify 函数,该函数调用其 item 参数上的 summarize 方法,该参数是某个实现了 Summary trait 的类型。为此,我们使用 impl Trait 语法,如下所示:
pub trait Summary {
fn summarize(&self) -> String;
}
pub struct NewsArticle {
pub headline: String,
pub location: String,
pub author: String,
pub content: String,
}
impl Summary for NewsArticle {
fn summarize(&self) -> String {
format!("{}, by {} ({})", self.headline, self.author, self.location)
}
}
pub struct SocialPost {
pub username: String,
pub content: String,
pub reply: bool,
pub repost: bool,
}
impl Summary for SocialPost {
fn summarize(&self) -> String {
format!("{}: {}", self.username, self.content)
}
}
pub fn notify(item: &impl Summary) {
println!("Breaking news! {}", item.summarize());
}对于 item 参数,我们不指定具体类型,而是指定 impl 关键字和 trait 名称。此参数接受任何实现了指定 trait 的类型。在 notify 的函数体中,我们可以调用 item 上来自 Summary trait 的任何方法,例如 summarize。我们可以调用 notify 并传入任何 NewsArticle 或 SocialPost 实例。使用任何其他类型(例如 String 或 i32)调用该函数的代码将无法编译,因为这些类型没有实现 Summary。
Trait 约束语法
impl Trait 语法适用于简单情况,但它实际上是较长形式的语法糖,称为 trait 约束(trait bound);它看起来像这样:
pub fn notify<T: Summary>(item: &T) {
println!("Breaking news! {}", item.summarize());
}这种较长形式等同于上一节中的示例,但更冗长。我们将 trait 约束放在泛型类型参数的声明之后,在冒号和尖括号内。
impl Trait 语法在简单情况下方便且使代码更简洁,而更全面的 trait 约束语法可以在其他情况下表达更复杂的含义。例如,我们可以有两个实现 Summary 的参数。使用 impl Trait 语法这样做看起来像这样:
pub fn notify(item1: &impl Summary, item2: &impl Summary) {如果我们希望此函数允许 item1 和 item2 具有不同的类型(只要两种类型都实现 Summary),使用 impl Trait 是合适的。然而,如果我们希望强制两个参数具有相同的类型,我们必须使用 trait 约束,如下所示:
pub fn notify<T: Summary>(item1: &T, item2: &T) {指定为 item1 和 item2 参数类型的泛型类型 T 约束了该函数,使得作为 item1 和 item2 参数传入的值必须是相同的具体类型。
通过 + 语法指定多个 Trait 约束
我们还可以指定多个 trait 约束。假设我们希望 notify 在 item 上同时使用 display 格式化以及 summarize:我们在 notify 的定义中指定 item 必须同时实现 Display 和 Summary。我们可以使用 + 语法来实现:
pub fn notify(item: &(impl Summary + Display)) {+ 语法也适用于泛型类型上的 trait 约束:
pub fn notify<T: Summary + Display>(item: &T) {通过指定这两个 trait 约束,notify 的函数体可以调用 summarize 并使用 {} 来格式化 item。
通过 where 子句使 Trait 约束更清晰
使用太多的 trait 约束有其缺点。每个泛型都有自己的 trait 约束,因此具有多个泛型类型参数的函数可能会在函数名称和参数列表之间包含大量 trait 约束信息,使函数签名难以阅读。因此,Rust 提供了另一种在函数签名后的 where 子句中指定 trait 约束的语法。所以,不必写成这样:
fn some_function<T: Display + Clone, U: Clone + Debug>(t: &T, u: &U) -> i32 {我们可以使用 where 子句,如下所示:
fn some_function<T, U>(t: &T, u: &U) -> i32
where
T: Display + Clone,
U: Clone + Debug,
{
unimplemented!()
}这个函数的签名不那么杂乱:函数名称、参数列表和返回类型靠在一起,类似于没有大量 trait 约束的函数。
返回实现了 Trait 的类型
我们也可以在返回位置使用 impl Trait 语法,返回某种实现了 trait 的类型的值,如下所示:
pub trait Summary {
fn summarize(&self) -> String;
}
pub struct NewsArticle {
pub headline: String,
pub location: String,
pub author: String,
pub content: String,
}
impl Summary for NewsArticle {
fn summarize(&self) -> String {
format!("{}, by {} ({})", self.headline, self.author, self.location)
}
}
pub struct SocialPost {
pub username: String,
pub content: String,
pub reply: bool,
pub repost: bool,
}
impl Summary for SocialPost {
fn summarize(&self) -> String {
format!("{}: {}", self.username, self.content)
}
}
fn returns_summarizable() -> impl Summary {
SocialPost {
username: String::from("horse_ebooks"),
content: String::from(
"of course, as you probably already know, people",
),
reply: false,
repost: false,
}
}通过使用 impl Summary 作为返回类型,我们指定 returns_summarizable 函数返回某种实现了 Summary trait 的类型,而不命名具体类型。在这种情况下,returns_summarizable 返回一个 SocialPost,但调用此函数的代码不需要知道这一点。
仅通过其实现的 trait 来指定返回类型的能力在闭包(closure)和迭代器(iterator)的上下文中特别有用,我们将在第 13 章中介绍。闭包和迭代器创建了只有编译器知道或非常长的类型。impl Trait 语法让你可以简洁地指定函数返回某种实现了 Iterator trait 的类型,而无需写出一个非常长的类型。
然而,只有当你返回单一类型时,才能使用 impl Trait。例如,返回一个 NewsArticle 或一个 SocialPost 并将返回类型指定为 impl Summary 的这段代码将无法工作:
pub trait Summary {
fn summarize(&self) -> String;
}
pub struct NewsArticle {
pub headline: String,
pub location: String,
pub author: String,
pub content: String,
}
impl Summary for NewsArticle {
fn summarize(&self) -> String {
format!("{}, by {} ({})", self.headline, self.author, self.location)
}
}
pub struct SocialPost {
pub username: String,
pub content: String,
pub reply: bool,
pub repost: bool,
}
impl Summary for SocialPost {
fn summarize(&self) -> String {
format!("{}: {}", self.username, self.content)
}
}
fn returns_summarizable(switch: bool) -> impl Summary {
if switch {
NewsArticle {
headline: String::from(
"Penguins win the Stanley Cup Championship!",
),
location: String::from("Pittsburgh, PA, USA"),
author: String::from("Iceburgh"),
content: String::from(
"The Pittsburgh Penguins once again are the best \
hockey team in the NHL.",
),
}
} else {
SocialPost {
username: String::from("horse_ebooks"),
content: String::from(
"of course, as you probably already know, people",
),
reply: false,
repost: false,
}
}
}由于 impl Trait 语法在编译器中的实现方式有限制,不允许返回 NewsArticle 或 SocialPost 两者之一。我们将在第 18 章的“使用 Trait 对象来抽象共享行为”部分介绍如何编写具有此行为的函数。
使用 Trait 约束有条件地实现方法
通过对使用泛型类型参数的 impl 块使用 trait 约束,我们可以有条件地为实现了指定 trait 的类型实现方法。例如,示例 10-15 中的 Pair<T> 类型始终实现了 new 函数以返回 Pair<T> 的新实例(回想一下第 5 章的“方法语法”部分,Self 是 impl 块类型的别名,在这种情况下是 Pair<T>)。但在下一个 impl 块中,Pair<T> 仅在其内部类型 T 实现了 PartialOrd trait(允许比较)和 Display trait(允许打印)时,才实现 cmp_display 方法。
use std::fmt::Display;
struct Pair<T> {
x: T,
y: T,
}
impl<T> Pair<T> {
fn new(x: T, y: T) -> Self {
Self { x, y }
}
}
impl<T: Display + PartialOrd> Pair<T> {
fn cmp_display(&self) {
if self.x >= self.y {
println!("The largest member is x = {}", self.x);
} else {
println!("The largest member is y = {}", self.y);
}
}
}我们也可以有条件地为实现了另一个 trait 的任何类型实现一个 trait。对满足 trait 约束的任何类型的 trait 实现被称为覆盖实现(blanket implementations),并在 Rust 标准库中广泛使用。例如,标准库对任何实现了 Display trait 的类型实现 ToString trait。标准库中的 impl 块看起来类似于以下代码:
impl<T: Display> ToString for T {
// --snip--
}因为标准库有这个覆盖实现,我们可以在任何实现了 Display trait 的类型上调用由 ToString trait 定义的 to_string 方法。例如,我们可以将整数转换为其对应的 String 值,因为整数实现了 Display:
#![allow(unused)]
fn main() {
let s = 3.to_string();
}覆盖实现出现在 trait 文档中的“Implementors“部分。
Trait 和 trait 约束使我们能够编写使用泛型类型参数来减少重复的代码,同时向编译器指定我们希望泛型类型具有特定的行为。然后编译器可以使用 trait 约束信息来检查与我们的代码一起使用的所有具体类型是否提供了正确的行为。在动态类型语言中,如果我们对未定义该方法的类型调用了该方法,我们会在运行时得到一个错误。但 Rust 将这些错误移到编译时,这样我们在代码甚至能够运行之前就被迫修复问题。此外,我们不必编写在运行时检查行为的代码,因为我们已经在编译时检查过了。这样做提高了性能,而不必放弃泛型的灵活性。
使用生命周期验证引用
使用生命周期(Lifetime)验证引用
生命周期是另一种我们已经在使用中的泛型。不同于确保类型具有我们想要的行为,生命周期确保引用在我们需要它们的时候一直有效。
我们在第 4 章的“引用与借用”部分没有讨论的一个细节是,Rust 中的每个引用都有一个生命周期(lifetime),也就是该引用有效的范围。大多数情况下,生命周期是隐式且可推断的,就像大多数情况下类型可以被推断一样。我们只在可能存在多种类型时才需要标注类型。类似地,当引用的生命周期可能以几种不同方式相互关联时,我们必须标注生命周期。Rust 要求我们使用泛型生命周期参数来标注这些关系,以确保运行时使用的实际引用绝对是有效的。
标注生命周期甚至不是大多数其他编程语言都有的概念,所以这可能会让人感到陌生。尽管我们不会在本章中完整地介绍生命周期,但我们将讨论你可能遇到的生命周期语法的常见方式,以便你能熟悉这个概念。
悬垂引用(Dangling References)
生命周期的主要目的是防止悬垂引用(dangling references),如果允许它们存在,程序会引用非其意图引用的数据。考虑示例 10-16 中的程序,它有一个外部作用域和一个内部作用域。
fn main() {
let r;
{
let x = 5;
r = &x;
}
println!("r: {r}");
}注意:示例 10-16、10-17 和 10-23 中的示例声明了变量但未赋予初始值,因此变量名存在于外部作用域。乍一看,这似乎与 Rust 没有空值(null)相冲突。然而,如果我们尝试在给变量赋值之前使用它,我们会得到一个编译时错误,这表明 Rust 确实不允许空值。
外部作用域声明了一个名为 r 的变量,没有初始值,内部作用域声明了一个名为 x 的变量,初始值为 5。在内部作用域中,我们尝试将 r 的值设置为对 x 的引用。然后,内部作用域结束,我们尝试打印 r 中的值。这段代码无法编译,因为 r 所引用的值在我们尝试使用它之前已经离开了作用域。以下是错误消息:
$ cargo run
Compiling chapter10 v0.1.0 (file:///projects/chapter10)
error[E0597]: `x` does not live long enough
--> src/main.rs:6:13
|
5 | let x = 5;
| - binding `x` declared here
6 | r = &x;
| ^^ borrowed value does not live long enough
7 | }
| - `x` dropped here while still borrowed
8 |
9 | println!("r: {r}");
| - borrow later used here
For more information about this error, try `rustc --explain E0597`.
error: could not compile `chapter10` (bin "chapter10") due to 1 previous error
错误消息说变量 x “does not live long enough”。原因是当内部作用域在第 7 行结束时,x 将超出作用域。但 r 在外部作用域中仍然有效;因为它的作用域更大,我们说它“活得更长“。如果 Rust 允许这段代码工作,r 将引用当 x 超出作用域时已释放的内存,而我们尝试对 r 做的任何事情都不会正确工作。那么,Rust 如何确定这段代码是无效的呢?它使用了一个借用检查器。
借用检查器(Borrow Checker)
Rust 编译器有一个借用检查器(borrow checker),它比较作用域以确定所有借用是否有效。示例 10-17 显示了与示例 10-16 相同的代码,但带有注释显示变量的生命周期。
fn main() {
let r; // ---------+-- 'a
// |
{ // |
let x = 5; // -+-- 'b |
r = &x; // | |
} // -+ |
// |
println!("r: {r}"); // |
} // ---------+r 和 x 的生命周期注释,分别命名为 'a 和 'b在这里,我们用 'a 注释了 r 的生命周期,用 'b 注释了 x 的生命周期。如你所见,内部的 'b 块比外部的 'a 生命周期块小得多。在编译时,Rust 比较两个生命周期的大小,并看到 r 的生命周期是 'a,但它引用的内存的生命周期是 'b。程序被拒绝,因为 'b 比 'a 短:引用的主题(subject)没有引用本身活得长。
示例 10-18 修复了代码,使其没有悬垂引用,并且可以编译而没有任何错误。
fn main() {
let x = 5; // ----------+-- 'b
// |
let r = &x; // --+-- 'a |
// | |
println!("r: {r}"); // | |
// --+ |
} // ----------+在这里,x 的生命周期是 'b,在这种情况下它比 'a 大。这意味着 r 可以引用 x,因为 Rust 知道只要 x 有效,r 中的引用就始终有效。
现在你已经知道引用的生命周期在哪里以及 Rust 如何分析生命周期以确保引用始终有效,让我们探讨函数参数和返回值中的泛型生命周期。
函数中的泛型生命周期
我们将编写一个返回两个字符串切片中较长者的函数。这个函数将接受两个字符串切片并返回一个字符串切片。在我们实现了 longest 函数之后,示例 10-19 中的代码应该打印 The longest string is abcd。
fn main() {
let string1 = String::from("abcd");
let string2 = "xyz";
let result = longest(string1.as_str(), string2);
println!("The longest string is {result}");
}longest 函数以查找两个字符串切片中较长者的 main 函数注意,我们希望函数接受字符串切片,即引用,而不是字符串,因为我们不希望 longest 函数获取其参数的所有权。请参阅第 4 章的“字符串切片作为参数”部分,了解更多关于为什么我们在示例 10-19 中使用的参数是我们想要的参数。
如果我们尝试按照示例 10-20 所示实现 longest 函数,它将无法编译。
fn main() {
let string1 = String::from("abcd");
let string2 = "xyz";
let result = longest(string1.as_str(), string2);
println!("The longest string is {result}");
}
fn longest(x: &str, y: &str) -> &str {
if x.len() > y.len() { x } else { y }
}longest 函数实现,但尚不能编译相反,我们得到以下关于生命周期的错误:
$ cargo run
Compiling chapter10 v0.1.0 (file:///projects/chapter10)
error[E0106]: missing lifetime specifier
--> src/main.rs:9:33
|
9 | fn longest(x: &str, y: &str) -> &str {
| ---- ---- ^ expected named lifetime parameter
|
= help: this function's return type contains a borrowed value, but the signature does not say whether it is borrowed from `x` or `y`
help: consider introducing a named lifetime parameter
|
9 | fn longest<'a>(x: &'a str, y: &'a str) -> &'a str {
| ++++ ++ ++ ++
For more information about this error, try `rustc --explain E0106`.
error: could not compile `chapter10` (bin "chapter10") due to 1 previous error
帮助文本显示返回类型需要一个泛型生命周期参数,因为 Rust 无法判断返回的引用是指向 x 还是 y。实际上,我们也不知道,因为这个函数体中的 if 块返回对 x 的引用,而 else 块返回对 y 的引用!
当我们定义这个函数时,我们不知道将传入此函数的具体值,因此我们不知道 if 情况还是 else 情况会执行。我们也不知道传入的引用的具体生命周期,因此我们无法像在示例 10-17 和 10-18 中那样查看作用域来确定我们返回的引用是否始终有效。借用检查器也无法确定这一点,因为它不知道 x 和 y 的生命周期如何与返回值的生命周期相关联。要修复这个错误,我们将添加泛型生命周期参数,用于定义引用之间的关系,以便借用检查器可以执行其分析。
生命周期注解语法
生命周期注解不会改变任何引用的存活时间。相反,它们描述多个引用的生命周期之间的相互关系,而不影响生命周期。就像函数在签名指定泛型类型参数时可以接受任何类型一样,函数可以通过指定泛型生命周期参数来接受具有任何生命周期的引用。
生命周期注解的语法有点不寻常:生命周期参数的名称必须以撇号(')开头,通常全是小写且非常短,就像泛型类型一样。大多数人使用名称 'a 作为第一个生命周期注解。我们将生命周期参数注解放在引用的 & 之后,使用空格将注解与引用的类型分隔开。
以下是一些示例——没有生命周期参数的 i32 引用、具有名为 'a 的生命周期参数的 i32 引用,以及同样具有生命周期 'a 的可变 i32 引用:
&i32 // a reference
&'a i32 // a reference with an explicit lifetime
&'a mut i32 // a mutable reference with an explicit lifetime一个生命周期注解本身没有多大意义,因为注解的目的是告诉 Rust 多个引用的泛型生命周期参数如何相互关联。让我们看看在 longest 函数的上下文中,生命周期注解如何相互关联。
在函数签名中
要在函数签名中使用生命周期注解,我们需要在函数名称和参数列表之间的尖括号内声明泛型生命周期参数,就像我们对泛型类型参数所做的那样。
我们希望签名表达以下约束:只要两个参数都有效,返回的引用就有效。这是参数生命周期和返回值生命周期之间的关系。我们将生命周期命名为 'a,然后将其添加到每个引用中,如示例 10-21 所示。
fn main() {
let string1 = String::from("abcd");
let string2 = "xyz";
let result = longest(string1.as_str(), string2);
println!("The longest string is {result}");
}
fn longest<'a>(x: &'a str, y: &'a str) -> &'a str {
if x.len() > y.len() { x } else { y }
}longest 函数定义,指定签名中的所有引用必须具有相同的生命周期 'a当我们将此代码与示例 10-19 中的 main 函数一起使用时,它应该能够编译并产生我们想要的结果。
函数签名现在告诉 Rust,对于某个生命周期 'a,该函数接受两个参数,这两个参数都是字符串切片,其存活时间至少与生命周期 'a 一样长。函数签名还告诉 Rust,从函数返回的字符串切片将至少存活与生命周期 'a 一样长。实际上,这意味着 longest 函数返回的引用的生命周期等于函数参数引用的值的生命周期中较小的那个。这些关系正是我们希望 Rust 在分析此代码时使用的。
记住,当我们在函数签名中指定生命周期参数时,我们并没有改变传入或返回的任何值的生命周期。相反,我们指定借用检查器应拒绝任何不遵守这些约束的值。注意,longest 函数不需要确切知道 x 和 y 将存活多久,只需要知道某个可以替代 'a 的作用域将满足此签名。
在函数中注解生命周期时,注解放在函数签名中,而不是函数体中。生命周期注解成为函数契约的一部分,就像签名中的类型一样。函数签名包含生命周期契约意味着 Rust 编译器所做的分析可以更简单。如果函数的注解方式或调用方式有问题,编译器错误可以更精确地指向我们代码和约束的部分。相反,如果 Rust 编译器对我们意图的生命周期关系做了更多推断,编译器可能只能在远离问题根源的多个步骤之后指向我们代码的使用处。
当我们向 longest 传递具体引用时,替代 'a 的具体生命周期是 x 的作用域与 y 的作用域重叠的部分。换句话说,泛型生命周期 'a 将获得等于 x 和 y 中较小的那个生命周期的具体生命周期。因为我们用相同的生命周期参数 'a 注解了返回的引用,所以返回的引用也将对 x 和 y 中较小的生命周期长度有效。
让我们通过传入具有不同具体生命周期的引用来看看生命周期注解如何限制 longest 函数。示例 10-22 是一个直接了当的例子。
fn main() {
let string1 = String::from("long string is long");
{
let string2 = String::from("xyz");
let result = longest(string1.as_str(), string2.as_str());
println!("The longest string is {result}");
}
}
fn longest<'a>(x: &'a str, y: &'a str) -> &'a str {
if x.len() > y.len() { x } else { y }
}String 值引用调用 longest 函数在这个例子中,string1 在外部作用域结束之前有效,string2 在内部作用域结束之前有效,而 result 引用的对象在内部作用域结束之前有效。运行这段代码,你会看到借用检查器批准了它;它将编译并打印 The longest string is long string is long。
接下来,让我们尝试一个例子,展示 result 中引用的生命周期必须是两个参数中较小的那个生命周期。我们将 result 变量的声明移到内部作用域之外,但将 result 变量的赋值留在 string2 的内部作用域内。然后,我们将使用 result 的 println! 移到内部作用域之外,在内部作用域结束之后。示例 10-23 中的代码将无法编译。
fn main() {
let string1 = String::from("long string is long");
let result;
{
let string2 = String::from("xyz");
result = longest(string1.as_str(), string2.as_str());
}
println!("The longest string is {result}");
}
fn longest<'a>(x: &'a str, y: &'a str) -> &'a str {
if x.len() > y.len() { x } else { y }
}string2 离开作用域后尝试使用 result当我们尝试编译这段代码时,会得到这个错误:
$ cargo run
Compiling chapter10 v0.1.0 (file:///projects/chapter10)
error[E0597]: `string2` does not live long enough
--> src/main.rs:6:44
|
5 | let string2 = String::from("xyz");
| ------- binding `string2` declared here
6 | result = longest(string1.as_str(), string2.as_str());
| ^^^^^^^ borrowed value does not live long enough
7 | }
| - `string2` dropped here while still borrowed
8 | println!("The longest string is {result}");
| ------ borrow later used here
For more information about this error, try `rustc --explain E0597`.
error: could not compile `chapter10` (bin "chapter10") due to 1 previous error
错误显示,要使 result 对 println! 语句有效,string2 需要直到外部作用域结束都有效。Rust 知道这一点,因为我们使用相同的生命周期参数 'a 标注了函数参数和返回值的生命周期。
作为人类,我们可以查看这段代码,看到 string1 比 string2 长,因此 result 将包含对 string1 的引用。因为 string1 尚未离开作用域,对 string1 的引用对于 println! 语句仍然有效。然而,编译器无法在这种情况下看到引用是有效的。我们已经告诉 Rust,longest 函数返回的引用的生命周期与传入的引用中较小的那个生命周期相同。因此,借用检查器禁止示例 10-23 中的代码,认为它可能具有无效的引用。
尝试设计更多实验,改变传入 longest 函数的引用的值和生命周期以及返回引用的使用方式。在编译之前,对你的实验是否能够通过借用检查器做出假设;然后,检查你是否正确!
关系
你需要指定生命周期参数的方式取决于你的函数正在做什么。例如,如果我们将 longest 函数的实现改为始终返回第一个参数而不是最长的字符串切片,我们就不需要在 y 参数上指定生命周期。以下代码将编译:
fn main() {
let string1 = String::from("abcd");
let string2 = "efghijklmnopqrstuvwxyz";
let result = longest(string1.as_str(), string2);
println!("The longest string is {result}");
}
fn longest<'a>(x: &'a str, y: &str) -> &'a str {
x
}我们为参数 x 和返回类型指定了生命周期参数 'a,但没有为参数 y 指定,因为 y 的生命周期与 x 的生命周期或返回值没有任何关系。
从函数返回引用时,返回类型的生命周期参数需要与其中一个参数的生命周期参数匹配。如果返回的引用不指向其中一个参数,它必须指向在此函数内部创建的值。然而,这将是一个悬垂引用,因为该值将在函数结束时离开作用域。考虑这个无法编译的 longest 函数实现尝试:
fn main() {
let string1 = String::from("abcd");
let string2 = "xyz";
let result = longest(string1.as_str(), string2);
println!("The longest string is {result}");
}
fn longest<'a>(x: &str, y: &str) -> &'a str {
let result = String::from("really long string");
result.as_str()
}在这里,即使我们已经为返回类型指定了生命周期参数 'a,这个实现也无法编译,因为返回值的生命周期与参数的生命周期完全无关。这是我们得到的错误消息:
$ cargo run
Compiling chapter10 v0.1.0 (file:///projects/chapter10)
error[E0515]: cannot return value referencing local variable `result`
--> src/main.rs:11:5
|
11 | result.as_str()
| ------^^^^^^^^^
| |
| returns a value referencing data owned by the current function
| `result` is borrowed here
For more information about this error, try `rustc --explain E0515`.
error: could not compile `chapter10` (bin "chapter10") due to 1 previous error
问题在于 result 在 longest 函数结束时离开作用域并被清理掉。我们还试图从函数返回对 result 的引用。我们无法指定会改变悬垂引用的生命周期参数,Rust 也不允许我们创建悬垂引用。在这种情况下,最好的修复方法是返回拥有所有权的数据类型而不是引用,这样调用函数就负责清理该值。
最终,生命周期语法是关于连接函数各种参数和返回值的生命周期的。一旦它们被连接起来,Rust 就有足够的信息来允许内存安全的操作,并禁止可能导致悬垂指针或以其他方式违反内存安全的操作。
在结构体定义中
到目前为止,我们定义的结构体都持有拥有所有权的类型。我们可以定义持有引用的结构体,但在此情况下,我们需要在结构体定义的每个引用上添加生命周期注解。示例 10-24 有一个名为 ImportantExcerpt 的结构体,它持有一个字符串切片。
struct ImportantExcerpt<'a> {
part: &'a str,
}
fn main() {
let novel = String::from("Call me Ishmael. Some years ago...");
let first_sentence = novel.split('.').next().unwrap();
let i = ImportantExcerpt {
part: first_sentence,
};
}这个结构体有单个字段 part,它持有一个字符串切片,即一个引用。与泛型数据类型一样,我们在结构体名称后面的尖括号内声明泛型生命周期参数的名称,这样我们就可以在结构体定义的主体中使用该生命周期参数。此注解意味着 ImportantExcerpt 的实例不能比它在 part 字段中持有的引用存活得更久。
这里的 main 函数创建了一个 ImportantExcerpt 结构体的实例,该实例持有对变量 novel 拥有的 String 的第一个句子的引用。novel 中的数据在 ImportantExcerpt 实例创建之前就已存在。此外,novel 在 ImportantExcerpt 离开作用域之后才离开作用域,因此 ImportantExcerpt 实例中的引用是有效的。
生命周期省略(Lifetime Elision)
你已经了解到每个引用都有一个生命周期,并且你需要为使用引用的函数或结构体指定生命周期参数。然而,我们在示例 4-9 中有一个函数(在示例 10-25 中再次展示),它在没有生命周期注解的情况下编译通过了。
fn first_word(s: &str) -> &str {
let bytes = s.as_bytes();
for (i, &item) in bytes.iter().enumerate() {
if item == b' ' {
return &s[0..i];
}
}
&s[..]
}
fn main() {
let my_string = String::from("hello world");
// first_word works on slices of `String`s
let word = first_word(&my_string[..]);
let my_string_literal = "hello world";
// first_word works on slices of string literals
let word = first_word(&my_string_literal[..]);
// Because string literals *are* string slices already,
// this works too, without the slice syntax!
let word = first_word(my_string_literal);
}这个函数在没有生命周期注解的情况下编译通过的原因是有历史原因的:在 Rust 的早期版本(pre-1.0)中,这段代码无法编译,因为每个引用都需要显式的生命周期。那时,函数签名将写成这样:
fn first_word<'a>(s: &'a str) -> &'a str {在编写了大量 Rust 代码之后,Rust 团队发现 Rust 程序员在特定情况下反复输入相同的生命周期注解。这些情况是可预测的,并遵循一些确定性的模式。开发者将这些模式编程到编译器的代码中,以便借用检查器在这些情况下可以推断出生命周期,而不需要显式注解。
这段 Rust 历史是相关的,因为将来可能会出现更多确定性的模式并添加到编译器中。在未来,可能需要的生命周期注解会更少。
编程到 Rust 的引用分析中的模式被称为生命周期省略规则(lifetime elision rules)。这些不是程序员要遵循的规则;它们是编译器会考虑的一组特定情况,如果你的代码符合这些情况,你就不需要显式地编写生命周期。
省略规则并不提供完整的推断。如果应用这些规则后,引用的生命周期仍然存在歧义,编译器不会猜测剩余引用的生命周期应该是什么。编译器不会猜测,而是会给你一个错误,你可以通过添加生命周期注解来解决。
函数或方法参数上的生命周期被称为输入生命周期(input lifetimes),而返回值上的生命周期被称为输出生命周期(output lifetimes)。
编译器使用三条规则来确定引用在没有显式注解时的生命周期。第一条规则适用于输入生命周期,第二和第三条规则适用于输出生命周期。如果编译器执行完三条规则后,仍然有它无法确定生命周期的引用,编译器将报错停止。这些规则适用于 fn 定义以及 impl 块。
第一条规则是编译器为每个引用参数分配一个生命周期参数。换句话说,有一个参数的函数得到一个生命周期参数:fn foo<'a>(x: &'a i32);有两个参数的函数得到两个独立的生命周期参数:fn foo<'a, 'b>(x: &'a i32, y: &'b i32);以此类推。
第二条规则是,如果只有一个输入生命周期参数,该生命周期被分配给所有输出生命周期参数:fn foo<'a>(x: &'a i32) -> &'a i32。
第三条规则是,如果有多个输入生命周期参数,但其中一个是 &self 或 &mut self(因为这是一个方法),则 self 的生命周期被分配给所有输出生命周期参数。第三条规则使得方法更易于读写,因为需要的符号更少。
让我们假装我们是编译器。我们将应用这些规则来确定示例 10-25 中 first_word 函数签名中引用的生命周期。签名开始时没有任何与引用关联的生命周期:
fn first_word(s: &str) -> &str {然后,编译器应用第一条规则,该规则指定每个参数获得自己的生命周期。我们照常称之为 'a,所以现在的签名是这样的:
fn first_word<'a>(s: &'a str) -> &str {第二条规则适用,因为只有一个输入生命周期。第二条规则指定一个输入参数的生命周期被分配给输出生命周期,所以现在的签名是这样的:
fn first_word<'a>(s: &'a str) -> &'a str {现在这个函数签名中的所有引用都有了生命周期,编译器可以继续其分析,而无需程序员在此函数签名中标注生命周期。
让我们再看一个例子,这次是我们在示例 10-20 中开始使用的没有生命周期参数的 longest 函数:
fn longest(x: &str, y: &str) -> &str {让我们应用第一条规则:每个参数获得自己的生命周期。这次我们有两个参数而不是一个,所以我们有两个生命周期:
fn longest<'a, 'b>(x: &'a str, y: &'b str) -> &str {你可以看到第二条规则不适用,因为有不止一个输入生命周期。第三条规则也不适用,因为 longest 是一个函数而不是方法,所以没有一个参数是 self。在应用了所有三条规则之后,我们仍然没有弄清楚返回类型的生命周期是什么。这就是为什么我们在尝试编译示例 10-20 中的代码时得到一个错误:编译器按照生命周期省略规则进行了处理,但仍然无法确定签名中所有引用的生命周期。
因为第三条规则实际上只适用于方法签名,所以我们接下来将看看方法中的生命周期上下文,以了解为什么第三条规则意味着我们不必经常在方法签名中标注生命周期。
在方法定义中
当我们在具有生命周期的结构体上实现方法时,我们使用与泛型类型参数相同的语法,如示例 10-11 所示。我们在哪里声明和使用生命周期参数取决于它们是与结构体字段相关,还是与方法参数和返回值相关。
结构体字段的生命周期名称始终需要在 impl 关键字之后声明,然后在结构体名称之后使用,因为这些生命周期是结构体类型的一部分。
在 impl 块内部的方法签名中,引用可能被绑定到结构体字段中的引用的生命周期,或者它们可能是独立的。此外,生命周期省略规则通常使得在方法签名中不需要生命周期注解。让我们看一些使用我们在示例 10-24 中定义的 ImportantExcerpt 结构体的例子。
首先,我们将使用一个名为 level 的方法,其唯一参数是对 self 的引用,其返回值是 i32,不是对任何东西的引用:
struct ImportantExcerpt<'a> {
part: &'a str,
}
impl<'a> ImportantExcerpt<'a> {
fn level(&self) -> i32 {
3
}
}
impl<'a> ImportantExcerpt<'a> {
fn announce_and_return_part(&self, announcement: &str) -> &str {
println!("Attention please: {announcement}");
self.part
}
}
fn main() {
let novel = String::from("Call me Ishmael. Some years ago...");
let first_sentence = novel.split('.').next().unwrap();
let i = ImportantExcerpt {
part: first_sentence,
};
}impl 之后的生命周期参数声明及其在类型名称后的使用是必需的,但由于第一条省略规则,我们不需要标注对 self 的引用的生命周期。
这是一个第三条生命周期省略规则适用的例子:
struct ImportantExcerpt<'a> {
part: &'a str,
}
impl<'a> ImportantExcerpt<'a> {
fn level(&self) -> i32 {
3
}
}
impl<'a> ImportantExcerpt<'a> {
fn announce_and_return_part(&self, announcement: &str) -> &str {
println!("Attention please: {announcement}");
self.part
}
}
fn main() {
let novel = String::from("Call me Ishmael. Some years ago...");
let first_sentence = novel.split('.').next().unwrap();
let i = ImportantExcerpt {
part: first_sentence,
};
}有两个输入生命周期,因此 Rust 应用第一条生命周期省略规则,并为 &self 和 announcement 分别赋予自己的生命周期。然后,因为其中一个参数是 &self,返回类型获得 &self 的生命周期,现在所有生命周期都已确定。
静态生命周期(Static Lifetime)
我们需要讨论的一个特殊生命周期是 'static,它表示受影响的引用可以在整个程序期间存活。所有字符串字面量(string literals)都具有 'static 生命周期,我们可以如下标注:
#![allow(unused)]
fn main() {
let s: &'static str = "I have a static lifetime.";
}该字符串的文本直接存储在程序的二进制文件中,始终可用。因此,所有字符串字面量的生命周期都是 'static。
你可能会在错误消息中看到建议使用 'static 生命周期。但在将 'static 指定为引用的生命周期之前,请考虑该引用是否真的在整个程序的生命周期内都存在,以及你是否希望如此。大多数情况下,建议使用 'static 生命周期的错误消息是由尝试创建悬垂引用或可用生命周期不匹配导致的。在这种情况下,解决方案是修复这些问题,而不是指定 'static 生命周期。
泛型类型参数、Trait 约束与生命周期
让我们简要地看一下在一个函数中指定泛型类型参数、trait 约束和生命周期的语法!
fn main() {
let string1 = String::from("abcd");
let string2 = "xyz";
let result = longest_with_an_announcement(
string1.as_str(),
string2,
"Today is someone's birthday!",
);
println!("The longest string is {result}");
}
use std::fmt::Display;
fn longest_with_an_announcement<'a, T>(
x: &'a str,
y: &'a str,
ann: T,
) -> &'a str
where
T: Display,
{
println!("Announcement! {ann}");
if x.len() > y.len() { x } else { y }
}这是示例 10-21 中的 longest 函数,它返回两个字符串切片中较长的那个。但现在它有一个额外的参数 ann,类型为泛型 T,可以由任何实现了 Display trait 的类型填充(由 where 子句指定)。这个额外的参数将使用 {} 打印,这就是为什么 Display trait 约束是必需的。因为生命周期是一种泛型,所以生命周期参数 'a 和泛型类型参数 T 的声明放在函数名称后面尖括号内的同一个列表中。
总结
我们在本章中涵盖了很多内容!现在你已经了解了泛型类型参数、trait 和 trait 约束以及泛型生命周期参数,你已经准备好编写没有重复且在许多不同情况下工作的代码了。泛型类型参数让你可以将代码应用于不同的类型。Trait 和 trait 约束确保即使类型是泛型的,它们也具有代码所需的行为。你学习了如何使用生命周期注解来确保灵活的代码不会出现悬垂引用。而所有这些分析都在编译时进行,不会影响运行时性能!
信不信由你,关于我们在本章中讨论的主题,还有很多需要学习:第 18 章讨论了 trait 对象,这是使用 trait 的另一种方式。还有一些涉及生命周期注解的更复杂场景,你只在非常高级的场景中才需要;对于这些,你应该阅读 Rust 参考手册。但接下来,你将学习如何在 Rust 中编写测试,以便确保你的代码按预期工作。
编写自动化测试(Writing Automated Tests)
Edsger W. Dijkstra 在他 1972 年的论文《谦逊的程序员》(The Humble Programmer)中说:“程序测试可以非常有效地展示 bug 的存在,但对于证明 bug 不存在则是无能为力的。“这并不意味着我们不应该尽可能多地测试!
我们程序中的*正确性(correctness)*是我们的代码在多大程度上做了我们期望它做的事情。Rust 在设计中高度重视程序的正确性,但正确性是复杂的,不容易证明。Rust 的类型系统承担了很大一部分责任,但类型系统并不能捕捉所有问题。因此,Rust 包含了对编写自动化软件测试的支持。
假设我们编写一个函数 add_two,它将传入的任何数字加上 2。这个函数的签名接受一个整数作为参数并返回一个整数作为结果。当我们实现并编译该函数时,Rust 会执行你到目前为止学到的所有类型检查和借用检查,以确保例如我们不会向此函数传递 String 值或无效引用。但 Rust 不能检查这个函数是否会精确地执行我们的意图,即返回参数加 2,而不是例如参数加 10 或参数减 50!这就是测试发挥作用的地方。
我们可以编写测试来断言,例如,当我们向 add_two 函数传递 3 时,返回值是 5。我们可以在对代码进行更改时运行这些测试,以确保任何现有的正确行为没有发生变化。
测试是一项复杂的技能:尽管我们无法在一章中涵盖编写良好测试的每个细节,但在本章中,我们将讨论 Rust 测试工具的机制。我们将讨论在编写测试时可用的注解和宏、运行测试时提供的默认行为和选项,以及如何将测试组织为单元测试(unit test)和集成测试(integration test)。
如何编写测试
如何编写测试(How to Write Tests)
*测试(Tests)*是验证非测试代码是否按预期方式运行的 Rust 函数。测试函数的主体通常执行以下三个操作:
- 设置所需的任何数据或状态。
- 运行你想要测试的代码。
- 断言结果是你所期望的。
让我们看看 Rust 专门为编写执行这些操作的测试而提供的功能,其中包括 test 属性、几个宏以及 should_panic 属性。
测试函数的结构
最简单地说,Rust 中的一个测试是标注了 test 属性的函数。属性是关于 Rust 代码片段的元数据;一个例子是我们在第 5 章中与结构体一起使用的 derive 属性。要将函数更改为测试函数,请在 fn 之前的一行添加 #[test]。当你使用 cargo test 命令运行测试时,Rust 会构建一个测试运行器(test runner)二进制文件,该文件运行标注过的函数,并报告每个测试函数是通过还是失败。
每当我们使用 Cargo 创建新的库项目时,都会自动为我们生成一个包含测试函数的测试模块。这个模块为你提供了编写测试的模板,这样你就不必在每次启动新项目时都查找确切的结构和语法。你可以添加任意数量的额外测试函数和测试模块!
在实际测试任何代码之前,我们将通过尝试模板测试来探讨测试工作的一些方面。然后,我们将编写一些真实的测试,调用我们编写的一些代码,并断言其行为是正确的。
让我们创建一个名为 adder 的新库项目,它将两个数相加:
$ cargo new adder --lib
Created library `adder` project
$ cd adder
adder 库中 src/lib.rs 文件的内容应该如示例 11-1 所示。
pub fn add(left: u64, right: u64) -> u64 {
left + right
}
#[cfg(test)]
mod tests {
use super::*;
#[test]
fn it_works() {
let result = add(2, 2);
assert_eq!(result, 4);
}
}cargo new 自动生成的代码该文件以一个示例 add 函数开头,以便我们有东西可以测试。
现在,让我们只关注 it_works 函数。注意 #[test] 注解:此属性表明这是一个测试函数,因此测试运行器知道将此函数视为测试。我们可能还在 tests 模块中有非测试函数,用于帮助设置常见场景或执行常见操作,因此我们总是需要指出哪些函数是测试。
示例函数体使用 assert_eq! 宏来断言 result(包含调用参数 2 和 2 的 add 的结果)等于 4。这个断言作为典型测试格式的示例。让我们运行它,看看这个测试是否通过。
cargo test 命令运行我们项目中的所有测试,如示例 11-2 所示。
$ cargo test
Compiling adder v0.1.0 (file:///projects/adder)
Finished `test` profile [unoptimized + debuginfo] target(s) in 0.57s
Running unittests src/lib.rs (target/debug/deps/adder-01ad14159ff659ab)
running 1 test
test tests::it_works ... ok
test result: ok. 1 passed; 0 failed; 0 ignored; 0 measured; 0 filtered out; finished in 0.00s
Doc-tests adder
running 0 tests
test result: ok. 0 passed; 0 failed; 0 ignored; 0 measured; 0 filtered out; finished in 0.00s
Cargo 编译并运行了测试。我们看到 running 1 test 这一行。下一行显示了生成的测试函数的名称 tests::it_works,并且运行该测试的结果是 ok。总体摘要 test result: ok. 意味着所有测试都通过了,1 passed; 0 failed 部分汇总了通过或失败的测试数量。
可以将测试标记为忽略,使其在特定实例中不运行;我们将在本章后面的“除非特别请求,否则忽略测试”部分介绍这一点。因为我们这里还没有这样做,所以摘要显示 0 ignored。我们也可以向 cargo test 命令传递参数,以仅运行名称与字符串匹配的测试;这称为过滤(filtering),我们将在“按名称运行测试子集”部分介绍。在这里,我们没有过滤正在运行的测试,因此摘要末尾显示 0 filtered out。
0 measured 统计信息适用于衡量性能的基准测试(benchmark tests)。截至撰写本文时,基准测试仅在 nightly Rust 中可用。请参阅关于基准测试的文档以了解更多。
测试输出中从 Doc-tests adder 开始的下一部分是关于任何文档测试的结果。我们还没有文档测试,但 Rust 可以编译出现在我们 API 文档中的任何代码示例。这个功能有助于保持文档和代码的同步!我们将在第 14 章的“文档注释作为测试”部分讨论如何编写文档测试。现在,我们将忽略 Doc-tests 输出。
让我们开始根据我们自己的需要定制测试。首先,将 it_works 函数的名称更改为其他名称,例如 exploration,如下所示:
Filename: src/lib.rs
pub fn add(left: u64, right: u64) -> u64 {
left + right
}
#[cfg(test)]
mod tests {
use super::*;
#[test]
fn exploration() {
let result = add(2, 2);
assert_eq!(result, 4);
}
}然后,再次运行 cargo test。现在的输出显示 exploration 而不是 it_works:
$ cargo test
Compiling adder v0.1.0 (file:///projects/adder)
Finished `test` profile [unoptimized + debuginfo] target(s) in 0.59s
Running unittests src/lib.rs (target/debug/deps/adder-92948b65e88960b4)
running 1 test
test tests::exploration ... ok
test result: ok. 1 passed; 0 failed; 0 ignored; 0 measured; 0 filtered out; finished in 0.00s
Doc-tests adder
running 0 tests
test result: ok. 0 passed; 0 failed; 0 ignored; 0 measured; 0 filtered out; finished in 0.00s
现在我们将添加另一个测试,但这次我们将使其失败!当测试函数中的某些内容 panic 时,测试就会失败。每个测试都在一个新的线程中运行,当主线程看到测试线程已死亡时,该测试被标记为失败。在第 9 章中,我们讨论了最简单的 panic 方式是调用 panic! 宏。将新的测试输入为名为 another 的函数,这样你的 src/lib.rs 文件看起来像示例 11-3。
pub fn add(left: u64, right: u64) -> u64 {
left + right
}
#[cfg(test)]
mod tests {
use super::*;
#[test]
fn exploration() {
let result = add(2, 2);
assert_eq!(result, 4);
}
#[test]
fn another() {
panic!("Make this test fail");
}
}panic! 宏再次使用 cargo test 运行测试。输出应该如示例 11-4 所示,显示我们的 exploration 测试通过了,而 another 失败了。
$ cargo test
Compiling adder v0.1.0 (file:///projects/adder)
Finished `test` profile [unoptimized + debuginfo] target(s) in 0.72s
Running unittests src/lib.rs (target/debug/deps/adder-92948b65e88960b4)
running 2 tests
test tests::another ... FAILED
test tests::exploration ... ok
failures:
---- tests::another stdout ----
thread 'tests::another' panicked at src/lib.rs:17:9:
Make this test fail
note: run with `RUST_BACKTRACE=1` environment variable to display a backtrace
failures:
tests::another
test result: FAILED. 1 passed; 1 failed; 0 ignored; 0 measured; 0 filtered out; finished in 0.00s
error: test failed, to rerun pass `--lib`
代替 ok,test tests::another 这一行显示 FAILED。在单个结果和摘要之间出现了两个新部分:第一部分显示了每个测试失败的详细原因。在这种情况下,我们得到详细信息:tests::another 失败,因为它在 src/lib.rs 文件的第 17 行 panic,消息为 Make this test fail。下一部分仅列出了所有失败测试的名称,当测试很多且失败的测试输出很详细时,这很有用。我们可以使用失败测试的名称仅运行该测试以更轻松地进行调试;我们将在“控制测试的运行方式”部分中更多地讨论运行测试的方法。
最后显示摘要行:总体而言,我们的测试结果是 FAILED。我们有一个测试通过、一个测试失败。
现在你已经看到了在不同场景下测试结果的样子,让我们看看除 panic! 之外的一些在测试中有用的宏。
使用 assert! 宏检查结果
标准库提供的 assert! 宏在你想要确保测试中的某个条件计算结果为 true 时非常有用。我们向 assert! 宏传递一个计算结果为布尔值的参数。如果值为 true,则不会发生任何事情,测试通过。如果值为 false,assert! 宏会调用 panic! 以使测试失败。使用 assert! 宏有助于检查我们的代码是否按照我们期望的方式运行。
在第 5 章示例 5-15 中,我们使用了 Rectangle 结构体和 can_hold 方法,这些内容在示例 11-5 中重复出现。让我们将此代码放入 src/lib.rs 文件中,然后使用 assert! 宏为其编写一些测试。
#[derive(Debug)]
struct Rectangle {
width: u32,
height: u32,
}
impl Rectangle {
fn can_hold(&self, other: &Rectangle) -> bool {
self.width > other.width && self.height > other.height
}
}Rectangle 结构体及其 can_hold 方法can_hold 方法返回一个布尔值,这意味着它是 assert! 宏的完美用例。在示例 11-6 中,我们编写了一个测试,通过创建一个宽度为 8、高度为 7 的 Rectangle 实例,并断言它可以容纳另一个宽度为 5、高度为 1 的 Rectangle 实例,来检验 can_hold 方法。
#[derive(Debug)]
struct Rectangle {
width: u32,
height: u32,
}
impl Rectangle {
fn can_hold(&self, other: &Rectangle) -> bool {
self.width > other.width && self.height > other.height
}
}
#[cfg(test)]
mod tests {
use super::*;
#[test]
fn larger_can_hold_smaller() {
let larger = Rectangle {
width: 8,
height: 7,
};
let smaller = Rectangle {
width: 5,
height: 1,
};
assert!(larger.can_hold(&smaller));
}
}can_hold,检查较大的矩形是否确实可以容纳较小的矩形注意 tests 模块中的 use super::*; 这一行。tests 模块是一个常规模块,遵循我们在第 7 章“路径用于引用模块树中的项”部分中介绍的常规可见性规则。因为 tests 模块是一个内部模块,我们需要将外部模块中要测试的代码引入内部模块的作用域。我们在这里使用了全局导入(glob),因此我们在外部模块中定义的任何内容都可以在此 tests 模块中使用。
我们将测试命名为 larger_can_hold_smaller,并创建了我们需要的两个 Rectangle 实例。然后,我们调用了 assert! 宏,并将调用 larger.can_hold(&smaller) 的结果传递给它。此表达式应该返回 true,因此我们的测试应该通过。让我们来验证!
$ cargo test
Compiling rectangle v0.1.0 (file:///projects/rectangle)
Finished `test` profile [unoptimized + debuginfo] target(s) in 0.66s
Running unittests src/lib.rs (target/debug/deps/rectangle-6584c4561e48942e)
running 1 test
test tests::larger_can_hold_smaller ... ok
test result: ok. 1 passed; 0 failed; 0 ignored; 0 measured; 0 filtered out; finished in 0.00s
Doc-tests rectangle
running 0 tests
test result: ok. 0 passed; 0 failed; 0 ignored; 0 measured; 0 filtered out; finished in 0.00s
确实通过了!让我们添加另一个测试,这次断言较小的矩形不能容纳较大的矩形:
Filename: src/lib.rs
#[derive(Debug)]
struct Rectangle {
width: u32,
height: u32,
}
impl Rectangle {
fn can_hold(&self, other: &Rectangle) -> bool {
self.width > other.width && self.height > other.height
}
}
#[cfg(test)]
mod tests {
use super::*;
#[test]
fn larger_can_hold_smaller() {
// --snip--
let larger = Rectangle {
width: 8,
height: 7,
};
let smaller = Rectangle {
width: 5,
height: 1,
};
assert!(larger.can_hold(&smaller));
}
#[test]
fn smaller_cannot_hold_larger() {
let larger = Rectangle {
width: 8,
height: 7,
};
let smaller = Rectangle {
width: 5,
height: 1,
};
assert!(!smaller.can_hold(&larger));
}
}因为在这种情况下 can_hold 函数的正确结果是 false,我们需要在将其传递给 assert! 宏之前对结果进行取反。因此,如果 can_hold 返回 false,我们的测试将通过:
$ cargo test
Compiling rectangle v0.1.0 (file:///projects/rectangle)
Finished `test` profile [unoptimized + debuginfo] target(s) in 0.66s
Running unittests src/lib.rs (target/debug/deps/rectangle-6584c4561e48942e)
running 2 tests
test tests::larger_can_hold_smaller ... ok
test tests::smaller_cannot_hold_larger ... ok
test result: ok. 2 passed; 0 failed; 0 ignored; 0 measured; 0 filtered out; finished in 0.00s
Doc-tests rectangle
running 0 tests
test result: ok. 0 passed; 0 failed; 0 ignored; 0 measured; 0 filtered out; finished in 0.00s
两个测试都通过了!现在让我们看看在代码中引入 bug 时测试结果会发生什么。我们将更改 can_hold 方法的实现,在比较宽度时将大于号(>)替换为小于号(<):
#[derive(Debug)]
struct Rectangle {
width: u32,
height: u32,
}
// --snip--
impl Rectangle {
fn can_hold(&self, other: &Rectangle) -> bool {
self.width < other.width && self.height > other.height
}
}
#[cfg(test)]
mod tests {
use super::*;
#[test]
fn larger_can_hold_smaller() {
let larger = Rectangle {
width: 8,
height: 7,
};
let smaller = Rectangle {
width: 5,
height: 1,
};
assert!(larger.can_hold(&smaller));
}
#[test]
fn smaller_cannot_hold_larger() {
let larger = Rectangle {
width: 8,
height: 7,
};
let smaller = Rectangle {
width: 5,
height: 1,
};
assert!(!smaller.can_hold(&larger));
}
}现在运行测试会产生以下结果:
$ cargo test
Compiling rectangle v0.1.0 (file:///projects/rectangle)
Finished `test` profile [unoptimized + debuginfo] target(s) in 0.66s
Running unittests src/lib.rs (target/debug/deps/rectangle-6584c4561e48942e)
running 2 tests
test tests::larger_can_hold_smaller ... FAILED
test tests::smaller_cannot_hold_larger ... ok
failures:
---- tests::larger_can_hold_smaller stdout ----
thread 'tests::larger_can_hold_smaller' panicked at src/lib.rs:28:9:
assertion failed: larger.can_hold(&smaller)
note: run with `RUST_BACKTRACE=1` environment variable to display a backtrace
failures:
tests::larger_can_hold_smaller
test result: FAILED. 1 passed; 1 failed; 0 ignored; 0 measured; 0 filtered out; finished in 0.00s
error: test failed, to rerun pass `--lib`
我们的测试捕捉到了 bug!因为 larger.width 是 8,smaller.width 是 5,can_hold 中的宽度比较现在返回 false:8 不小于 5。
使用 assert_eq! 和 assert_ne! 宏测试相等性
验证功能的一种常见方法是测试代码的结果与你期望代码返回的值是否相等。你可以通过使用 assert! 宏并向其传递使用 == 运算符的表达式来做到这一点。然而,这是一个非常常见的测试,标准库提供了一对宏——assert_eq! 和 assert_ne!——来更方便地执行此测试。这两个宏分别比较两个参数是否相等或不相等。如果断言失败,它们还会打印这两个值,这使得更容易看到测试为什么失败;相反,assert! 宏只表明它为 == 表达式得到了一个 false 值,而不打印导致该 false 值的值。
在示例 11-7 中,我们编写了一个名为 add_two 的函数,它将 2 加到其参数上,然后使用 assert_eq! 宏测试此函数。
pub fn add_two(a: u64) -> u64 {
a + 2
}
#[cfg(test)]
mod tests {
use super::*;
#[test]
fn it_adds_two() {
let result = add_two(2);
assert_eq!(result, 4);
}
}assert_eq! 宏测试函数 add_two让我们检查它是否通过!
$ cargo test
Compiling adder v0.1.0 (file:///projects/adder)
Finished `test` profile [unoptimized + debuginfo] target(s) in 0.58s
Running unittests src/lib.rs (target/debug/deps/adder-92948b65e88960b4)
running 1 test
test tests::it_adds_two ... ok
test result: ok. 1 passed; 0 failed; 0 ignored; 0 measured; 0 filtered out; finished in 0.00s
Doc-tests adder
running 0 tests
test result: ok. 0 passed; 0 failed; 0 ignored; 0 measured; 0 filtered out; finished in 0.00s
我们创建了一个名为 result 的变量,它持有调用 add_two(2) 的结果。然后,我们将 result 和 4 作为参数传递给 assert_eq! 宏。此测试的输出行是 test tests::it_adds_two ... ok,而 ok 文本表明我们的测试通过了!
让我们在代码中引入一个 bug,看看 assert_eq! 在失败时是什么样子。将 add_two 函数的实现改为加 3:
pub fn add_two(a: u64) -> u64 {
a + 3
}
#[cfg(test)]
mod tests {
use super::*;
#[test]
fn it_adds_two() {
let result = add_two(2);
assert_eq!(result, 4);
}
}再次运行测试:
$ cargo test
Compiling adder v0.1.0 (file:///projects/adder)
Finished `test` profile [unoptimized + debuginfo] target(s) in 0.61s
Running unittests src/lib.rs (target/debug/deps/adder-92948b65e88960b4)
running 1 test
test tests::it_adds_two ... FAILED
failures:
---- tests::it_adds_two stdout ----
thread 'tests::it_adds_two' panicked at src/lib.rs:12:9:
assertion `left == right` failed
left: 5
right: 4
note: run with `RUST_BACKTRACE=1` environment variable to display a backtrace
failures:
tests::it_adds_two
test result: FAILED. 0 passed; 1 failed; 0 ignored; 0 measured; 0 filtered out; finished in 0.00s
error: test failed, to rerun pass `--lib`
我们的测试捕捉到了 bug!tests::it_adds_two 测试失败了,消息告诉我们失败的断言是 left == right,并且 left 和 right 的值是什么。这条消息帮助我们开始调试:left 参数(我们持有调用 add_two(2) 的结果)是 5,但 right 参数是 4。你可以想象,当我们有大量测试时,这将特别有帮助。
请注意,在某些语言和测试框架中,相等性断言函数的参数被称为 expected 和 actual,并且指定参数的顺序很重要。然而,在 Rust 中,它们被称为 left 和 right,并且我们指定期望值和代码产生的值的顺序并不重要。我们可以在此测试中将断言写为 assert_eq!(4, result),这将产生相同的失败消息,显示 assertion `left == right` failed。
assert_ne! 宏在我们给定的两个值不相等时通过,在它们相等时失败。当我们不确定某个值会是什么,但我们知道该值肯定不应该是什么时,此宏最有用。例如,如果我们正在测试一个保证会以某种方式改变其输入的函数,但输入改变的方式取决于运行测试的星期几,那么最好的断言可能是函数的输出不等于输入。
在底层,assert_eq! 和 assert_ne! 宏分别使用 == 和 != 运算符。当断言失败时,这些宏使用调试格式打印它们的参数,这意味着被比较的值必须实现 PartialEq 和 Debug trait。所有基本类型和大多数标准库类型都实现了这些 trait。对于你自己定义的结构体和枚举,你需要实现 PartialEq 来断言这些类型的相等性。你还需要实现 Debug 以在断言失败时打印这些值。由于这两个都是可派生 trait,如第 5 章示例 5-12 所述,这通常只需在结构体或枚举定义上添加 #[derive(PartialEq, Debug)] 注解即可。有关这些和其他可派生 trait 的更多详细信息,请参阅附录 C “可派生 Trait”。
添加自定义失败消息
你还可以添加自定义消息,作为可选参数与 assert!、assert_eq! 和 assert_ne! 宏一起打印在失败消息中。在必需参数之后指定的任何参数都会传递给 format! 宏(在第 8 章的“使用 + 或 format! 进行拼接”中讨论过),因此你可以传递一个包含 {} 占位符的格式字符串以及要放入这些占位符的值。自定义消息对于记录断言的含义很有用;当测试失败时,你将更好地了解代码的问题所在。
例如,假设我们有一个按名称问候人们的函数,我们希望测试传递给该函数的名称是否出现在输出中:
Filename: src/lib.rs
pub fn greeting(name: &str) -> String {
format!("Hello {name}!")
}
#[cfg(test)]
mod tests {
use super::*;
#[test]
fn greeting_contains_name() {
let result = greeting("Carol");
assert!(result.contains("Carol"));
}
}该程序的要求尚未达成一致,并且我们相当确定问候语开头的 Hello 文本会发生变化。我们决定不想在需求发生变化时更新测试,因此我们不检查与 greeting 函数返回值的完全相等性,而只是断言输出包含输入参数的文本。
现在让我们通过更改 greeting 以排除 name 来在代码中引入一个 bug,看看默认的测试失败是什么样子:
pub fn greeting(name: &str) -> String {
String::from("Hello!")
}
#[cfg(test)]
mod tests {
use super::*;
#[test]
fn greeting_contains_name() {
let result = greeting("Carol");
assert!(result.contains("Carol"));
}
}运行此测试会产生以下结果:
$ cargo test
Compiling greeter v0.1.0 (file:///projects/greeter)
Finished `test` profile [unoptimized + debuginfo] target(s) in 0.91s
Running unittests src/lib.rs (target/debug/deps/greeter-170b942eb5bf5e3a)
running 1 test
test tests::greeting_contains_name ... FAILED
failures:
---- tests::greeting_contains_name stdout ----
thread 'tests::greeting_contains_name' panicked at src/lib.rs:12:9:
assertion failed: result.contains("Carol")
note: run with `RUST_BACKTRACE=1` environment variable to display a backtrace
failures:
tests::greeting_contains_name
test result: FAILED. 0 passed; 1 failed; 0 ignored; 0 measured; 0 filtered out; finished in 0.00s
error: test failed, to rerun pass `--lib`
此结果仅表明断言失败以及断言所在的行。更有用的失败消息会打印来自 greeting 函数的值。让我们添加一个自定义失败消息,由格式字符串组成,其中占位符填充了从 greeting 函数获得的实际值:
pub fn greeting(name: &str) -> String {
String::from("Hello!")
}
#[cfg(test)]
mod tests {
use super::*;
#[test]
fn greeting_contains_name() {
let result = greeting("Carol");
assert!(
result.contains("Carol"),
"Greeting did not contain name, value was `{result}`"
);
}
}现在当我们运行测试时,我们会得到更详细的错误消息:
$ cargo test
Compiling greeter v0.1.0 (file:///projects/greeter)
Finished `test` profile [unoptimized + debuginfo] target(s) in 0.93s
Running unittests src/lib.rs (target/debug/deps/greeter-170b942eb5bf5e3a)
running 1 test
test tests::greeting_contains_name ... FAILED
failures:
---- tests::greeting_contains_name stdout ----
thread 'tests::greeting_contains_name' panicked at src/lib.rs:12:9:
Greeting did not contain name, value was `Hello!`
note: run with `RUST_BACKTRACE=1` environment variable to display a backtrace
failures:
tests::greeting_contains_name
test result: FAILED. 0 passed; 1 failed; 0 ignored; 0 measured; 0 filtered out; finished in 0.00s
error: test failed, to rerun pass `--lib`
我们可以在测试输出中看到实际获得的值,这将帮助我们调试发生了什么,而不是我们期望发生什么。
使用 should_panic 检查 panic
除了检查返回值之外,检查我们的代码是否按我们期望的方式处理错误条件也很重要。例如,考虑我们在第 9 章示例 9-13 中创建的 Guess 类型。使用 Guess 的其他代码依赖于这样的保证:Guess 实例将仅包含 1 到 100 之间的值。我们可以编写一个测试,确保尝试使用超出该范围的值创建 Guess 实例会导致 panic。
我们通过将 should_panic 属性添加到测试函数来实现这一点。如果函数内部的代码 panic,则测试通过;如果函数内部的代码没有 panic,则测试失败。
示例 11-8 显示了一个测试,它检查 Guess::new 的错误条件是否在我们期望的时候发生。
pub struct Guess {
value: i32,
}
impl Guess {
pub fn new(value: i32) -> Guess {
if value < 1 || value > 100 {
panic!("Guess value must be between 1 and 100, got {value}.");
}
Guess { value }
}
}
#[cfg(test)]
mod tests {
use super::*;
#[test]
#[should_panic]
fn greater_than_100() {
Guess::new(200);
}
}panic!我们将 #[should_panic] 属性放在 #[test] 属性之后、它所应用的测试函数之前。当此测试通过时,我们来看看结果:
$ cargo test
Compiling guessing_game v0.1.0 (file:///projects/guessing_game)
Finished `test` profile [unoptimized + debuginfo] target(s) in 0.58s
Running unittests src/lib.rs (target/debug/deps/guessing_game-57d70c3acb738f4d)
running 1 test
test tests::greater_than_100 - should panic ... ok
test result: ok. 1 passed; 0 failed; 0 ignored; 0 measured; 0 filtered out; finished in 0.00s
Doc-tests guessing_game
running 0 tests
test result: ok. 0 passed; 0 failed; 0 ignored; 0 measured; 0 filtered out; finished in 0.00s
看起来不错!现在让我们通过在代码中移除 new 函数在值大于 100 时会 panic 的条件来引入一个 bug:
pub struct Guess {
value: i32,
}
// --snip--
impl Guess {
pub fn new(value: i32) -> Guess {
if value < 1 {
panic!("Guess value must be between 1 and 100, got {value}.");
}
Guess { value }
}
}
#[cfg(test)]
mod tests {
use super::*;
#[test]
#[should_panic]
fn greater_than_100() {
Guess::new(200);
}
}当我们运行示例 11-8 中的测试时,它会失败:
$ cargo test
Compiling guessing_game v0.1.0 (file:///projects/guessing_game)
Finished `test` profile [unoptimized + debuginfo] target(s) in 0.62s
Running unittests src/lib.rs (target/debug/deps/guessing_game-57d70c3acb738f4d)
running 1 test
test tests::greater_than_100 - should panic ... FAILED
failures:
---- tests::greater_than_100 stdout ----
note: test did not panic as expected at src/lib.rs:21:8
failures:
tests::greater_than_100
test result: FAILED. 0 passed; 1 failed; 0 ignored; 0 measured; 0 filtered out; finished in 0.00s
error: test failed, to rerun pass `--lib`
在这种情况下,我们没有得到非常有用的消息,但是当我们查看测试函数时,我们看到它被注解为 #[should_panic]。我们得到的失败意味着测试函数中的代码没有导致 panic。
使用 should_panic 的测试可能不精确。即使测试由于不同于我们预期的原因 panic,should_panic 测试也会通过。为了使 should_panic 测试更精确,我们可以向 should_panic 属性添加一个可选的 expected 参数。测试框架将确保失败消息包含提供的文本。例如,考虑示例 11-9 中修改后的 Guess 代码,其中 new 函数根据值是太小还是太大而使用不同的消息 panic。
pub struct Guess {
value: i32,
}
// --snip--
impl Guess {
pub fn new(value: i32) -> Guess {
if value < 1 {
panic!(
"Guess value must be greater than or equal to 1, got {value}."
);
} else if value > 100 {
panic!(
"Guess value must be less than or equal to 100, got {value}."
);
}
Guess { value }
}
}
#[cfg(test)]
mod tests {
use super::*;
#[test]
#[should_panic(expected = "less than or equal to 100")]
fn greater_than_100() {
Guess::new(200);
}
}panic!此测试将通过,因为我们放在 should_panic 属性的 expected 参数中的值是 Guess::new 函数 panic 时消息的子串。我们可以指定预期的整个 panic 消息,在本例中为 Guess value must be less than or equal to 100, got 200。你选择指定的内容取决于 panic 消息中有多少是唯一或动态的,以及你希望测试有多精确。在这种情况下,panic 消息的子串足以确保测试函数中的代码执行了 else if value > 100 分支。
要查看带有 expected 消息的 should_panic 测试失败时会发生什么,让我们再次通过在代码中交换 if value < 1 和 else if value > 100 块的主体来引入一个 bug:
pub struct Guess {
value: i32,
}
impl Guess {
pub fn new(value: i32) -> Guess {
if value < 1 {
panic!(
"Guess value must be less than or equal to 100, got {value}."
);
} else if value > 100 {
panic!(
"Guess value must be greater than or equal to 1, got {value}."
);
}
Guess { value }
}
}
#[cfg(test)]
mod tests {
use super::*;
#[test]
#[should_panic(expected = "less than or equal to 100")]
fn greater_than_100() {
Guess::new(200);
}
}这次当我们运行 should_panic 测试时,它会失败:
$ cargo test
Compiling guessing_game v0.1.0 (file:///projects/guessing_game)
Finished `test` profile [unoptimized + debuginfo] target(s) in 0.66s
Running unittests src/lib.rs (target/debug/deps/guessing_game-57d70c3acb738f4d)
running 1 test
test tests::greater_than_100 - should panic ... FAILED
failures:
---- tests::greater_than_100 stdout ----
thread 'tests::greater_than_100' panicked at src/lib.rs:12:13:
Guess value must be greater than or equal to 1, got 200.
note: run with `RUST_BACKTRACE=1` environment variable to display a backtrace
note: panic did not contain expected string
panic message: "Guess value must be greater than or equal to 1, got 200."
expected substring: "less than or equal to 100"
failures:
tests::greater_than_100
test result: FAILED. 0 passed; 1 failed; 0 ignored; 0 measured; 0 filtered out; finished in 0.00s
error: test failed, to rerun pass `--lib`
失败消息表明该测试确实如我们预期的那样 panic 了,但 panic 消息不包含预期的字符串 less than or equal to 100。在这种情况下,我们得到的 panic 消息是 Guess value must be greater than or equal to 1, got 200。现在我们可以开始找出 bug 在哪里了!
在测试中使用 Result<T, E>
到目前为止,我们所有的测试在失败时都会 panic。我们也可以编写使用 Result<T, E> 的测试!以下是示例 11-1 中的测试,重写为使用 Result<T, E> 并在失败时返回 Err 而不是 panic:
pub fn add(left: u64, right: u64) -> u64 {
left + right
}
#[cfg(test)]
mod tests {
use super::*;
#[test]
fn it_works() -> Result<(), String> {
let result = add(2, 2);
if result == 4 {
Ok(())
} else {
Err(String::from("two plus two does not equal four"))
}
}
}it_works 函数现在的返回类型是 Result<(), String>。在函数体中,我们不调用 assert_eq! 宏,而是在测试通过时返回 Ok(()),在测试失败时返回包含 String 的 Err。
编写返回 Result<T, E> 的测试使您能够在测试主体中使用问号运算符,这可以方便地编写如果其中的任何操作返回 Err 变体就应失败的测试。
你不能在使用 Result<T, E> 的测试上使用 #[should_panic] 注解。要断言操作返回 Err 变体,不要在 Result<T, E> 值上使用问号运算符。相反,使用 assert!(value.is_err())。
现在你已经了解了编写测试的几种方法,让我们看看运行测试时会发生什么,并探索我们可以与 cargo test 一起使用的不同选项。
控制测试运行方式
控制测试的运行方式(Controlling How Tests Are Run)
就像 cargo run 编译你的代码然后运行生成的可执行文件一样,cargo test 在测试模式下编译你的代码并运行生成的测试二进制文件。cargo test 生成的二进制文件的默认行为是并行运行所有测试,并捕获测试运行期间生成的输出,防止输出显示出来,这使读取与测试结果相关的输出更轻松。但是,你可以指定命令行选项来更改此默认行为。
某些命令行选项适用于 cargo test,另一些适用于生成的测试二进制文件。要分隔这两类参数,请列出要传递给 cargo test 的参数,后跟分隔符 --,然后是要传递给测试二进制文件的参数。运行 cargo test --help 显示你可以与 cargo test 一起使用的选项,运行 cargo test -- --help 显示可在分隔符之后使用的选项。这些选项也在 《rustc 手册》的“测试“部分中有文档说明。
并行或连续运行测试
当你运行多个测试时,默认情况下它们使用线程并行运行,这意味着它们能更快地运行完成,并且你能更快地获得反馈。由于测试是同时运行的,你必须确保测试不会相互依赖,也不会依赖于任何共享状态,包括共享环境,例如当前工作目录或环境变量。
例如,假设每个测试都运行一些代码,这些代码在磁盘上创建一个名为 test-output.txt 的文件并向其中写入一些数据。然后,每个测试读取该文件中的数据并断言该文件包含特定的值——每个测试的值都不同。因为测试是同时运行的,一个测试可能在另一个测试写入和读取文件之间的时间内覆盖该文件。然后第二个测试将失败,不是因为代码不正确,而是因为测试在并行运行时相互干扰了。一种解决方案是确保每个测试写入不同的文件;另一种解决方案是一次只运行一个测试。
如果你不想并行运行测试,或者想要更精细地控制使用的线程数,你可以向测试二进制文件传递 --test-threads 标志以及要使用的线程数。请看以下示例:
$ cargo test -- --test-threads=1
我们将测试线程数设置为 1,告诉程序不要使用任何并行性。使用一个线程运行测试将比并行运行它们花费更长时间,但如果它们共享状态,测试将不会相互干扰。
显示函数输出
默认情况下,如果测试通过,Rust 的测试库会捕获任何打印到标准输出的内容。例如,如果我们在测试中调用 println! 并且测试通过,我们将不会在终端中看到 println! 的输出;我们只会看到表明测试通过的那一行。如果测试失败,我们将看到打印到标准输出的内容以及其余失败消息。
例如,示例 11-10 有一个愚蠢的函数,它打印其参数的值并返回 10,以及一个通过的测试和一个失败的测试。
fn prints_and_returns_10(a: i32) -> i32 {
println!("I got the value {a}");
10
}
#[cfg(test)]
mod tests {
use super::*;
#[test]
fn this_test_will_pass() {
let value = prints_and_returns_10(4);
assert_eq!(value, 10);
}
#[test]
fn this_test_will_fail() {
let value = prints_and_returns_10(8);
assert_eq!(value, 5);
}
}println! 的函数的测试当我们使用 cargo test 运行这些测试时,我们将看到以下输出:
$ cargo test
Compiling silly-function v0.1.0 (file:///projects/silly-function)
Finished `test` profile [unoptimized + debuginfo] target(s) in 0.58s
Running unittests src/lib.rs (target/debug/deps/silly_function-160869f38cff9166)
running 2 tests
test tests::this_test_will_fail ... FAILED
test tests::this_test_will_pass ... ok
failures:
---- tests::this_test_will_fail stdout ----
I got the value 8
thread 'tests::this_test_will_fail' panicked at src/lib.rs:19:9:
assertion `left == right` failed
left: 10
right: 5
note: run with `RUST_BACKTRACE=1` environment variable to display a backtrace
failures:
tests::this_test_will_fail
test result: FAILED. 1 passed; 1 failed; 0 ignored; 0 measured; 0 filtered out; finished in 0.00s
error: test failed, to rerun pass `--lib`
注意,在此输出中,我们看不到 I got the value 4,这是在通过的测试运行时打印的。该输出已被捕获。失败测试的输出 I got the value 8 出现在测试摘要输出部分,该部分也显示了测试失败的原因。
如果我们也想看到通过的测试的打印值,我们可以使用 --show-output 告诉 Rust 也显示成功测试的输出:
$ cargo test -- --show-output
当我们使用 --show-output 标志再次运行示例 11-10 中的测试时,我们看到以下输出:
$ cargo test -- --show-output
Compiling silly-function v0.1.0 (file:///projects/silly-function)
Finished `test` profile [unoptimized + debuginfo] target(s) in 0.60s
Running unittests src/lib.rs (target/debug/deps/silly_function-160869f38cff9166)
running 2 tests
test tests::this_test_will_fail ... FAILED
test tests::this_test_will_pass ... ok
successes:
---- tests::this_test_will_pass stdout ----
I got the value 4
successes:
tests::this_test_will_pass
failures:
---- tests::this_test_will_fail stdout ----
I got the value 8
thread 'tests::this_test_will_fail' panicked at src/lib.rs:19:9:
assertion `left == right` failed
left: 10
right: 5
note: run with `RUST_BACKTRACE=1` environment variable to display a backtrace
failures:
tests::this_test_will_fail
test result: FAILED. 1 passed; 1 failed; 0 ignored; 0 measured; 0 filtered out; finished in 0.00s
error: test failed, to rerun pass `--lib`
按名称运行测试子集
有时运行完整的测试套件可能需要很长时间。如果你在某个特定区域的代码上工作,你可能只想运行与该代码相关的测试。你可以通过向 cargo test 传递要运行的测试的名称(或名称列表)作为参数来选择要运行的测试。
为了演示如何运行测试子集,我们将首先为 add_two 函数创建三个测试,如示例 11-11 所示,并选择要运行哪些测试。
pub fn add_two(a: u64) -> u64 {
a + 2
}
#[cfg(test)]
mod tests {
use super::*;
#[test]
fn add_two_and_two() {
let result = add_two(2);
assert_eq!(result, 4);
}
#[test]
fn add_three_and_two() {
let result = add_two(3);
assert_eq!(result, 5);
}
#[test]
fn one_hundred() {
let result = add_two(100);
assert_eq!(result, 102);
}
}如果我们不传递任何参数就运行测试,如前所述,所有测试将并行运行:
$ cargo test
Compiling adder v0.1.0 (file:///projects/adder)
Finished `test` profile [unoptimized + debuginfo] target(s) in 0.62s
Running unittests src/lib.rs (target/debug/deps/adder-92948b65e88960b4)
running 3 tests
test tests::add_three_and_two ... ok
test tests::add_two_and_two ... ok
test tests::one_hundred ... ok
test result: ok. 3 passed; 0 failed; 0 ignored; 0 measured; 0 filtered out; finished in 0.00s
Doc-tests adder
running 0 tests
test result: ok. 0 passed; 0 failed; 0 ignored; 0 measured; 0 filtered out; finished in 0.00s
运行单个测试
我们可以将任何测试函数的名称传递给 cargo test 以仅运行该测试:
$ cargo test one_hundred
Compiling adder v0.1.0 (file:///projects/adder)
Finished `test` profile [unoptimized + debuginfo] target(s) in 0.69s
Running unittests src/lib.rs (target/debug/deps/adder-92948b65e88960b4)
running 1 test
test tests::one_hundred ... ok
test result: ok. 1 passed; 0 failed; 0 ignored; 0 measured; 2 filtered out; finished in 0.00s
只有名为 one_hundred 的测试运行了;其他两个测试的名称不匹配。测试输出通过末尾显示 2 filtered out 让我们知道我们还有更多测试没有运行。
我们不能以这种方式指定多个测试的名称;只有传递给 cargo test 的第一个值会被使用。但有一种方法可以运行多个测试。
过滤以运行多个测试
我们可以指定测试名称的一部分,任何名称与该值匹配的测试都将被运行。例如,因为我们的两个测试的名称中包含 add,我们可以通过运行 cargo test add 来运行这两个测试:
$ cargo test add
Compiling adder v0.1.0 (file:///projects/adder)
Finished `test` profile [unoptimized + debuginfo] target(s) in 0.61s
Running unittests src/lib.rs (target/debug/deps/adder-92948b65e88960b4)
running 2 tests
test tests::add_three_and_two ... ok
test tests::add_two_and_two ... ok
test result: ok. 2 passed; 0 failed; 0 ignored; 0 measured; 1 filtered out; finished in 0.00s
此命令运行了名称中包含 add 的所有测试,并过滤掉了名为 one_hundred 的测试。还要注意,测试所在的模块会成为测试名称的一部分,因此我们可以通过按模块名称进行过滤来运行模块中的所有测试。
除非特别请求,否则忽略测试
有时一些特定的测试执行起来可能非常耗时,因此你可能希望在大多数 cargo test 运行中排除它们。而不是列出所有你想运行的测试作为参数,你可以使用 ignore 属性标注耗时的测试以排除它们,如下所示:
Filename: src/lib.rs
pub fn add(left: u64, right: u64) -> u64 {
left + right
}
#[cfg(test)]
mod tests {
use super::*;
#[test]
fn it_works() {
let result = add(2, 2);
assert_eq!(result, 4);
}
#[test]
#[ignore]
fn expensive_test() {
// code that takes an hour to run
}
}在 #[test] 之后,我们在要排除的测试上添加 #[ignore] 这一行。现在当我们运行测试时,it_works 会运行,但 expensive_test 不会:
$ cargo test
Compiling adder v0.1.0 (file:///projects/adder)
Finished `test` profile [unoptimized + debuginfo] target(s) in 0.60s
Running unittests src/lib.rs (target/debug/deps/adder-92948b65e88960b4)
running 2 tests
test tests::expensive_test ... ignored
test tests::it_works ... ok
test result: ok. 1 passed; 0 failed; 1 ignored; 0 measured; 0 filtered out; finished in 0.00s
Doc-tests adder
running 0 tests
test result: ok. 0 passed; 0 failed; 0 ignored; 0 measured; 0 filtered out; finished in 0.00s
expensive_test 函数被列为 ignored。如果我们只想运行被忽略的测试,我们可以使用 cargo test -- --ignored:
$ cargo test -- --ignored
Compiling adder v0.1.0 (file:///projects/adder)
Finished `test` profile [unoptimized + debuginfo] target(s) in 0.61s
Running unittests src/lib.rs (target/debug/deps/adder-92948b65e88960b4)
running 1 test
test tests::expensive_test ... ok
test result: ok. 1 passed; 0 failed; 0 ignored; 0 measured; 1 filtered out; finished in 0.00s
Doc-tests adder
running 0 tests
test result: ok. 0 passed; 0 failed; 0 ignored; 0 measured; 0 filtered out; finished in 0.00s
通过控制哪些测试运行,你可以确保你的 cargo test 结果能快速返回。当你认为有必要检查 ignored 测试的结果并且有时间等待结果时,你可以运行 cargo test -- --ignored。如果你想运行所有测试,无论它们是否被忽略,你可以运行 cargo test -- --include-ignored。
测试组织
测试组织(Test Organization)
正如本章开头提到的,测试是一项复杂的学科,不同的人使用不同的术语和组织方式。Rust 社区将测试分为两个主要类别:单元测试(unit tests)和集成测试(integration tests)。单元测试规模较小,更专注,一次单独测试一个模块,并且可以测试私有接口。集成测试完全位于你的库外部,以任何其他外部代码使用你的代码的相同方式使用你的代码,仅使用公共接口,并且每个测试可能涉及多个模块。
编写这两种测试对于确保库的各个部分(单独地和一起地)按你期望的方式工作都很重要。
单元测试
单元测试的目的是在与其余代码隔离的情况下测试每个代码单元,以快速定位代码在哪些地方按预期工作,哪些地方没有。你将单元测试放在 src 目录中,与它们所测试的代码放在同一个文件中。惯例是在每个文件中创建一个名为 tests 的模块来包含测试函数,并使用 cfg(test) 标注该模块。
tests 模块和 #[cfg(test)]
tests 模块上的 #[cfg(test)] 注解告诉 Rust,仅当你运行 cargo test 时才编译和运行测试代码,而不是在运行 cargo build 时。这在你只想构建库时可以节省编译时间,并且在生成的编译产物中节省空间,因为测试不包含在内。你会看到,由于集成测试放在不同的目录中,它们不需要 #[cfg(test)] 注解。然而,由于单元测试与代码放在相同的文件中,你将使用 #[cfg(test)] 来指定它们不应包含在编译结果中。
回想一下,当我们在本章第一节中生成新的 adder 项目时,Cargo 为我们生成了以下代码:
Filename: src/lib.rs
pub fn add(left: u64, right: u64) -> u64 {
left + right
}
#[cfg(test)]
mod tests {
use super::*;
#[test]
fn it_works() {
let result = add(2, 2);
assert_eq!(result, 4);
}
}在自动生成的 tests 模块上,属性 cfg 代表 configuration(配置),并告诉 Rust 只有在给定特定配置选项时才应包含以下项。在这种情况下,配置选项是 test,由 Rust 提供用于编译和运行测试。通过使用 cfg 属性,Cargo 仅在我们主动使用 cargo test 运行测试时才编译我们的测试代码。这包括此模块中可能存在的任何辅助函数,以及标注了 #[test] 的函数。
测试私有函数
在测试社区中,关于是否应该直接测试私有函数存在争议,而其他语言使得测试私有函数变得困难或不可能。无论你遵循哪种测试理念,Rust 的隐私规则确实允许你测试私有函数。考虑示例 11-12 中带有私有函数 internal_adder 的代码。
pub fn add_two(a: u64) -> u64 {
internal_adder(a, 2)
}
fn internal_adder(left: u64, right: u64) -> u64 {
left + right
}
#[cfg(test)]
mod tests {
use super::*;
#[test]
fn internal() {
let result = internal_adder(2, 2);
assert_eq!(result, 4);
}
}注意,internal_adder 函数未被标记为 pub。测试只是 Rust 代码,tests 模块只是另一个模块。正如我们在“用于引用模块树中的项的路径”中所讨论的,子模块中的项可以使用其祖先模块中的项。在此测试中,我们使用 use super::* 将所有属于 tests 模块父模块的项引入作用域,然后测试可以调用 internal_adder。如果你认为不应测试私有函数,Rust 中没有任何东西会强迫你这样做。
集成测试
在 Rust 中,集成测试完全位于你的库外部。它们以任何其他代码使用你的库的相同方式使用你的库,这意味着它们只能调用属于库公共 API 的函数。它们的目的是测试库的多个部分是否能够正确地协同工作。能够单独正确工作的代码单元在集成时可能会出现问题,因此集成代码的测试覆盖范围也很重要。要创建集成测试,你首先需要一个 tests 目录。
tests 目录
我们在项目目录的顶层创建一个 tests 目录,与 src 相邻。Cargo 知道要在此目录中查找集成测试文件。然后我们可以根据需要创建任意数量的测试文件,Cargo 会将每个文件编译为单独的 crate。
让我们创建一个集成测试。在 src/lib.rs 文件中仍然保留示例 11-12 中的代码,创建一个 tests 目录,并创建一个名为 tests/integration_test.rs 的新文件。你的目录结构应如下所示:
adder
├── Cargo.lock
├── Cargo.toml
├── src
│ └── lib.rs
└── tests
└── integration_test.rs
将示例 11-13 中的代码输入到 tests/integration_test.rs 文件中。
use adder::add_two;
#[test]
fn it_adds_two() {
let result = add_two(2);
assert_eq!(result, 4);
}adder crate 中某个函数的集成测试tests 目录中的每个文件都是单独的 crate,因此我们需要将库引入每个测试 crate 的作用域。因此,我们在代码顶部添加了 use adder::add_two;,这在单元测试中是不需要的。
我们不需要在 tests/integration_test.rs 中使用 #[cfg(test)] 标注任何代码。Cargo 特殊处理 tests 目录,并且仅在我们运行 cargo test 时才编译此目录中的文件。现在运行 cargo test:
$ cargo test
Compiling adder v0.1.0 (file:///projects/adder)
Finished `test` profile [unoptimized + debuginfo] target(s) in 1.31s
Running unittests src/lib.rs (target/debug/deps/adder-1082c4b063a8fbe6)
running 1 test
test tests::internal ... ok
test result: ok. 1 passed; 0 failed; 0 ignored; 0 measured; 0 filtered out; finished in 0.00s
Running tests/integration_test.rs (target/debug/deps/integration_test-1082c4b063a8fbe6)
running 1 test
test it_adds_two ... ok
test result: ok. 1 passed; 0 failed; 0 ignored; 0 measured; 0 filtered out; finished in 0.00s
Doc-tests adder
running 0 tests
test result: ok. 0 passed; 0 failed; 0 ignored; 0 measured; 0 filtered out; finished in 0.00s
输出的三个部分包括单元测试、集成测试和文档测试。注意,如果某个部分中的任何测试失败,后续部分将不会运行。例如,如果单元测试失败,将不会有集成测试和文档测试的输出,因为这些测试只有在所有单元测试通过时才会运行。
单元测试的第一个部分与我们一直看到的相同:每个单元测试一行(一个名为 internal 的测试,我们在示例 11-12 中添加的),然后是单元测试的摘要行。
集成测试部分以 Running tests/integration_test.rs 行开头。接下来,是该集成测试中每个测试函数的一行,以及在 Doc-tests adder 部分开始之前的集成测试结果摘要行。
每个集成测试文件都有自己的部分,因此如果我们在 tests 目录中添加更多文件,就会有更多的集成测试部分。
我们仍然可以通过将特定测试函数的名称作为参数传递给 cargo test 来运行该测试函数。要运行特定集成测试文件中的所有测试,请使用 cargo test 的 --test 参数,后跟文件名:
$ cargo test --test integration_test
Compiling adder v0.1.0 (file:///projects/adder)
Finished `test` profile [unoptimized + debuginfo] target(s) in 0.64s
Running tests/integration_test.rs (target/debug/deps/integration_test-82e7799c1bc62298)
running 1 test
test it_adds_two ... ok
test result: ok. 1 passed; 0 failed; 0 ignored; 0 measured; 0 filtered out; finished in 0.00s
此命令仅运行 tests/integration_test.rs 文件中的测试。
集成测试中的子模块
随着你添加更多的集成测试,你可能希望在 tests 目录中创建更多文件来帮助组织它们;例如,你可以根据测试的功能对测试函数进行分组。如前所述,tests 目录中的每个文件都被编译为其自己的独立 crate,这对于创建单独的作用域以更接近地模仿最终用户使用你的 crate 的方式非常有用。然而,这意味着 tests 目录中的文件与 src 中的文件行为不同,正如你在第 7 章中关于如何将代码分离为模块和文件所了解的那样。
tests 目录文件的不同行为最明显的是,当你有一组辅助函数要在多个集成测试文件中使用,并且你尝试按照第 7 章的“将模块分隔到不同文件中”部分的步骤将它们提取到一个公共模块中时。例如,如果我们创建 tests/common.rs 并在其中放置一个名为 setup 的函数,我们可以向 setup 添加一些我们想从多个测试文件中的多个测试函数调用的代码:
Filename: tests/common.rs
pub fn setup() {
// setup code specific to your library's tests would go here
}当我们再次运行测试时,即使在输出中会看到 common.rs 文件的新部分,即使此文件不包含任何测试函数,也没有在任何地方调用 setup 函数:
$ cargo test
Compiling adder v0.1.0 (file:///projects/adder)
Finished `test` profile [unoptimized + debuginfo] target(s) in 0.89s
Running unittests src/lib.rs (target/debug/deps/adder-92948b65e88960b4)
running 1 test
test tests::internal ... ok
test result: ok. 1 passed; 0 failed; 0 ignored; 0 measured; 0 filtered out; finished in 0.00s
Running tests/common.rs (target/debug/deps/common-92948b65e88960b4)
running 0 tests
test result: ok. 0 passed; 0 failed; 0 ignored; 0 measured; 0 filtered out; finished in 0.00s
Running tests/integration_test.rs (target/debug/deps/integration_test-92948b65e88960b4)
running 1 test
test it_adds_two ... ok
test result: ok. 1 passed; 0 failed; 0 ignored; 0 measured; 0 filtered out; finished in 0.00s
Doc-tests adder
running 0 tests
test result: ok. 0 passed; 0 failed; 0 ignored; 0 measured; 0 filtered out; finished in 0.00s
common 出现在测试结果中并显示 running 0 tests 不是我们想要的。我们只想与其他集成测试文件共享一些代码。为了避免 common 出现在测试输出中,我们将创建 tests/common/mod.rs 而不是 tests/common.rs。项目目录现在如下所示:
├── Cargo.lock
├── Cargo.toml
├── src
│ └── lib.rs
└── tests
├── common
│ └── mod.rs
└── integration_test.rs
这是 Rust 也理解的较旧的命名约定,我们在第 7 章的“备用文件路径”中提到过。以这种方式命名文件告诉 Rust 不要将 common 模块视为集成测试文件。当我们把 setup 函数代码移到 tests/common/mod.rs 并删除 tests/common.rs 文件时,测试输出中的该部分将不再出现。tests 目录的子目录中的文件不会作为单独的 crate 编译,也不会在测试输出中显示为单独的部分。
在创建了 tests/common/mod.rs 之后,我们可以从任何集成测试文件中将其作为模块使用。以下是从 tests/integration_test.rs 中的 it_adds_two 测试调用 setup 函数的示例:
Filename: tests/integration_test.rs
use adder::add_two;
mod common;
#[test]
fn it_adds_two() {
common::setup();
let result = add_two(2);
assert_eq!(result, 4);
}注意,mod common; 声明与我们在示例 7-21 中演示的模块声明相同。然后,在测试函数中,我们可以调用 common::setup() 函数。
二进制 crate 的集成测试
如果我们的项目是一个仅包含 src/main.rs 文件而没有 src/lib.rs 文件的二进制 crate,我们无法在 tests 目录中创建集成测试,也不能使用 use 语句将 src/main.rs 文件中定义的函数引入作用域。只有库 crate 会暴露其他 crate 可以使用的函数;二进制 crate 旨在独立运行。
这就是为什么提供二进制的 Rust 项目会有一个简单的 src/main.rs 文件,该文件调用位于 src/lib.rs 文件中的逻辑的原因之一。使用这种结构,集成测试可以使用 use 测试库 crate,使重要功能可用。如果重要功能正常,src/main.rs 文件中的少量代码也将正常工作,并且这些少量代码不需要测试。
总结
Rust 的测试功能提供了一种指定代码应如何运行的方法,以确保即使在你进行更改时,代码也能继续按预期工作。单元测试分别测试库的不同部分,并且可以测试私有实现细节。集成测试检查库的多个部分是否能够正确协同工作,并且它们使用库的公共 API 以与外部代码将使用它的相同方式测试代码。即使 Rust 的类型系统和所有权规则有助于防止某些类型的 bug,但测试对于减少与代码预期行为方式相关的逻辑 bug 仍然很重要。
让我们将本章以及前几章学到的知识结合起来,着手一个项目!
I/O 项目:构建命令行程序(Building a Command Line Program)
本章是对你到目前为止学到的许多技能的回顾,以及对更多标准库功能的探索。我们将构建一个与文件和命令行输入/输出交互的命令行工具,以实践你现在掌握的 Rust 概念。
Rust 的速度、安全性、单一二进制输出和跨平台支持使其成为创建命令行工具的理想语言,因此对于我们的项目,我们将制作经典命令行搜索工具 grep 的自己的版本(globally search a regular expression and print,即全局搜索正则表达式并打印)。在最简单的用例中,grep 在指定文件中搜索指定的字符串。为此,grep 以文件路径和一个字符串作为参数。然后,它读取文件,找到包含该字符串参数的行,并打印这些行。
在此过程中,我们将展示如何使我们的命令行工具使用许多其他命令行工具使用的终端功能。我们将读取环境变量的值,以允许用户配置我们工具的行为。我们还将错误消息打印到标准错误控制台流(stderr)而不是标准输出(stdout),以便例如用户可以将成功输出重定向到文件,同时仍然在屏幕上看到错误消息。
一位 Rust 社区成员 Andrew Gallant 已经创建了一个功能齐全、速度极快的 grep 版本,称为 ripgrep。相比之下,我们的版本将相当简单,但本章将为你提供一些理解诸如 ripgrep 等真实世界项目所需的背景知识。
我们的 grep 项目将结合你到目前为止学到的许多概念:
我们还将简要介绍闭包(closure)、迭代器(iterator)和 trait 对象(trait object),第 13 章和第 18 章将详细涵盖这些内容。
接收命令行参数
接收命令行参数(Accepting Command Line Arguments)
让我们像往常一样使用 cargo new 创建一个新项目。我们将项目命名为 minigrep,以区别于你可能已在系统上安装的 grep 工具:
$ cargo new minigrep
Created binary (application) `minigrep` project
$ cd minigrep
第一个任务是让 minigrep 接受两个命令行参数:文件路径和要搜索的字符串。也就是说,我们希望能够使用 cargo run、两个连字符(表示后面的参数是给我们的程序的,而不是给 cargo 的)、要搜索的字符串和要搜索的文件路径来运行我们的程序,如下所示:
$ cargo run -- searchstring example-filename.txt
目前,cargo new 生成的程序无法处理我们给它的参数。crates.io 上的一些现有库可以帮助编写接受命令行参数的程序,但由于你刚刚学习这个概念,让我们自己实现这个能力。
读取参数值
为了使 minigrep 能够读取传递给它的命令行参数的值,我们需要使用 Rust 标准库中的 std::env::args 函数。此函数返回传递给 minigrep 的命令行参数的迭代器(iterator)。我们将在第 13 章全面介绍迭代器。现在,你只需要了解关于迭代器的两个细节:迭代器产生一系列值,我们可以在迭代器上调用 collect 方法将其转换为集合(例如向量),其中包含迭代器产生的所有元素。
示例 12-1 中的代码允许你的 minigrep 程序读取传递给它的任何命令行参数,然后将这些值收集到一个向量中。
use std::env;
fn main() {
let args: Vec<String> = env::args().collect();
dbg!(args);
}首先,我们使用 use 语句将 std::env 模块引入作用域,以便可以使用其 args 函数。注意,std::env::args 函数嵌套在两层模块中。正如我们在第 7 章中讨论的,当所需的函数嵌套在多个模块中时,我们选择将父模块引入作用域,而不是函数本身。这样做,我们可以轻松地使用 std::env 中的其他函数。这也比添加 use std::env::args 然后仅用 args 调用函数更不容易产生歧义,因为 args 可能很容易被误认为是当前模块中定义的函数。
args 函数与无效 Unicode
注意,如果任何参数包含无效的 Unicode,std::env::args 会 panic。如果你的程序需要接受包含无效 Unicode 的参数,请改用 std::env::args_os。该函数返回一个产生 OsString 值(而不是 String 值)的迭代器。我们为了简单起见在此选择使用 std::env::args,因为 OsString 值因平台而异,并且比 String 值更难以处理。
在 main 的第一行,我们调用 env::args,并立即使用 collect 将迭代器转换为包含迭代器产生的所有值的向量。我们可以使用 collect 函数创建多种类型的集合,因此我们显式标注了 args 的类型,以指定我们想要一个字符串向量。尽管你在 Rust 中很少需要标注类型,但 collect 是你经常需要标注的一个函数,因为 Rust 无法推断出你想要哪种集合。
最后,我们使用调试宏打印向量。让我们先尝试不带参数、再带两个参数运行代码:
$ cargo run
Compiling minigrep v0.1.0 (file:///projects/minigrep)
Finished `dev` profile [unoptimized + debuginfo] target(s) in 0.61s
Running `target/debug/minigrep`
[src/main.rs:5:5] args = [
"target/debug/minigrep",
]
$ cargo run -- needle haystack
Compiling minigrep v0.1.0 (file:///projects/minigrep)
Finished `dev` profile [unoptimized + debuginfo] target(s) in 1.57s
Running `target/debug/minigrep needle haystack`
[src/main.rs:5:5] args = [
"target/debug/minigrep",
"needle",
"haystack",
]
注意,向量中的第一个值是 "target/debug/minigrep",这是我们的二进制文件名称。这与 C 中参数列表的行为一致,允许程序使用其在执行时被调用的名称。能够访问程序名称通常很方便,以防你想在消息中打印它,或根据调用程序的命令行列名改变程序的行为。但出于本章的目的,我们将忽略它,只保存我们需要的两个参数。
将参数值保存在变量中
程序目前能够访问指定为命令行参数的值。现在我们需要将这两个参数的值保存在变量中,以便在程序的其余部分使用这些值。我们在示例 12-2 中执行此操作。
use std::env;
fn main() {
let args: Vec<String> = env::args().collect();
let query = &args[1];
let file_path = &args[2];
println!("Searching for {query}");
println!("In file {file_path}");
}正如我们在打印向量时看到的,程序名称占用了 args[0] 中的第一个值,因此我们从索引 1 开始处理参数。minigrep 接受的第一个参数是我们要搜索的字符串,因此我们将对第一个参数的引用放入变量 query 中。第二个参数将是文件路径,因此我们将对第二个参数的引用放入变量 file_path 中。
我们临时打印这些变量的值,以证明代码按我们预期的方式工作。让我们使用参数 test 和 sample.txt 再次运行此程序:
$ cargo run -- test sample.txt
Compiling minigrep v0.1.0 (file:///projects/minigrep)
Finished `dev` profile [unoptimized + debuginfo] target(s) in 0.0s
Running `target/debug/minigrep test sample.txt`
Searching for test
In file sample.txt
很好,程序在正常工作!我们需要的参数值已保存到正确的变量中。稍后我们将添加一些错误处理,以应对某些潜在的错误情况,例如用户不提供参数时;目前,我们将忽略这种情况,而是着手添加文件读取功能。
读取文件
读取文件(Reading a File)
现在我们将添加功能来读取 file_path 参数中指定的文件。首先,我们需要一个示例文件来进行测试:我们将使用一个包含少量文本、多行且有一些重复单词的文件。示例 12-3 中艾米莉·狄金森的一首诗就很好用!在项目的根目录下创建一个名为 poem.txt 的文件,并输入诗歌“我是无名之辈!你是谁?“
I'm nobody! Who are you?
Are you nobody, too?
Then there's a pair of us - don't tell!
They'd banish us, you know.
How dreary to be somebody!
How public, like a frog
To tell your name the livelong day
To an admiring bog!
文本就位后,编辑 src/main.rs 并添加读取文件的代码,如示例 12-4 所示。
use std::env;
use std::fs;
fn main() {
// --snip--
let args: Vec<String> = env::args().collect();
let query = &args[1];
let file_path = &args[2];
println!("Searching for {query}");
println!("In file {file_path}");
let contents = fs::read_to_string(file_path)
.expect("Should have been able to read the file");
println!("With text:\n{contents}");
}首先,我们使用 use 语句引入标准库的一个相关部分:我们需要 std::fs 来处理文件。
在 main 中,新的语句 fs::read_to_string 接受 file_path,打开该文件,并返回一个包含文件内容的 std::io::Result<String> 类型的值。
之后,我们再次添加一个临时的 println! 语句,在读取文件后打印 contents 的值,以便我们可以检查程序到目前为止是否正常工作。
让我们使用任意字符串作为第一个命令行参数(因为我们尚未实现搜索部分),并将 poem.txt 文件作为第二个参数来运行此代码:
$ cargo run -- the poem.txt
Compiling minigrep v0.1.0 (file:///projects/minigrep)
Finished `dev` profile [unoptimized + debuginfo] target(s) in 0.0s
Running `target/debug/minigrep the poem.txt`
Searching for the
In file poem.txt
With text:
I'm nobody! Who are you?
Are you nobody, too?
Then there's a pair of us - don't tell!
They'd banish us, you know.
How dreary to be somebody!
How public, like a frog
To tell your name the livelong day
To an admiring bog!
很好!代码读取并打印了文件的内容。但代码有一些缺陷。目前,main 函数有多个职责:通常,如果每个函数只负责一个概念,函数会更清晰且更易于维护。另一个问题是我们没有尽可能好地处理错误。程序仍然很小,所以这些缺陷不是大问题,但随着程序增长,将更难干净地修复它们。在开发程序时尽早开始重构是一个好习惯,因为重构少量代码要容易得多。我们接下来将这样做。
重构以改进模块化与错误处理
重构以改善模块化和错误处理(Refactoring to Improve Modularity and Error Handling)
为了改进我们的程序,我们将解决与程序结构以及处理潜在错误方式相关的四个问题。首先,我们的 main 函数现在执行两个任务:解析参数和读取文件。随着程序增长,main 函数处理的不同任务数量将会增加。随着一个函数承担越来越多的职责,它变得更加难以推理、更难以测试、更难以在不破坏其某个部分的情况下进行更改。最好将功能分开,使每个函数只负责一项任务。
此问题也与第二个问题相关:虽然 query 和 file_path 是我们程序的配置变量,但像 contents 这样的变量用于执行程序的逻辑。main 越长,我们需要引入作用域的变量就越多;作用域中的变量越多,就越难跟踪每个变量的用途。最好将配置变量分组到一个结构中,以明确它们的用途。
第三个问题是,我们在读取文件失败时使用了 expect 来打印错误消息,但错误消息只打印了 Should have been able to read the file。读取文件可能以多种方式失败:例如,文件可能缺失,或者我们可能没有权限打开文件。目前,无论情况如何,我们都会为所有情况打印相同的错误消息,这不会给用户任何信息!
第四,我们使用 expect 来处理错误,如果用户运行我们的程序时未指定足够的参数,他们将得到一个来自 Rust 的 index out of bounds 错误,这并没有清楚地解释问题。最好将所有错误处理代码放在一个地方,这样如果错误处理逻辑需要更改,未来的维护者只需查阅代码的一个地方。将所有错误处理代码放在一个地方也将确保我们打印的消息对最终用户有意义。
让我们通过重构项目来解决这四个问题。
分离二进制项目的关注点
将多个任务的职责分配给 main 函数的组织问题在许多二进制项目中都很常见。因此,许多 Rust 程序员发现,当 main 函数开始变得庞大时,将二进制程序的不同关注点分开是很有用的。此过程包含以下步骤:
- 将程序拆分为 main.rs 文件和 lib.rs 文件,并将程序的逻辑移到 lib.rs 中。
- 只要你的命令行解析逻辑很小,它可以保留在
main函数中。 - 当命令行解析逻辑开始变得复杂时,将其从
main函数提取到其他函数或类型中。
在此过程之后,main 函数中保留的职责应限于以下内容:
- 使用参数值调用命令行解析逻辑
- 设置任何其他配置
- 调用 lib.rs 中的
run函数 - 如果
run返回错误,则处理该错误
这种模式是关于分离关注点:main.rs 处理运行程序,lib.rs 处理手头任务的所有逻辑。因为你无法直接测试 main 函数,这种结构通过将程序的所有逻辑移出 main 函数,使你可以测试所有逻辑。main 函数中保留的代码将足够小,可以通过阅读来验证其正确性。让我们按照此过程重新组织我们的程序。
提取参数解析器
我们将提取解析参数的功能到一个 main 将调用的函数中。示例 12-5 显示了 main 函数的新开头,它调用了一个新的 parse_config 函数,我们将在 src/main.rs 中定义。
use std::env;
use std::fs;
fn main() {
let args: Vec<String> = env::args().collect();
let (query, file_path) = parse_config(&args);
// --snip--
println!("Searching for {query}");
println!("In file {file_path}");
let contents = fs::read_to_string(file_path)
.expect("Should have been able to read the file");
println!("With text:\n{contents}");
}
fn parse_config(args: &[String]) -> (&str, &str) {
let query = &args[1];
let file_path = &args[2];
(query, file_path)
}main 提取一个 parse_config 函数我们仍然将命令行参数收集到一个向量中,但不再在 main 函数中将索引 1 处的参数值赋给变量 query、将索引 2 处的参数值赋给变量 file_path,而是将整个向量传递给 parse_config 函数。parse_config 函数随后包含确定哪个参数进入哪个变量的逻辑,并将值传递回 main。我们仍然在 main 中创建 query 和 file_path 变量,但 main 不再负责确定命令行参数和变量之间的对应关系。
这种重写对于我们的小程序来说可能看起来有点小题大做,但我们正在以小的、递增的步骤进行重构。在进行此更改后,再次运行程序以验证参数解析仍然有效。经常检查你的进度是很好的做法,以帮助在出现问题时识别原因。
分组配置值
我们可以再采取一小步来进一步改进 parse_config 函数。目前,我们返回一个元组,但随后我们立即将该元组再次分解为各个部分。这是一个迹象,表明我们可能还没有正确的抽象。
另一个表明有改进空间的指标是 parse_config 名称中的 config 部分,它暗示我们返回的两个值是相关的,并且都是一个配置值的两个部分。我们目前没有在数据结构中传达这种含义,除了将两个值分组到元组中;相反,我们将把这两个值放入一个结构体中,并给每个结构体字段一个有意义的名称。这样做将使未来代码的维护者更容易理解不同值之间的关系以及它们的用途。
示例 12-6 显示了 parse_config 函数的改进。
use std::env;
use std::fs;
fn main() {
let args: Vec<String> = env::args().collect();
let config = parse_config(&args);
println!("Searching for {}", config.query);
println!("In file {}", config.file_path);
let contents = fs::read_to_string(config.file_path)
.expect("Should have been able to read the file");
// --snip--
println!("With text:\n{contents}");
}
struct Config {
query: String,
file_path: String,
}
fn parse_config(args: &[String]) -> Config {
let query = args[1].clone();
let file_path = args[2].clone();
Config { query, file_path }
}parse_config 以返回 Config 结构体的实例我们添加了一个名为 Config 的结构体,其字段名为 query 和 file_path。parse_config 的签名现在表明它返回一个 Config 值。在 parse_config 的函数体中,我们之前返回引用 args 中 String 值的字符串切片,现在我们定义 Config 包含拥有所有权的 String 值。main 中的 args 变量是参数值的所有者,并且只让 parse_config 函数借用它们,这意味着如果 Config 试图获取 args 中值的所有权,我们将违反 Rust 的借用规则。
有几种方法可以管理 String 数据;最简单(虽然效率略低)的方法是在值上调用 clone 方法。这将为 Config 实例制作数据的完整副本以供其拥有,这比存储对字符串数据的引用需要更多时间和内存。然而,克隆数据也使我们的代码非常直接,因为我们不必管理引用的生命周期;在这种情况下,牺牲一点性能来换取简单性是一个值得的权衡。
使用 clone 的权衡
许多 Rustaceans 倾向于避免使用 clone 来解决所有权问题,因为它有运行时成本。在第 13 章中,你将学习如何在类似情况下使用更高效的方法。但现在,复制几个字符串以继续前进是可以的,因为你只会复制一次,而且你的文件路径和查询字符串非常小。拥有一个虽然效率略低但可以工作的程序,比在第一次尝试时就过度优化代码要好。随着你对 Rust 越来越有经验,更容易从最有效的解决方案开始,但现在,调用 clone 是完全可接受的。
我们已经更新了 main,使其将通过 parse_config 返回的 Config 实例放入名为 config 的变量中,并更新了之前使用单独的 query 和 file_path 变量的代码,使其现在改为使用 Config 结构体的字段。
现在我们的代码更清晰地传达了 query 和 file_path 是相关的,并且它们的目的是配置程序将如何工作。任何使用这些值的代码都知道在 config 实例的字段中找到它们,这些字段以它们的用途命名。
为 Config 创建构造函数
到目前为止,我们已经将从 main 解析命令行参数的逻辑提取出来,并放入 parse_config 函数中。这样做帮助我们看到了 query 和 file_path 值是相关的,并且这种关系应该在代码中传达。然后,我们添加了一个 Config 结构体来命名 query 和 file_path 的相关用途,并能够从 parse_config 函数中将值的名称作为结构体字段名返回。
所以,既然 parse_config 函数的目的是创建一个 Config 实例,我们可以将 parse_config 从一个普通函数更改为一个与 Config 结构体关联的名为 new 的函数。进行此更改将使代码更符合惯例(idiomatic)。我们可以通过调用 String::new 来创建标准库中类型(如 String)的实例。类似地,通过将 parse_config 更改为与 Config 关联的 new 函数,我们将能够通过调用 Config::new 来创建 Config 实例。示例 12-7 显示了我们需要做的更改。
use std::env;
use std::fs;
fn main() {
let args: Vec<String> = env::args().collect();
let config = Config::new(&args);
println!("Searching for {}", config.query);
println!("In file {}", config.file_path);
let contents = fs::read_to_string(config.file_path)
.expect("Should have been able to read the file");
println!("With text:\n{contents}");
// --snip--
}
// --snip--
struct Config {
query: String,
file_path: String,
}
impl Config {
fn new(args: &[String]) -> Config {
let query = args[1].clone();
let file_path = args[2].clone();
Config { query, file_path }
}
}parse_config 改为 Config::new我们已经更新了 main,将调用 parse_config 的地方改为调用 Config::new。我们将 parse_config 的名称改为 new,并将其移到 impl 块中,这将 new 函数与 Config 关联起来。再次编译此代码以确保其正常工作。
修复错误处理
现在我们来修复错误处理。回想一下,如果 args 向量包含少于三个项,尝试访问索引 1 或索引 2 处的值会导致程序 panic。尝试不带任何参数运行程序;它将如下所示:
$ cargo run
Compiling minigrep v0.1.0 (file:///projects/minigrep)
Finished `dev` profile [unoptimized + debuginfo] target(s) in 0.0s
Running `target/debug/minigrep`
thread 'main' panicked at src/main.rs:27:21:
index out of bounds: the len is 1 but the index is 1
note: run with `RUST_BACKTRACE=1` environment variable to display a backtrace
index out of bounds: the len is 1 but the index is 1 这一行是面向程序员的错误消息。它不会帮助我们的最终用户理解他们应该怎么做。让我们现在修复它。
改进错误消息
在示例 12-8 中,我们在 new 函数中添加了一个检查,用于在访问索引 1 和索引 2 之前验证切片是否足够长。如果切片不够长,程序会 panic 并显示更好的错误消息。
use std::env;
use std::fs;
fn main() {
let args: Vec<String> = env::args().collect();
let config = Config::new(&args);
println!("Searching for {}", config.query);
println!("In file {}", config.file_path);
let contents = fs::read_to_string(config.file_path)
.expect("Should have been able to read the file");
println!("With text:\n{contents}");
}
struct Config {
query: String,
file_path: String,
}
impl Config {
// --snip--
fn new(args: &[String]) -> Config {
if args.len() < 3 {
panic!("not enough arguments");
}
// --snip--
let query = args[1].clone();
let file_path = args[2].clone();
Config { query, file_path }
}
}这段代码类似于我们在示例 9-13 中编写的 Guess::new 函数,当 value 参数超出有效值范围时,我们调用了 panic!。这里我们不是检查值的范围,而是检查 args 的长度是否至少为 3,函数的其余部分可以在假定此条件已满足的情况下运行。如果 args 少于三个项,此条件将为 true,我们调用 panic! 宏立即结束程序。
在 new 中添加这几行代码后,让我们再次不带任何参数运行程序,看看现在的错误是什么样子:
$ cargo run
Compiling minigrep v0.1.0 (file:///projects/minigrep)
Finished `dev` profile [unoptimized + debuginfo] target(s) in 0.0s
Running `target/debug/minigrep`
thread 'main' panicked at src/main.rs:26:13:
not enough arguments
note: run with `RUST_BACKTRACE=1` environment variable to display a backtrace
这个输出更好:现在我们有了一个合理的错误消息。但是,我们还有一些不想给用户的无关信息。也许我们在示例 9-13 中使用的技术不是这里的最佳选择:调用 panic! 更适合编程问题而不是使用问题,正如第 9 章中讨论的那样。相反,我们将使用你在第 9 章中学到的另一种技术——返回一个 Result,它表示成功或错误。
返回 Result 而不是调用 panic!
我们可以改为返回一个 Result 值,在成功情况下包含一个 Config 实例,在错误情况下描述问题。我们还打算将函数名称从 new 改为 build,因为许多程序员期望 new 函数永远不会失败。当 Config::build 与 main 通信时,我们可以使用 Result 类型来指示存在问题。然后,我们可以更改 main,将 Err 变体转换为对用户更实用的错误,而不包含 panic! 调用带来的 thread 'main' 和 RUST_BACKTRACE 等周围文本。
示例 12-9 显示了我们现在称为 Config::build 的函数的返回值以及函数体返回 Result 所需的更改。请注意,在更新 main 之前,这将无法编译,我们将在下一个示例中执行此操作。
use std::env;
use std::fs;
fn main() {
let args: Vec<String> = env::args().collect();
let config = Config::new(&args);
println!("Searching for {}", config.query);
println!("In file {}", config.file_path);
let contents = fs::read_to_string(config.file_path)
.expect("Should have been able to read the file");
println!("With text:\n{contents}");
}
struct Config {
query: String,
file_path: String,
}
impl Config {
fn build(args: &[String]) -> Result<Config, &'static str> {
if args.len() < 3 {
return Err("not enough arguments");
}
let query = args[1].clone();
let file_path = args[2].clone();
Ok(Config { query, file_path })
}
}Config::build 返回 Result我们的 build 函数返回一个 Result,在成功情况下包含 Config 实例,在错误情况下包含字符串字面量。我们的错误值将始终是具有 'static 生命周期的字符串字面量。
我们在函数体中做了两处更改:当用户没有传递足够的参数时,我们现在返回一个 Err 值,而不是调用 panic!,并且我们将 Config 返回值包裹在 Ok 中。这些更改使函数符合其新的类型签名。
从 Config::build 返回 Err 值允许 main 函数处理从 build 函数返回的 Result 值,并在错误情况下更干净地退出进程。
调用 Config::build 并处理错误
为了处理错误情况并打印用户友好的消息,我们需要更新 main 以处理 Config::build 返回的 Result,如示例 12-10 所示。我们还将从 panic! 中移除以非零错误代码退出命令行工具的责任,并改为手动实现。非零退出状态是一种约定,通知调用我们程序的进程程序以错误状态退出。
use std::env;
use std::fs;
use std::process;
fn main() {
let args: Vec<String> = env::args().collect();
let config = Config::build(&args).unwrap_or_else(|err| {
println!("Problem parsing arguments: {err}");
process::exit(1);
});
// --snip--
println!("Searching for {}", config.query);
println!("In file {}", config.file_path);
let contents = fs::read_to_string(config.file_path)
.expect("Should have been able to read the file");
println!("With text:\n{contents}");
}
struct Config {
query: String,
file_path: String,
}
impl Config {
fn build(args: &[String]) -> Result<Config, &'static str> {
if args.len() < 3 {
return Err("not enough arguments");
}
let query = args[1].clone();
let file_path = args[2].clone();
Ok(Config { query, file_path })
}
}Config 时失败,则以错误代码退出在此示例中,我们使用了一个尚未详细介绍的方法:unwrap_or_else,它由标准库在 Result<T, E> 上定义。使用 unwrap_or_else 允许我们定义一些自定义的、非 panic! 的错误处理。如果 Result 是 Ok 值,此方法的行为类似于 unwrap:它返回 Ok 包装的内部值。然而,如果值是 Err 值,此方法会调用闭包中的代码——闭包是我们定义并作为参数传递给 unwrap_or_else 的匿名函数。我们将在第 13 章更详细地介绍闭包。现在,你只需要知道 unwrap_or_else 会将 Err 的内部值(在本例中是我们添加在示例 12-9 中的静态字符串 "not enough arguments")传递给我们闭包中竖线之间的参数 err。然后闭包中的代码可以在运行时使用 err 值。
我们添加了一个新的 use 行,将标准库中的 process 引入作用域。在错误情况下运行的闭包代码只有两行:我们打印 err 值,然后调用 process::exit。process::exit 函数将立即停止程序并返回作为退出状态码传入的数字。这与我们在示例 12-8 中使用的基于 panic! 的处理类似,但我们不再获得所有额外的输出。让我们尝试一下:
$ cargo run
Compiling minigrep v0.1.0 (file:///projects/minigrep)
Finished `dev` profile [unoptimized + debuginfo] target(s) in 0.48s
Running `target/debug/minigrep`
Problem parsing arguments: not enough arguments
很好!这个输出对我们的用户友好得多。
从 main 提取逻辑
既然我们已经完成了配置解析的重构,让我们转向程序的逻辑。正如我们在“分离二进制项目的关注点”中所说的,我们将提取一个名为 run 的函数,该函数将包含 main 函数中当前所有不涉及设置配置或处理错误的逻辑。完成后,main 函数将简洁且易于通过检查验证,我们将能够为所有其他逻辑编写测试。
示例 12-11 显示了提取 run 函数的微小增量改进。
use std::env;
use std::fs;
use std::process;
fn main() {
// --snip--
let args: Vec<String> = env::args().collect();
let config = Config::build(&args).unwrap_or_else(|err| {
println!("Problem parsing arguments: {err}");
process::exit(1);
});
println!("Searching for {}", config.query);
println!("In file {}", config.file_path);
run(config);
}
fn run(config: Config) {
let contents = fs::read_to_string(config.file_path)
.expect("Should have been able to read the file");
println!("With text:\n{contents}");
}
// --snip--
struct Config {
query: String,
file_path: String,
}
impl Config {
fn build(args: &[String]) -> Result<Config, &'static str> {
if args.len() < 3 {
return Err("not enough arguments");
}
let query = args[1].clone();
let file_path = args[2].clone();
Ok(Config { query, file_path })
}
}run 函数run 函数现在包含 main 中的剩余逻辑,从读取文件开始。run 函数将 Config 实例作为参数。
从 run 返回错误
将剩余的程序逻辑分离到 run 函数后,我们可以改进错误处理,就像我们在示例 12-9 中对 Config::build 所做的那样。run 函数不会通过调用 expect 来允许程序 panic,而是在出现问题时返回一个 Result<T, E>。这将使我们能够进一步将处理错误的逻辑以用户友好的方式整合到 main 中。示例 12-12 显示了我们需要对 run 的签名和主体进行的更改。
use std::env;
use std::fs;
use std::process;
use std::error::Error;
// --snip--
fn main() {
let args: Vec<String> = env::args().collect();
let config = Config::build(&args).unwrap_or_else(|err| {
println!("Problem parsing arguments: {err}");
process::exit(1);
});
println!("Searching for {}", config.query);
println!("In file {}", config.file_path);
run(config);
}
fn run(config: Config) -> Result<(), Box<dyn Error>> {
let contents = fs::read_to_string(config.file_path)?;
println!("With text:\n{contents}");
Ok(())
}
struct Config {
query: String,
file_path: String,
}
impl Config {
fn build(args: &[String]) -> Result<Config, &'static str> {
if args.len() < 3 {
return Err("not enough arguments");
}
let query = args[1].clone();
let file_path = args[2].clone();
Ok(Config { query, file_path })
}
}run 函数改为返回 Result我们在这里做了三个重要更改。首先,我们将 run 函数的返回类型更改为 Result<(), Box<dyn Error>>。此函数之前返回单元类型 (),我们保持该值作为 Ok 情况下的返回值。
对于错误类型,我们使用了 trait 对象 Box<dyn Error>(并且我们在顶部使用 use 语句将 std::error::Error 引入作用域)。我们将在第 18 章介绍 trait 对象。现在,只需知道 Box<dyn Error> 意味着该函数将返回一个实现了 Error trait 的类型,但我们不必指定返回值将是哪种特定类型。这为我们提供了灵活性,可以在不同的错误情况下返回可能不同类型的错误值。dyn 关键字是 dynamic 的缩写。
其次,我们移除了对 expect 的调用,转而使用 ? 运算符,正如我们在第 9 章中讨论的那样。? 不会在错误时 panic!,而是从当前函数返回错误值供调用者处理。
第三,run 函数现在在成功情况下返回一个 Ok 值。我们已经在签名中声明了 run 函数的成功类型为 (),这意味着我们需要将单元类型值包裹在 Ok 值中。这种 Ok(()) 语法一开始可能看起来有点奇怪。但像这样使用 () 是一种符合惯例的方式,表明我们调用 run 只是为了它的副作用;它不返回我们需要的结果值。
当你运行此代码时,它将编译但会显示一个警告:
$ cargo run -- the poem.txt
Compiling minigrep v0.1.0 (file:///projects/minigrep)
warning: unused `Result` that must be used
--> src/main.rs:19:5
|
19 | run(config);
| ^^^^^^^^^^^
|
= note: this `Result` may be an `Err` variant, which should be handled
= note: `#[warn(unused_must_use)]` on by default
help: use `let _ = ...` to ignore the resulting value
|
19 | let _ = run(config);
| +++++++
warning: `minigrep` (bin "minigrep") generated 1 warning
Finished `dev` profile [unoptimized + debuginfo] target(s) in 0.71s
Running `target/debug/minigrep the poem.txt`
Searching for the
In file poem.txt
With text:
I'm nobody! Who are you?
Are you nobody, too?
Then there's a pair of us - don't tell!
They'd banish us, you know.
How dreary to be somebody!
How public, like a frog
To tell your name the livelong day
To an admiring bog!
Rust 告诉我们,我们的代码忽略了 Result 值,而 Result 值可能表示发生了错误。但我们没有检查是否发生了错误,编译器提醒我们这里可能应该有一些错误处理代码!让我们现在纠正这个问题。
在 main 中处理从 run 返回的错误
我们将检查错误并使用与我们在示例 12-10 中对 Config::build 使用的类似技术来处理它们,但略有不同:
Filename: src/main.rs
use std::env;
use std::error::Error;
use std::fs;
use std::process;
fn main() {
// --snip--
let args: Vec<String> = env::args().collect();
let config = Config::build(&args).unwrap_or_else(|err| {
println!("Problem parsing arguments: {err}");
process::exit(1);
});
println!("Searching for {}", config.query);
println!("In file {}", config.file_path);
if let Err(e) = run(config) {
println!("Application error: {e}");
process::exit(1);
}
}
fn run(config: Config) -> Result<(), Box<dyn Error>> {
let contents = fs::read_to_string(config.file_path)?;
println!("With text:\n{contents}");
Ok(())
}
struct Config {
query: String,
file_path: String,
}
impl Config {
fn build(args: &[String]) -> Result<Config, &'static str> {
if args.len() < 3 {
return Err("not enough arguments");
}
let query = args[1].clone();
let file_path = args[2].clone();
Ok(Config { query, file_path })
}
}我们使用 if let 而不是 unwrap_or_else 来检查 run 是否返回 Err 值,如果返回则调用 process::exit(1)。run 函数不像 Config::build 返回 Config 实例那样返回我们想要 unwrap 的值。因为 run 在成功情况下返回 (),我们只关心检测错误,所以我们不需要 unwrap_or_else 来返回解包的值(那将只是 ())。
if let 和 unwrap_or_else 的函数体在两种情况下是相同的:我们打印错误并退出。
将代码拆分为库 Crate
我们的 minigrep 项目目前看起来不错!现在我们将拆分 src/main.rs 文件,并将一些代码放入 src/lib.rs 文件中。这样,我们可以测试代码,并且 src/main.rs 文件的职责更少。
让我们在 src/lib.rs 中定义负责搜索文本的代码,而不是在 src/main.rs 中,这将使我们(或任何其他使用我们 minigrep 库的人)能够从比我们的 minigrep 二进制文件更多的上下文中调用搜索函数。
首先,在 src/lib.rs 中定义 search 函数的签名,如示例 12-13 所示,其函数体调用 unimplemented! 宏。我们将在填写实现时更详细地解释签名。
pub fn search<'a>(query: &str, contents: &'a str) -> Vec<&'a str> {
unimplemented!();
}search 函数我们在函数定义上使用了 pub 关键字,将 search 指定为库 crate 公共 API 的一部分。现在我们有了一个库 crate,可以从二进制 crate 中使用它,并且可以测试它!
现在,我们需要将在 src/lib.rs 中定义的代码引入二进制 crate src/main.rs 的作用域并调用它,如示例 12-14 所示。
use std::env;
use std::error::Error;
use std::fs;
use std::process;
// --snip--
use minigrep::search;
fn main() {
// --snip--
let args: Vec<String> = env::args().collect();
let config = Config::build(&args).unwrap_or_else(|err| {
println!("Problem parsing arguments: {err}");
process::exit(1);
});
if let Err(e) = run(config) {
println!("Application error: {e}");
process::exit(1);
}
}
// --snip--
struct Config {
query: String,
file_path: String,
}
impl Config {
fn build(args: &[String]) -> Result<Config, &'static str> {
if args.len() < 3 {
return Err("not enough arguments");
}
let query = args[1].clone();
let file_path = args[2].clone();
Ok(Config { query, file_path })
}
}
fn run(config: Config) -> Result<(), Box<dyn Error>> {
let contents = fs::read_to_string(config.file_path)?;
for line in search(&config.query, &contents) {
println!("{line}");
}
Ok(())
}minigrep 库 crate 的 search 函数我们添加了一行 use minigrep::search;,将 search 函数从库 crate 引入二进制 crate 的作用域。然后,在 run 函数中,我们不再打印文件的内容,而是调用 search 函数并传递 config.query 值和 contents 作为参数。然后,run 将使用 for 循环打印从 search 返回的匹配查询的每一行。这也是一个很好的时机来移除 main 函数中显示查询和文件路径的 println! 调用,这样我们的程序只打印搜索结果(如果没有发生错误)。
注意,搜索函数将在任何打印发生之前将所有结果收集到一个向量中返回。这种实现在搜索大文件时显示结果可能会很慢,因为结果不会在找到时立即打印;我们将在第 13 章讨论使用迭代器解决此问题的可能方法。
唷!这是大量的工作,但我们为未来的成功奠定了基础。现在处理错误容易得多,而且我们已经使代码更加模块化。从现在开始,我们几乎所有的工作将在 src/lib.rs 中完成。
让我们利用这种新获得的模块化性来做一些旧代码难以做到但新代码容易做到的事情:我们将编写一些测试!
通过测试驱动开发增加功能
使用测试驱动开发(Test-Driven Development,TDD)添加功能
既然我们已经将搜索逻辑从 main 函数分离到 src/lib.rs 中,编写针对代码核心功能的测试就容易多了。我们可以直接使用各种参数调用函数并检查返回值,而无需从命令行调用二进制文件。
在本节中,我们将使用测试驱动开发(TDD)过程将搜索逻辑添加到 minigrep 程序,遵循以下步骤:
- 编写一个会失败的测试,并运行它以确保它按照你期望的原因失败。
- 编写或修改刚好足够的代码以使新测试通过。
- 重构你刚刚添加或更改的代码,并确保测试继续通过。
- 从第 1 步开始重复!
虽然这只是编写软件的众多方法之一,但 TDD 有助于驱动代码设计。在编写使测试通过的代码之前编写测试,有助于在整个过程中保持较高的测试覆盖率。
我们将测试驱动实现将在文件内容中搜索查询字符串并生成匹配查询的行列表的功能。我们将在一个名为 search 的函数中添加此功能。
编写一个会失败的测试
在 src/lib.rs 中,我们将添加一个带有测试函数的 tests 模块,就像我们在第 11 章中所做的那样。测试函数指定了我们希望 search 函数具有的行为:它将接受一个查询和要搜索的文本,并且只返回文本中包含查询的那些行。示例 12-15 显示了此测试。
pub fn search<'a>(query: &str, contents: &'a str) -> Vec<&'a str> {
unimplemented!();
}
// --snip--
#[cfg(test)]
mod tests {
use super::*;
#[test]
fn one_result() {
let query = "duct";
let contents = "\
Rust:
safe, fast, productive.
Pick three.";
assert_eq!(vec!["safe, fast, productive."], search(query, contents));
}
}search 功能创建一个会失败的测试此测试搜索字符串 "duct"。我们要搜索的文本有三行,其中只有一行包含 "duct"(注意开头的双引号后的反斜杠告诉 Rust 不要在此字符串字面量内容开头放置换行符)。我们断言从 search 函数返回的值只包含我们期望的行。
如果我们运行此测试,它目前会失败,因为 unimplemented! 宏会 panic 并显示消息“not implemented“。根据 TDD 原则,我们将采取一小步,通过将 search 函数定义为始终返回空向量来添加刚好足够的代码使测试在调用该函数时不会 panic,如示例 12-16 所示。然后,测试应该能编译但会失败,因为空向量与包含行 "safe, fast, productive." 的向量不匹配。
pub fn search<'a>(query: &str, contents: &'a str) -> Vec<&'a str> {
vec![]
}
#[cfg(test)]
mod tests {
use super::*;
#[test]
fn one_result() {
let query = "duct";
let contents = "\
Rust:
safe, fast, productive.
Pick three.";
assert_eq!(vec!["safe, fast, productive."], search(query, contents));
}
}search 函数,以便调用它时不会 panic现在让我们讨论为什么我们需要在 search 的签名中定义一个显式的生命周期 'a,并将该生命周期与 contents 参数和返回值一起使用。回想一下第 10 章中,生命周期参数指定哪个参数的生命周期与返回值的生命周期相关联。在这种情况下,我们指示返回的向量应包含引用 contents 参数切片的字符串切片(而不是引用 query 参数)。
换句话说,我们告诉 Rust,search 函数返回的数据将与通过 contents 参数传递到 search 函数的数据存活时间一样长。这很重要!切片所引用的数据必须有效,引用才能有效;如果编译器假设我们是在制作 query 的字符串切片而不是 contents,它将错误地进行安全检查。
如果我们忘记生命周期注解并尝试编译此函数,将得到以下错误:
$ cargo build
Compiling minigrep v0.1.0 (file:///projects/minigrep)
error[E0106]: missing lifetime specifier
--> src/lib.rs:1:51
|
1 | pub fn search(query: &str, contents: &str) -> Vec<&str> {
| ---- ---- ^ expected named lifetime parameter
|
= help: this function's return type contains a borrowed value, but the signature does not say whether it is borrowed from `query` or `contents`
help: consider introducing a named lifetime parameter
|
1 | pub fn search<'a>(query: &'a str, contents: &'a str) -> Vec<&'a str> {
| ++++ ++ ++ ++
For more information about this error, try `rustc --explain E0106`.
error: could not compile `minigrep` (lib) due to 1 previous error
Rust 无法知道输出需要两个参数中的哪一个,因此我们需要明确告诉它。注意,帮助文本建议为所有参数和输出类型指定相同的生命周期参数,这是不正确的!因为 contents 是包含我们所有文本的参数,并且我们想要返回该文本中匹配的部分,我们知道 contents 是唯一应使用生命周期语法连接到返回值的参数。
其他编程语言不要求你在签名中连接参数和返回值,但这种做法会随着时间的推移变得更容易。你可能想将此示例与第 10 章中“使用生命周期验证引用”部分的示例进行比较。
编写使测试通过的代码
目前,我们的测试失败了,因为我们总是返回一个空向量。为了修复此问题并实现 search,我们的程序需要遵循以下步骤:
- 遍历内容的每一行。
- 检查该行是否包含我们的查询字符串。
- 如果包含,则将其添加到我们要返回的值列表中。
- 如果不包含,则不执行任何操作。
- 返回匹配的结果列表。
让我们逐步进行,从遍历行开始。
使用 lines 方法遍历行
Rust 有一个有用的方法来逐行遍历字符串,恰当地命名为 lines,它的工作方式如示例 12-17 所示。注意,这还不能编译。
pub fn search<'a>(query: &str, contents: &'a str) -> Vec<&'a str> {
for line in contents.lines() {
// do something with line
}
}
#[cfg(test)]
mod tests {
use super::*;
#[test]
fn one_result() {
let query = "duct";
let contents = "\
Rust:
safe, fast, productive.
Pick three.";
assert_eq!(vec!["safe, fast, productive."], search(query, contents));
}
}contents 中的每一行lines 方法返回一个迭代器(iterator)。我们将在第 13 章深入讨论迭代器。但回想一下你在示例 3-5中看到过使用迭代器的方式,我们在那里使用了带有迭代器的 for 循环来对集合中的每个项运行一些代码。
搜索每行中的查询
接下来,我们将检查当前行是否包含我们的查询字符串。幸运的是,字符串有一个名为 contains 的有用方法可以为我们做到这点!在对 search 函数的调用中添加 contains 方法,如示例 12-18 所示。注意,这仍然不能编译。
pub fn search<'a>(query: &str, contents: &'a str) -> Vec<&'a str> {
for line in contents.lines() {
if line.contains(query) {
// do something with line
}
}
}
#[cfg(test)]
mod tests {
use super::*;
#[test]
fn one_result() {
let query = "duct";
let contents = "\
Rust:
safe, fast, productive.
Pick three.";
assert_eq!(vec!["safe, fast, productive."], search(query, contents));
}
}query 中的字符串目前,我们正在逐步构建功能。为了让代码编译,我们需要像在函数签名中表示的那样从函数体返回一个值。
存储匹配的行
为了完成这个函数,我们需要一种方法来存储我们要返回的匹配行。为此,我们可以在 for 循环之前创建一个可变向量,并调用 push 方法将 line 存储在向量中。在 for 循环之后,我们返回该向量,如示例 12-19 所示。
pub fn search<'a>(query: &str, contents: &'a str) -> Vec<&'a str> {
let mut results = Vec::new();
for line in contents.lines() {
if line.contains(query) {
results.push(line);
}
}
results
}
#[cfg(test)]
mod tests {
use super::*;
#[test]
fn one_result() {
let query = "duct";
let contents = "\
Rust:
safe, fast, productive.
Pick three.";
assert_eq!(vec!["safe, fast, productive."], search(query, contents));
}
}现在,search 函数应该只返回包含 query 的行,并且我们的测试应该通过。让我们运行测试:
$ cargo test
Compiling minigrep v0.1.0 (file:///projects/minigrep)
Finished `test` profile [unoptimized + debuginfo] target(s) in 1.22s
Running unittests src/lib.rs (target/debug/deps/minigrep-9cd200e5fac0fc94)
running 1 test
test tests::one_result ... ok
test result: ok. 1 passed; 0 failed; 0 ignored; 0 measured; 0 filtered out; finished in 0.00s
Running unittests src/main.rs (target/debug/deps/minigrep-9cd200e5fac0fc94)
running 0 tests
test result: ok. 0 passed; 0 failed; 0 ignored; 0 measured; 0 filtered out; finished in 0.00s
Doc-tests minigrep
running 0 tests
test result: ok. 0 passed; 0 failed; 0 ignored; 0 measured; 0 filtered out; finished in 0.00s
我们的测试通过了,所以我们知道它是有效的!
此时,我们可以考虑重构搜索函数实现的机会,同时保持测试通过以维持相同的功能。搜索函数中的代码还不错,但它没有利用迭代器的一些有用特性。我们将在第 13 章回到这个例子,届时我们将详细探讨迭代器,并看看如何改进它。
现在整个程序应该可以工作了!让我们试试看,首先用一个应该从艾米莉·狄金森的诗中准确地返回一行的词:frog。
$ cargo run -- frog poem.txt
Compiling minigrep v0.1.0 (file:///projects/minigrep)
Finished `dev` profile [unoptimized + debuginfo] target(s) in 0.38s
Running `target/debug/minigrep frog poem.txt`
How public, like a frog
酷!现在让我们尝试一个将匹配多行的词,比如 body:
$ cargo run -- body poem.txt
Compiling minigrep v0.1.0 (file:///projects/minigrep)
Finished `dev` profile [unoptimized + debuginfo] target(s) in 0.0s
Running `target/debug/minigrep body poem.txt`
I'm nobody! Who are you?
Are you nobody, too?
How dreary to be somebody!
最后,让我们确保当我们搜索一个在诗中任何地方都不存在的词时,比如 monomorphization,不会得到任何行:
$ cargo run -- monomorphization poem.txt
Compiling minigrep v0.1.0 (file:///projects/minigrep)
Finished `dev` profile [unoptimized + debuginfo] target(s) in 0.0s
Running `target/debug/minigrep monomorphization poem.txt`
太棒了!我们已经构建了一个经典工具的自己版本,并学到了很多关于如何构建应用程序的知识。我们还学到了一些关于文件输入输出、生命周期、测试和命令行解析的知识。
为了完成这个项目,我们将简要地演示如何使用环境变量以及如何打印到标准错误,这两者在编写命令行程序时都很有用。
使用环境变量
使用环境变量(Working with Environment Variables)
我们将通过添加一个额外功能来改进 minigrep 二进制文件:一个不区分大小写的搜索选项,用户可以通过环境变量打开它。我们可以将此功能作为一个命令行选项,并要求用户每次想要使用时都输入它,但通过将其设置为环境变量,我们允许用户设置一次环境变量,然后在该终端会话中的所有搜索都不区分大小写。
为不区分大小写的搜索编写一个会失败的测试
我们首先在 minigrep 库中添加一个新的 search_case_insensitive 函数,当环境变量有值时将调用该函数。我们将继续遵循 TDD 过程,因此第一步同样是编写一个会失败的测试。我们将为新的 search_case_insensitive 函数添加一个新测试,并将旧测试从 one_result 重命名为 case_sensitive,以澄清两个测试之间的区别,如示例 12-20 所示。
pub fn search<'a>(query: &str, contents: &'a str) -> Vec<&'a str> {
let mut results = Vec::new();
for line in contents.lines() {
if line.contains(query) {
results.push(line);
}
}
results
}
#[cfg(test)]
mod tests {
use super::*;
#[test]
fn case_sensitive() {
let query = "duct";
let contents = "\
Rust:
safe, fast, productive.
Pick three.
Duct tape.";
assert_eq!(vec!["safe, fast, productive."], search(query, contents));
}
#[test]
fn case_insensitive() {
let query = "rUsT";
let contents = "\
Rust:
safe, fast, productive.
Pick three.
Trust me.";
assert_eq!(
vec!["Rust:", "Trust me."],
search_case_insensitive(query, contents)
);
}
}注意,我们也编辑了旧测试的 contents。我们添加了一行包含 "Duct tape." 的文本,其中使用了大写 D,在以区分大小写方式搜索时不应与查询 "duct" 匹配。以这种方式更改旧测试有助于确保我们不会意外破坏已经实现的区分大小写搜索功能。此测试现在应该通过,并且在我们进行不区分大小写搜索的工作时应继续通过。
不区分大小写的搜索的新测试使用 "rUsT" 作为其查询。在我们即将添加的 search_case_insensitive 函数中,查询 "rUsT" 应匹配包含 "Rust:"(大写 R)的行,并匹配 "Trust me." 这一行,尽管它们的大小写与查询不同。这是我们会失败的测试,并且由于我们尚未定义 search_case_insensitive 函数,它将无法编译。请随意添加一个始终返回空向量的骨架实现,类似于我们在示例 12-16 中对 search 函数的做法,以观察测试编译和失败。
实现 search_case_insensitive 函数
search_case_insensitive 函数(如示例 12-21 所示)将与 search 函数几乎相同。唯一的区别是,我们将把 query 和每个 line 转换为小写,这样无论输入参数的大小写如何,当检查该行是否包含查询时,它们将具有相同的大小写。
pub fn search<'a>(query: &str, contents: &'a str) -> Vec<&'a str> {
let mut results = Vec::new();
for line in contents.lines() {
if line.contains(query) {
results.push(line);
}
}
results
}
pub fn search_case_insensitive<'a>(
query: &str,
contents: &'a str,
) -> Vec<&'a str> {
let query = query.to_lowercase();
let mut results = Vec::new();
for line in contents.lines() {
if line.to_lowercase().contains(&query) {
results.push(line);
}
}
results
}
#[cfg(test)]
mod tests {
use super::*;
#[test]
fn case_sensitive() {
let query = "duct";
let contents = "\
Rust:
safe, fast, productive.
Pick three.
Duct tape.";
assert_eq!(vec!["safe, fast, productive."], search(query, contents));
}
#[test]
fn case_insensitive() {
let query = "rUsT";
let contents = "\
Rust:
safe, fast, productive.
Pick three.
Trust me.";
assert_eq!(
vec!["Rust:", "Trust me."],
search_case_insensitive(query, contents)
);
}
}search_case_insensitive 函数,在比较之前将查询和行都转换为小写首先,我们将 query 字符串转换为小写,并将其存储在一个同名的新变量中,遮盖了原始的 query。对查询调用 to_lowercase 是必要的,这样无论用户的查询是 "rust"、"RUST"、"Rust" 还是 "rUsT",我们都会将查询视为 "rust" 并且不区分大小写。虽然 to_lowercase 会处理基本的 Unicode,但它不会是 100% 准确的。如果我们正在编写一个真正的应用程序,我们想在这里做更多的工作,但本节是关于环境变量的,而不是 Unicode,所以我们在此就此打住。
注意,query 现在是一个 String 而不是一个字符串切片,因为调用 to_lowercase 创建了新数据,而不是引用现有数据。例如,假设查询是 "rUsT":该字符串切片不包含小写的 u 或 t 供我们使用,因此我们必须分配一个新的包含 "rust" 的 String。现在我们向 contains 方法传递 query 作为参数时,需要添加一个 &,因为 contains 的签名被定义为接受一个字符串切片。
接下来,我们在每个 line 上添加对 to_lowercase 的调用,将所有字符转换为小写。现在我们已经将 line 和 query 都转换为小写,无论查询的大小写如何,我们都会找到匹配项。
让我们看看这个实现是否通过了测试:
$ cargo test
Compiling minigrep v0.1.0 (file:///projects/minigrep)
Finished `test` profile [unoptimized + debuginfo] target(s) in 1.33s
Running unittests src/lib.rs (target/debug/deps/minigrep-9cd200e5fac0fc94)
running 2 tests
test tests::case_insensitive ... ok
test tests::case_sensitive ... ok
test result: ok. 2 passed; 0 failed; 0 ignored; 0 measured; 0 filtered out; finished in 0.00s
Running unittests src/main.rs (target/debug/deps/minigrep-9cd200e5fac0fc94)
running 0 tests
test result: ok. 0 passed; 0 failed; 0 ignored; 0 measured; 0 filtered out; finished in 0.00s
Doc-tests minigrep
running 0 tests
test result: ok. 0 passed; 0 failed; 0 ignored; 0 measured; 0 filtered out; finished in 0.00s
太好了!它们通过了。现在让我们从 run 函数调用新的 search_case_insensitive 函数。首先,我们向 Config 结构体添加一个配置选项,以便在区分大小写和不区分大小写搜索之间切换。添加此字段会导致编译器错误,因为我们还没有在任何地方初始化此字段:
Filename: src/main.rs
use std::env;
use std::error::Error;
use std::fs;
use std::process;
use minigrep::{search, search_case_insensitive};
// --snip--
fn main() {
let args: Vec<String> = env::args().collect();
let config = Config::build(&args).unwrap_or_else(|err| {
println!("Problem parsing arguments: {err}");
process::exit(1);
});
if let Err(e) = run(config) {
println!("Application error: {e}");
process::exit(1);
}
}
pub struct Config {
pub query: String,
pub file_path: String,
pub ignore_case: bool,
}
impl Config {
fn build(args: &[String]) -> Result<Config, &'static str> {
if args.len() < 3 {
return Err("not enough arguments");
}
let query = args[1].clone();
let file_path = args[2].clone();
Ok(Config { query, file_path })
}
}
fn run(config: Config) -> Result<(), Box<dyn Error>> {
let contents = fs::read_to_string(config.file_path)?;
let results = if config.ignore_case {
search_case_insensitive(&config.query, &contents)
} else {
search(&config.query, &contents)
};
for line in results {
println!("{line}");
}
Ok(())
}我们添加了 ignore_case 字段,它持有一个布尔值。接下来,run 函数需要检查 ignore_case 字段的值,并用它来决定是调用 search 函数还是 search_case_insensitive 函数,如示例 12-22 所示。这仍然不能编译。
use std::env;
use std::error::Error;
use std::fs;
use std::process;
use minigrep::{search, search_case_insensitive};
// --snip--
fn main() {
let args: Vec<String> = env::args().collect();
let config = Config::build(&args).unwrap_or_else(|err| {
println!("Problem parsing arguments: {err}");
process::exit(1);
});
if let Err(e) = run(config) {
println!("Application error: {e}");
process::exit(1);
}
}
pub struct Config {
pub query: String,
pub file_path: String,
pub ignore_case: bool,
}
impl Config {
fn build(args: &[String]) -> Result<Config, &'static str> {
if args.len() < 3 {
return Err("not enough arguments");
}
let query = args[1].clone();
let file_path = args[2].clone();
Ok(Config { query, file_path })
}
}
fn run(config: Config) -> Result<(), Box<dyn Error>> {
let contents = fs::read_to_string(config.file_path)?;
let results = if config.ignore_case {
search_case_insensitive(&config.query, &contents)
} else {
search(&config.query, &contents)
};
for line in results {
println!("{line}");
}
Ok(())
}config.ignore_case 的值调用 search 或 search_case_insensitive最后,我们需要检查环境变量。用于处理环境变量的函数位于标准库的 env 模块中,该模块已在 src/main.rs 顶部的作用域中。我们将使用 env 模块的 var 函数来检查是否已为名为 IGNORE_CASE 的环境变量设置了任何值,如示例 12-23 所示。
use std::env;
use std::error::Error;
use std::fs;
use std::process;
use minigrep::{search, search_case_insensitive};
fn main() {
let args: Vec<String> = env::args().collect();
let config = Config::build(&args).unwrap_or_else(|err| {
println!("Problem parsing arguments: {err}");
process::exit(1);
});
if let Err(e) = run(config) {
println!("Application error: {e}");
process::exit(1);
}
}
pub struct Config {
pub query: String,
pub file_path: String,
pub ignore_case: bool,
}
impl Config {
fn build(args: &[String]) -> Result<Config, &'static str> {
if args.len() < 3 {
return Err("not enough arguments");
}
let query = args[1].clone();
let file_path = args[2].clone();
let ignore_case = env::var("IGNORE_CASE").is_ok();
Ok(Config {
query,
file_path,
ignore_case,
})
}
}
fn run(config: Config) -> Result<(), Box<dyn Error>> {
let contents = fs::read_to_string(config.file_path)?;
let results = if config.ignore_case {
search_case_insensitive(&config.query, &contents)
} else {
search(&config.query, &contents)
};
for line in results {
println!("{line}");
}
Ok(())
}IGNORE_CASE 的环境变量的任何值在这里,我们创建一个新变量 ignore_case。为了设置其值,我们调用 env::var 函数,并传递环境变量的名称 IGNORE_CASE。env::var 函数返回一个 Result:如果环境变量设置为任何值,它将成功返回包含该环境变量值的 Ok 变体;如果环境变量未设置,它将返回 Err 变体。
我们使用 Result 上的 is_ok 方法检查环境变量是否已设置,这意味着程序应进行不区分大小写的搜索。如果 IGNORE_CASE 环境变量未设置任何值,is_ok 将返回 false,程序将执行区分大小写的搜索。我们不关心环境变量的值,只关心它是已设置还是未设置,因此我们检查 is_ok,而不是使用 unwrap、expect 或我们在 Result 上见过的其他方法。
我们将 ignore_case 变量中的值传递给 Config 实例,以便 run 函数可以读取该值并决定是调用 search_case_insensitive 还是 search,正如我们在示例 12-22 中实现的那样。
让我们试试看!首先,我们将在没有设置环境变量且查询 to 的情况下运行程序,它应该匹配任何包含全小写单词 to 的行:
$ cargo run -- to poem.txt
Compiling minigrep v0.1.0 (file:///projects/minigrep)
Finished `dev` profile [unoptimized + debuginfo] target(s) in 0.0s
Running `target/debug/minigrep to poem.txt`
Are you nobody, too?
How dreary to be somebody!
看起来仍然有效!现在让我们在设置 IGNORE_CASE 为 1 的情况下运行程序,但使用相同的查询 to:
$ IGNORE_CASE=1 cargo run -- to poem.txt
如果你使用的是 PowerShell,则需要设置环境变量并作为单独的命令运行程序:
PS> $Env:IGNORE_CASE=1; cargo run -- to poem.txt
这将使 IGNORE_CASE 在你的 shell 会话的剩余时间内持续存在。可以使用 Remove-Item cmdlet 取消设置:
PS> Remove-Item Env:IGNORE_CASE
我们应得到包含 to(可能有大写字母)的行:
Are you nobody, too?
How dreary to be somebody!
To tell your name the livelong day
To an admiring bog!
太棒了,我们还得到了包含 To 的行!我们的 minigrep 程序现在可以进行由环境变量控制的不区分大小写的搜索。现在你知道了如何管理使用命令行参数或环境变量设置的选项。
有些程序允许同一配置使用参数和环境变量。在这些情况下,程序决定其中一个具有优先权。作为你自己的另一个练习,尝试通过命令行参数或环境变量来控制大小写敏感性。如果程序在运行时一个设置为区分大小写、一个设置为忽略大小写,请决定命令行参数或环境变量哪个应优先。
std::env 模块包含更多用于处理环境变量的有用功能:请查看其文档以了解哪些功能可用。
将错误信息重定向到标准错误输出
将错误重定向到标准错误(Redirecting Errors to Standard Error)
目前,我们使用 println! 宏将所有输出写入终端。在大多数终端中,有两种输出:用于一般信息的标准输出(standard output,stdout)和用于错误消息的标准错误(standard error,stderr)。这种区别使用户能够选择将程序的成功输出定向到文件,但仍然在屏幕上打印错误消息。
println! 宏只能打印到标准输出,因此我们必须使用其他方法来打印到标准错误。
检查错误写入位置
首先,让我们观察一下 minigrep 当前打印的内容是如何写入标准输出的,包括任何我们希望改为写入标准错误的错误消息。我们将通过将标准输出流重定向到文件,同时故意引发错误来做到这一点。我们不会重定向标准错误流,因此任何发送到标准错误的内容都会继续显示在屏幕上。
命令行程序应该将错误消息发送到标准错误流,这样即使我们将标准输出流重定向到文件,我们仍然可以在屏幕上看到错误消息。我们的程序目前行为不佳:我们即将看到它将错误消息输出保存到了文件中!
为了演示这种行为,我们将使用 > 和要重定向标准输出流的文件路径 output.txt 来运行程序。我们不传递任何参数,这应该会引发错误:
$ cargo run > output.txt
> 语法告诉 shell 将标准输出的内容写入 output.txt 而不是屏幕。我们没有看到期望的错误消息打印到屏幕上,所以这意味着它一定进入了文件中。这就是 output.txt 包含的内容:
Problem parsing arguments: not enough arguments
是的,我们的错误消息被打印到了标准输出。对于这样的错误消息来说,将其打印到标准错误要有用得多,这样只有成功运行的数据才会进入文件。我们将改变这一点。
将错误打印到标准错误
我们将使用示例 12-24 中的代码来更改错误消息的打印方式。由于我们在本章前面进行了重构,所有打印错误消息的代码都在一个函数 main 中。标准库提供了 eprintln! 宏,它打印到标准错误流,因此让我们将调用 println! 打印错误的两个地方改为使用 eprintln!。
use std::env;
use std::error::Error;
use std::fs;
use std::process;
use minigrep::{search, search_case_insensitive};
fn main() {
let args: Vec<String> = env::args().collect();
let config = Config::build(&args).unwrap_or_else(|err| {
eprintln!("Problem parsing arguments: {err}");
process::exit(1);
});
if let Err(e) = run(config) {
eprintln!("Application error: {e}");
process::exit(1);
}
}
pub struct Config {
pub query: String,
pub file_path: String,
pub ignore_case: bool,
}
impl Config {
fn build(args: &[String]) -> Result<Config, &'static str> {
if args.len() < 3 {
return Err("not enough arguments");
}
let query = args[1].clone();
let file_path = args[2].clone();
let ignore_case = env::var("IGNORE_CASE").is_ok();
Ok(Config {
query,
file_path,
ignore_case,
})
}
}
fn run(config: Config) -> Result<(), Box<dyn Error>> {
let contents = fs::read_to_string(config.file_path)?;
let results = if config.ignore_case {
search_case_insensitive(&config.query, &contents)
} else {
search(&config.query, &contents)
};
for line in results {
println!("{line}");
}
Ok(())
}eprintln! 将错误消息写入标准错误而不是标准输出现在让我们以相同的方式再次运行程序,不带任何参数并使用 > 重定向标准输出:
$ cargo run > output.txt
Problem parsing arguments: not enough arguments
现在我们看到错误在屏幕上,而 output.txt 为空,这是我们对命令行程序的期望行为。
让我们再次运行程序,使用不会引发错误的参数,但仍然将标准输出重定向到一个文件,如下所示:
$ cargo run -- to poem.txt > output.txt
我们不会在终端中看到任何输出,而 output.txt 将包含我们的结果:
Filename: output.txt
Are you nobody, too?
How dreary to be somebody!
这表明我们现在适当地使用标准输出用于成功输出,使用标准错误用于错误输出。
总结
本章回顾了你到目前为止学到的一些主要概念,并介绍了如何在 Rust 中执行常见的 I/O 操作。通过使用命令行参数、文件、环境变量和用于打印错误的 eprintln! 宏,你现在已经准备好编写命令行应用程序。结合之前章节中的概念,你的代码将组织良好,有效地在适当的数据结构中存储数据,妥善处理错误,并且得到良好的测试。
接下来,我们将探索一些受函数式语言启发的 Rust 特性:闭包和迭代器。
函数式语言特性:迭代器(Iterator)与闭包(Closure)
Rust 的设计从许多现有的语言和技术中汲取了灵感,其中一个重要的影响是函数式编程(functional programming)。函数式风格的编程通常包括将函数作为值使用,例如将其作为参数传递、从其他函数返回、分配给变量供以后执行等等。
在本章中,我们不会讨论什么算或不算函数式编程,而是讨论 Rust 中与许多常被称为函数式的语言特性相似的一些功能。
更具体地说,我们将涵盖:
- 闭包(Closures),一种类似函数的构造,你可以将其存储在变量中
- 迭代器(Iterators),一种处理元素序列的方式
- 如何使用闭包和迭代器改进第 12 章的 I/O 项目
- 闭包和迭代器的性能(剧透警告:它们比你想象的更快!)
我们已经介绍过 Rust 的其他一些特性,例如模式匹配和枚举,它们也受到了函数式风格的影响。由于掌握闭包和迭代器是编写快速、地道的 Rust 代码的重要组成部分,我们将用整章来介绍它们。
闭包
闭包(Closures)
Rust 的闭包(closures)是可以保存在变量中或作为参数传递给其他函数的匿名函数。你可以在一个地方创建闭包,然后在不同的上下文中调用它以求值。与函数不同,闭包可以从其定义的作用域中捕获值。我们将演示这些闭包特性如何实现代码重用和行为定制。
捕获环境(Capturing the Environment)
我们首先考察如何使用闭包从其定义的环境中捕获值以供以后使用。场景如下:我们的 T 恤公司时不时将一件独家限量版衬衫赠送给邮件列表中的某人作为促销活动。邮件列表中的人可以选择将他们的最喜欢的颜色添加到个人资料中。如果被选中获得免费衬衫的人设置了最喜欢的颜色,他们将获得该颜色的衬衫。如果该人没有指定最喜欢的颜色,他们将获得公司目前库存最多的颜色。
有很多方法可以实现这一点。对于此示例,我们将使用一个名为 ShirtColor 的枚举,它有 Red 和 Blue 两个变体(为简单起见限制了可用颜色数量)。我们使用一个 Inventory 结构体来表示公司的库存,该结构体有一个名为 shirts 的字段,包含一个 Vec<ShirtColor>,表示当前库存的衬衫颜色。在 Inventory 上定义的 giveaway 方法获取免费衬衫赢家的可选衬衫颜色偏好,并返回此人将获得的衬衫颜色。此设置在示例 13-1 中展示。
#[derive(Debug, PartialEq, Copy, Clone)]
enum ShirtColor {
Red,
Blue,
}
struct Inventory {
shirts: Vec<ShirtColor>,
}
impl Inventory {
fn giveaway(&self, user_preference: Option<ShirtColor>) -> ShirtColor {
user_preference.unwrap_or_else(|| self.most_stocked())
}
fn most_stocked(&self) -> ShirtColor {
let mut num_red = 0;
let mut num_blue = 0;
for color in &self.shirts {
match color {
ShirtColor::Red => num_red += 1,
ShirtColor::Blue => num_blue += 1,
}
}
if num_red > num_blue {
ShirtColor::Red
} else {
ShirtColor::Blue
}
}
}
fn main() {
let store = Inventory {
shirts: vec![ShirtColor::Blue, ShirtColor::Red, ShirtColor::Blue],
};
let user_pref1 = Some(ShirtColor::Red);
let giveaway1 = store.giveaway(user_pref1);
println!(
"The user with preference {:?} gets {:?}",
user_pref1, giveaway1
);
let user_pref2 = None;
let giveaway2 = store.giveaway(user_pref2);
println!(
"The user with preference {:?} gets {:?}",
user_pref2, giveaway2
);
}main 中定义的 store 还剩下两件蓝衬衫和一件红衬衫可供此限量版促销分发。我们为一位偏好红衬衫的用户和一位没有偏好的用户调用 giveaway 方法。
同样,这段代码可以用多种方式实现,此处为了专注于闭包,我们坚持使用你已经学过的概念,除了 giveaway 方法体中使用了一个闭包。在 giveaway 方法中,我们将用户偏好作为类型 Option<ShirtColor> 的参数获取,并在 user_preference 上调用 unwrap_or_else 方法。Option<T> 上的 unwrap_or_else 方法由标准库定义。它接受一个参数:一个不带任何参数并返回 T 类型值的闭包(与存储在 Option<T> 的 Some 变体中的类型相同,在本例中是 ShirtColor)。如果 Option<T> 是 Some 变体,unwrap_or_else 返回 Some 内部的值。如果 Option<T> 是 None 变体,unwrap_or_else 调用闭包并返回闭包返回的值。
我们将闭包表达式 || self.most_stocked() 指定为 unwrap_or_else 的参数。这是一个自身不带参数的闭包(如果闭包有参数,它们会出现在两个竖线之间)。闭包体调用 self.most_stocked()。我们在此定义闭包,而 unwrap_or_else 的实现将在需要结果时稍后求值闭包。
运行此代码会打印以下内容:
$ cargo run
Compiling shirt-company v0.1.0 (file:///projects/shirt-company)
Finished `dev` profile [unoptimized + debuginfo] target(s) in 0.27s
Running `target/debug/shirt-company`
The user with preference Some(Red) gets Red
The user with preference None gets Blue
这里一个有趣的方面是我们传递了一个闭包,它在当前的 Inventory 实例上调用 self.most_stocked()。标准库不需要知道我们定义的 Inventory 或 ShirtColor 类型,也不需要知道我们在此场景中想要使用的逻辑。闭包捕获了对 self Inventory 实例的不可变引用,并将其与我们指定的代码一起传递给 unwrap_or_else 方法。而函数则无法以这种方式捕获它们的环境。
推断和标注闭包类型
函数和闭包之间还有更多区别。闭包通常不需要你像 fn 函数那样标注参数类型或返回值类型。类型注解在函数上是必需的,因为类型是暴露给用户的显式接口的一部分。严格定义这个接口对于确保每个人都同意函数使用和返回什么类型的值很重要。而闭包则不会在这种暴露的接口中使用:它们存储在变量中,在不命名也不暴露给库用户的情况下使用。
闭包通常很短,并且仅与狭窄的上下文相关,而不是任意场景。在这些有限的上下文中,编译器可以推断参数类型和返回类型,类似于它推断大多数变量类型的方式(也有极少数情况下编译器也需要闭包类型注解)。
与变量一样,如果我们想增加明确性和清晰度,可以添加类型注解,代价是比严格必要的更冗长。为闭包标注类型看起来像示例 13-2 中所示的定义。在此示例中,我们定义了一个闭包并将其存储在变量中,而不是像在示例 13-1 中那样将闭包定义在将其作为参数传递的位置。
use std::thread;
use std::time::Duration;
fn generate_workout(intensity: u32, random_number: u32) {
let expensive_closure = |num: u32| -> u32 {
println!("calculating slowly...");
thread::sleep(Duration::from_secs(2));
num
};
if intensity < 25 {
println!("Today, do {} pushups!", expensive_closure(intensity));
println!("Next, do {} situps!", expensive_closure(intensity));
} else {
if random_number == 3 {
println!("Take a break today! Remember to stay hydrated!");
} else {
println!(
"Today, run for {} minutes!",
expensive_closure(intensity)
);
}
}
}
fn main() {
let simulated_user_specified_value = 10;
let simulated_random_number = 7;
generate_workout(simulated_user_specified_value, simulated_random_number);
}添加类型注解后,闭包的语法看起来更类似于函数的语法。为了比较,我们定义了一个将其参数加 1 的函数和一个具有相同行为的闭包。我们添加了一些空格来对齐相关部分。这说明闭包语法与函数语法相似,除了使用竖线和可选的一些语法:
fn add_one_v1 (x: u32) -> u32 { x + 1 }
let add_one_v2 = |x: u32| -> u32 { x + 1 };
let add_one_v3 = |x| { x + 1 };
let add_one_v4 = |x| x + 1 ;第一行显示了一个函数定义,第二行显示了一个完整标注的闭包定义。在第三行中,我们移除了闭包定义中的类型注解。在第四行中,我们移除了花括号,这是可选的,因为闭包体只有一个表达式。这些都是有效的定义,在调用时会产生相同的行为。add_one_v3 和 add_one_v4 行要求闭包被求值才能编译,因为类型将从它们的使用中推断出来。这类似于 let v = Vec::new(); 需要类型注解或某些类型的值插入到 Vec 中,Rust 才能推断出类型。
对于闭包定义,编译器将为每个参数和返回值推断一个具体类型。例如,示例 13-3 显示了一个简短的闭包定义,它只是返回它收到的参数作为值。除了此示例的目的之外,这个闭包不是很有用。注意,我们没有在定义中添加任何类型注解。因为没有类型注解,我们可以用任何类型调用这个闭包,我们第一次用 String 这样做。如果我们随后尝试用整数调用 example_closure,我们将得到一个错误。
fn main() {
let example_closure = |x| x;
let s = example_closure(String::from("hello"));
let n = example_closure(5);
}编译器给出这个错误:
$ cargo run
Compiling closure-example v0.1.0 (file:///projects/closure-example)
error[E0308]: mismatched types
--> src/main.rs:5:29
|
5 | let n = example_closure(5);
| --------------- ^ expected `String`, found integer
| |
| arguments to this function are incorrect
|
note: expected because the closure was earlier called with an argument of type `String`
--> src/main.rs:4:29
|
4 | let s = example_closure(String::from("hello"));
| --------------- ^^^^^^^^^^^^^^^^^^^^^ expected because this argument is of type `String`
| |
| in this closure call
note: closure parameter defined here
--> src/main.rs:2:28
|
2 | let example_closure = |x| x;
| ^
help: try using a conversion method
|
5 | let n = example_closure(5.to_string());
| ++++++++++++
For more information about this error, try `rustc --explain E0308`.
error: could not compile `closure-example` (bin "closure-example") due to 1 previous error
第一次用 String 值调用 example_closure 时,编译器推断 x 的类型和闭包的返回类型是 String。这些类型随后被锁定在 example_closure 的闭包中,当我们下次尝试用不同的类型使用同一个闭包时,就会得到类型错误。
捕获引用或移动所有权
闭包可以通过三种方式从其环境中捕获值,这直接映射到函数接受参数的三种方式:不可变借用、可变借用和获取所有权。闭包将根据函数体对捕获值执行的操作来决定使用哪种方式。
在示例 13-4 中,我们定义了一个闭包,它捕获对名为 list 的向量的不可变引用,因为它只需要一个不可变引用来打印值。
fn main() {
let list = vec![1, 2, 3];
println!("Before defining closure: {list:?}");
let only_borrows = || println!("From closure: {list:?}");
println!("Before calling closure: {list:?}");
only_borrows();
println!("After calling closure: {list:?}");
}这个例子还说明变量可以绑定到闭包定义,我们以后可以通过使用变量名和括号来调用闭包,就像变量名是函数名一样。
因为我们可以同时对 list 有多个不可变引用,所以在闭包定义之前、闭包定义之后但闭包被调用之前以及闭包被调用之后,list 仍然可从代码中访问。这段代码编译、运行并打印:
$ cargo run
Compiling closure-example v0.1.0 (file:///projects/closure-example)
Finished `dev` profile [unoptimized + debuginfo] target(s) in 0.43s
Running `target/debug/closure-example`
Before defining closure: [1, 2, 3]
Before calling closure: [1, 2, 3]
From closure: [1, 2, 3]
After calling closure: [1, 2, 3]
接下来,在示例 13-5 中,我们更改了闭包体,使其向 list 向量添加一个元素。闭包现在捕获了一个可变引用。
fn main() {
let mut list = vec![1, 2, 3];
println!("Before defining closure: {list:?}");
let mut borrows_mutably = || list.push(7);
borrows_mutably();
println!("After calling closure: {list:?}");
}这段代码编译、运行并打印:
$ cargo run
Compiling closure-example v0.1.0 (file:///projects/closure-example)
Finished `dev` profile [unoptimized + debuginfo] target(s) in 0.43s
Running `target/debug/closure-example`
Before defining closure: [1, 2, 3]
After calling closure: [1, 2, 3, 7]
注意,在 borrows_mutably 闭包的定义和调用之间不再有 println!:当 borrows_mutably 被定义时,它捕获了对 list 的可变引用。我们在闭包被调用后不再使用该闭包,因此可变借用结束。在闭包定义和闭包调用之间,不允许进行不可变借用打印,因为在存在可变借用时不允许其他借用。尝试在那里添加一个 println!,看看你会得到什么错误消息!
如果你想强制闭包获取它在其环境中使用的值的所有权,即使闭包体并非严格需要所有权,你也可以在参数列表前使用 move 关键字。
这种技术主要在将闭包传递给新线程以移动数据使其由新线程所有时有用。我们将在第 16 章讨论并发时详细讨论线程以及为什么要使用它们,但现在,让我们简要地探索使用需要 move 关键字的闭包来生成新线程。示例 13-6 显示了示例 13-4 的修改版本,在新线程中而不是在主线程中打印向量。
use std::thread;
fn main() {
let list = vec![1, 2, 3];
println!("Before defining closure: {list:?}");
thread::spawn(move || println!("From thread: {list:?}"))
.join()
.unwrap();
}move 强制线程的闭包获取 list 的所有权我们生成了一个新线程,将闭包作为参数传递给线程运行。闭包体打印出列表。在示例 13-4 中,闭包仅使用不可变引用捕获了 list,因为这是打印它所需的最少访问权限。在此示例中,尽管闭包体仍然只需要不可变引用,但我们需要通过在闭包定义的开头放置 move 关键字来指定 list 应被移入闭包。如果主线程在调用新线程上的 join 之前执行了更多操作,新线程可能在其他主线程部分完成之前完成,或者主线程可能先完成。如果主线程保持 list 的所有权但在新线程结束前结束并释放了 list,则线程中的不可变引用将无效。因此,编译器要求将 list 移入给新线程的闭包中,以便引用有效。尝试移除 move 关键字,或者在定义闭包后在主线程中使用 list,以查看你会得到什么编译器错误!
将被捕获的值移出闭包
一旦闭包捕获了一个引用或从定义闭包的环境中获取了一个值的所有权(从而影响了什么被移入闭包),闭包体中的代码就定义了当闭包稍后被求值时引用或值会发生什么(从而影响了什么被移出闭包)。
闭包体可以执行以下任何操作:将捕获的值移出闭包、改变捕获的值、既不移动也不改变该值,或者一开始就不从环境中捕获任何东西。
闭包从环境捕获和处理值的方式影响闭包实现了哪些 trait,而 trait 是函数和结构体指定它们可以使用哪些闭包的方式。闭包将根据闭包体如何处理值,以累加的方式自动实现一个、两个或全部三个 Fn trait:
FnOnce适用于可以被调用一次的闭包。所有闭包都至少实现这个 trait,因为所有闭包都可以被调用。将捕获的值移出其函数体的闭包只会实现FnOnce而不会实现其他Fntrait,因为它只能被调用一次。FnMut适用于不将捕获的值移出其函数体但可能改变捕获的值的闭包。这些闭包可以被调用多次。Fn适用于不将捕获的值移出其函数体且不改变捕获的值的闭包,以及从其环境中什么都不捕获的闭包。这些闭包可以在不改变其环境的情况下被多次调用,这在此类情况下很重要,例如并发多次调用一个闭包。
让我们看看在示例 13-1 中使用的 Option<T> 上 unwrap_or_else 方法的定义:
impl<T> Option<T> {
pub fn unwrap_or_else<F>(self, f: F) -> T
where
F: FnOnce() -> T
{
match self {
Some(x) => x,
None => f(),
}
}
}回想一下,T 是泛型类型,代表 Option 的 Some 变体中的值类型。那个类型 T 也是 unwrap_or_else 函数的返回类型:例如,在 Option<String> 上调用 unwrap_or_else 的代码将获得一个 String。
接下来,注意 unwrap_or_else 函数有一个额外的泛型类型参数 F。F 类型是名为 f 的参数的类型,f 是我们调用 unwrap_or_else 时提供的闭包。
泛型类型 F 上指定的 trait 约束是 FnOnce() -> T,这意味着 F 必须能够被调用一次,不带参数,并返回一个 T。在 trait 约束中使用 FnOnce 表达了约束:unwrap_or_else 不会调用 f 超过一次。在 unwrap_or_else 的主体中,我们可以看到如果 Option 是 Some,f 不会被调用。如果 Option 是 None,f 将被调用一次。因为所有闭包都实现了 FnOnce,所以 unwrap_or_else 接受所有三种闭包,并且尽可能灵活。
注意:如果我们想做的事情不需要从环境中捕获值,我们可以在需要实现某个
Fntrait 的地方使用函数名而不是闭包。例如,在Option<Vec<T>>值上,我们可以调用unwrap_or_else(Vec::new)来在值为None时获取一个新的空向量。编译器会自动为函数定义实现适用的Fntrait。
现在让我们看看标准库中在切片上定义的 sort_by_key 方法,以了解它与 unwrap_or_else 有何不同,以及为什么 sort_by_key 在 trait 约束中使用 FnMut 而不是 FnOnce。闭包以对切片中当前项的引用的形式接收一个参数,并返回一个可排序的 K 类型的值。当你想要按每个项的特定属性对切片进行排序时,此函数很有用。在示例 13-7 中,我们有一个 Rectangle 实例列表,并使用 sort_by_key 按它们的 width 属性从低到高排序。
#[derive(Debug)]
struct Rectangle {
width: u32,
height: u32,
}
fn main() {
let mut list = [
Rectangle { width: 10, height: 1 },
Rectangle { width: 3, height: 5 },
Rectangle { width: 7, height: 12 },
];
list.sort_by_key(|r| r.width);
println!("{list:#?}");
}sort_by_key 按宽度对矩形排序这段代码打印:
$ cargo run
Compiling rectangles v0.1.0 (file:///projects/rectangles)
Finished `dev` profile [unoptimized + debuginfo] target(s) in 0.41s
Running `target/debug/rectangles`
[
Rectangle {
width: 3,
height: 5,
},
Rectangle {
width: 7,
height: 12,
},
Rectangle {
width: 10,
height: 1,
},
]
sort_by_key 被定义为接受 FnMut 闭包的原因是它多次调用闭包:对切片中的每个项调用一次。闭包 |r| r.width 不从其环境中捕获、改变或移动任何内容,因此它满足 trait 约束要求。
相比之下,示例 13-8 显示了一个仅实现 FnOnce trait 的闭包示例,因为它将值移出了环境。编译器不允许我们将此闭包与 sort_by_key 一起使用。
#[derive(Debug)]
struct Rectangle {
width: u32,
height: u32,
}
fn main() {
let mut list = [
Rectangle { width: 10, height: 1 },
Rectangle { width: 3, height: 5 },
Rectangle { width: 7, height: 12 },
];
let mut sort_operations = vec![];
let value = String::from("closure called");
list.sort_by_key(|r| {
sort_operations.push(value);
r.width
});
println!("{list:#?}");
}FnOnce 闭包与 sort_by_key 一起使用这是一种人为的、复杂的方式(不起作用),试图计算在对 list 排序时 sort_by_key 调用闭包的次数。此代码尝试通过将 value(来自闭包环境的 String)推入 sort_operations 向量来进行计数。闭包捕获了 value,然后通过将 value 的所有权转移到 sort_operations 向量将其移出闭包。这个闭包只能被调用一次;尝试第二次调用它将不起作用,因为 value 将不再在环境中被推入 sort_operations!因此,此闭包只实现了 FnOnce。当我们尝试编译此代码时,我们会得到这个错误,指出 value 不能被移出闭包,因为闭包必须实现 FnMut:
$ cargo run
Compiling rectangles v0.1.0 (file:///projects/rectangles)
error[E0507]: cannot move out of `value`, a captured variable in an `FnMut` closure
--> src/main.rs:18:30
|
15 | let value = String::from("closure called");
| ----- ------------------------------ move occurs because `value` has type `String`, which does not implement the `Copy` trait
| |
| captured outer variable
16 |
17 | list.sort_by_key(|r| {
| --- captured by this `FnMut` closure
18 | sort_operations.push(value);
| ^^^^^ `value` is moved here
|
help: consider cloning the value if the performance cost is acceptable
|
18 | sort_operations.push(value.clone());
| ++++++++
For more information about this error, try `rustc --explain E0507`.
error: could not compile `rectangles` (bin "rectangles") due to 1 previous error
错误指向闭包体中将 value 移出环境的行。要修复此问题,我们需要更改闭包体,使其不将值移出环境。在环境中保持一个计数器并在闭包体中递增其值是计算闭包被调用次数的更直接方式。示例 13-9 中的闭包可以与 sort_by_key 一起使用,因为它只捕获了 num_sort_operations 计数器的可变引用,因此可以被调用多次。
#[derive(Debug)]
struct Rectangle {
width: u32,
height: u32,
}
fn main() {
let mut list = [
Rectangle { width: 10, height: 1 },
Rectangle { width: 3, height: 5 },
Rectangle { width: 7, height: 12 },
];
let mut num_sort_operations = 0;
list.sort_by_key(|r| {
num_sort_operations += 1;
r.width
});
println!("{list:#?}, sorted in {num_sort_operations} operations");
}FnMut 闭包与 sort_by_key 一起使用在定义或使用使用闭包的函数或类型时,Fn trait 很重要。在下一节中,我们将讨论迭代器。许多迭代器方法接受闭包参数,因此在我们继续时,请记住这些闭包细节!
使用迭代器处理一系列元素
使用迭代器(Iterator)处理一系列项
迭代器模式(iterator pattern)允许你对一系列项依次执行某些任务。迭代器负责遍历每个项的逻辑以及确定序列何时结束的逻辑。当你使用迭代器时,你不需要自己重新实现该逻辑。
在 Rust 中,迭代器是惰性的(lazy),这意味着在你调用使用迭代器的方法之前,它们不会产生效果。例如,示例 13-10 中的代码通过调用 Vec<T> 上定义的 iter 方法,在向量 v1 中的项上创建了一个迭代器。这段代码本身并不做任何有用的事情。
fn main() {
let v1 = vec![1, 2, 3];
let v1_iter = v1.iter();
}该迭代器存储在 v1_iter 变量中。一旦我们创建了一个迭代器,我们可以以多种方式使用它。在示例 3-5 中,我们使用 for 循环遍历了一个数组,对其每个项执行了一些代码。在底层,这隐式地创建并消耗了一个迭代器,但直到现在我们才详细解释它是如何工作的。
在示例 13-11 的例子中,我们将迭代器的创建与在 for 循环中的使用分离开来。当使用 v1_iter 中的迭代器调用 for 循环时,迭代器中的每个元素都在循环的一次迭代中被使用,循环会打印出每个值。
fn main() {
let v1 = vec![1, 2, 3];
let v1_iter = v1.iter();
for val in v1_iter {
println!("Got: {val}");
}
}for 循环中使用迭代器在那些标准库没有提供迭代器的语言中,你可能会通过从索引 0 开始一个变量、使用该变量索引向量以获取值、并在循环中递增变量值直到达到向量中项的总数来编写相同的功能。
迭代器为你处理所有逻辑,减少了你可能搞砸的重复代码。迭代器让你更灵活地将相同的逻辑用于许多不同类型的序列,而不仅仅是像向量那样可以索引的数据结构。让我们来看看迭代器是如何做到这一点的。
Iterator Trait 和 next 方法
所有迭代器都实现了 Iterator trait,该 trait 在标准库中定义。该 trait 的定义如下:
#![allow(unused)]
fn main() {
pub trait Iterator {
type Item;
fn next(&mut self) -> Option<Self::Item>;
// 带有默认实现的方法已省略
}
}注意,此定义使用了一些新语法:type Item 和 Self::Item,它们正在定义与此 trait 的关联类型(associated type)。我们将在第 20 章深入讨论关联类型。现在,你只需要知道这段代码表示实现 Iterator trait 要求你还定义一个 Item 类型,并且此 Item 类型用于 next 方法的返回类型。换句话说,Item 类型将是迭代器返回的类型。
Iterator trait 只要求实现者定义一个方法:next 方法,该方法一次返回迭代器的一个项,包裹在 Some 中,当迭代结束时返回 None。
我们可以直接在迭代器上调用 next 方法;示例 13-12 演示了从向量创建的迭代器上重复调用 next 会返回什么值。
#[cfg(test)]
mod tests {
#[test]
fn iterator_demonstration() {
let v1 = vec![1, 2, 3];
let mut v1_iter = v1.iter();
assert_eq!(v1_iter.next(), Some(&1));
assert_eq!(v1_iter.next(), Some(&2));
assert_eq!(v1_iter.next(), Some(&3));
assert_eq!(v1_iter.next(), None);
}
}next 方法注意,我们需要将 v1_iter 声明为可变的:在迭代器上调用 next 方法会改变迭代器用于跟踪其在序列中位置的内部状态。换句话说,这段代码*消耗(consumes)*或使用了迭代器。每次对 next 的调用都会从迭代器中消耗一个项。当我们使用 for 循环时,我们不需要使 v1_iter 可变,因为循环获取了 v1_iter 的所有权并在幕后使其可变。
还要注意,我们从调用 next 获得的值是对向量中值的不可变引用。iter 方法生成一个不可变引用的迭代器。如果我们想创建一个获取 v1 所有权并返回拥有的值的迭代器,我们可以调用 into_iter 而不是 iter。类似地,如果我们想遍历可变引用,我们可以调用 iter_mut 而不是 iter。
消耗迭代器的方法
Iterator trait 有许多不同的方法,标准库提供了默认实现;你可以通过查看标准库 API 文档中 Iterator trait 来了解这些方法。其中一些方法在其定义中调用了 next 方法,这就是为什么在实现 Iterator trait 时要求你实现 next 方法。
调用 next 的方法被称为消耗适配器(consuming adapters),因为调用它们会消耗掉迭代器。一个例子是 sum 方法,它获取迭代器的所有权,并通过重复调用 next 来迭代各项,从而消耗迭代器。在迭代过程中,它将每个项添加到一个运行总数中,并在迭代完成时返回总数。示例 13-13 有一个测试,说明了 sum 方法的用法。
#[cfg(test)]
mod tests {
#[test]
fn iterator_sum() {
let v1 = vec![1, 2, 3];
let v1_iter = v1.iter();
let total: i32 = v1_iter.sum();
assert_eq!(total, 6);
}
}sum 方法以获取迭代器中所有项的总和在调用 sum 之后,我们不允许再使用 v1_iter,因为 sum 获取了我们调用它的迭代器的所有权。
产生其他迭代器的方法
*迭代器适配器(Iterator adapters)*是在 Iterator trait 上定义的方法,它们不消耗迭代器。相反,它们通过改变原始迭代器的某些方面来产生不同的迭代器。
示例 13-14 显示了一个调用迭代器适配器方法 map 的例子,map 接受一个闭包,该闭包在遍历每个项时被调用。map 方法返回一个新的迭代器,它产生修改后的项。这里的闭包创建了一个新迭代器,其中向量中的每个项都将递增 1。
fn main() {
let v1: Vec<i32> = vec![1, 2, 3];
v1.iter().map(|x| x + 1);
}map 以创建新迭代器然而,这段代码会产生一条警告:
$ cargo run
Compiling iterators v0.1.0 (file:///projects/iterators)
warning: unused `Map` that must be used
--> src/main.rs:4:5
|
4 | v1.iter().map(|x| x + 1);
| ^^^^^^^^^^^^^^^^^^^^^^^^
|
= note: iterators are lazy and do nothing unless consumed
= note: `#[warn(unused_must_use)]` on by default
help: use `let _ = ...` to ignore the resulting value
|
4 | let _ = v1.iter().map(|x| x + 1);
| +++++++
warning: `iterators` (bin "iterators") generated 1 warning
Finished `dev` profile [unoptimized + debuginfo] target(s) in 0.47s
Running `target/debug/iterators`
示例 13-14 中的代码没有做任何事情;我们指定的闭包从未被调用。警告提醒我们原因:迭代器适配器是惰性的,我们需要在这里消耗迭代器。
要修复此警告并消耗迭代器,我们将使用 collect 方法,我们在示例 12-1 中与 env::args 一起使用过。此方法消耗迭代器并将结果值收集到集合数据类型中。
在示例 13-15 中,我们将迭代从调用 map 返回的迭代器的结果收集到一个向量中。这个向量最终将包含原始向量中的每个项,每个项递增 1。
fn main() {
let v1: Vec<i32> = vec![1, 2, 3];
let v2: Vec<_> = v1.iter().map(|x| x + 1).collect();
assert_eq!(v2, vec![2, 3, 4]);
}map 方法创建新迭代器,然后调用 collect 方法消耗新迭代器并创建向量因为 map 接受一个闭包,我们可以指定我们想对每个项执行的任何操作。这是一个很好的例子,说明了闭包如何让你定制某些行为,同时重用 Iterator trait 提供的迭代行为。
你可以链式调用多个迭代器适配器,以可读的方式执行复杂操作。但由于所有迭代器都是惰性的,你必须调用其中一个消耗适配器方法才能从迭代器适配器的调用中获取结果。
捕获其环境的闭包
许多迭代器适配器接受闭包作为参数,通常我们指定为迭代器适配器参数的闭包将是捕获其环境的闭包。
在此示例中,我们将使用接受闭包的 filter 方法。闭包从迭代器中获取一个项并返回一个 bool。如果闭包返回 true,该值将包含在 filter 产生的迭代中。如果闭包返回 false,该值将不会包含在内。
在示例 13-16 中,我们使用 filter 和一个捕获其环境中 shoe_size 变量的闭包来遍历 Shoe 结构体实例的集合。它将只返回指定尺寸的鞋子。
#[derive(PartialEq, Debug)]
struct Shoe {
size: u32,
style: String,
}
fn shoes_in_size(shoes: Vec<Shoe>, shoe_size: u32) -> Vec<Shoe> {
shoes.into_iter().filter(|s| s.size == shoe_size).collect()
}
#[cfg(test)]
mod tests {
use super::*;
#[test]
fn filters_by_size() {
let shoes = vec![
Shoe {
size: 10,
style: String::from("sneaker"),
},
Shoe {
size: 13,
style: String::from("sandal"),
},
Shoe {
size: 10,
style: String::from("boot"),
},
];
let in_my_size = shoes_in_size(shoes, 10);
assert_eq!(
in_my_size,
vec![
Shoe {
size: 10,
style: String::from("sneaker")
},
Shoe {
size: 10,
style: String::from("boot")
},
]
);
}
}filter 方法以及捕获 shoe_size 的闭包shoes_in_size 函数获取鞋子向量的所有权和一个鞋码作为参数。它返回一个仅包含指定尺寸鞋子的向量。
在 shoes_in_size 的函数体中,我们调用 into_iter 来创建一个获取向量所有权的迭代器。然后,我们调用 filter 将该迭代器适配为仅包含闭包返回 true 的元素的新迭代器。
闭包从环境中捕获 shoe_size 参数,并将该值与每只鞋的尺寸进行比较,只保留指定尺寸的鞋子。最后,调用 collect 将由适配后的迭代器返回的值收集到一个向量中,该向量由函数返回。
测试表明,当我们调用 shoes_in_size 时,我们只会得到与我们指定的值相同尺寸的鞋子。
改进我们的 I/O 项目
改进我们的 I/O 项目
有了这些关于迭代器的新知识,我们可以使用迭代器来改进第 12 章的 I/O 项目,使代码中的某些部分更加清晰和简洁。让我们看看迭代器如何改进我们的 Config::build 函数和 search 函数的实现。
使用迭代器移除一个 clone
在示例 12-6 中,我们添加了代码,获取了一个 String 值的切片,通过索引切片并克隆值来创建 Config 结构体的实例,从而使 Config 结构体拥有这些值。在示例 13-17 中,我们重现了示例 12-23 中 Config::build 函数的实现。
use std::env;
use std::error::Error;
use std::fs;
use std::process;
use minigrep::{search, search_case_insensitive};
fn main() {
let args: Vec<String> = env::args().collect();
let config = Config::build(&args).unwrap_or_else(|err| {
println!("Problem parsing arguments: {err}");
process::exit(1);
});
if let Err(e) = run(config) {
println!("Application error: {e}");
process::exit(1);
}
}
pub struct Config {
pub query: String,
pub file_path: String,
pub ignore_case: bool,
}
impl Config {
fn build(args: &[String]) -> Result<Config, &'static str> {
if args.len() < 3 {
return Err("not enough arguments");
}
let query = args[1].clone();
let file_path = args[2].clone();
let ignore_case = env::var("IGNORE_CASE").is_ok();
Ok(Config {
query,
file_path,
ignore_case,
})
}
}
fn run(config: Config) -> Result<(), Box<dyn Error>> {
let contents = fs::read_to_string(config.file_path)?;
let results = if config.ignore_case {
search_case_insensitive(&config.query, &contents)
} else {
search(&config.query, &contents)
};
for line in results {
println!("{line}");
}
Ok(())
}Config::build 函数的重现当时,我们说不必担心低效的 clone 调用,因为我们将来会移除它们。好吧,现在就是时候了!
我们在这里需要 clone,因为我们在参数 args 中有一个包含 String 元素的切片,但 build 函数并不拥有 args。为了返回 Config 实例的所有权,我们不得不从 query 和 file_path 字段克隆值,以便 Config 实例可以拥有其值。
有了关于迭代器的新知识,我们可以更改 build 函数,使其获取迭代器的所有权作为参数,而不是借用切片。我们将使用迭代器功能,而不是检查切片长度和索引特定位置的代码。这将澄清 Config::build 函数正在做什么,因为迭代器将访问这些值。
一旦 Config::build 获取了迭代器的所有权并停止使用借用的索引操作,我们可以将 String 值从迭代器移入 Config,而不是调用 clone 并进行新的分配。
直接使用返回的迭代器
打开你的 I/O 项目的 src/main.rs 文件,它应该如下所示:
Filename: src/main.rs
use std::env;
use std::error::Error;
use std::fs;
use std::process;
use minigrep::{search, search_case_insensitive};
fn main() {
let args: Vec<String> = env::args().collect();
let config = Config::build(&args).unwrap_or_else(|err| {
eprintln!("Problem parsing arguments: {err}");
process::exit(1);
});
// --snip--
if let Err(e) = run(config) {
eprintln!("Application error: {e}");
process::exit(1);
}
}
pub struct Config {
pub query: String,
pub file_path: String,
pub ignore_case: bool,
}
impl Config {
fn build(args: &[String]) -> Result<Config, &'static str> {
if args.len() < 3 {
return Err("not enough arguments");
}
let query = args[1].clone();
let file_path = args[2].clone();
let ignore_case = env::var("IGNORE_CASE").is_ok();
Ok(Config {
query,
file_path,
ignore_case,
})
}
}
fn run(config: Config) -> Result<(), Box<dyn Error>> {
let contents = fs::read_to_string(config.file_path)?;
let results = if config.ignore_case {
search_case_insensitive(&config.query, &contents)
} else {
search(&config.query, &contents)
};
for line in results {
println!("{line}");
}
Ok(())
}我们首先将示例 12-24 中的 main 函数开头改为示例 13-18 中的代码,这次使用了迭代器。在更新 Config::build 之前,这还不能编译。
use std::env;
use std::error::Error;
use std::fs;
use std::process;
use minigrep::{search, search_case_insensitive};
fn main() {
let config = Config::build(env::args()).unwrap_or_else(|err| {
eprintln!("Problem parsing arguments: {err}");
process::exit(1);
});
// --snip--
if let Err(e) = run(config) {
eprintln!("Application error: {e}");
process::exit(1);
}
}
pub struct Config {
pub query: String,
pub file_path: String,
pub ignore_case: bool,
}
impl Config {
fn build(args: &[String]) -> Result<Config, &'static str> {
if args.len() < 3 {
return Err("not enough arguments");
}
let query = args[1].clone();
let file_path = args[2].clone();
let ignore_case = env::var("IGNORE_CASE").is_ok();
Ok(Config {
query,
file_path,
ignore_case,
})
}
}
fn run(config: Config) -> Result<(), Box<dyn Error>> {
let contents = fs::read_to_string(config.file_path)?;
let results = if config.ignore_case {
search_case_insensitive(&config.query, &contents)
} else {
search(&config.query, &contents)
};
for line in results {
println!("{line}");
}
Ok(())
}env::args 的返回值传递给 Config::buildenv::args 函数返回一个迭代器!现在,我们不将迭代器值收集到向量中然后将切片传递给 Config::build,而是直接将 env::args 返回的迭代器的所有权传递给 Config::build。
接下来,我们需要更新 Config::build 的定义。让我们将 Config::build 的签名改为示例 13-19 所示。这仍然不能编译,因为我们需要更新函数体。
use std::env;
use std::error::Error;
use std::fs;
use std::process;
use minigrep::{search, search_case_insensitive};
fn main() {
let config = Config::build(env::args()).unwrap_or_else(|err| {
eprintln!("Problem parsing arguments: {err}");
process::exit(1);
});
if let Err(e) = run(config) {
eprintln!("Application error: {e}");
process::exit(1);
}
}
pub struct Config {
pub query: String,
pub file_path: String,
pub ignore_case: bool,
}
impl Config {
fn build(
mut args: impl Iterator<Item = String>,
) -> Result<Config, &'static str> {
// --snip--
if args.len() < 3 {
return Err("not enough arguments");
}
let query = args[1].clone();
let file_path = args[2].clone();
let ignore_case = env::var("IGNORE_CASE").is_ok();
Ok(Config {
query,
file_path,
ignore_case,
})
}
}
fn run(config: Config) -> Result<(), Box<dyn Error>> {
let contents = fs::read_to_string(config.file_path)?;
let results = if config.ignore_case {
search_case_insensitive(&config.query, &contents)
} else {
search(&config.query, &contents)
};
for line in results {
println!("{line}");
}
Ok(())
}Config::build 的签名以期望迭代器env::args 函数的标准库文档显示,它返回的迭代器的类型是 std::env::Args,该类型实现了 Iterator trait 并返回 String 值。
我们更新了 Config::build 函数的签名,使参数 args 具有泛型类型,并带有 trait 约束 impl Iterator<Item = String> 而不是 &[String]。我们在第 10 章的“使用 Trait 作为参数”部分讨论的这种 impl Trait 语法意味着 args 可以是任何实现了 Iterator trait 并返回 String 项的类型。
因为我们正在获取 args 的所有权,并且将通过遍历它来修改 args,我们可以在 args 参数的规范中添加 mut 关键字使其可变。
使用 Iterator Trait 方法
接下来,我们将修复 Config::build 的函数体。因为 args 实现了 Iterator trait,我们知道可以在它上面调用 next 方法!示例 13-20 更新了示例 12-23 中的代码以使用 next 方法。
use std::env;
use std::error::Error;
use std::fs;
use std::process;
use minigrep::{search, search_case_insensitive};
fn main() {
let config = Config::build(env::args()).unwrap_or_else(|err| {
eprintln!("Problem parsing arguments: {err}");
process::exit(1);
});
if let Err(e) = run(config) {
eprintln!("Application error: {e}");
process::exit(1);
}
}
pub struct Config {
pub query: String,
pub file_path: String,
pub ignore_case: bool,
}
impl Config {
fn build(
mut args: impl Iterator<Item = String>,
) -> Result<Config, &'static str> {
args.next();
let query = match args.next() {
Some(arg) => arg,
None => return Err("Didn't get a query string"),
};
let file_path = match args.next() {
Some(arg) => arg,
None => return Err("Didn't get a file path"),
};
let ignore_case = env::var("IGNORE_CASE").is_ok();
Ok(Config {
query,
file_path,
ignore_case,
})
}
}
fn run(config: Config) -> Result<(), Box<dyn Error>> {
let contents = fs::read_to_string(config.file_path)?;
let results = if config.ignore_case {
search_case_insensitive(&config.query, &contents)
} else {
search(&config.query, &contents)
};
for line in results {
println!("{line}");
}
Ok(())
}Config::build 的函数体以使用迭代器方法记住,env::args 返回值中的第一个值是程序名称。我们想忽略它并获取下一个值,因此首先我们调用 next 并且不对返回值做任何操作。然后,我们调用 next 来获取我们想要放入 Config 的 query 字段的值。如果 next 返回 Some,我们使用 match 提取该值。如果它返回 None,意味着没有提供足够的参数,我们提前返回一个 Err 值。我们对 file_path 值做同样的事情。
使用迭代器适配器使代码更清晰
我们还可以利用 I/O 项目中 search 函数的迭代器,该函数在示例 13-21 中重现,与示例 12-19 中的相同。
pub fn search<'a>(query: &str, contents: &'a str) -> Vec<&'a str> {
let mut results = Vec::new();
for line in contents.lines() {
if line.contains(query) {
results.push(line);
}
}
results
}
#[cfg(test)]
mod tests {
use super::*;
#[test]
fn one_result() {
let query = "duct";
let contents = "\
Rust:
safe, fast, productive.
Pick three.";
assert_eq!(vec!["safe, fast, productive."], search(query, contents));
}
}search 函数的实现我们可以使用迭代器适配器方法以更简洁的方式编写此代码。这样做还可以避免拥有一个可变的中间 results 向量。函数式编程风格倾向于最小化可变状态的数量以使代码更清晰。移除可变状态可能使未来的增强(如并行搜索)成为可能,因为我们不必管理对 results 向量的并发访问。示例 13-22 显示了此更改。
pub fn search<'a>(query: &str, contents: &'a str) -> Vec<&'a str> {
contents
.lines()
.filter(|line| line.contains(query))
.collect()
}
pub fn search_case_insensitive<'a>(
query: &str,
contents: &'a str,
) -> Vec<&'a str> {
let query = query.to_lowercase();
let mut results = Vec::new();
for line in contents.lines() {
if line.to_lowercase().contains(&query) {
results.push(line);
}
}
results
}
#[cfg(test)]
mod tests {
use super::*;
#[test]
fn case_sensitive() {
let query = "duct";
let contents = "\
Rust:
safe, fast, productive.
Pick three.
Duct tape.";
assert_eq!(vec!["safe, fast, productive."], search(query, contents));
}
#[test]
fn case_insensitive() {
let query = "rUsT";
let contents = "\
Rust:
safe, fast, productive.
Pick three.
Trust me.";
assert_eq!(
vec!["Rust:", "Trust me."],
search_case_insensitive(query, contents)
);
}
}search 函数的实现中使用迭代器适配器方法回想一下,search 函数的目的是返回 contents 中包含 query 的所有行。与示例 13-16 中的 filter 示例类似,此代码使用 filter 适配器仅保留 line.contains(query) 返回 true 的行。然后,我们使用 collect 将匹配的行收集到另一个向量中。简单多了!你也可以自由地对 search_case_insensitive 函数进行相同的更改以使用迭代器方法。
为了进一步改进,可以通过移除对 collect 的调用并将返回类型更改为 impl Iterator<Item = &'a str> 来从 search 函数返回一个迭代器,这样函数就变成了一个迭代器适配器。注意,你还需要更新测试!在进行此更改前后,使用你的 minigrep 工具搜索大文件以观察行为差异。在此更改之前,程序在收集所有结果之前不会打印任何结果,但在更改之后,一旦找到每个匹配行,结果就会被打印出来,因为 run 函数中的 for 循环能够利用迭代器的惰性。
在循环和迭代器之间选择
下一个合理的问题是在你自己的代码中应该选择哪种风格以及为什么:示例 13-21 中的原始实现还是示例 13-22 中使用迭代器的版本(假设我们在返回结果之前收集所有结果,而不是返回迭代器)。大多数 Rust 程序员更喜欢使用迭代器风格。一开始要掌握它有点困难,但是一旦你熟悉了各种迭代器适配器及其作用,迭代器就会更容易理解。代码不是摆弄循环和构建新向量的各个部分,而是专注于循环的高级目标。这抽象掉了一些常见代码,使得更容易看到此代码特有的概念,例如迭代器中每个元素必须通过的过滤条件。
但是这两个实现真正等价吗?直观的假设可能是较低级别的循环会更快。让我们谈谈性能。
循环与迭代器的性能
循环与迭代器的性能(Performance in Loops vs. Iterators)
要决定使用循环还是迭代器,你需要知道哪个实现更快:使用显式 for 循环的 search 函数版本还是使用迭代器的版本。
我们运行了一个基准测试,将亚瑟·柯南·道尔爵士的《福尔摩斯冒险史》的全部内容加载到一个 String 中,并在内容中查找单词 the。以下是使用 for 循环的 search 版本和使用迭代器的版本的基准测试结果:
test bench_search_for ... bench: 19,620,300 ns/iter (+/- 915,700)
test bench_search_iter ... bench: 19,234,900 ns/iter (+/- 657,200)
这两个实现具有相似的性能!我们不会在这里解释基准测试代码,因为重点不是证明这两个版本是等价的,而是从性能角度大致了解这两个实现的比较情况。
对于更全面的基准测试,你应该使用不同大小和不同内容的文本作为 contents,使用不同的单词和不同长度的单词作为 query,以及其他各种变化。重点是:迭代器虽然是一种高级抽象,但在编译后得到的大致代码与你手写的较低级别代码相同。迭代器是 Rust 的*零成本抽象(zero-cost abstractions)*之一,这意味着使用该抽象不会带来额外的运行时开销。这类似于 C++ 的原始设计者和实现者 Bjarne Stroustrup 在他 2012 年 ETAPS 主题演讲“Foundations of C++“中定义的零开销:
通常,C++ 的实现遵循零开销原则:你未使用的内容,不需要付费。进一步说:你使用的内容,也无法手写出更好的代码。
在许多情况下,使用迭代器的 Rust 代码会编译成与你手写相同的汇编代码。诸如循环展开和消除数组访问的边界检查等优化被应用,使生成的代码极其高效。既然你知道了这一点,你可以毫无顾虑地使用迭代器和闭包了!它们使代码看起来更高级,但这样做不会带来运行时性能损失。
总结
闭包和迭代器是 Rust 中受函数式编程语言思想启发的特性。它们有助于 Rust 在低级性能下清晰地表达高级思想的能力。闭包和迭代器的实现方式使得运行时性能不受影响。这是 Rust 努力提供零成本抽象的目标的一部分。
既然我们已经改进了 I/O 项目的表达能力,让我们看看 cargo 的一些更多特性,这些特性将帮助我们与世界分享这个项目。
更多关于 Cargo 和 Crates.io
到目前为止,我们只使用了 Cargo 最基本的功能来构建、运行和测试代码,但它能做的远不止这些。在本章中,我们将讨论它的一些其他更高级的功能,向你展示如何完成以下任务:
- 通过发布配置(release profile)自定义构建。
- 在 crates.io 上发布库。
- 使用工作空间(workspace)组织大型项目。
- 从 crates.io 安装二进制文件。
- 使用自定义命令(custom command)扩展 Cargo。
Cargo 能做的比我们在本章中介绍的功能还要多,因此要全面了解其所有功能,请参阅其文档。
通过发布配置自定义构建
通过发布配置(Release Profile)自定义构建
在 Rust 中,*发布配置(release profiles)*是预定义的、可自定义的配置,它们具有不同的设置,允许程序员对编译代码的各种选项有更多控制。每个配置都独立于其他配置进行配置。
Cargo 有两个主要配置:当你运行 cargo build 时 Cargo 使用的 dev 配置,以及当你运行 cargo build --release 时 Cargo 使用的 release 配置。dev 配置为开发定义了良好的默认值,release 配置为发布构建定义了良好的默认值。
这些配置名称可能从构建输出中就很熟悉:
$ cargo build
Finished `dev` profile [unoptimized + debuginfo] target(s) in 0.00s
$ cargo build --release
Finished `release` profile [optimized] target(s) in 0.32s
dev 和 release 是编译器使用的这些不同的配置。
Cargo 对每个配置都有默认设置,当你没有在项目的 Cargo.toml 文件中显式添加任何 [profile.*] 节时,这些设置会生效。通过为你想要自定义的任何配置添加 [profile.*] 节,你可以覆盖默认设置的任何子集。例如,以下是 dev 和 release 配置的 opt-level 设置的默认值:
Filename: Cargo.toml
[profile.dev]
opt-level = 0
[profile.release]
opt-level = 3
opt-level 设置控制 Rust 将应用于代码的优化数量,范围为 0 到 3。应用更多优化会延长编译时间,因此如果你在开发过程中经常编译代码,您希望使用较少的优化以加快编译速度,即使生成的代码运行速度较慢。因此 dev 的默认 opt-level 是 0。当你准备发布代码时,最好花更多时间编译。你只会以发布模式编译一次,但你会多次运行编译后的程序,因此发布模式用更长的编译时间换取运行更快的代码。这就是为什么 release 配置的默认 opt-level 是 3。
你可以通过在 Cargo.toml 中为其添加不同的值来覆盖默认设置。例如,如果我们想在开发配置中使用优化级别 1,我们可以将这两行添加到项目的 Cargo.toml 文件中:
Filename: Cargo.toml
[profile.dev]
opt-level = 1
此代码覆盖了默认设置 0。现在当我们运行 cargo build 时,Cargo 将使用 dev 配置的默认值以及我们对 opt-level 的自定义。因为我们将 opt-level 设置为 1,Cargo 将应用比默认更多的优化,但不如发布构建那么多。
有关每个配置的配置选项和默认值的完整列表,请参阅 Cargo 的文档。
将 Crate 发布到 Crates.io
将 Crate 发布到 Crates.io
我们使用过 crates.io 上的包作为项目的依赖,但你也可以通过发布自己的包来与他人共享代码。crates.io 上的 crate 注册表分发你包的源代码,因此它主要托管开源代码。
Rust 和 Cargo 具有使你的已发布包更容易被他人发现和使用的功能。我们接下来将讨论其中的一些功能,然后解释如何发布一个包。
编写有用的文档注释
准确记录你的包将帮助其他用户知道如何以及何时使用它们,因此投入时间编写文档是值得的。在第 3 章中,我们讨论了如何使用两个斜杠 // 来注释 Rust 代码。Rust 还有一种特殊的文档注释,恰当地称为文档注释(documentation comment),它将生成 HTML 文档。HTML 显示文档注释的内容,用于公共 API 项,适用于有兴趣了解如何使用你的 crate 的程序员,而不是你的 crate 是如何实现的。
文档注释使用三个斜杠 /// 而不是两个,并支持 Markdown 表示法来格式化文本。将文档注释放在它们所记录的项之前。示例 14-1 显示了一个名为 my_crate 的 crate 中 add_one 函数的文档注释。
/// Adds one to the number given.
///
/// # Examples
///
/// ```
/// let arg = 5;
/// let answer = my_crate::add_one(arg);
///
/// assert_eq!(6, answer);
/// ```
pub fn add_one(x: i32) -> i32 {
x + 1
}在这里,我们描述了 add_one 函数的功能,以标题 Examples 开始一个部分,然后提供了演示如何使用 add_one 函数的代码。我们可以通过运行 cargo doc 从此文档注释生成 HTML 文档。此命令运行与 Rust 一起分发的 rustdoc 工具,并将生成的 HTML 文档放在 target/doc 目录中。
为方便起见,运行 cargo doc --open 将为你当前 crate 的文档(以及你 crate 的所有依赖的文档)构建 HTML,并在 Web 浏览器中打开结果。导航到 add_one 函数,你将看到文档注释中的文本是如何呈现的,如图 14-1 所示。
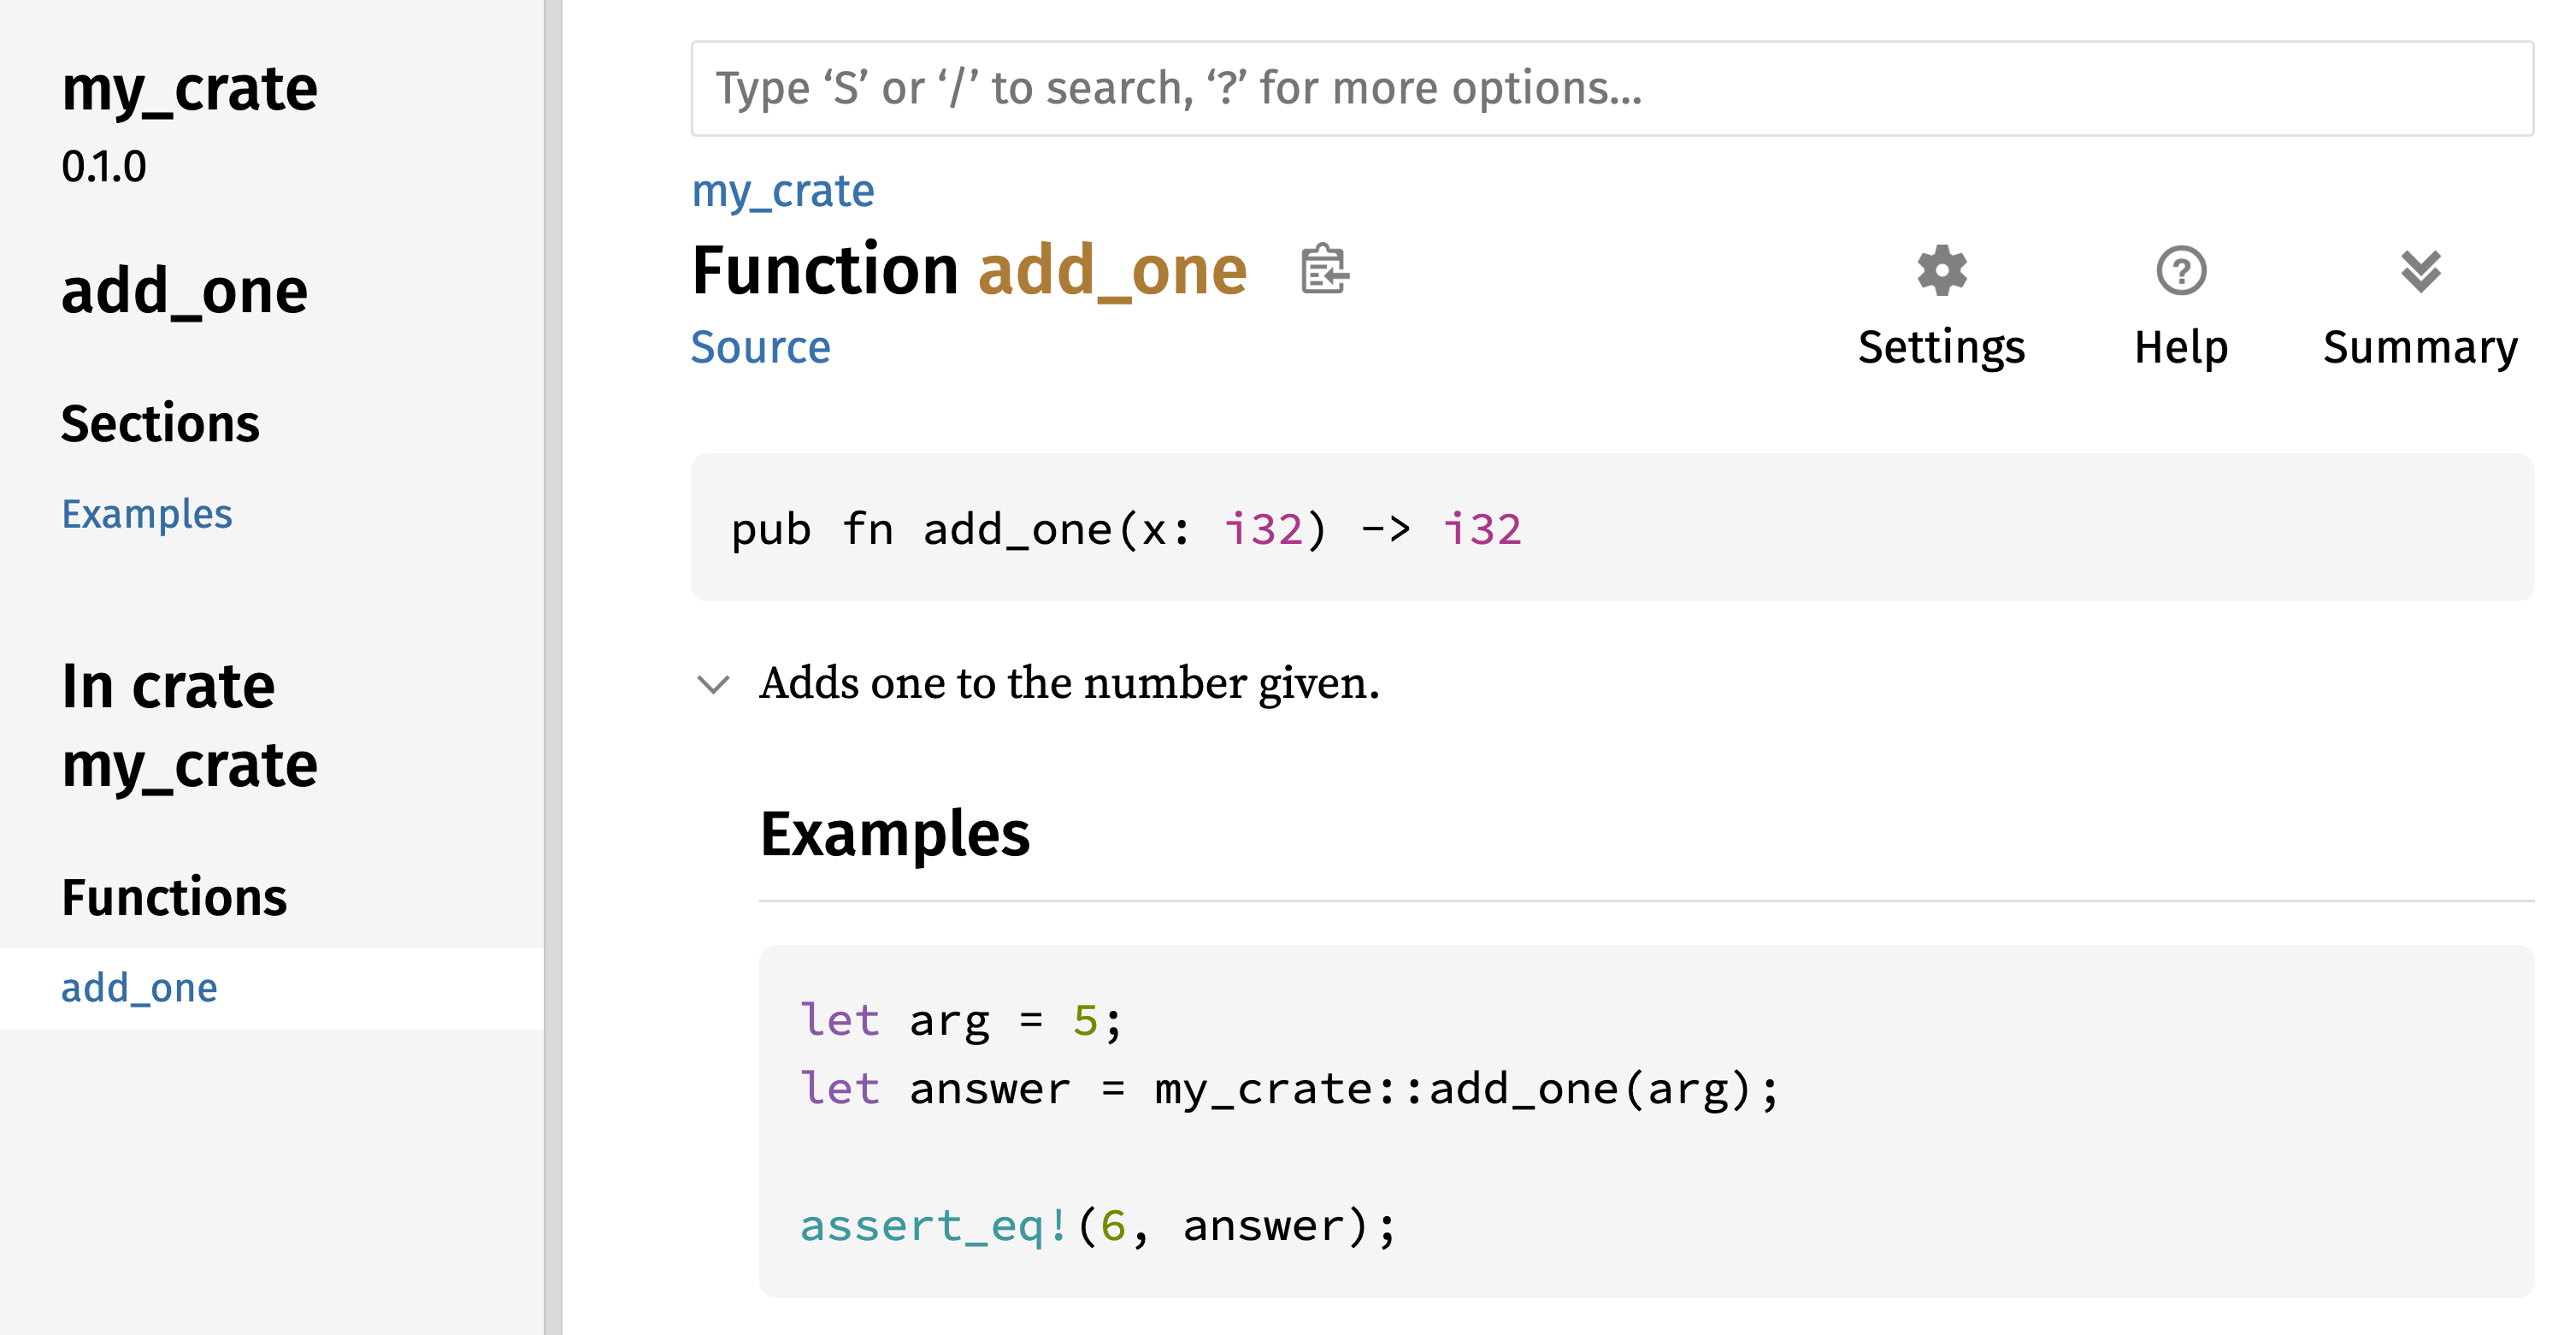
图 14-1:add_one 函数的 HTML 文档
常用部分
我们在示例 14-1 中使用了 # Examples Markdown 标题在 HTML 中创建了一个标题为“Examples“的部分。以下是 crate 作者在他们的文档中经常使用的一些其他部分:
- Panics:被记录的函数可能 panic 的场景。不希望程序 panic 的函数调用者应确保他们不会在这些情况下调用该函数。
- Errors:如果函数返回一个
Result,描述可能发生的错误类型以及什么条件可能导致这些错误被返回,对调用者很有帮助,以便他们可以编写代码以不同方式处理不同类型的错误。 - Safety:如果调用该函数是
unsafe的(我们将在第 20 章讨论不安全性),应该有一个部分解释为什么该函数是不安全的,并涵盖该函数期望调用者遵守的不变式。
大多数文档注释不需要所有这些部分,但这是一个很好的清单,可以提醒你用户有兴趣了解的代码方面。
文档注释作为测试
在文档注释中添加示例代码块可以帮助演示如何使用你的库,并且还有一个额外的好处:运行 cargo test 会将文档中的代码示例作为测试运行!没有什么比带有示例的文档更好的了。但没有什么比因为文档编写后代码已更改而导致示例无法运行更糟糕的了。如果我们使用示例 14-1 中 add_one 函数的文档运行 cargo test,我们将在测试结果中看到一个部分,如下所示:
Doc-tests my_crate
running 1 test
test src/lib.rs - add_one (line 5) ... ok
test result: ok. 1 passed; 0 failed; 0 ignored; 0 measured; 0 filtered out; finished in 0.27s
现在,如果我们更改函数或示例,使示例中的 assert_eq! panic,然后再次运行 cargo test,我们将看到文档测试检测到示例和代码不同步!
包含项的注释
//! 风格的文档注释为包含注释的项(而不是注释后面的项)添加文档。我们通常将这些文档注释放在 crate 根文件(按惯例是 src/lib.rs)内部或模块内部,以记录整个 crate 或模块。
例如,为了添加描述包含 add_one 函数的 my_crate crate 的目的的文档,我们在 src/lib.rs 文件的开头添加以 //! 开头的文档注释,如示例 14-2 所示。
//! # My Crate
//!
//! `my_crate` is a collection of utilities to make performing certain
//! calculations more convenient.
/// Adds one to the number given.
// --snip--
///
/// # Examples
///
/// ```
/// let arg = 5;
/// let answer = my_crate::add_one(arg);
///
/// assert_eq!(6, answer);
/// ```
pub fn add_one(x: i32) -> i32 {
x + 1
}my_crate crate 的文档注意,在以 //! 开头的最后一行之后没有任何代码。因为我们以 //! 而不是 /// 开头注释,所以我们正在记录包含此注释的项,而不是此注释后面的项。在这种情况下,该项是 src/lib.rs 文件,它是 crate 根。这些注释描述整个 crate。
当我们运行 cargo doc --open 时,这些注释将显示在 my_crate 文档的首页上,位于 crate 中公共项列表上方,如图 14-2 所示。
项内的文档注释对于描述 crate 和模块尤其有用。使用它们来解释容器的整体目的,以帮助你的用户理解 crate 的组织结构。
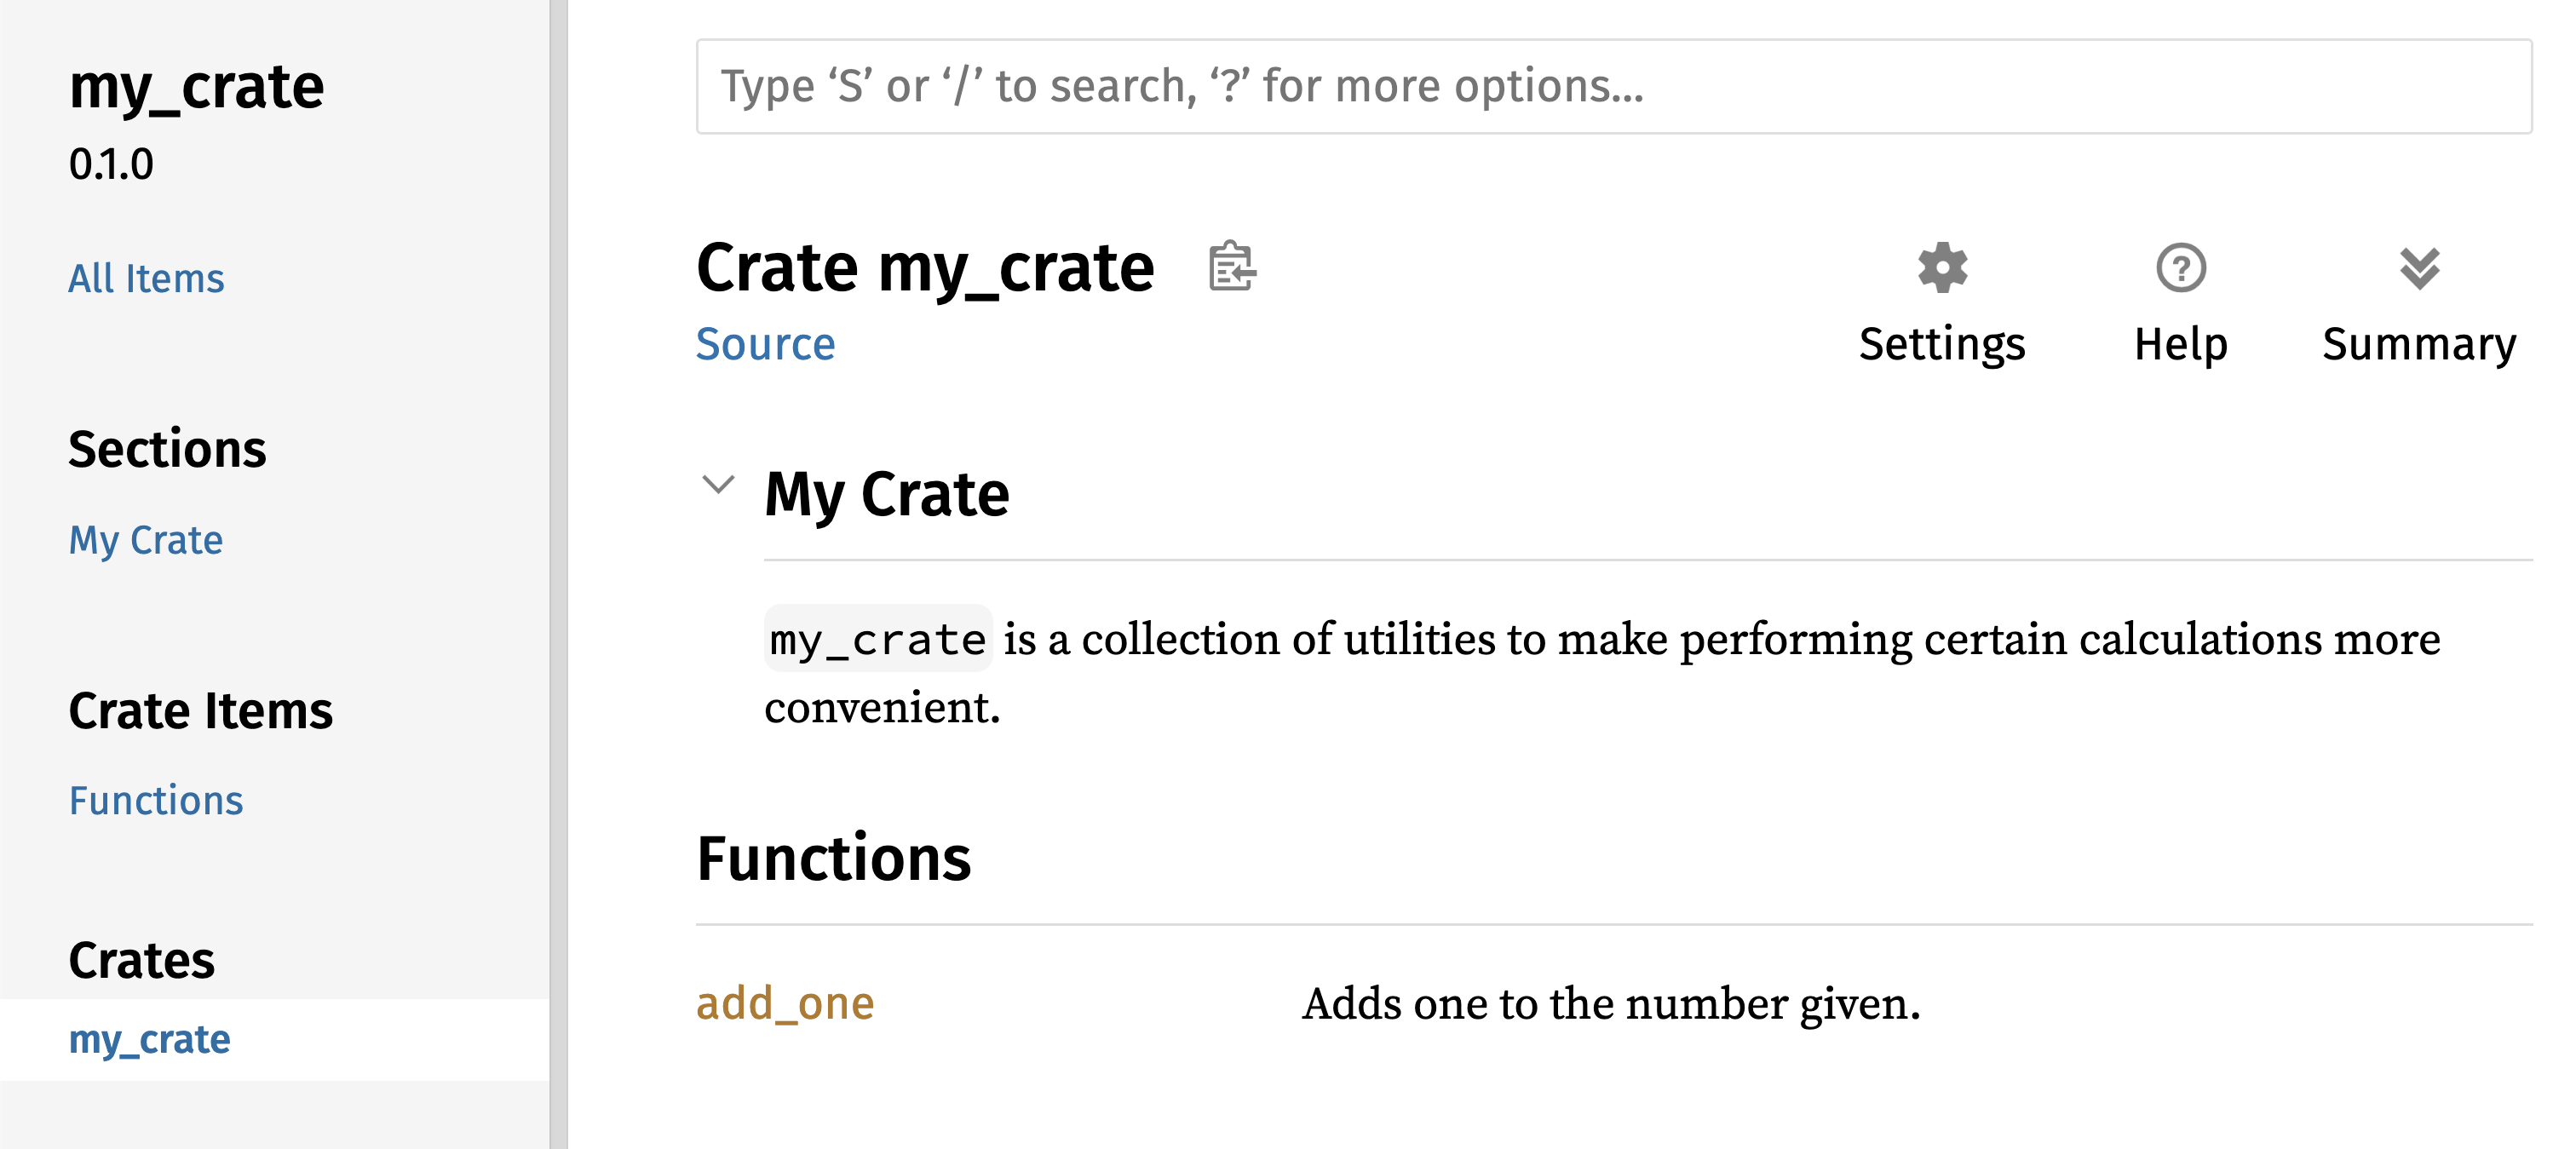
图 14-2:my_crate 的渲染文档,包括描述整个 crate 的注释
导出方便的公共 API
发布 crate 时,公共 API 的结构是一个主要的考虑因素。使用你的 crate 的人不像你那样熟悉结构,如果你的 crate 有大型模块层次结构,他们可能难以找到他们想要使用的部分。
在第 7 章中,我们介绍了如何使用 pub 关键字使项公开,以及如何使用 use 关键字将项引入作用域。但是,在开发 crate 时对你来说有意义的结构可能对你的用户并不方便。你可能希望将结构体组织成包含多个级别的层次结构,但是想要使用你在层次结构深处定义的类型的人可能很难发现该类型的存在。他们也可能对必须输入 use my_crate::some_module::another_module::UsefulType; 而不是 use my_crate::UsefulType; 感到恼火。
好消息是,如果该结构不方便其他人从另一个库使用,你不必重新安排你的内部组织:相反,你可以使用 pub use 重新导出项,以创建与你的私有结构不同的公共结构。*重新导出(Re-exporting)*将一个位置的公共项在另一个位置也变为公共项,就好像它是在另一个位置定义的一样。
例如,假设我们制作了一个名为 art 的库来建模艺术概念。在这个库中,有两个模块:一个 kinds 模块包含两个枚举 PrimaryColor 和 SecondaryColor,以及一个 utils 模块包含一个名为 mix 的函数,如示例 14-3 所示。
//! # Art
//!
//! A library for modeling artistic concepts.
pub mod kinds {
/// The primary colors according to the RYB color model.
pub enum PrimaryColor {
Red,
Yellow,
Blue,
}
/// The secondary colors according to the RYB color model.
pub enum SecondaryColor {
Orange,
Green,
Purple,
}
}
pub mod utils {
use crate::kinds::*;
/// Combines two primary colors in equal amounts to create
/// a secondary color.
pub fn mix(c1: PrimaryColor, c2: PrimaryColor) -> SecondaryColor {
// --snip--
unimplemented!();
}
}art 库,其项组织在 kinds 和 utils 模块中图 14-3 显示了 cargo doc 为此 crate 生成的文档首页的外观。
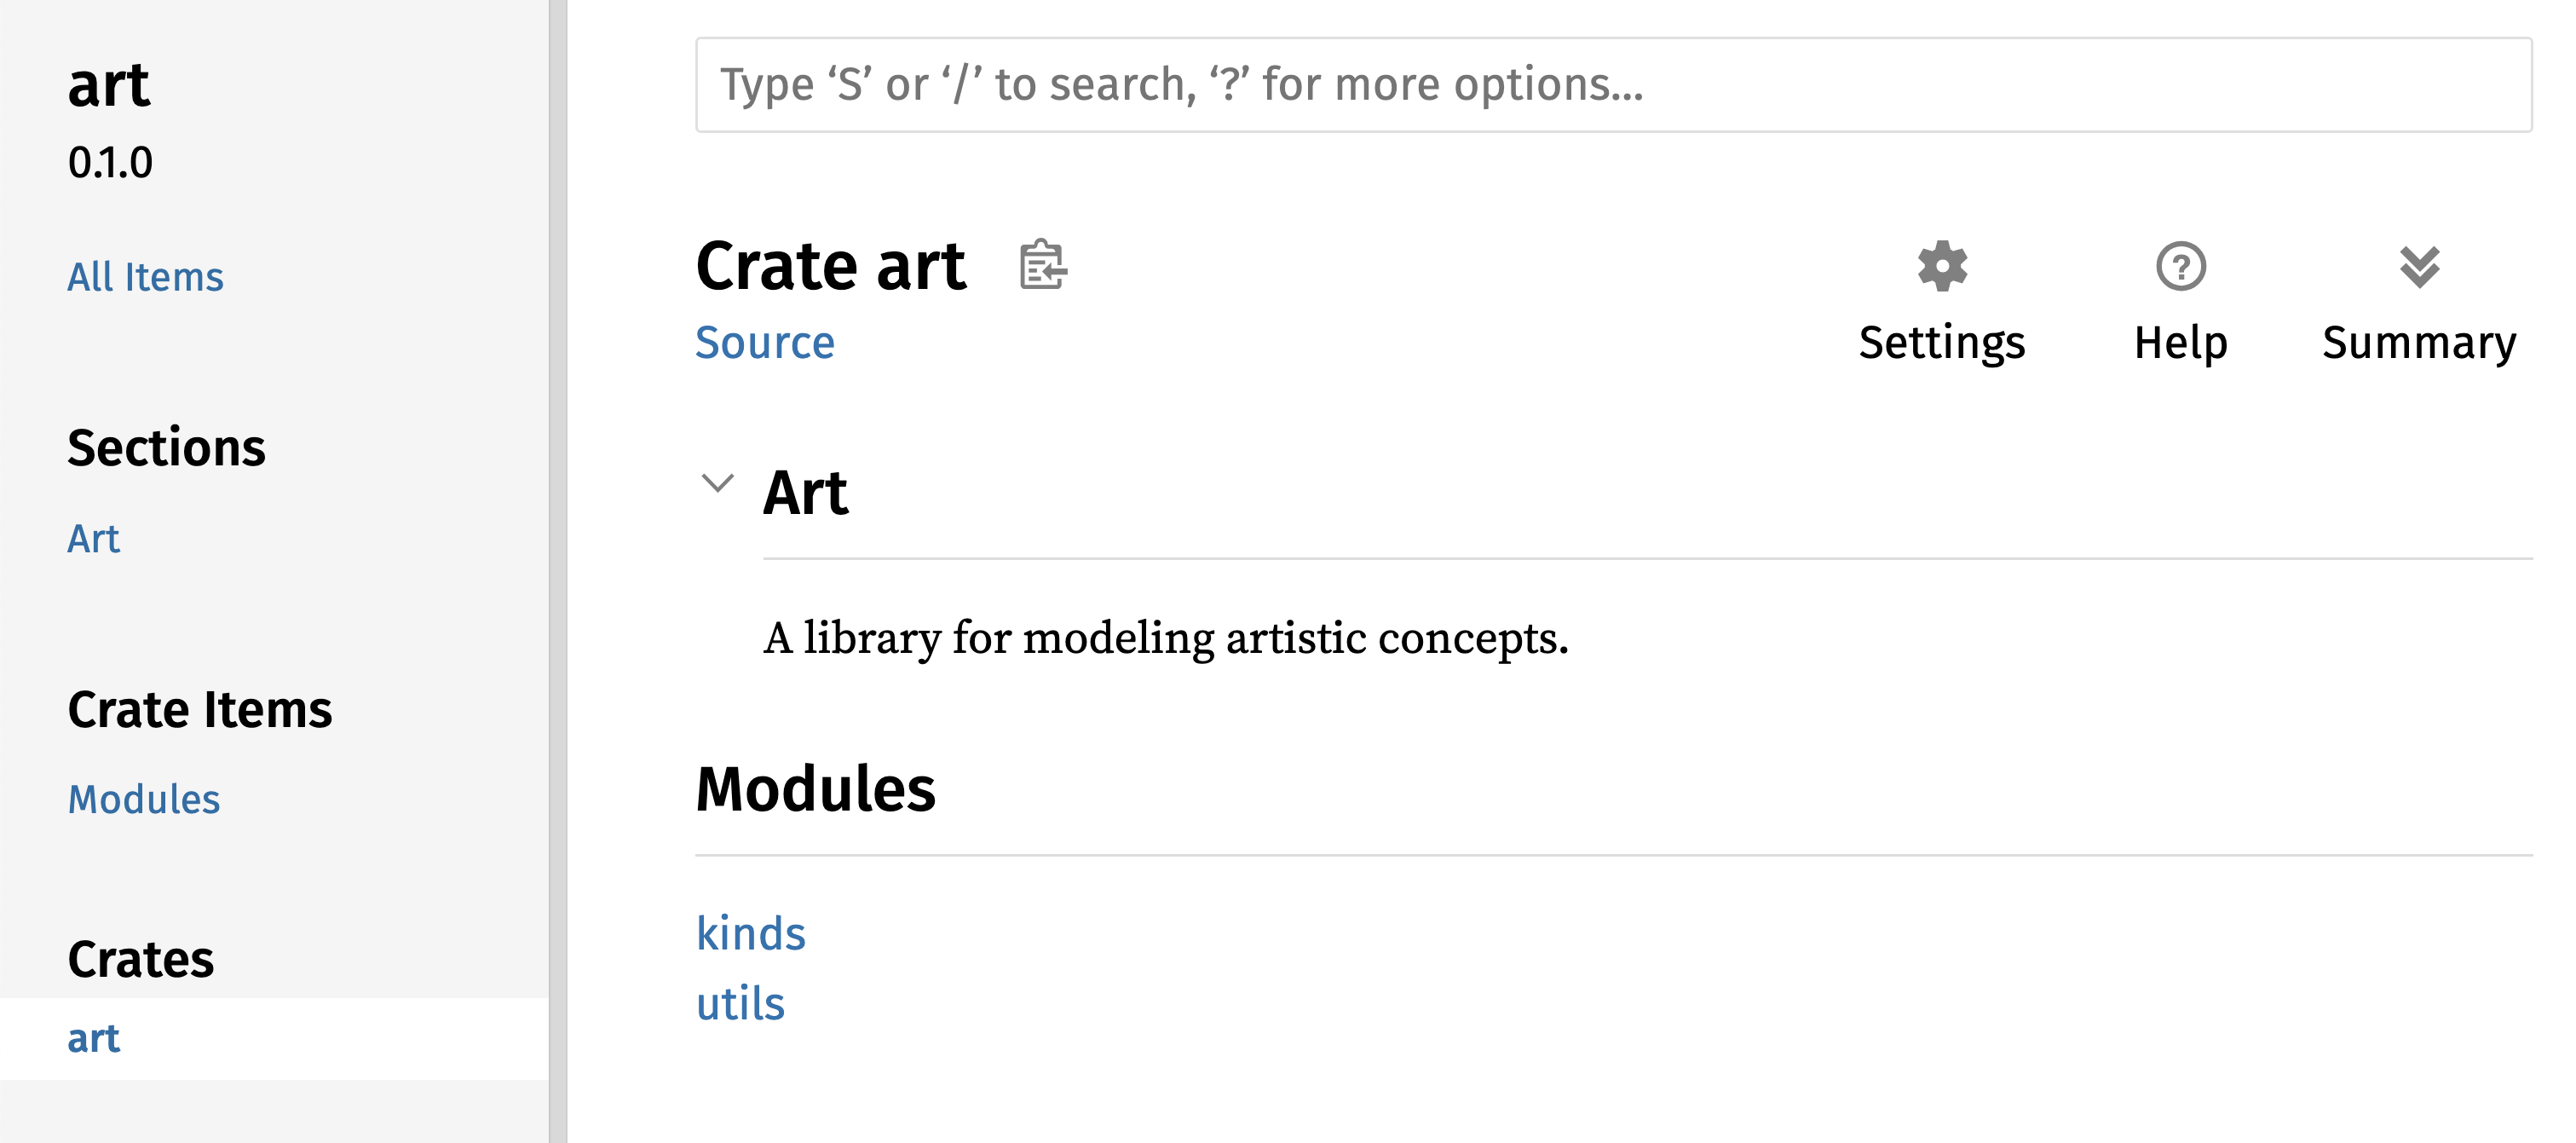
图 14-3:art 的文档首页,列出了 kinds 和 utils 模块
注意,PrimaryColor 和 SecondaryColor 类型没有列在首页上,mix 函数也没有。我们必须点击 kinds 和 utils 才能看到它们。
另一个依赖此库的 crate 将需要使用 use 语句将 art 中的项引入作用域,指定当前定义的模块结构。示例 14-4 显示了一个使用 art crate 中的 PrimaryColor 和 mix 项的 crate 示例。
use art::kinds::PrimaryColor;
use art::utils::mix;
fn main() {
let red = PrimaryColor::Red;
let yellow = PrimaryColor::Yellow;
mix(red, yellow);
}art crate 的项(使用其内部结构导出)的 crate示例 14-4 中使用 art crate 的代码的作者必须弄清楚 PrimaryColor 在 kinds 模块中,mix 在 utils 模块中。art crate 的模块结构对从事 art crate 的开发人员比对使用它的人更相关。内部结构不包含任何对试图理解如何使用 art crate 的人有用的信息,反而会引起混淆,因为使用它的开发人员必须弄清楚在哪里查找,并且必须在 use 语句中指定模块名称。
要从公共 API 中移除内部组织,我们可以修改示例 14-3 中的 art crate 代码,添加 pub use 语句在顶层重新导出项,如示例 14-5 所示。
//! # Art
//!
//! A library for modeling artistic concepts.
pub use self::kinds::PrimaryColor;
pub use self::kinds::SecondaryColor;
pub use self::utils::mix;
pub mod kinds {
// --snip--
/// The primary colors according to the RYB color model.
pub enum PrimaryColor {
Red,
Yellow,
Blue,
}
/// The secondary colors according to the RYB color model.
pub enum SecondaryColor {
Orange,
Green,
Purple,
}
}
pub mod utils {
// --snip--
use crate::kinds::*;
/// Combines two primary colors in equal amounts to create
/// a secondary color.
pub fn mix(c1: PrimaryColor, c2: PrimaryColor) -> SecondaryColor {
SecondaryColor::Orange
}
}pub use 语句以重新导出项cargo doc 为此 crate 生成的 API 文档现在将在首页列出和链接重新导出的项,如图 14-4 所示,使 PrimaryColor 和 SecondaryColor 类型以及 mix 函数更容易找到。
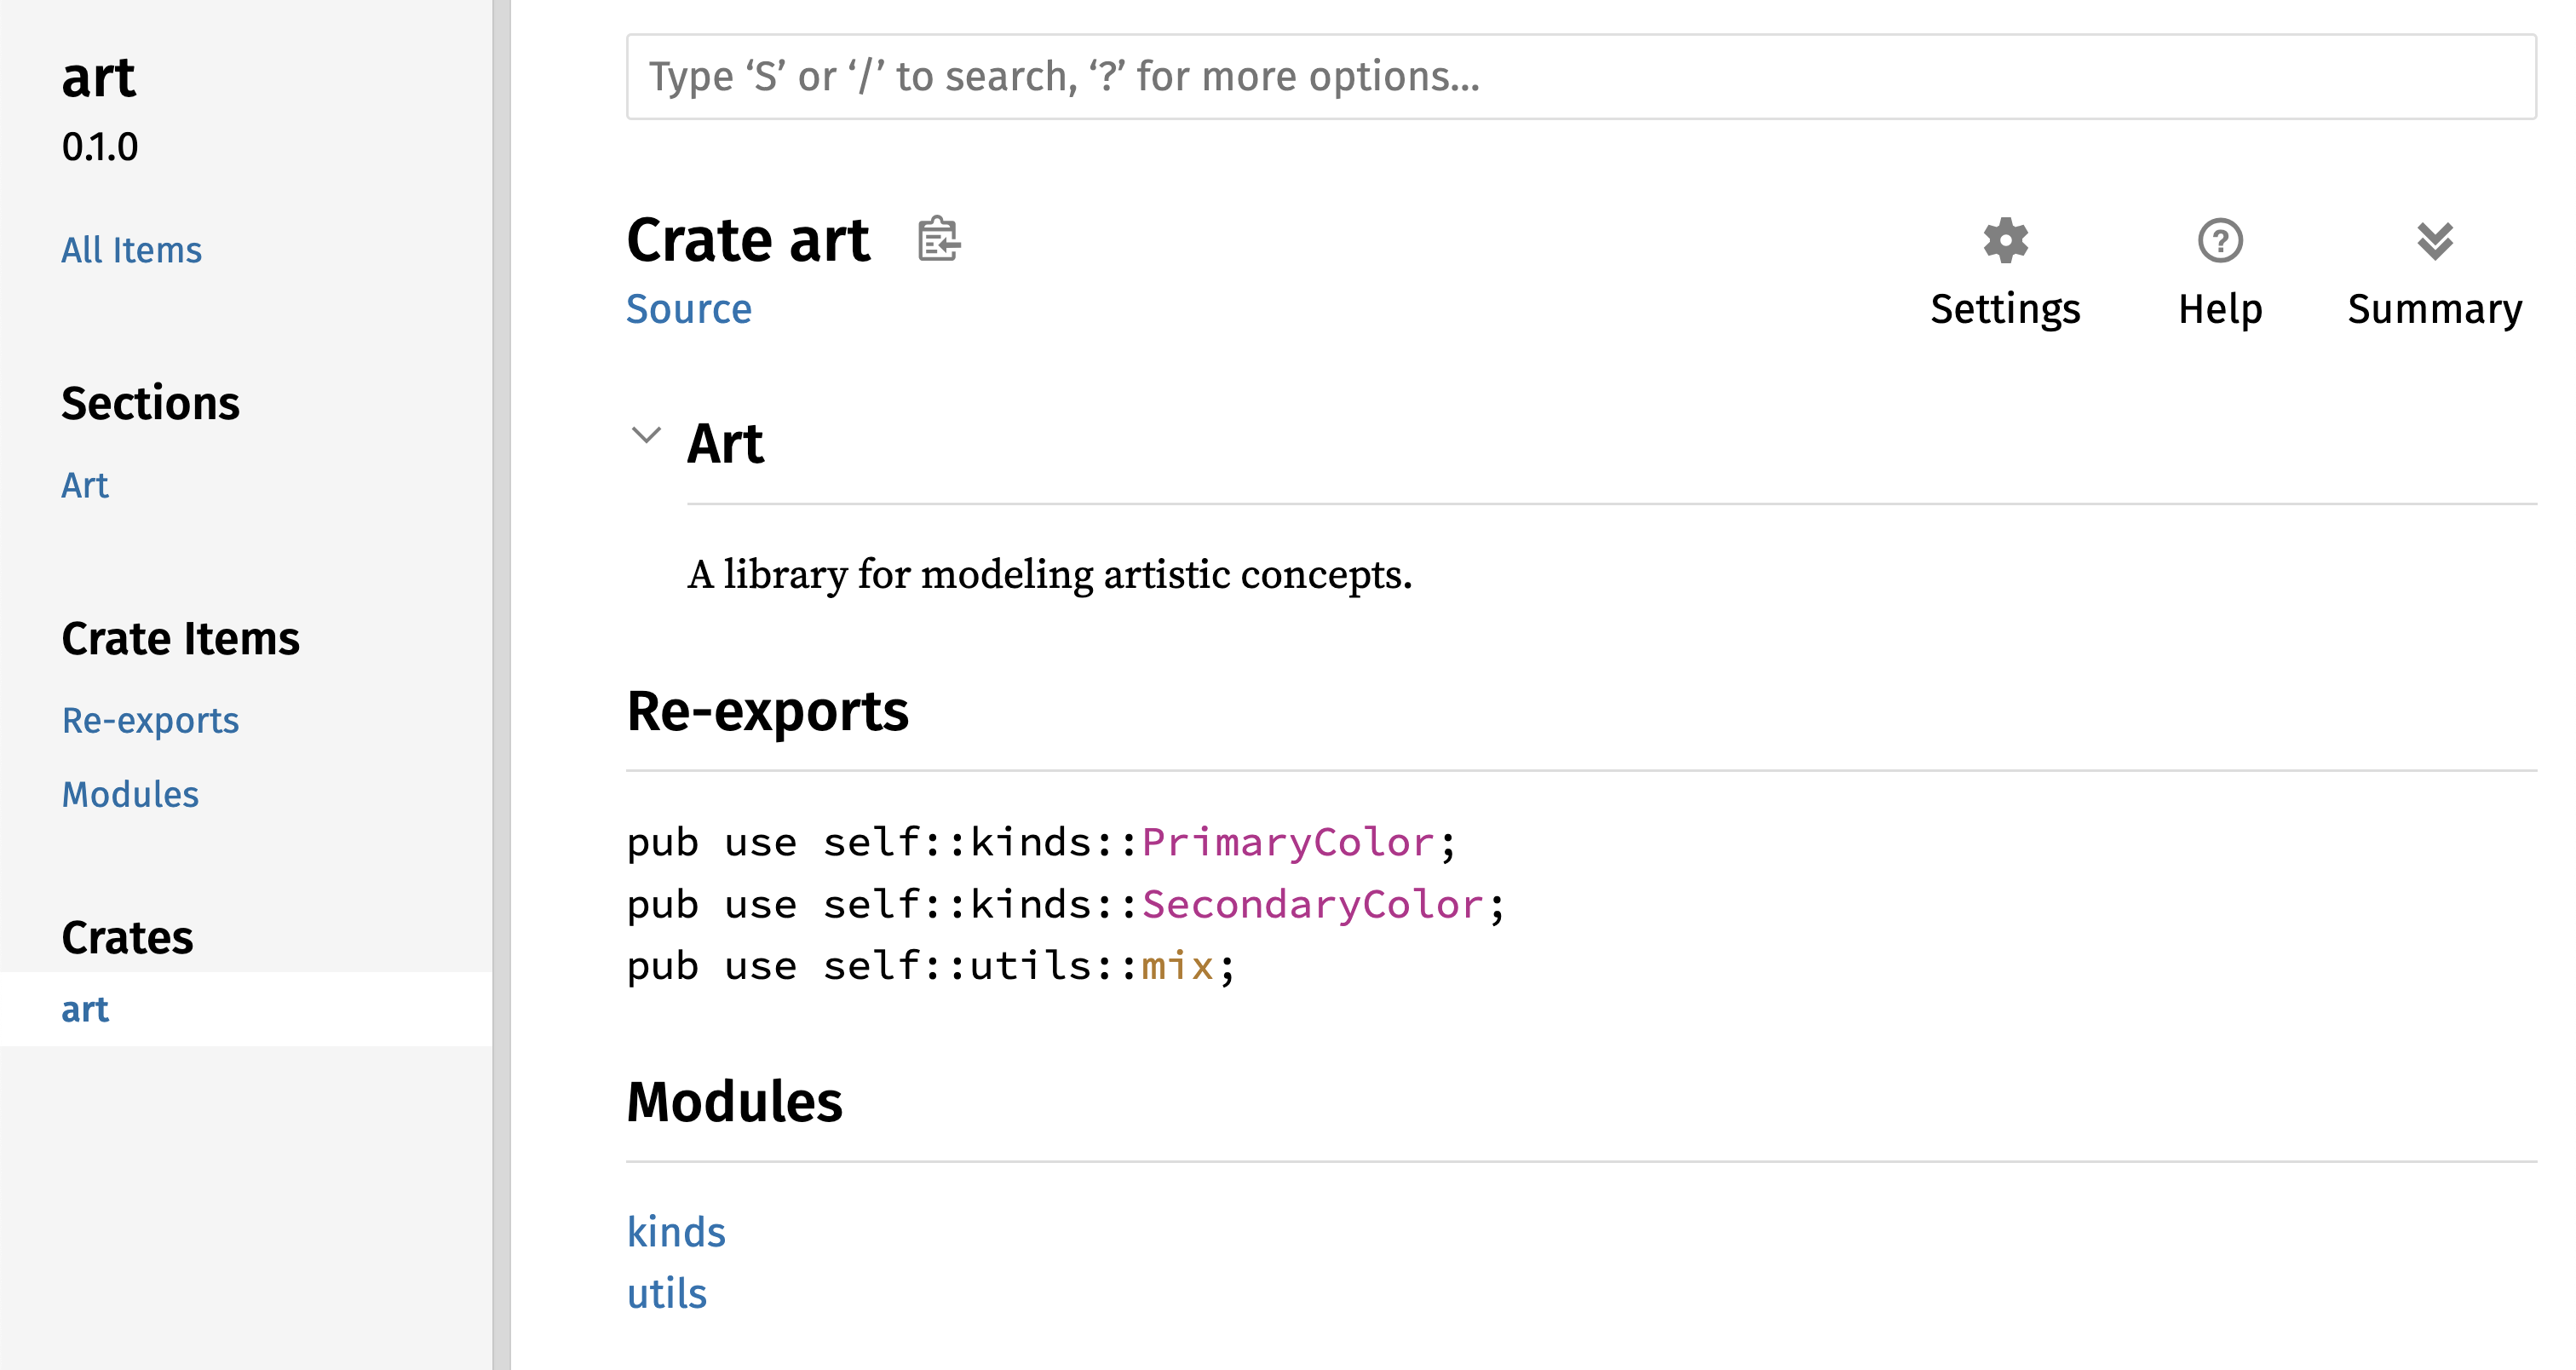
图 14-4:art 的文档首页,列出了重新导出的项
art crate 的用户仍然可以看到并使用示例 14-3 中的内部结构,如示例 14-4 所示,或者他们可以使用示例 14-5 中更方便的结构,如示例 14-6 所示。
use art::PrimaryColor;
use art::mix;
fn main() {
// --snip--
let red = PrimaryColor::Red;
let yellow = PrimaryColor::Yellow;
mix(red, yellow);
}art crate 中重新导出项的程序在存在许多嵌套模块的情况下,使用 pub use 在顶层重新导出类型可以对使用 crate 的人的体验产生重大影响。pub use 的另一个常见用途是在当前 crate 中重新导出依赖项的定义,以使该 crate 的定义成为你的 crate 公共 API 的一部分。
创建有用的公共 API 结构与其说是科学,不如说是一门艺术,你可以迭代以找到最适合你的用户的 API。选择 pub use 使你在如何内部组织 crate 方面具有灵活性,并将该内部结构与向用户呈现的内容解耦。看看你已经安装的一些 crate 的代码,看看它们的内部结构是否与其公共 API 不同。
设置 Crates.io 账户
在你可以发布任何 crate 之前,你需要在 crates.io 上创建一个帐户并获取一个 API token。为此,请访问 crates.io 的主页并通过 GitHub 帐户登录。(GitHub 帐户目前是必需的,但该网站将来可能支持创建帐户的其他方式。)登录后,请访问 https://crates.io/me/ 的帐户设置并检索你的 API key。然后,运行 cargo login 命令并在提示时粘贴你的 API key,如下所示:
$ cargo login
abcdefghijklmnopqrstuvwxyz012345
此命令将告知 Cargo 你的 API token,并将其本地存储在 ~/.cargo/credentials.toml 中。注意,此 token 是保密的:不要与其他人共享。如果由于任何原因确实与他人共享,你应在 crates.io 上撤销它并生成一个新 token。
向新 Crate 添加元数据
假设你有一个想要发布的 crate。在发布之前,你需要在 crate 的 Cargo.toml 文件的 [package] 部分添加一些元数据。
你的 crate 需要一个唯一的名称。在本地开发 crate 时,你可以随心所欲地命名 crate。然而,crates.io 上的 crate 名称是先到先得的。一旦一个 crate 名称被占用,其他任何人都不能使用该名称发布 crate。在尝试发布 crate 之前,搜索你想要使用的名称。如果该名称已被使用,你将需要找到另一个名称,并编辑 Cargo.toml 文件中 [package] 部分下的 name 字段以使用新名称进行发布,如下所示:
Filename: Cargo.toml
[package]
name = "guessing_game"
即使你选择了唯一的名称,此时运行 cargo publish 发布 crate 时,你会收到一个警告,然后是一个错误:
$ cargo publish
Updating crates.io index
warning: manifest has no description, license, license-file, documentation, homepage or repository.
See https://doc.rust-lang.org/cargo/reference/manifest.html#package-metadata for more info.
--snip--
error: failed to publish to registry at https://crates.io
Caused by:
the remote server responded with an error (status 400 Bad Request): missing or empty metadata fields: description, license. Please see https://doc.rust-lang.org/cargo/reference/manifest.html for more information on configuring these fields
这会导致错误,因为你缺少一些关键信息:description 和 license 是必需的,以便人们知道你的 crate 是做什么的以及他们可以在什么条件下使用它。在 Cargo.toml 中,添加一个描述,只需一两句话,因为它将与你的 crate 一起出现在搜索结果中。对于 license 字段,你需要提供一个许可证标识符值(license identifier value)。Linux 基金会的软件包数据交换(SPDX) 列出了你可以使用该值的标识符。例如,要指定你已使用 MIT 许可证许可你的 crate,请添加 MIT 标识符:
Filename: Cargo.toml
[package]
name = "guessing_game"
license = "MIT"
如果你想使用 SPDX 中没有的许可证,你需要将该许可证的文本放在一个文件中,将该文件包含在你的项目中,然后使用 license-file 指定该文件的名称,而不是使用 license 键。
关于哪种许可证适合你的项目的指南超出了本书的范围。Rust 社区中的许多人以与 Rust 相同的方式许可他们的项目,使用 MIT OR Apache-2.0 的双重许可。这种做法表明你还可以通过 OR 分隔多个许可证标识符来为你的项目拥有多个许可证。
有了唯一的名称、版本、描述和许可证,一个准备发布的项目 Cargo.toml 文件可能如下所示:
Filename: Cargo.toml
[package]
name = "guessing_game"
version = "0.1.0"
edition = "2024"
description = "A fun game where you guess what number the computer has chosen."
license = "MIT OR Apache-2.0"
[dependencies]
Cargo 的文档描述了你可以指定的其他元数据,以确保其他人可以更容易地发现和使用你的 crate。
发布到 Crates.io
既然你已经创建了帐户、保存了 API token、为你的 crate 选择了名称并指定了所需的元数据,你就可以发布了!发布 crate 会将特定版本上传到 crates.io 供其他人使用。
请小心,因为发布是永久性的。该版本永远不能被覆盖,除非在特定情况下,代码不能被删除。Crates.io 的一个主要目标是作为代码的永久存档,以便依赖于 crates.io 的 crate 的所有项目的构建都能继续工作。允许删除版本将使实现该目标变得不可能。但是,你可以发布的 crate 版本数量没有限制。
再次运行 cargo publish 命令。现在应该成功了:
$ cargo publish
Updating crates.io index
Packaging guessing_game v0.1.0 (file:///projects/guessing_game)
Packaged 6 files, 1.2KiB (895.0B compressed)
Verifying guessing_game v0.1.0 (file:///projects/guessing_game)
Compiling guessing_game v0.1.0
(file:///projects/guessing_game/target/package/guessing_game-0.1.0)
Finished `dev` profile [unoptimized + debuginfo] target(s) in 0.19s
Uploading guessing_game v0.1.0 (file:///projects/guessing_game)
Uploaded guessing_game v0.1.0 to registry `crates-io`
note: waiting for `guessing_game v0.1.0` to be available at registry
`crates-io`.
You may press ctrl-c to skip waiting; the crate should be available shortly.
Published guessing_game v0.1.0 at registry `crates-io`
恭喜!现在你已经与 Rust 社区共享了你的代码,任何人都可以轻松地将你的 crate 添加为他们项目的依赖。
发布现有 Crate 的新版本
当你对 crate 进行了更改并准备发布新版本时,请更改 Cargo.toml 文件中指定的 version 值并重新发布。使用语义化版本控制规则根据你所做的更改类型确定适当的下一版本号。然后,运行 cargo publish 上传新版本。
从 Crates.io 弃用版本
虽然你不能删除 crate 的旧版本,但你可以阻止任何未来的项目将其添加为新依赖。当 crate 版本因某种原因损坏时,这很有用。在这种情况下,Cargo 支持 yanking(废弃)一个 crate 版本。
Yanking 一个版本可防止新项目依赖于该版本,同时允许所有依赖于它的现有项目继续。本质上,yank 意味着所有具有 Cargo.lock 的项目都不会中断,而任何将来生成的 Cargo.lock 文件都不会使用被 yank 的版本。
要 yank crate 的一个版本,在你之前发布的 crate 的目录中,运行 cargo yank 并指定你想要 yank 的版本。例如,如果我们发布了一个名为 guessing_game 的 1.0.1 版本的 crate,并且我们想要 yank 它,那么我们在 guessing_game 的项目目录中运行以下命令:
$ cargo yank --vers 1.0.1
Updating crates.io index
Yank guessing_game@1.0.1
通过向命令添加 --undo,你也可以撤销 yank 并允许项目再次开始依赖该版本:
$ cargo yank --vers 1.0.1 --undo
Updating crates.io index
Unyank guessing_game@1.0.1
Yank 不会删除任何代码。例如,它无法删除意外上传的机密信息。如果发生这种情况,你必须立即重置这些机密。
Cargo 工作空间
Cargo 工作空间(Workspace)
在第 12 章中,我们构建了一个包含二进制 crate 和库 crate 的包。随着项目的发展,你可能会发现库 crate 持续变大,并希望进一步将包拆分为多个库 crate。Cargo 提供了一个称为*工作空间(workspaces)*的功能,可以帮助管理多个协同开发的相关包。
创建工作空间
工作空间是一组共享相同 Cargo.lock 和输出目录的包。让我们创建一个使用工作空间的项目——我们将使用简单的代码,以便专注于工作空间的结构。有多种方式可以构造工作空间,因此我们只展示一种常见的方式。我们将有一个包含一个二进制文件和两个库的工作空间。二进制文件将提供主要功能,并将依赖于这两个库。一个库将提供 add_one 函数,另一个库提供 add_two 函数。这三个 crate 将是同一工作空间的一部分。我们首先为工作空间创建一个新目录:
$ mkdir add
$ cd add
接下来,在 add 目录中,我们创建将配置整个工作空间的 Cargo.toml 文件。此文件不会有 [package] 部分。相反,它将以 [workspace] 部分开头,允许我们向工作空间添加成员。我们还通过将 resolver 值设置为 "3",确保在工作空间中使用最新最好的 Cargo 解析器算法:
Filename: Cargo.toml
[workspace]
resolver = "3"
接下来,我们通过在 add 目录中运行 cargo new 来创建 adder 二进制 crate:
$ cargo new adder
Created binary (application) `adder` package
Adding `adder` as member of workspace at `file:///projects/add`
在工作空间内运行 cargo new 也会自动将新创建的包添加到工作空间 Cargo.toml 中 [workspace] 定义的 members 键中,如下所示:
[workspace]
resolver = "3"
members = ["adder"]
此时,我们可以通过运行 cargo build 来构建工作空间。你的 add 目录中的文件应如下所示:
├── Cargo.lock
├── Cargo.toml
├── adder
│ ├── Cargo.toml
│ └── src
│ └── main.rs
└── target
工作空间在顶层有一个 target 目录,编译的工件将被放入其中;adder 包没有自己的 target 目录。即使我们从 adder 目录内部运行 cargo build,编译的工件仍将位于 add/target 中,而不是 add/adder/target 中。Cargo 以这种方式在 work 空间中组织 target 目录,因为工作空间中的 crate 旨在相互依赖。如果每个 crate 都有自己的 target 目录,每个 crate 都必须重新编译工作空间中的其他每个 crate 以将工件放置在其自己的 target 目录中。通过共享一个 target 目录,crate 可以避免不必要的重新构建。
创建工作空间中的第二个包
接下来,让我们在工作空间中创建另一个成员包,并将其命名为 add_one。生成一个名为 add_one 的新库 crate:
$ cargo new add_one --lib
Created library `add_one` package
Adding `add_one` as member of workspace at `file:///projects/add`
顶层的 Cargo.toml 现在将在 members 列表中包含 add_one 路径:
Filename: Cargo.toml
[workspace]
resolver = "3"
members = ["adder", "add_one"]
你的 add 目录现在应包含这些目录和文件:
├── Cargo.lock
├── Cargo.toml
├── add_one
│ ├── Cargo.toml
│ └── src
│ └── lib.rs
├── adder
│ ├── Cargo.toml
│ └── src
│ └── main.rs
└── target
在 add_one/src/lib.rs 文件中,让我们添加一个 add_one 函数:
Filename: add_one/src/lib.rs
pub fn add_one(x: i32) -> i32 {
x + 1
}现在我们可以让拥有二进制文件的 adder 包依赖于拥有我们库的 add_one 包。首先,我们需要在 adder/Cargo.toml 中添加对 add_one 的路径依赖。
Filename: adder/Cargo.toml
[dependencies]
add_one = { path = "../add_one" }
Cargo 不会假定工作空间中的 crate 会相互依赖,因此我们需要明确说明依赖关系。
接下来,让我们在 adder crate 中使用 add_one crate 中的 add_one 函数。打开 adder/src/main.rs 文件,并将 main 函数更改为调用 add_one 函数,如示例 14-7 所示。
fn main() {
let num = 10;
println!("Hello, world! {num} plus one is {}!", add_one::add_one(num));
}adder crate 使用 add_one 库 crate让我们通过在顶层 add 目录中运行 cargo build 来构建工作空间!
$ cargo build
Compiling add_one v0.1.0 (file:///projects/add/add_one)
Compiling adder v0.1.0 (file:///projects/add/adder)
Finished `dev` profile [unoptimized + debuginfo] target(s) in 0.22s
要从 add 目录运行二进制 crate,我们可以使用 -p 参数和包名称与 cargo run 来指定我们要运行工作空间中的哪个包:
$ cargo run -p adder
Finished `dev` profile [unoptimized + debuginfo] target(s) in 0.00s
Running `target/debug/adder`
Hello, world! 10 plus one is 11!
这将运行 adder/src/main.rs 中的代码,该代码依赖于 add_one crate。
依赖外部包
注意,工作空间在顶层只有一个 Cargo.lock 文件,而不是在每个 crate 的目录中都有一个。这确保了所有 crate 都使用所有依赖项的相同版本。如果我们将 rand 包添加到 adder/Cargo.toml 和 add_one/Cargo.toml 文件中,Cargo 会将两者解析为 rand 的一个版本,并将其记录在单个 Cargo.lock 中。使工作空间中的所有 crate 使用相同的依赖关系意味着这些 crate 将始终相互兼容。让我们将 rand crate 添加到 add_one/Cargo.toml 文件的 [dependencies] 部分,以便我们可以在 add_one crate 中使用 rand crate:
Filename: add_one/Cargo.toml
[dependencies]
rand = "0.8.5"
我们现在可以将 use rand; 添加到 add_one/src/lib.rs 文件中,通过在 add 目录中运行 cargo build 来构建整个工作空间将引入并编译 rand crate。我们会收到一个警告,因为我们没有引用引入作用域的 rand:
$ cargo build
Updating crates.io index
Downloaded rand v0.8.5
--snip--
Compiling rand v0.8.5
Compiling add_one v0.1.0 (file:///projects/add/add_one)
warning: unused import: `rand`
--> add_one/src/lib.rs:1:5
|
1 | use rand;
| ^^^^
|
= note: `#[warn(unused_imports)]` on by default
warning: `add_one` (lib) generated 1 warning (run `cargo fix --lib -p add_one` to apply 1 suggestion)
Compiling adder v0.1.0 (file:///projects/add/adder)
Finished `dev` profile [unoptimized + debuginfo] target(s) in 0.95s
顶层的 Cargo.lock 现在包含关于 add_one 对 rand 的依赖的信息。然而,即使 rand 在工作空间中的某个地方被使用,我们也不能在工作空间中的其他 crate 中使用它,除非我们也将 rand 添加到它们的 Cargo.toml 文件中。例如,如果我们将 use rand; 添加到 adder 包的 adder/src/main.rs 文件中,我们将得到一个错误:
$ cargo build
--snip--
Compiling adder v0.1.0 (file:///projects/add/adder)
error[E0432]: unresolved import `rand`
--> adder/src/main.rs:2:5
|
2 | use rand;
| ^^^^ no external crate `rand`
要修复此问题,请编辑 adder 包的 Cargo.toml 文件并指示 rand 也是它的依赖。构建 adder 包会将 rand 添加到 Cargo.lock 中 adder 的依赖列表,但不会下载额外的 rand 副本。Cargo 将确保工作空间中每个包中使用 rand 的 crate 都将使用相同的版本,只要它们指定了兼容的 rand 版本,从而节省了空间并确保工作空间中的 crate 相互兼容。
如果工作空间中的 crate 指定了不兼容版本的相同依赖,Cargo 将分别解析每个 crate,但仍会尝试解析尽可能少的版本。
向工作空间添加测试
作为另一个增强,让我们在 add_one crate 中添加对 add_one::add_one 函数的测试:
Filename: add_one/src/lib.rs
pub fn add_one(x: i32) -> i32 {
x + 1
}
#[cfg(test)]
mod tests {
use super::*;
#[test]
fn it_works() {
assert_eq!(3, add_one(2));
}
}现在在顶层 add 目录中运行 cargo test。在像这样结构的工作空间中运行 cargo test 将运行工作空间中所有 crate 的测试:
$ cargo test
Compiling add_one v0.1.0 (file:///projects/add/add_one)
Compiling adder v0.1.0 (file:///projects/add/adder)
Finished `test` profile [unoptimized + debuginfo] target(s) in 0.20s
Running unittests src/lib.rs (target/debug/deps/add_one-93c49ee75dc46543)
running 1 test
test tests::it_works ... ok
test result: ok. 1 passed; 0 failed; 0 ignored; 0 measured; 0 filtered out; finished in 0.00s
Running unittests src/main.rs (target/debug/deps/adder-3a47283c568d2b6a)
running 0 tests
test result: ok. 0 passed; 0 failed; 0 ignored; 0 measured; 0 filtered out; finished in 0.00s
Doc-tests add_one
running 0 tests
test result: ok. 0 passed; 0 failed; 0 ignored; 0 measured; 0 filtered out; finished in 0.00s
输出的第一部分显示 add_one crate 中的 it_works 测试通过了。下一部分显示在 adder crate 中未找到任何测试,最后一部分显示在 add_one crate 中未找到任何文档测试。
我们还可以从顶层目录使用 -p 标志并指定要测试的 crate 名称来运行工作空间中特定 crate 的测试:
$ cargo test -p add_one
Finished `test` profile [unoptimized + debuginfo] target(s) in 0.00s
Running unittests src/lib.rs (target/debug/deps/add_one-93c49ee75dc46543)
running 1 test
test tests::it_works ... ok
test result: ok. 1 passed; 0 failed; 0 ignored; 0 measured; 0 filtered out; finished in 0.00s
Doc-tests add_one
running 0 tests
test result: ok. 0 passed; 0 failed; 0 ignored; 0 measured; 0 filtered out; finished in 0.00s
此输出显示 cargo test 只运行了 add_one crate 的测试,没有运行 adder crate 的测试。
如果你将工作空间中的 crate 发布到 crates.io,工作空间中的每个 crate 都需要单独发布。与 cargo test 类似,我们可以使用 -p 标志并指定要发布的 crate 名称来发布工作空间中特定的 crate。
为了额外的练习,以类似于 add_one crate 的方式向此工作空间添加一个 add_two crate!
随着项目的增长,考虑使用工作空间:它使你能够处理比一大块代码更小、更易于理解的组件。此外,将 crate 保留在工作空间内,如果它们经常同时更改,可以使 crate 之间的协调更容易。
使用 cargo install 安装二进制程序
使用 cargo install 安装二进制文件
cargo install 命令允许你在本地安装和使用二进制 crate。这并非旨在替代系统包管理器;它旨在成为 Rust 开发人员安装其他人已在 crates.io 上共享的工具的便捷方式。注意,你只能安装具有二进制目标(binary target)的包。二进制目标是指如果 crate 有 src/main.rs 文件或其他指定为二进制的文件时所创建的可运行程序,与此相对的是库目标——它本身不可运行,但适合包含在其他程序中。通常,crate 在 README 文件中会说明是库、具有二进制目标,还是两者兼有。
使用 cargo install 安装的所有二进制文件都存储在安装根目录的 bin 文件夹中。如果你使用 rustup.rs 安装 Rust 并且没有自定义配置,此目录将是 $HOME/.cargo/bin。确保此目录在你的 $PATH 中,以便能够运行你使用 cargo install 安装的程序。
例如,在第 12 章中我们提到有一个 Rust 实现的 grep 工具叫做 ripgrep,用于搜索文件。要安装 ripgrep,我们可以运行以下命令:
$ cargo install ripgrep
Updating crates.io index
Downloaded ripgrep v14.1.1
Downloaded 1 crate (213.6 KB) in 0.40s
Installing ripgrep v14.1.1
--snip--
Compiling grep v0.3.2
Finished `release` profile [optimized + debuginfo] target(s) in 6.73s
Installing ~/.cargo/bin/rg
Installed package `ripgrep v14.1.1` (executable `rg`)
输出的倒数第二行显示了已安装二进制文件的位置和名称,对于 ripgrep 来说是 rg。只要安装目录在你的 $PATH 中,如前所述,你就可以运行 rg --help 并开始使用一个更快、更 Rust 化的文件搜索工具!
使用自定义命令扩展 Cargo
通过自定义命令(Custom Commands)扩展 Cargo
Cargo 的设计允许你使用新的子命令扩展它,而无需修改它本身。如果你的 $PATH 中有一个名为 cargo-something 的二进制文件,你可以通过运行 cargo something 来运行它,就像它是 Cargo 的子命令一样。当你运行 cargo --list 时,也会列出这样的自定义命令。能够使用 cargo install 安装扩展,然后像内置 Cargo 工具一样运行它们,是 Cargo 设计的一个超级方便的益处!
总结
使用 Cargo 和 crates.io 共享代码是使 Rust 生态系统对许多不同任务有用的部分原因。Rust 的标准库小巧且稳定,但 crate 易于共享、使用和改进,其迭代周期与语言本身不同。不要羞于在 crates.io 上分享对你有用的代码;很可能它对其他人也有用!
Smart Pointers
A pointer is a general concept for a variable that contains an address in
memory. This address refers to, or “points at,” some other data. The most
common kind of pointer in Rust is a reference, which you learned about in
Chapter 4. References are indicated by the & symbol and borrow the value they
point to. They don’t have any special capabilities other than referring to
data, and they have no overhead.
Smart pointers, on the other hand, are data structures that act like a pointer but also have additional metadata and capabilities. The concept of smart pointers isn’t unique to Rust: Smart pointers originated in C++ and exist in other languages as well. Rust has a variety of smart pointers defined in the standard library that provide functionality beyond that provided by references. To explore the general concept, we’ll look at a couple of different examples of smart pointers, including a reference counting smart pointer type. This pointer enables you to allow data to have multiple owners by keeping track of the number of owners and, when no owners remain, cleaning up the data.
In Rust, with its concept of ownership and borrowing, there is an additional difference between references and smart pointers: While references only borrow data, in many cases smart pointers own the data they point to.
Smart pointers are usually implemented using structs. Unlike an ordinary
struct, smart pointers implement the Deref and Drop traits. The Deref
trait allows an instance of the smart pointer struct to behave like a reference
so that you can write your code to work with either references or smart
pointers. The Drop trait allows you to customize the code that’s run when an
instance of the smart pointer goes out of scope. In this chapter, we’ll discuss
both of these traits and demonstrate why they’re important to smart pointers.
Given that the smart pointer pattern is a general design pattern used frequently in Rust, this chapter won’t cover every existing smart pointer. Many libraries have their own smart pointers, and you can even write your own. We’ll cover the most common smart pointers in the standard library:
Box<T>, for allocating values on the heapRc<T>, a reference counting type that enables multiple ownershipRef<T>andRefMut<T>, accessed throughRefCell<T>, a type that enforces the borrowing rules at runtime instead of compile time
In addition, we’ll cover the interior mutability pattern where an immutable type exposes an API for mutating an interior value. We’ll also discuss reference cycles: how they can leak memory and how to prevent them.
Let’s dive in!
使用 Box<T> 在堆上分配数据
Using Box<T> to Point to Data on the Heap
The most straightforward smart pointer is a box, whose type is written
Box<T>. Boxes allow you to store data on the heap rather than the stack.
What remains on the stack is the pointer to the heap data. Refer to Chapter 4
to review the difference between the stack and the heap.
Boxes don’t have performance overhead, other than storing their data on the heap instead of on the stack. But they don’t have many extra capabilities either. You’ll use them most often in these situations:
- When you have a type whose size can’t be known at compile time, and you want to use a value of that type in a context that requires an exact size
- When you have a large amount of data, and you want to transfer ownership but ensure that the data won’t be copied when you do so
- When you want to own a value, and you care only that it’s a type that implements a particular trait rather than being of a specific type
We’ll demonstrate the first situation in “Enabling Recursive Types with Boxes”. In the second case, transferring ownership of a large amount of data can take a long time because the data is copied around on the stack. To improve performance in this situation, we can store the large amount of data on the heap in a box. Then, only the small amount of pointer data is copied around on the stack, while the data it references stays in one place on the heap. The third case is known as a trait object, and “Using Trait Objects to Abstract over Shared Behavior” in Chapter 18 is devoted to that topic. So, what you learn here you’ll apply again in that section!
Storing Data on the Heap
Before we discuss the heap storage use case for Box<T>, we’ll cover the
syntax and how to interact with values stored within a Box<T>.
Listing 15-1 shows how to use a box to store an i32 value on the heap.
fn main() {
let b = Box::new(5);
println!("b = {b}");
}i32 value on the heap using a boxWe define the variable b to have the value of a Box that points to the
value 5, which is allocated on the heap. This program will print b = 5; in
this case, we can access the data in the box similarly to how we would if this
data were on the stack. Just like any owned value, when a box goes out of
scope, as b does at the end of main, it will be deallocated. The
deallocation happens both for the box (stored on the stack) and the data it
points to (stored on the heap).
Putting a single value on the heap isn’t very useful, so you won’t use boxes by
themselves in this way very often. Having values like a single i32 on the
stack, where they’re stored by default, is more appropriate in the majority of
situations. Let’s look at a case where boxes allow us to define types that we
wouldn’t be allowed to define if we didn’t have boxes.
Enabling Recursive Types with Boxes
A value of a recursive type can have another value of the same type as part of itself. Recursive types pose an issue because Rust needs to know at compile time how much space a type takes up. However, the nesting of values of recursive types could theoretically continue infinitely, so Rust can’t know how much space the value needs. Because boxes have a known size, we can enable recursive types by inserting a box in the recursive type definition.
As an example of a recursive type, let’s explore the cons list. This is a data type commonly found in functional programming languages. The cons list type we’ll define is straightforward except for the recursion; therefore, the concepts in the example we’ll work with will be useful anytime you get into more complex situations involving recursive types.
Understanding the Cons List
A cons list is a data structure that comes from the Lisp programming language
and its dialects, is made up of nested pairs, and is the Lisp version of a
linked list. Its name comes from the cons function (short for construct
function) in Lisp that constructs a new pair from its two arguments. By
calling cons on a pair consisting of a value and another pair, we can
construct cons lists made up of recursive pairs.
For example, here’s a pseudocode representation of a cons list containing the
list 1, 2, 3 with each pair in parentheses:
(1, (2, (3, Nil)))
Each item in a cons list contains two elements: the value of the current item
and of the next item. The last item in the list contains only a value called
Nil without a next item. A cons list is produced by recursively calling the
cons function. The canonical name to denote the base case of the recursion is
Nil. Note that this is not the same as the “null” or “nil” concept discussed
in Chapter 6, which is an invalid or absent value.
The cons list isn’t a commonly used data structure in Rust. Most of the time
when you have a list of items in Rust, Vec<T> is a better choice to use.
Other, more complex recursive data types are useful in various situations,
but by starting with the cons list in this chapter, we can explore how boxes
let us define a recursive data type without much distraction.
Listing 15-2 contains an enum definition for a cons list. Note that this code
won’t compile yet, because the List type doesn’t have a known size, which
we’ll demonstrate.
enum List {
Cons(i32, List),
Nil,
}
fn main() {}i32 valuesNote: We’re implementing a cons list that holds only i32 values for the
purposes of this example. We could have implemented it using generics, as we
discussed in Chapter 10, to define a cons list type that could store values of
any type.
Using the List type to store the list 1, 2, 3 would look like the code in
Listing 15-3.
enum List {
Cons(i32, List),
Nil,
}
// --snip--
use crate::List::{Cons, Nil};
fn main() {
let list = Cons(1, Cons(2, Cons(3, Nil)));
}List enum to store the list 1, 2, 3The first Cons value holds 1 and another List value. This List value is
another Cons value that holds 2 and another List value. This List value
is one more Cons value that holds 3 and a List value, which is finally
Nil, the non-recursive variant that signals the end of the list.
If we try to compile the code in Listing 15-3, we get the error shown in Listing 15-4.
$ cargo run
Compiling cons-list v0.1.0 (file:///projects/cons-list)
error[E0072]: recursive type `List` has infinite size
--> src/main.rs:1:1
|
1 | enum List {
| ^^^^^^^^^
2 | Cons(i32, List),
| ---- recursive without indirection
|
help: insert some indirection (e.g., a `Box`, `Rc`, or `&`) to break the cycle
|
2 | Cons(i32, Box<List>),
| ++++ +
error[E0391]: cycle detected when computing when `List` needs drop
--> src/main.rs:1:1
|
1 | enum List {
| ^^^^^^^^^
|
= note: ...which immediately requires computing when `List` needs drop again
= note: cycle used when computing whether `List` needs drop
= note: see https://rustc-dev-guide.rust-lang.org/overview.html#queries and https://rustc-dev-guide.rust-lang.org/query.html for more information
Some errors have detailed explanations: E0072, E0391.
For more information about an error, try `rustc --explain E0072`.
error: could not compile `cons-list` (bin "cons-list") due to 2 previous errors
The error shows this type “has infinite size.” The reason is that we’ve defined
List with a variant that is recursive: It holds another value of itself
directly. As a result, Rust can’t figure out how much space it needs to store a
List value. Let’s break down why we get this error. First, we’ll look at how
Rust decides how much space it needs to store a value of a non-recursive type.
Computing the Size of a Non-Recursive Type
Recall the Message enum we defined in Listing 6-2 when we discussed enum
definitions in Chapter 6:
enum Message {
Quit,
Move { x: i32, y: i32 },
Write(String),
ChangeColor(i32, i32, i32),
}
fn main() {}To determine how much space to allocate for a Message value, Rust goes
through each of the variants to see which variant needs the most space. Rust
sees that Message::Quit doesn’t need any space, Message::Move needs enough
space to store two i32 values, and so forth. Because only one variant will be
used, the most space a Message value will need is the space it would take to
store the largest of its variants.
Contrast this with what happens when Rust tries to determine how much space a
recursive type like the List enum in Listing 15-2 needs. The compiler starts
by looking at the Cons variant, which holds a value of type i32 and a value
of type List. Therefore, Cons needs an amount of space equal to the size of
an i32 plus the size of a List. To figure out how much memory the List
type needs, the compiler looks at the variants, starting with the Cons
variant. The Cons variant holds a value of type i32 and a value of type
List, and this process continues infinitely, as shown in Figure 15-1.
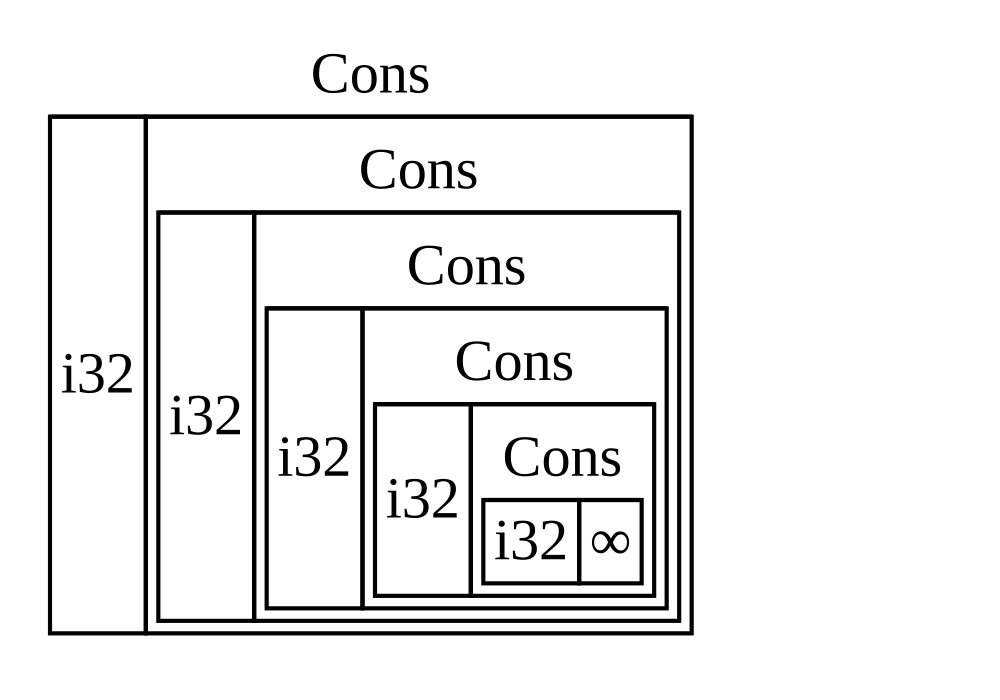
Figure 15-1: An infinite List consisting of infinite
Cons variants
Getting a Recursive Type with a Known Size
Because Rust can’t figure out how much space to allocate for recursively defined types, the compiler gives an error with this helpful suggestion:
help: insert some indirection (e.g., a `Box`, `Rc`, or `&`) to break the cycle
|
2 | Cons(i32, Box<List>),
| ++++ +
In this suggestion, indirection means that instead of storing a value directly, we should change the data structure to store the value indirectly by storing a pointer to the value instead.
Because a Box<T> is a pointer, Rust always knows how much space a Box<T>
needs: A pointer’s size doesn’t change based on the amount of data it’s
pointing to. This means we can put a Box<T> inside the Cons variant instead
of another List value directly. The Box<T> will point to the next List
value that will be on the heap rather than inside the Cons variant.
Conceptually, we still have a list, created with lists holding other lists, but
this implementation is now more like placing the items next to one another
rather than inside one another.
We can change the definition of the List enum in Listing 15-2 and the usage
of the List in Listing 15-3 to the code in Listing 15-5, which will compile.
enum List {
Cons(i32, Box<List>),
Nil,
}
use crate::List::{Cons, Nil};
fn main() {
let list = Cons(1, Box::new(Cons(2, Box::new(Cons(3, Box::new(Nil))))));
}List that uses Box<T> in order to have a known sizeThe Cons variant needs the size of an i32 plus the space to store the box’s
pointer data. The Nil variant stores no values, so it needs less space on the
stack than the Cons variant. We now know that any List value will take up
the size of an i32 plus the size of a box’s pointer data. By using a box,
we’ve broken the infinite, recursive chain, so the compiler can figure out the
size it needs to store a List value. Figure 15-2 shows what the Cons
variant looks like now.
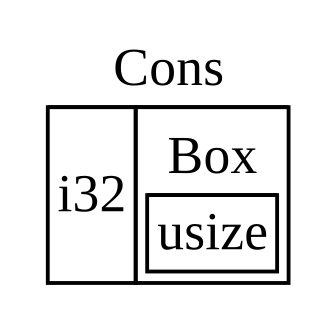
Figure 15-2: A List that is not infinitely sized,
because Cons holds a Box
Boxes provide only the indirection and heap allocation; they don’t have any other special capabilities, like those we’ll see with the other smart pointer types. They also don’t have the performance overhead that these special capabilities incur, so they can be useful in cases like the cons list where the indirection is the only feature we need. We’ll look at more use cases for boxes in Chapter 18.
The Box<T> type is a smart pointer because it implements the Deref trait,
which allows Box<T> values to be treated like references. When a Box<T>
value goes out of scope, the heap data that the box is pointing to is cleaned
up as well because of the Drop trait implementation. These two traits will be
even more important to the functionality provided by the other smart pointer
types we’ll discuss in the rest of this chapter. Let’s explore these two traits
in more detail.
将智能指针视为常规引用
Treating Smart Pointers Like Regular References
Implementing the Deref trait allows you to customize the behavior of the
dereference operator * (not to be confused with the multiplication or glob
operator). By implementing Deref in such a way that a smart pointer can be
treated like a regular reference, you can write code that operates on
references and use that code with smart pointers too.
Let’s first look at how the dereference operator works with regular references.
Then, we’ll try to define a custom type that behaves like Box<T> and see why
the dereference operator doesn’t work like a reference on our newly defined
type. We’ll explore how implementing the Deref trait makes it possible for
smart pointers to work in ways similar to references. Then, we’ll look at
Rust’s deref coercion feature and how it lets us work with either references or
smart pointers.
Following the Reference to the Value
A regular reference is a type of pointer, and one way to think of a pointer is
as an arrow to a value stored somewhere else. In Listing 15-6, we create a
reference to an i32 value and then use the dereference operator to follow the
reference to the value.
fn main() {
let x = 5;
let y = &x;
assert_eq!(5, x);
assert_eq!(5, *y);
}i32 valueThe variable x holds an i32 value 5. We set y equal to a reference to
x. We can assert that x is equal to 5. However, if we want to make an
assertion about the value in y, we have to use *y to follow the reference
to the value it’s pointing to (hence, dereference) so that the compiler can
compare the actual value. Once we dereference y, we have access to the
integer value y is pointing to that we can compare with 5.
If we tried to write assert_eq!(5, y); instead, we would get this compilation
error:
$ cargo run
Compiling deref-example v0.1.0 (file:///projects/deref-example)
error[E0277]: can't compare `{integer}` with `&{integer}`
--> src/main.rs:6:5
|
6 | assert_eq!(5, y);
| ^^^^^^^^^^^^^^^^ no implementation for `{integer} == &{integer}`
|
= help: the trait `PartialEq<&{integer}>` is not implemented for `{integer}`
= note: this error originates in the macro `assert_eq` (in Nightly builds, run with -Z macro-backtrace for more info)
For more information about this error, try `rustc --explain E0277`.
error: could not compile `deref-example` (bin "deref-example") due to 1 previous error
Comparing a number and a reference to a number isn’t allowed because they’re different types. We must use the dereference operator to follow the reference to the value it’s pointing to.
Using Box<T> Like a Reference
We can rewrite the code in Listing 15-6 to use a Box<T> instead of a
reference; the dereference operator used on the Box<T> in Listing 15-7
functions in the same way as the dereference operator used on the reference in
Listing 15-6.
fn main() {
let x = 5;
let y = Box::new(x);
assert_eq!(5, x);
assert_eq!(5, *y);
}Box<i32>The main difference between Listing 15-7 and Listing 15-6 is that here we set
y to be an instance of a box pointing to a copied value of x rather than a
reference pointing to the value of x. In the last assertion, we can use the
dereference operator to follow the box’s pointer in the same way that we did
when y was a reference. Next, we’ll explore what is special about Box<T>
that enables us to use the dereference operator by defining our own box type.
Defining Our Own Smart Pointer
Let’s build a wrapper type similar to the Box<T> type provided by the
standard library to experience how smart pointer types behave differently from
references by default. Then, we’ll look at how to add the ability to use the
dereference operator.
Note: There’s one big difference between the MyBox<T> type we’re about to
build and the real Box<T>: Our version will not store its data on the heap.
We are focusing this example on Deref, so where the data is actually stored
is less important than the pointer-like behavior.
The Box<T> type is ultimately defined as a tuple struct with one element, so
Listing 15-8 defines a MyBox<T> type in the same way. We’ll also define a
new function to match the new function defined on Box<T>.
struct MyBox<T>(T);
impl<T> MyBox<T> {
fn new(x: T) -> MyBox<T> {
MyBox(x)
}
}
fn main() {}MyBox<T> typeWe define a struct named MyBox and declare a generic parameter T because we
want our type to hold values of any type. The MyBox type is a tuple struct
with one element of type T. The MyBox::new function takes one parameter of
type T and returns a MyBox instance that holds the value passed in.
Let’s try adding the main function in Listing 15-7 to Listing 15-8 and
changing it to use the MyBox<T> type we’ve defined instead of Box<T>. The
code in Listing 15-9 won’t compile, because Rust doesn’t know how to
dereference MyBox.
struct MyBox<T>(T);
impl<T> MyBox<T> {
fn new(x: T) -> MyBox<T> {
MyBox(x)
}
}
fn main() {
let x = 5;
let y = MyBox::new(x);
assert_eq!(5, x);
assert_eq!(5, *y);
}MyBox<T> in the same way we used references and Box<T>Here’s the resultant compilation error:
$ cargo run
Compiling deref-example v0.1.0 (file:///projects/deref-example)
error[E0614]: type `MyBox<{integer}>` cannot be dereferenced
--> src/main.rs:14:19
|
14 | assert_eq!(5, *y);
| ^^ can't be dereferenced
For more information about this error, try `rustc --explain E0614`.
error: could not compile `deref-example` (bin "deref-example") due to 1 previous error
Our MyBox<T> type can’t be dereferenced because we haven’t implemented that
ability on our type. To enable dereferencing with the * operator, we
implement the Deref trait.
Implementing the Deref Trait
As discussed in “Implementing a Trait on a Type” in
Chapter 10, to implement a trait we need to provide implementations for the
trait’s required methods. The Deref trait, provided by the standard library,
requires us to implement one method named deref that borrows self and
returns a reference to the inner data. Listing 15-10 contains an implementation
of Deref to add to the definition of MyBox<T>.
use std::ops::Deref;
impl<T> Deref for MyBox<T> {
type Target = T;
fn deref(&self) -> &Self::Target {
&self.0
}
}
struct MyBox<T>(T);
impl<T> MyBox<T> {
fn new(x: T) -> MyBox<T> {
MyBox(x)
}
}
fn main() {
let x = 5;
let y = MyBox::new(x);
assert_eq!(5, x);
assert_eq!(5, *y);
}Deref on MyBox<T>The type Target = T; syntax defines an associated type for the Deref trait
to use. Associated types are a slightly different way of declaring a generic
parameter, but you don’t need to worry about them for now; we’ll cover them in
more detail in Chapter 20.
We fill in the body of the deref method with &self.0 so that deref
returns a reference to the value we want to access with the * operator;
recall from “Creating Different Types with Tuple Structs” in Chapter 5 that .0 accesses the first value in a tuple struct.
The main function in Listing 15-9 that calls * on the MyBox<T> value now
compiles, and the assertions pass!
Without the Deref trait, the compiler can only dereference & references.
The deref method gives the compiler the ability to take a value of any type
that implements Deref and call the deref method to get a reference that
it knows how to dereference.
When we entered *y in Listing 15-9, behind the scenes Rust actually ran this
code:
*(y.deref())Rust substitutes the * operator with a call to the deref method and then a
plain dereference so that we don’t have to think about whether or not we need
to call the deref method. This Rust feature lets us write code that functions
identically whether we have a regular reference or a type that implements
Deref.
The reason the deref method returns a reference to a value, and that the
plain dereference outside the parentheses in *(y.deref()) is still necessary,
has to do with the ownership system. If the deref method returned the value
directly instead of a reference to the value, the value would be moved out of
self. We don’t want to take ownership of the inner value inside MyBox<T> in
this case or in most cases where we use the dereference operator.
Note that the * operator is replaced with a call to the deref method and
then a call to the * operator just once, each time we use a * in our code.
Because the substitution of the * operator does not recurse infinitely, we
end up with data of type i32, which matches the 5 in assert_eq! in
Listing 15-9.
Using Deref Coercion in Functions and Methods
Deref coercion converts a reference to a type that implements the Deref
trait into a reference to another type. For example, deref coercion can convert
&String to &str because String implements the Deref trait such that it
returns &str. Deref coercion is a convenience Rust performs on arguments to
functions and methods, and it works only on types that implement the Deref
trait. It happens automatically when we pass a reference to a particular type’s
value as an argument to a function or method that doesn’t match the parameter
type in the function or method definition. A sequence of calls to the deref
method converts the type we provided into the type the parameter needs.
Deref coercion was added to Rust so that programmers writing function and
method calls don’t need to add as many explicit references and dereferences
with & and *. The deref coercion feature also lets us write more code that
can work for either references or smart pointers.
To see deref coercion in action, let’s use the MyBox<T> type we defined in
Listing 15-8 as well as the implementation of Deref that we added in Listing
15-10. Listing 15-11 shows the definition of a function that has a string slice
parameter.
fn hello(name: &str) {
println!("Hello, {name}!");
}
fn main() {}hello function that has the parameter name of type &strWe can call the hello function with a string slice as an argument, such as
hello("Rust");, for example. Deref coercion makes it possible to call hello
with a reference to a value of type MyBox<String>, as shown in Listing 15-12.
use std::ops::Deref;
impl<T> Deref for MyBox<T> {
type Target = T;
fn deref(&self) -> &T {
&self.0
}
}
struct MyBox<T>(T);
impl<T> MyBox<T> {
fn new(x: T) -> MyBox<T> {
MyBox(x)
}
}
fn hello(name: &str) {
println!("Hello, {name}!");
}
fn main() {
let m = MyBox::new(String::from("Rust"));
hello(&m);
}hello with a reference to a MyBox<String> value, which works because of deref coercionHere we’re calling the hello function with the argument &m, which is a
reference to a MyBox<String> value. Because we implemented the Deref trait
on MyBox<T> in Listing 15-10, Rust can turn &MyBox<String> into &String
by calling deref. The standard library provides an implementation of Deref
on String that returns a string slice, and this is in the API documentation
for Deref. Rust calls deref again to turn the &String into &str, which
matches the hello function’s definition.
If Rust didn’t implement deref coercion, we would have to write the code in
Listing 15-13 instead of the code in Listing 15-12 to call hello with a value
of type &MyBox<String>.
use std::ops::Deref;
impl<T> Deref for MyBox<T> {
type Target = T;
fn deref(&self) -> &T {
&self.0
}
}
struct MyBox<T>(T);
impl<T> MyBox<T> {
fn new(x: T) -> MyBox<T> {
MyBox(x)
}
}
fn hello(name: &str) {
println!("Hello, {name}!");
}
fn main() {
let m = MyBox::new(String::from("Rust"));
hello(&(*m)[..]);
}The (*m) dereferences the MyBox<String> into a String. Then, the & and
[..] take a string slice of the String that is equal to the whole string to
match the signature of hello. This code without deref coercions is harder to
read, write, and understand with all of these symbols involved. Deref coercion
allows Rust to handle these conversions for us automatically.
When the Deref trait is defined for the types involved, Rust will analyze the
types and use Deref::deref as many times as necessary to get a reference to
match the parameter’s type. The number of times that Deref::deref needs to be
inserted is resolved at compile time, so there is no runtime penalty for taking
advantage of deref coercion!
Handling Deref Coercion with Mutable References
Similar to how you use the Deref trait to override the * operator on
immutable references, you can use the DerefMut trait to override the *
operator on mutable references.
Rust does deref coercion when it finds types and trait implementations in three cases:
- From
&Tto&UwhenT: Deref<Target=U> - From
&mut Tto&mut UwhenT: DerefMut<Target=U> - From
&mut Tto&UwhenT: Deref<Target=U>
The first two cases are the same except that the second implements mutability.
The first case states that if you have a &T, and T implements Deref to
some type U, you can get a &U transparently. The second case states that
the same deref coercion happens for mutable references.
The third case is trickier: Rust will also coerce a mutable reference to an immutable one. But the reverse is not possible: Immutable references will never coerce to mutable references. Because of the borrowing rules, if you have a mutable reference, that mutable reference must be the only reference to that data (otherwise, the program wouldn’t compile). Converting one mutable reference to one immutable reference will never break the borrowing rules. Converting an immutable reference to a mutable reference would require that the initial immutable reference is the only immutable reference to that data, but the borrowing rules don’t guarantee that. Therefore, Rust can’t make the assumption that converting an immutable reference to a mutable reference is possible.
运行清理代码的 Drop Trait
Running Code on Cleanup with the Drop Trait
The second trait important to the smart pointer pattern is Drop, which lets
you customize what happens when a value is about to go out of scope. You can
provide an implementation for the Drop trait on any type, and that code can
be used to release resources like files or network connections.
We’re introducing Drop in the context of smart pointers because the
functionality of the Drop trait is almost always used when implementing a
smart pointer. For example, when a Box<T> is dropped, it will deallocate the
space on the heap that the box points to.
In some languages, for some types, the programmer must call code to free memory or resources every time they finish using an instance of those types. Examples include file handles, sockets, and locks. If the programmer forgets, the system might become overloaded and crash. In Rust, you can specify that a particular bit of code be run whenever a value goes out of scope, and the compiler will insert this code automatically. As a result, you don’t need to be careful about placing cleanup code everywhere in a program that an instance of a particular type is finished with—you still won’t leak resources!
You specify the code to run when a value goes out of scope by implementing the
Drop trait. The Drop trait requires you to implement one method named
drop that takes a mutable reference to self. To see when Rust calls drop,
let’s implement drop with println! statements for now.
Listing 15-14 shows a CustomSmartPointer struct whose only custom
functionality is that it will print Dropping CustomSmartPointer! when the
instance goes out of scope, to show when Rust runs the drop method.
struct CustomSmartPointer {
data: String,
}
impl Drop for CustomSmartPointer {
fn drop(&mut self) {
println!("Dropping CustomSmartPointer with data `{}`!", self.data);
}
}
fn main() {
let c = CustomSmartPointer {
data: String::from("my stuff"),
};
let d = CustomSmartPointer {
data: String::from("other stuff"),
};
println!("CustomSmartPointers created");
}CustomSmartPointer struct that implements the Drop trait where we would put our cleanup codeThe Drop trait is included in the prelude, so we don’t need to bring it into
scope. We implement the Drop trait on CustomSmartPointer and provide an
implementation for the drop method that calls println!. The body of the
drop method is where you would place any logic that you wanted to run when an
instance of your type goes out of scope. We’re printing some text here to
demonstrate visually when Rust will call drop.
In main, we create two instances of CustomSmartPointer and then print
CustomSmartPointers created. At the end of main, our instances of
CustomSmartPointer will go out of scope, and Rust will call the code we put
in the drop method, printing our final message. Note that we didn’t need to
call the drop method explicitly.
When we run this program, we’ll see the following output:
$ cargo run
Compiling drop-example v0.1.0 (file:///projects/drop-example)
Finished `dev` profile [unoptimized + debuginfo] target(s) in 0.60s
Running `target/debug/drop-example`
CustomSmartPointers created
Dropping CustomSmartPointer with data `other stuff`!
Dropping CustomSmartPointer with data `my stuff`!
Rust automatically called drop for us when our instances went out of scope,
calling the code we specified. Variables are dropped in the reverse order of
their creation, so d was dropped before c. This example’s purpose is to
give you a visual guide to how the drop method works; usually you would
specify the cleanup code that your type needs to run rather than a print
message.
Unfortunately, it’s not straightforward to disable the automatic drop
functionality. Disabling drop isn’t usually necessary; the whole point of the
Drop trait is that it’s taken care of automatically. Occasionally, however,
you might want to clean up a value early. One example is when using smart
pointers that manage locks: You might want to force the drop method that
releases the lock so that other code in the same scope can acquire the lock.
Rust doesn’t let you call the Drop trait’s drop method manually; instead,
you have to call the std::mem::drop function provided by the standard library
if you want to force a value to be dropped before the end of its scope.
Trying to call the Drop trait’s drop method manually by modifying the
main function from Listing 15-14 won’t work, as shown in Listing 15-15.
struct CustomSmartPointer {
data: String,
}
impl Drop for CustomSmartPointer {
fn drop(&mut self) {
println!("Dropping CustomSmartPointer with data `{}`!", self.data);
}
}
fn main() {
let c = CustomSmartPointer {
data: String::from("some data"),
};
println!("CustomSmartPointer created");
c.drop();
println!("CustomSmartPointer dropped before the end of main");
}drop method from the Drop trait manually to clean up earlyWhen we try to compile this code, we’ll get this error:
$ cargo run
Compiling drop-example v0.1.0 (file:///projects/drop-example)
error[E0040]: explicit use of destructor method
--> src/main.rs:16:7
|
16 | c.drop();
| ^^^^ explicit destructor calls not allowed
|
help: consider using `drop` function
|
16 - c.drop();
16 + drop(c);
|
For more information about this error, try `rustc --explain E0040`.
error: could not compile `drop-example` (bin "drop-example") due to 1 previous error
This error message states that we’re not allowed to explicitly call drop. The
error message uses the term destructor, which is the general programming term
for a function that cleans up an instance. A destructor is analogous to a
constructor, which creates an instance. The drop function in Rust is one
particular destructor.
Rust doesn’t let us call drop explicitly, because Rust would still
automatically call drop on the value at the end of main. This would cause a
double free error because Rust would be trying to clean up the same value twice.
We can’t disable the automatic insertion of drop when a value goes out of
scope, and we can’t call the drop method explicitly. So, if we need to force
a value to be cleaned up early, we use the std::mem::drop function.
The std::mem::drop function is different from the drop method in the Drop
trait. We call it by passing as an argument the value we want to force-drop.
The function is in the prelude, so we can modify main in Listing 15-15 to
call the drop function, as shown in Listing 15-16.
struct CustomSmartPointer {
data: String,
}
impl Drop for CustomSmartPointer {
fn drop(&mut self) {
println!("Dropping CustomSmartPointer with data `{}`!", self.data);
}
}
fn main() {
let c = CustomSmartPointer {
data: String::from("some data"),
};
println!("CustomSmartPointer created");
drop(c);
println!("CustomSmartPointer dropped before the end of main");
}std::mem::drop to explicitly drop a value before it goes out of scopeRunning this code will print the following:
$ cargo run
Compiling drop-example v0.1.0 (file:///projects/drop-example)
Finished `dev` profile [unoptimized + debuginfo] target(s) in 0.73s
Running `target/debug/drop-example`
CustomSmartPointer created
Dropping CustomSmartPointer with data `some data`!
CustomSmartPointer dropped before the end of main
The text Dropping CustomSmartPointer with data `some data`! is printed
between the CustomSmartPointer created and CustomSmartPointer dropped before the end of main text, showing that the drop method code is called to drop
c at that point.
You can use code specified in a Drop trait implementation in many ways to
make cleanup convenient and safe: For instance, you could use it to create your
own memory allocator! With the Drop trait and Rust’s ownership system, you
don’t have to remember to clean up, because Rust does it automatically.
You also don’t have to worry about problems resulting from accidentally
cleaning up values still in use: The ownership system that makes sure
references are always valid also ensures that drop gets called only once when
the value is no longer being used.
Now that we’ve examined Box<T> and some of the characteristics of smart
pointers, let’s look at a few other smart pointers defined in the standard
library.
Rc<T>:引用计数的智能指针
Rc<T>, the Reference-Counted Smart Pointer
In the majority of cases, ownership is clear: You know exactly which variable owns a given value. However, there are cases when a single value might have multiple owners. For example, in graph data structures, multiple edges might point to the same node, and that node is conceptually owned by all of the edges that point to it. A node shouldn’t be cleaned up unless it doesn’t have any edges pointing to it and so has no owners.
You have to enable multiple ownership explicitly by using the Rust type
Rc<T>, which is an abbreviation for reference counting. The Rc<T> type
keeps track of the number of references to a value to determine whether or not
the value is still in use. If there are zero references to a value, the value
can be cleaned up without any references becoming invalid.
Imagine Rc<T> as a TV in a family room. When one person enters to watch TV,
they turn it on. Others can come into the room and watch the TV. When the last
person leaves the room, they turn off the TV because it’s no longer being used.
If someone turns off the TV while others are still watching it, there would be
an uproar from the remaining TV watchers!
We use the Rc<T> type when we want to allocate some data on the heap for
multiple parts of our program to read and we can’t determine at compile time
which part will finish using the data last. If we knew which part would finish
last, we could just make that part the data’s owner, and the normal ownership
rules enforced at compile time would take effect.
Note that Rc<T> is only for use in single-threaded scenarios. When we discuss
concurrency in Chapter 16, we’ll cover how to do reference counting in
multithreaded programs.
Sharing Data
Let’s return to our cons list example in Listing 15-5. Recall that we defined
it using Box<T>. This time, we’ll create two lists that both share ownership
of a third list. Conceptually, this looks similar to Figure 15-3.
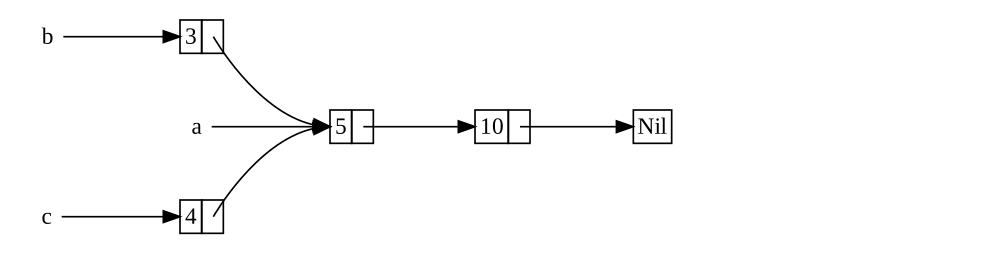
Figure 15-3: Two lists, b and c, sharing ownership of
a third list, a
We’ll create list a that contains 5 and then 10. Then, we’ll make two
more lists: b that starts with 3 and c that starts with 4. Both the b
and c lists will then continue on to the first a list containing 5 and
10. In other words, both lists will share the first list containing 5 and
10.
Trying to implement this scenario using our definition of List with Box<T>
won’t work, as shown in Listing 15-17.
enum List {
Cons(i32, Box<List>),
Nil,
}
use crate::List::{Cons, Nil};
fn main() {
let a = Cons(5, Box::new(Cons(10, Box::new(Nil))));
let b = Cons(3, Box::new(a));
let c = Cons(4, Box::new(a));
}Box<T> that try to share ownership of a third listWhen we compile this code, we get this error:
$ cargo run
Compiling cons-list v0.1.0 (file:///projects/cons-list)
error[E0382]: use of moved value: `a`
--> src/main.rs:11:30
|
9 | let a = Cons(5, Box::new(Cons(10, Box::new(Nil))));
| - move occurs because `a` has type `List`, which does not implement the `Copy` trait
10 | let b = Cons(3, Box::new(a));
| - value moved here
11 | let c = Cons(4, Box::new(a));
| ^ value used here after move
|
note: if `List` implemented `Clone`, you could clone the value
--> src/main.rs:1:1
|
1 | enum List {
| ^^^^^^^^^ consider implementing `Clone` for this type
...
10 | let b = Cons(3, Box::new(a));
| - you could clone this value
For more information about this error, try `rustc --explain E0382`.
error: could not compile `cons-list` (bin "cons-list") due to 1 previous error
The Cons variants own the data they hold, so when we create the b list, a
is moved into b and b owns a. Then, when we try to use a again when
creating c, we’re not allowed to because a has been moved.
We could change the definition of Cons to hold references instead, but then
we would have to specify lifetime parameters. By specifying lifetime
parameters, we would be specifying that every element in the list will live at
least as long as the entire list. This is the case for the elements and lists
in Listing 15-17, but not in every scenario.
Instead, we’ll change our definition of List to use Rc<T> in place of
Box<T>, as shown in Listing 15-18. Each Cons variant will now hold a value
and an Rc<T> pointing to a List. When we create b, instead of taking
ownership of a, we’ll clone the Rc<List> that a is holding, thereby
increasing the number of references from one to two and letting a and b
share ownership of the data in that Rc<List>. We’ll also clone a when
creating c, increasing the number of references from two to three. Every time
we call Rc::clone, the reference count to the data within the Rc<List> will
increase, and the data won’t be cleaned up unless there are zero references to
it.
enum List {
Cons(i32, Rc<List>),
Nil,
}
use crate::List::{Cons, Nil};
use std::rc::Rc;
fn main() {
let a = Rc::new(Cons(5, Rc::new(Cons(10, Rc::new(Nil)))));
let b = Cons(3, Rc::clone(&a));
let c = Cons(4, Rc::clone(&a));
}List that uses Rc<T>We need to add a use statement to bring Rc<T> into scope because it’s not
in the prelude. In main, we create the list holding 5 and 10 and store it
in a new Rc<List> in a. Then, when we create b and c, we call the
Rc::clone function and pass a reference to the Rc<List> in a as an
argument.
We could have called a.clone() rather than Rc::clone(&a), but Rust’s
convention is to use Rc::clone in this case. The implementation of
Rc::clone doesn’t make a deep copy of all the data like most types’
implementations of clone do. The call to Rc::clone only increments the
reference count, which doesn’t take much time. Deep copies of data can take a
lot of time. By using Rc::clone for reference counting, we can visually
distinguish between the deep-copy kinds of clones and the kinds of clones that
increase the reference count. When looking for performance problems in the
code, we only need to consider the deep-copy clones and can disregard calls to
Rc::clone.
Cloning to Increase the Reference Count
Let’s change our working example in Listing 15-18 so that we can see the
reference counts changing as we create and drop references to the Rc<List> in
a.
In Listing 15-19, we’ll change main so that it has an inner scope around list
c; then, we can see how the reference count changes when c goes out of
scope.
enum List {
Cons(i32, Rc<List>),
Nil,
}
use crate::List::{Cons, Nil};
use std::rc::Rc;
// --snip--
fn main() {
let a = Rc::new(Cons(5, Rc::new(Cons(10, Rc::new(Nil)))));
println!("count after creating a = {}", Rc::strong_count(&a));
let b = Cons(3, Rc::clone(&a));
println!("count after creating b = {}", Rc::strong_count(&a));
{
let c = Cons(4, Rc::clone(&a));
println!("count after creating c = {}", Rc::strong_count(&a));
}
println!("count after c goes out of scope = {}", Rc::strong_count(&a));
}At each point in the program where the reference count changes, we print the
reference count, which we get by calling the Rc::strong_count function. This
function is named strong_count rather than count because the Rc<T> type
also has a weak_count; we’ll see what weak_count is used for in “Preventing
Reference Cycles Using Weak<T>”.
This code prints the following:
$ cargo run
Compiling cons-list v0.1.0 (file:///projects/cons-list)
Finished `dev` profile [unoptimized + debuginfo] target(s) in 0.45s
Running `target/debug/cons-list`
count after creating a = 1
count after creating b = 2
count after creating c = 3
count after c goes out of scope = 2
We can see that the Rc<List> in a has an initial reference count of 1;
then, each time we call clone, the count goes up by 1. When c goes out of
scope, the count goes down by 1. We don’t have to call a function to decrease
the reference count like we have to call Rc::clone to increase the reference
count: The implementation of the Drop trait decreases the reference count
automatically when an Rc<T> value goes out of scope.
What we can’t see in this example is that when b and then a go out of scope
at the end of main, the count is 0, and the Rc<List> is cleaned up
completely. Using Rc<T> allows a single value to have multiple owners, and
the count ensures that the value remains valid as long as any of the owners
still exist.
Via immutable references, Rc<T> allows you to share data between multiple
parts of your program for reading only. If Rc<T> allowed you to have multiple
mutable references too, you might violate one of the borrowing rules discussed
in Chapter 4: Multiple mutable borrows to the same place can cause data races
and inconsistencies. But being able to mutate data is very useful! In the next
section, we’ll discuss the interior mutability pattern and the RefCell<T>
type that you can use in conjunction with an Rc<T> to work with this
immutability restriction.
RefCell<T> 与内部可变性模式
RefCell<T> and the Interior Mutability Pattern
Interior mutability is a design pattern in Rust that allows you to mutate
data even when there are immutable references to that data; normally, this
action is disallowed by the borrowing rules. To mutate data, the pattern uses
unsafe code inside a data structure to bend Rust’s usual rules that govern
mutation and borrowing. Unsafe code indicates to the compiler that we’re
checking the rules manually instead of relying on the compiler to check them
for us; we will discuss unsafe code more in Chapter 20.
We can use types that use the interior mutability pattern only when we can
ensure that the borrowing rules will be followed at runtime, even though the
compiler can’t guarantee that. The unsafe code involved is then wrapped in a
safe API, and the outer type is still immutable.
Let’s explore this concept by looking at the RefCell<T> type that follows the
interior mutability pattern.
Enforcing Borrowing Rules at Runtime
Unlike Rc<T>, the RefCell<T> type represents single ownership over the data
it holds. So, what makes RefCell<T> different from a type like Box<T>?
Recall the borrowing rules you learned in Chapter 4:
- At any given time, you can have either one mutable reference or any number of immutable references (but not both).
- References must always be valid.
With references and Box<T>, the borrowing rules’ invariants are enforced at
compile time. With RefCell<T>, these invariants are enforced at runtime.
With references, if you break these rules, you’ll get a compiler error. With
RefCell<T>, if you break these rules, your program will panic and exit.
The advantages of checking the borrowing rules at compile time are that errors will be caught sooner in the development process, and there is no impact on runtime performance because all the analysis is completed beforehand. For those reasons, checking the borrowing rules at compile time is the best choice in the majority of cases, which is why this is Rust’s default.
The advantage of checking the borrowing rules at runtime instead is that certain memory-safe scenarios are then allowed, where they would’ve been disallowed by the compile-time checks. Static analysis, like the Rust compiler, is inherently conservative. Some properties of code are impossible to detect by analyzing the code: The most famous example is the Halting Problem, which is beyond the scope of this book but is an interesting topic to research.
Because some analysis is impossible, if the Rust compiler can’t be sure the
code complies with the ownership rules, it might reject a correct program; in
this way, it’s conservative. If Rust accepted an incorrect program, users
wouldn’t be able to trust the guarantees Rust makes. However, if Rust rejects a
correct program, the programmer will be inconvenienced, but nothing
catastrophic can occur. The RefCell<T> type is useful when you’re sure your
code follows the borrowing rules but the compiler is unable to understand and
guarantee that.
Similar to Rc<T>, RefCell<T> is only for use in single-threaded scenarios
and will give you a compile-time error if you try using it in a multithreaded
context. We’ll talk about how to get the functionality of RefCell<T> in a
multithreaded program in Chapter 16.
Here is a recap of the reasons to choose Box<T>, Rc<T>, or RefCell<T>:
Rc<T>enables multiple owners of the same data;Box<T>andRefCell<T>have single owners.Box<T>allows immutable or mutable borrows checked at compile time;Rc<T>allows only immutable borrows checked at compile time;RefCell<T>allows immutable or mutable borrows checked at runtime.- Because
RefCell<T>allows mutable borrows checked at runtime, you can mutate the value inside theRefCell<T>even when theRefCell<T>is immutable.
Mutating the value inside an immutable value is the interior mutability pattern. Let’s look at a situation in which interior mutability is useful and examine how it’s possible.
Using Interior Mutability
A consequence of the borrowing rules is that when you have an immutable value, you can’t borrow it mutably. For example, this code won’t compile:
fn main() {
let x = 5;
let y = &mut x;
}If you tried to compile this code, you’d get the following error:
$ cargo run
Compiling borrowing v0.1.0 (file:///projects/borrowing)
error[E0596]: cannot borrow `x` as mutable, as it is not declared as mutable
--> src/main.rs:3:13
|
3 | let y = &mut x;
| ^^^^^^ cannot borrow as mutable
|
help: consider changing this to be mutable
|
2 | let mut x = 5;
| +++
For more information about this error, try `rustc --explain E0596`.
error: could not compile `borrowing` (bin "borrowing") due to 1 previous error
However, there are situations in which it would be useful for a value to mutate
itself in its methods but appear immutable to other code. Code outside the
value’s methods would not be able to mutate the value. Using RefCell<T> is
one way to get the ability to have interior mutability, but RefCell<T>
doesn’t get around the borrowing rules completely: The borrow checker in the
compiler allows this interior mutability, and the borrowing rules are checked
at runtime instead. If you violate the rules, you’ll get a panic! instead of
a compiler error.
Let’s work through a practical example where we can use RefCell<T> to mutate
an immutable value and see why that is useful.
Testing with Mock Objects
Sometimes during testing a programmer will use a type in place of another type, in order to observe particular behavior and assert that it’s implemented correctly. This placeholder type is called a test double. Think of it in the sense of a stunt double in filmmaking, where a person steps in and substitutes for an actor to do a particularly tricky scene. Test doubles stand in for other types when we’re running tests. Mock objects are specific types of test doubles that record what happens during a test so that you can assert that the correct actions took place.
Rust doesn’t have objects in the same sense as other languages have objects, and Rust doesn’t have mock object functionality built into the standard library as some other languages do. However, you can definitely create a struct that will serve the same purposes as a mock object.
Here’s the scenario we’ll test: We’ll create a library that tracks a value against a maximum value and sends messages based on how close to the maximum value the current value is. This library could be used to keep track of a user’s quota for the number of API calls they’re allowed to make, for example.
Our library will only provide the functionality of tracking how close to the
maximum a value is and what the messages should be at what times. Applications
that use our library will be expected to provide the mechanism for sending the
messages: The application could show the message to the user directly, send an
email, send a text message, or do something else. The library doesn’t need to
know that detail. All it needs is something that implements a trait we’ll
provide, called Messenger. Listing 15-20 shows the library code.
pub trait Messenger {
fn send(&self, msg: &str);
}
pub struct LimitTracker<'a, T: Messenger> {
messenger: &'a T,
value: usize,
max: usize,
}
impl<'a, T> LimitTracker<'a, T>
where
T: Messenger,
{
pub fn new(messenger: &'a T, max: usize) -> LimitTracker<'a, T> {
LimitTracker {
messenger,
value: 0,
max,
}
}
pub fn set_value(&mut self, value: usize) {
self.value = value;
let percentage_of_max = self.value as f64 / self.max as f64;
if percentage_of_max >= 1.0 {
self.messenger.send("Error: You are over your quota!");
} else if percentage_of_max >= 0.9 {
self.messenger
.send("Urgent warning: You've used up over 90% of your quota!");
} else if percentage_of_max >= 0.75 {
self.messenger
.send("Warning: You've used up over 75% of your quota!");
}
}
}One important part of this code is that the Messenger trait has one method
called send that takes an immutable reference to self and the text of the
message. This trait is the interface our mock object needs to implement so that
the mock can be used in the same way a real object is. The other important part
is that we want to test the behavior of the set_value method on the
LimitTracker. We can change what we pass in for the value parameter, but
set_value doesn’t return anything for us to make assertions on. We want to be
able to say that if we create a LimitTracker with something that implements
the Messenger trait and a particular value for max, the messenger is told
to send the appropriate messages when we pass different numbers for value.
We need a mock object that, instead of sending an email or text message when we
call send, will only keep track of the messages it’s told to send. We can
create a new instance of the mock object, create a LimitTracker that uses the
mock object, call the set_value method on LimitTracker, and then check that
the mock object has the messages we expect. Listing 15-21 shows an attempt to
implement a mock object to do just that, but the borrow checker won’t allow it.
pub trait Messenger {
fn send(&self, msg: &str);
}
pub struct LimitTracker<'a, T: Messenger> {
messenger: &'a T,
value: usize,
max: usize,
}
impl<'a, T> LimitTracker<'a, T>
where
T: Messenger,
{
pub fn new(messenger: &'a T, max: usize) -> LimitTracker<'a, T> {
LimitTracker {
messenger,
value: 0,
max,
}
}
pub fn set_value(&mut self, value: usize) {
self.value = value;
let percentage_of_max = self.value as f64 / self.max as f64;
if percentage_of_max >= 1.0 {
self.messenger.send("Error: You are over your quota!");
} else if percentage_of_max >= 0.9 {
self.messenger
.send("Urgent warning: You've used up over 90% of your quota!");
} else if percentage_of_max >= 0.75 {
self.messenger
.send("Warning: You've used up over 75% of your quota!");
}
}
}
#[cfg(test)]
mod tests {
use super::*;
struct MockMessenger {
sent_messages: Vec<String>,
}
impl MockMessenger {
fn new() -> MockMessenger {
MockMessenger {
sent_messages: vec![],
}
}
}
impl Messenger for MockMessenger {
fn send(&self, message: &str) {
self.sent_messages.push(String::from(message));
}
}
#[test]
fn it_sends_an_over_75_percent_warning_message() {
let mock_messenger = MockMessenger::new();
let mut limit_tracker = LimitTracker::new(&mock_messenger, 100);
limit_tracker.set_value(80);
assert_eq!(mock_messenger.sent_messages.len(), 1);
}
}MockMessenger that isn’t allowed by the borrow checkerThis test code defines a MockMessenger struct that has a sent_messages
field with a Vec of String values to keep track of the messages it’s told
to send. We also define an associated function new to make it convenient to
create new MockMessenger values that start with an empty list of messages. We
then implement the Messenger trait for MockMessenger so that we can give a
MockMessenger to a LimitTracker. In the definition of the send method, we
take the message passed in as a parameter and store it in the MockMessenger
list of sent_messages.
In the test, we’re testing what happens when the LimitTracker is told to set
value to something that is more than 75 percent of the max value. First, we
create a new MockMessenger, which will start with an empty list of messages.
Then, we create a new LimitTracker and give it a reference to the new
MockMessenger and a max value of 100. We call the set_value method on
the LimitTracker with a value of 80, which is more than 75 percent of 100.
Then, we assert that the list of messages that the MockMessenger is keeping
track of should now have one message in it.
However, there’s one problem with this test, as shown here:
$ cargo test
Compiling limit-tracker v0.1.0 (file:///projects/limit-tracker)
error[E0596]: cannot borrow `self.sent_messages` as mutable, as it is behind a `&` reference
--> src/lib.rs:58:13
|
58 | self.sent_messages.push(String::from(message));
| ^^^^^^^^^^^^^^^^^^ `self` is a `&` reference, so the data it refers to cannot be borrowed as mutable
|
help: consider changing this to be a mutable reference in the `impl` method and the `trait` definition
|
2 ~ fn send(&mut self, msg: &str);
3 | }
...
56 | impl Messenger for MockMessenger {
57 ~ fn send(&mut self, message: &str) {
|
For more information about this error, try `rustc --explain E0596`.
error: could not compile `limit-tracker` (lib test) due to 1 previous error
We can’t modify the MockMessenger to keep track of the messages, because the
send method takes an immutable reference to self. We also can’t take the
suggestion from the error text to use &mut self in both the impl method and
the trait definition. We do not want to change the Messenger trait solely for
the sake of testing. Instead, we need to find a way to make our test code work
correctly with our existing design.
This is a situation in which interior mutability can help! We’ll store the
sent_messages within a RefCell<T>, and then the send method will be able
to modify sent_messages to store the messages we’ve seen. Listing 15-22 shows
what that looks like.
pub trait Messenger {
fn send(&self, msg: &str);
}
pub struct LimitTracker<'a, T: Messenger> {
messenger: &'a T,
value: usize,
max: usize,
}
impl<'a, T> LimitTracker<'a, T>
where
T: Messenger,
{
pub fn new(messenger: &'a T, max: usize) -> LimitTracker<'a, T> {
LimitTracker {
messenger,
value: 0,
max,
}
}
pub fn set_value(&mut self, value: usize) {
self.value = value;
let percentage_of_max = self.value as f64 / self.max as f64;
if percentage_of_max >= 1.0 {
self.messenger.send("Error: You are over your quota!");
} else if percentage_of_max >= 0.9 {
self.messenger
.send("Urgent warning: You've used up over 90% of your quota!");
} else if percentage_of_max >= 0.75 {
self.messenger
.send("Warning: You've used up over 75% of your quota!");
}
}
}
#[cfg(test)]
mod tests {
use super::*;
use std::cell::RefCell;
struct MockMessenger {
sent_messages: RefCell<Vec<String>>,
}
impl MockMessenger {
fn new() -> MockMessenger {
MockMessenger {
sent_messages: RefCell::new(vec![]),
}
}
}
impl Messenger for MockMessenger {
fn send(&self, message: &str) {
self.sent_messages.borrow_mut().push(String::from(message));
}
}
#[test]
fn it_sends_an_over_75_percent_warning_message() {
// --snip--
let mock_messenger = MockMessenger::new();
let mut limit_tracker = LimitTracker::new(&mock_messenger, 100);
limit_tracker.set_value(80);
assert_eq!(mock_messenger.sent_messages.borrow().len(), 1);
}
}RefCell<T> to mutate an inner value while the outer value is considered immutableThe sent_messages field is now of type RefCell<Vec<String>> instead of
Vec<String>. In the new function, we create a new RefCell<Vec<String>>
instance around the empty vector.
For the implementation of the send method, the first parameter is still an
immutable borrow of self, which matches the trait definition. We call
borrow_mut on the RefCell<Vec<String>> in self.sent_messages to get a
mutable reference to the value inside the RefCell<Vec<String>>, which is the
vector. Then, we can call push on the mutable reference to the vector to keep
track of the messages sent during the test.
The last change we have to make is in the assertion: To see how many items are
in the inner vector, we call borrow on the RefCell<Vec<String>> to get an
immutable reference to the vector.
Now that you’ve seen how to use RefCell<T>, let’s dig into how it works!
Tracking Borrows at Runtime
When creating immutable and mutable references, we use the & and &mut
syntax, respectively. With RefCell<T>, we use the borrow and borrow_mut
methods, which are part of the safe API that belongs to RefCell<T>. The
borrow method returns the smart pointer type Ref<T>, and borrow_mut
returns the smart pointer type RefMut<T>. Both types implement Deref, so we
can treat them like regular references.
The RefCell<T> keeps track of how many Ref<T> and RefMut<T> smart
pointers are currently active. Every time we call borrow, the RefCell<T>
increases its count of how many immutable borrows are active. When a Ref<T>
value goes out of scope, the count of immutable borrows goes down by 1. Just
like the compile-time borrowing rules, RefCell<T> lets us have many immutable
borrows or one mutable borrow at any point in time.
If we try to violate these rules, rather than getting a compiler error as we
would with references, the implementation of RefCell<T> will panic at
runtime. Listing 15-23 shows a modification of the implementation of send in
Listing 15-22. We’re deliberately trying to create two mutable borrows active
for the same scope to illustrate that RefCell<T> prevents us from doing this
at runtime.
pub trait Messenger {
fn send(&self, msg: &str);
}
pub struct LimitTracker<'a, T: Messenger> {
messenger: &'a T,
value: usize,
max: usize,
}
impl<'a, T> LimitTracker<'a, T>
where
T: Messenger,
{
pub fn new(messenger: &'a T, max: usize) -> LimitTracker<'a, T> {
LimitTracker {
messenger,
value: 0,
max,
}
}
pub fn set_value(&mut self, value: usize) {
self.value = value;
let percentage_of_max = self.value as f64 / self.max as f64;
if percentage_of_max >= 1.0 {
self.messenger.send("Error: You are over your quota!");
} else if percentage_of_max >= 0.9 {
self.messenger
.send("Urgent warning: You've used up over 90% of your quota!");
} else if percentage_of_max >= 0.75 {
self.messenger
.send("Warning: You've used up over 75% of your quota!");
}
}
}
#[cfg(test)]
mod tests {
use super::*;
use std::cell::RefCell;
struct MockMessenger {
sent_messages: RefCell<Vec<String>>,
}
impl MockMessenger {
fn new() -> MockMessenger {
MockMessenger {
sent_messages: RefCell::new(vec![]),
}
}
}
impl Messenger for MockMessenger {
fn send(&self, message: &str) {
let mut one_borrow = self.sent_messages.borrow_mut();
let mut two_borrow = self.sent_messages.borrow_mut();
one_borrow.push(String::from(message));
two_borrow.push(String::from(message));
}
}
#[test]
fn it_sends_an_over_75_percent_warning_message() {
let mock_messenger = MockMessenger::new();
let mut limit_tracker = LimitTracker::new(&mock_messenger, 100);
limit_tracker.set_value(80);
assert_eq!(mock_messenger.sent_messages.borrow().len(), 1);
}
}RefCell<T> will panicWe create a variable one_borrow for the RefMut<T> smart pointer returned
from borrow_mut. Then, we create another mutable borrow in the same way in
the variable two_borrow. This makes two mutable references in the same scope,
which isn’t allowed. When we run the tests for our library, the code in Listing
15-23 will compile without any errors, but the test will fail:
$ cargo test
Compiling limit-tracker v0.1.0 (file:///projects/limit-tracker)
Finished `test` profile [unoptimized + debuginfo] target(s) in 0.91s
Running unittests src/lib.rs (target/debug/deps/limit_tracker-e599811fa246dbde)
running 1 test
test tests::it_sends_an_over_75_percent_warning_message ... FAILED
failures:
---- tests::it_sends_an_over_75_percent_warning_message stdout ----
thread 'tests::it_sends_an_over_75_percent_warning_message' panicked at src/lib.rs:60:53:
RefCell already borrowed
note: run with `RUST_BACKTRACE=1` environment variable to display a backtrace
failures:
tests::it_sends_an_over_75_percent_warning_message
test result: FAILED. 0 passed; 1 failed; 0 ignored; 0 measured; 0 filtered out; finished in 0.00s
error: test failed, to rerun pass `--lib`
Notice that the code panicked with the message already borrowed: BorrowMutError. This is how RefCell<T> handles violations of the borrowing
rules at runtime.
Choosing to catch borrowing errors at runtime rather than compile time, as
we’ve done here, means you’d potentially be finding mistakes in your code later
in the development process: possibly not until your code was deployed to
production. Also, your code would incur a small runtime performance penalty as
a result of keeping track of the borrows at runtime rather than compile time.
However, using RefCell<T> makes it possible to write a mock object that can
modify itself to keep track of the messages it has seen while you’re using it
in a context where only immutable values are allowed. You can use RefCell<T>
despite its trade-offs to get more functionality than regular references
provide.
Allowing Multiple Owners of Mutable Data
A common way to use RefCell<T> is in combination with Rc<T>. Recall that
Rc<T> lets you have multiple owners of some data, but it only gives immutable
access to that data. If you have an Rc<T> that holds a RefCell<T>, you can
get a value that can have multiple owners and that you can mutate!
For example, recall the cons list example in Listing 15-18 where we used
Rc<T> to allow multiple lists to share ownership of another list. Because
Rc<T> holds only immutable values, we can’t change any of the values in the
list once we’ve created them. Let’s add in RefCell<T> for its ability to
change the values in the lists. Listing 15-24 shows that by using a
RefCell<T> in the Cons definition, we can modify the value stored in all
the lists.
#[derive(Debug)]
enum List {
Cons(Rc<RefCell<i32>>, Rc<List>),
Nil,
}
use crate::List::{Cons, Nil};
use std::cell::RefCell;
use std::rc::Rc;
fn main() {
let value = Rc::new(RefCell::new(5));
let a = Rc::new(Cons(Rc::clone(&value), Rc::new(Nil)));
let b = Cons(Rc::new(RefCell::new(3)), Rc::clone(&a));
let c = Cons(Rc::new(RefCell::new(4)), Rc::clone(&a));
*value.borrow_mut() += 10;
println!("a after = {a:?}");
println!("b after = {b:?}");
println!("c after = {c:?}");
}Rc<RefCell<i32>> to create a List that we can mutateWe create a value that is an instance of Rc<RefCell<i32>> and store it in a
variable named value so that we can access it directly later. Then, we create
a List in a with a Cons variant that holds value. We need to clone
value so that both a and value have ownership of the inner 5 value
rather than transferring ownership from value to a or having a borrow
from value.
We wrap the list a in an Rc<T> so that when we create lists b and c,
they can both refer to a, which is what we did in Listing 15-18.
After we’ve created the lists in a, b, and c, we want to add 10 to the
value in value. We do this by calling borrow_mut on value, which uses the
automatic dereferencing feature we discussed in “Where’s the ->
Operator?” in Chapter 5 to dereference
the Rc<T> to the inner RefCell<T> value. The borrow_mut method returns a
RefMut<T> smart pointer, and we use the dereference operator on it and change
the inner value.
When we print a, b, and c, we can see that they all have the modified
value of 15 rather than 5:
$ cargo run
Compiling cons-list v0.1.0 (file:///projects/cons-list)
Finished `dev` profile [unoptimized + debuginfo] target(s) in 0.63s
Running `target/debug/cons-list`
a after = Cons(RefCell { value: 15 }, Nil)
b after = Cons(RefCell { value: 3 }, Cons(RefCell { value: 15 }, Nil))
c after = Cons(RefCell { value: 4 }, Cons(RefCell { value: 15 }, Nil))
This technique is pretty neat! By using RefCell<T>, we have an outwardly
immutable List value. But we can use the methods on RefCell<T> that provide
access to its interior mutability so that we can modify our data when we need
to. The runtime checks of the borrowing rules protect us from data races, and
it’s sometimes worth trading a bit of speed for this flexibility in our data
structures. Note that RefCell<T> does not work for multithreaded code!
Mutex<T> is the thread-safe version of RefCell<T>, and we’ll discuss
Mutex<T> in Chapter 16.
引用循环可能导致内存泄漏
Reference Cycles Can Leak Memory
Rust’s memory safety guarantees make it difficult, but not impossible, to
accidentally create memory that is never cleaned up (known as a memory leak).
Preventing memory leaks entirely is not one of Rust’s guarantees, meaning
memory leaks are memory safe in Rust. We can see that Rust allows memory leaks
by using Rc<T> and RefCell<T>: It’s possible to create references where
items refer to each other in a cycle. This creates memory leaks because the
reference count of each item in the cycle will never reach 0, and the values
will never be dropped.
Creating a Reference Cycle
Let’s look at how a reference cycle might happen and how to prevent it,
starting with the definition of the List enum and a tail method in Listing
15-25.
use crate::List::{Cons, Nil};
use std::cell::RefCell;
use std::rc::Rc;
#[derive(Debug)]
enum List {
Cons(i32, RefCell<Rc<List>>),
Nil,
}
impl List {
fn tail(&self) -> Option<&RefCell<Rc<List>>> {
match self {
Cons(_, item) => Some(item),
Nil => None,
}
}
}
fn main() {}RefCell<T> so that we can modify what a Cons variant is referring toWe’re using another variation of the List definition from Listing 15-5. The
second element in the Cons variant is now RefCell<Rc<List>>, meaning that
instead of having the ability to modify the i32 value as we did in Listing
15-24, we want to modify the List value a Cons variant is pointing to.
We’re also adding a tail method to make it convenient for us to access the
second item if we have a Cons variant.
In Listing 15-26, we’re adding a main function that uses the definitions in
Listing 15-25. This code creates a list in a and a list in b that points to
the list in a. Then, it modifies the list in a to point to b, creating a
reference cycle. There are println! statements along the way to show what the
reference counts are at various points in this process.
use crate::List::{Cons, Nil};
use std::cell::RefCell;
use std::rc::Rc;
#[derive(Debug)]
enum List {
Cons(i32, RefCell<Rc<List>>),
Nil,
}
impl List {
fn tail(&self) -> Option<&RefCell<Rc<List>>> {
match self {
Cons(_, item) => Some(item),
Nil => None,
}
}
}
fn main() {
let a = Rc::new(Cons(5, RefCell::new(Rc::new(Nil))));
println!("a initial rc count = {}", Rc::strong_count(&a));
println!("a next item = {:?}", a.tail());
let b = Rc::new(Cons(10, RefCell::new(Rc::clone(&a))));
println!("a rc count after b creation = {}", Rc::strong_count(&a));
println!("b initial rc count = {}", Rc::strong_count(&b));
println!("b next item = {:?}", b.tail());
if let Some(link) = a.tail() {
*link.borrow_mut() = Rc::clone(&b);
}
println!("b rc count after changing a = {}", Rc::strong_count(&b));
println!("a rc count after changing a = {}", Rc::strong_count(&a));
// Uncomment the next line to see that we have a cycle;
// it will overflow the stack.
// println!("a next item = {:?}", a.tail());
}List values pointing to each otherWe create an Rc<List> instance holding a List value in the variable a
with an initial list of 5, Nil. We then create an Rc<List> instance holding
another List value in the variable b that contains the value 10 and
points to the list in a.
We modify a so that it points to b instead of Nil, creating a cycle. We
do that by using the tail method to get a reference to the
RefCell<Rc<List>> in a, which we put in the variable link. Then, we use
the borrow_mut method on the RefCell<Rc<List>> to change the value inside
from an Rc<List> that holds a Nil value to the Rc<List> in b.
When we run this code, keeping the last println! commented out for the
moment, we’ll get this output:
$ cargo run
Compiling cons-list v0.1.0 (file:///projects/cons-list)
Finished `dev` profile [unoptimized + debuginfo] target(s) in 0.53s
Running `target/debug/cons-list`
a initial rc count = 1
a next item = Some(RefCell { value: Nil })
a rc count after b creation = 2
b initial rc count = 1
b next item = Some(RefCell { value: Cons(5, RefCell { value: Nil }) })
b rc count after changing a = 2
a rc count after changing a = 2
The reference count of the Rc<List> instances in both a and b is 2 after
we change the list in a to point to b. At the end of main, Rust drops the
variable b, which decreases the reference count of the b Rc<List>
instance from 2 to 1. The memory that Rc<List> has on the heap won’t be
dropped at this point because its reference count is 1, not 0. Then, Rust drops
a, which decreases the reference count of the a Rc<List> instance from 2
to 1 as well. This instance’s memory can’t be dropped either, because the other
Rc<List> instance still refers to it. The memory allocated to the list will
remain uncollected forever. To visualize this reference cycle, we’ve created
the diagram in Figure 15-4.
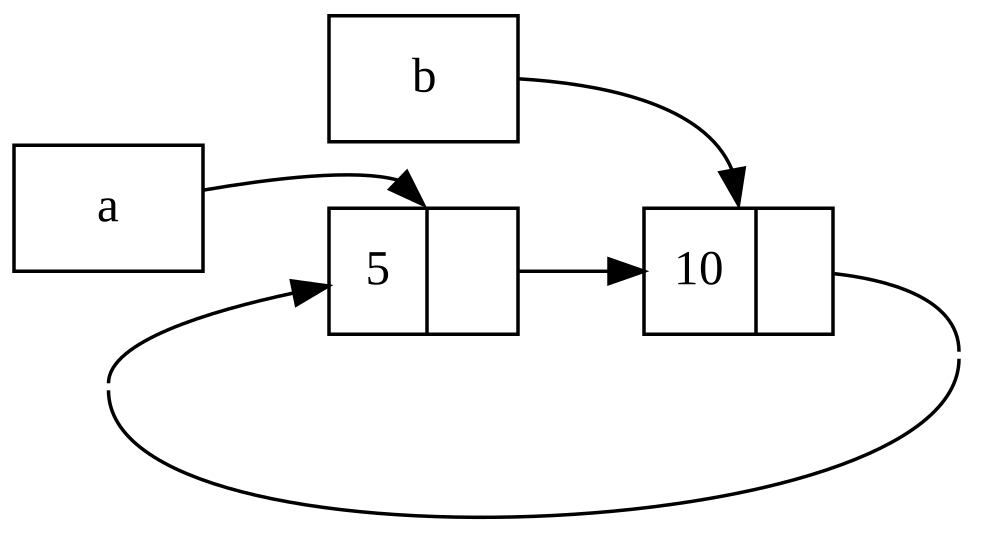
Figure 15-4: A reference cycle of lists a and b
pointing to each other
If you uncomment the last println! and run the program, Rust will try to
print this cycle with a pointing to b pointing to a and so forth until it
overflows the stack.
Compared to a real-world program, the consequences of creating a reference cycle in this example aren’t very dire: Right after we create the reference cycle, the program ends. However, if a more complex program allocated lots of memory in a cycle and held onto it for a long time, the program would use more memory than it needed and might overwhelm the system, causing it to run out of available memory.
Creating reference cycles is not easily done, but it’s not impossible either.
If you have RefCell<T> values that contain Rc<T> values or similar nested
combinations of types with interior mutability and reference counting, you must
ensure that you don’t create cycles; you can’t rely on Rust to catch them.
Creating a reference cycle would be a logic bug in your program that you should
use automated tests, code reviews, and other software development practices to
minimize.
Another solution for avoiding reference cycles is reorganizing your data
structures so that some references express ownership and some references don’t.
As a result, you can have cycles made up of some ownership relationships and
some non-ownership relationships, and only the ownership relationships affect
whether or not a value can be dropped. In Listing 15-25, we always want Cons
variants to own their list, so reorganizing the data structure isn’t possible.
Let’s look at an example using graphs made up of parent nodes and child nodes
to see when non-ownership relationships are an appropriate way to prevent
reference cycles.
Preventing Reference Cycles Using Weak<T>
So far, we’ve demonstrated that calling Rc::clone increases the
strong_count of an Rc<T> instance, and an Rc<T> instance is only cleaned
up if its strong_count is 0. You can also create a weak reference to the
value within an Rc<T> instance by calling Rc::downgrade and passing a
reference to the Rc<T>. Strong references are how you can share ownership
of an Rc<T> instance. Weak references don’t express an ownership
relationship, and their count doesn’t affect when an Rc<T> instance is
cleaned up. They won’t cause a reference cycle, because any cycle involving
some weak references will be broken once the strong reference count of values
involved is 0.
When you call Rc::downgrade, you get a smart pointer of type Weak<T>.
Instead of increasing the strong_count in the Rc<T> instance by 1, calling
Rc::downgrade increases the weak_count by 1. The Rc<T> type uses
weak_count to keep track of how many Weak<T> references exist, similar to
strong_count. The difference is the weak_count doesn’t need to be 0 for the
Rc<T> instance to be cleaned up.
Because the value that Weak<T> references might have been dropped, to do
anything with the value that a Weak<T> is pointing to you must make sure the
value still exists. Do this by calling the upgrade method on a Weak<T>
instance, which will return an Option<Rc<T>>. You’ll get a result of Some
if the Rc<T> value has not been dropped yet and a result of None if the
Rc<T> value has been dropped. Because upgrade returns an Option<Rc<T>>,
Rust will ensure that the Some case and the None case are handled, and
there won’t be an invalid pointer.
As an example, rather than using a list whose items know only about the next item, we’ll create a tree whose items know about their child items and their parent items.
Creating a Tree Data Structure
To start, we’ll build a tree with nodes that know about their child nodes.
We’ll create a struct named Node that holds its own i32 value as well as
references to its child Node values:
Filename: src/main.rs
use std::cell::RefCell;
use std::rc::Rc;
#[derive(Debug)]
struct Node {
value: i32,
children: RefCell<Vec<Rc<Node>>>,
}
fn main() {
let leaf = Rc::new(Node {
value: 3,
children: RefCell::new(vec![]),
});
let branch = Rc::new(Node {
value: 5,
children: RefCell::new(vec![Rc::clone(&leaf)]),
});
}We want a Node to own its children, and we want to share that ownership with
variables so that we can access each Node in the tree directly. To do this,
we define the Vec<T> items to be values of type Rc<Node>. We also want to
modify which nodes are children of another node, so we have a RefCell<T> in
children around the Vec<Rc<Node>>.
Next, we’ll use our struct definition and create one Node instance named
leaf with the value 3 and no children, and another instance named branch
with the value 5 and leaf as one of its children, as shown in Listing 15-27.
use std::cell::RefCell;
use std::rc::Rc;
#[derive(Debug)]
struct Node {
value: i32,
children: RefCell<Vec<Rc<Node>>>,
}
fn main() {
let leaf = Rc::new(Node {
value: 3,
children: RefCell::new(vec![]),
});
let branch = Rc::new(Node {
value: 5,
children: RefCell::new(vec![Rc::clone(&leaf)]),
});
}leaf node with no children and a branch node with leaf as one of its childrenWe clone the Rc<Node> in leaf and store that in branch, meaning the
Node in leaf now has two owners: leaf and branch. We can get from
branch to leaf through branch.children, but there’s no way to get from
leaf to branch. The reason is that leaf has no reference to branch and
doesn’t know they’re related. We want leaf to know that branch is its
parent. We’ll do that next.
Adding a Reference from a Child to Its Parent
To make the child node aware of its parent, we need to add a parent field to
our Node struct definition. The trouble is in deciding what the type of
parent should be. We know it can’t contain an Rc<T>, because that would
create a reference cycle with leaf.parent pointing to branch and
branch.children pointing to leaf, which would cause their strong_count
values to never be 0.
Thinking about the relationships another way, a parent node should own its children: If a parent node is dropped, its child nodes should be dropped as well. However, a child should not own its parent: If we drop a child node, the parent should still exist. This is a case for weak references!
So, instead of Rc<T>, we’ll make the type of parent use Weak<T>,
specifically a RefCell<Weak<Node>>. Now our Node struct definition looks
like this:
Filename: src/main.rs
use std::cell::RefCell;
use std::rc::{Rc, Weak};
#[derive(Debug)]
struct Node {
value: i32,
parent: RefCell<Weak<Node>>,
children: RefCell<Vec<Rc<Node>>>,
}
fn main() {
let leaf = Rc::new(Node {
value: 3,
parent: RefCell::new(Weak::new()),
children: RefCell::new(vec![]),
});
println!("leaf parent = {:?}", leaf.parent.borrow().upgrade());
let branch = Rc::new(Node {
value: 5,
parent: RefCell::new(Weak::new()),
children: RefCell::new(vec![Rc::clone(&leaf)]),
});
*leaf.parent.borrow_mut() = Rc::downgrade(&branch);
println!("leaf parent = {:?}", leaf.parent.borrow().upgrade());
}A node will be able to refer to its parent node but doesn’t own its parent. In
Listing 15-28, we update main to use this new definition so that the leaf
node will have a way to refer to its parent, branch.
use std::cell::RefCell;
use std::rc::{Rc, Weak};
#[derive(Debug)]
struct Node {
value: i32,
parent: RefCell<Weak<Node>>,
children: RefCell<Vec<Rc<Node>>>,
}
fn main() {
let leaf = Rc::new(Node {
value: 3,
parent: RefCell::new(Weak::new()),
children: RefCell::new(vec![]),
});
println!("leaf parent = {:?}", leaf.parent.borrow().upgrade());
let branch = Rc::new(Node {
value: 5,
parent: RefCell::new(Weak::new()),
children: RefCell::new(vec![Rc::clone(&leaf)]),
});
*leaf.parent.borrow_mut() = Rc::downgrade(&branch);
println!("leaf parent = {:?}", leaf.parent.borrow().upgrade());
}leaf node with a weak reference to its parent node, branchCreating the leaf node looks similar to Listing 15-27 with the exception of
the parent field: leaf starts out without a parent, so we create a new,
empty Weak<Node> reference instance.
At this point, when we try to get a reference to the parent of leaf by using
the upgrade method, we get a None value. We see this in the output from the
first println! statement:
leaf parent = None
When we create the branch node, it will also have a new Weak<Node>
reference in the parent field because branch doesn’t have a parent node. We
still have leaf as one of the children of branch. Once we have the Node
instance in branch, we can modify leaf to give it a Weak<Node> reference
to its parent. We use the borrow_mut method on the RefCell<Weak<Node>> in
the parent field of leaf, and then we use the Rc::downgrade function to
create a Weak<Node> reference to branch from the Rc<Node> in branch.
When we print the parent of leaf again, this time we’ll get a Some variant
holding branch: Now leaf can access its parent! When we print leaf, we
also avoid the cycle that eventually ended in a stack overflow like we had in
Listing 15-26; the Weak<Node> references are printed as (Weak):
leaf parent = Some(Node { value: 5, parent: RefCell { value: (Weak) },
children: RefCell { value: [Node { value: 3, parent: RefCell { value: (Weak) },
children: RefCell { value: [] } }] } })
The lack of infinite output indicates that this code didn’t create a reference
cycle. We can also tell this by looking at the values we get from calling
Rc::strong_count and Rc::weak_count.
Visualizing Changes to strong_count and weak_count
Let’s look at how the strong_count and weak_count values of the Rc<Node>
instances change by creating a new inner scope and moving the creation of
branch into that scope. By doing so, we can see what happens when branch is
created and then dropped when it goes out of scope. The modifications are shown
in Listing 15-29.
use std::cell::RefCell;
use std::rc::{Rc, Weak};
#[derive(Debug)]
struct Node {
value: i32,
parent: RefCell<Weak<Node>>,
children: RefCell<Vec<Rc<Node>>>,
}
fn main() {
let leaf = Rc::new(Node {
value: 3,
parent: RefCell::new(Weak::new()),
children: RefCell::new(vec![]),
});
println!(
"leaf strong = {}, weak = {}",
Rc::strong_count(&leaf),
Rc::weak_count(&leaf),
);
{
let branch = Rc::new(Node {
value: 5,
parent: RefCell::new(Weak::new()),
children: RefCell::new(vec![Rc::clone(&leaf)]),
});
*leaf.parent.borrow_mut() = Rc::downgrade(&branch);
println!(
"branch strong = {}, weak = {}",
Rc::strong_count(&branch),
Rc::weak_count(&branch),
);
println!(
"leaf strong = {}, weak = {}",
Rc::strong_count(&leaf),
Rc::weak_count(&leaf),
);
}
println!("leaf parent = {:?}", leaf.parent.borrow().upgrade());
println!(
"leaf strong = {}, weak = {}",
Rc::strong_count(&leaf),
Rc::weak_count(&leaf),
);
}branch in an inner scope and examining strong and weak reference countsAfter leaf is created, its Rc<Node> has a strong count of 1 and a weak
count of 0. In the inner scope, we create branch and associate it with
leaf, at which point when we print the counts, the Rc<Node> in branch
will have a strong count of 1 and a weak count of 1 (for leaf.parent pointing
to branch with a Weak<Node>). When we print the counts in leaf, we’ll see
it will have a strong count of 2 because branch now has a clone of the
Rc<Node> of leaf stored in branch.children but will still have a weak
count of 0.
When the inner scope ends, branch goes out of scope and the strong count of
the Rc<Node> decreases to 0, so its Node is dropped. The weak count of 1
from leaf.parent has no bearing on whether or not Node is dropped, so we
don’t get any memory leaks!
If we try to access the parent of leaf after the end of the scope, we’ll get
None again. At the end of the program, the Rc<Node> in leaf has a strong
count of 1 and a weak count of 0 because the variable leaf is now the only
reference to the Rc<Node> again.
All of the logic that manages the counts and value dropping is built into
Rc<T> and Weak<T> and their implementations of the Drop trait. By
specifying that the relationship from a child to its parent should be a
Weak<T> reference in the definition of Node, you’re able to have parent
nodes point to child nodes and vice versa without creating a reference cycle
and memory leaks.
Summary
This chapter covered how to use smart pointers to make different guarantees and
trade-offs from those Rust makes by default with regular references. The
Box<T> type has a known size and points to data allocated on the heap. The
Rc<T> type keeps track of the number of references to data on the heap so
that the data can have multiple owners. The RefCell<T> type with its interior
mutability gives us a type that we can use when we need an immutable type but
need to change an inner value of that type; it also enforces the borrowing
rules at runtime instead of at compile time.
Also discussed were the Deref and Drop traits, which enable a lot of the
functionality of smart pointers. We explored reference cycles that can cause
memory leaks and how to prevent them using Weak<T>.
If this chapter has piqued your interest and you want to implement your own smart pointers, check out “The Rustonomicon” for more useful information.
Next, we’ll talk about concurrency in Rust. You’ll even learn about a few new smart pointers.
Fearless Concurrency
Handling concurrent programming safely and efficiently is another of Rust’s major goals. Concurrent programming, in which different parts of a program execute independently, and parallel programming, in which different parts of a program execute at the same time, are becoming increasingly important as more computers take advantage of their multiple processors. Historically, programming in these contexts has been difficult and error-prone. Rust hopes to change that.
Initially, the Rust team thought that ensuring memory safety and preventing concurrency problems were two separate challenges to be solved with different methods. Over time, the team discovered that the ownership and type systems are a powerful set of tools to help manage memory safety and concurrency problems! By leveraging ownership and type checking, many concurrency errors are compile-time errors in Rust rather than runtime errors. Therefore, rather than making you spend lots of time trying to reproduce the exact circumstances under which a runtime concurrency bug occurs, incorrect code will refuse to compile and present an error explaining the problem. As a result, you can fix your code while you’re working on it rather than potentially after it has been shipped to production. We’ve nicknamed this aspect of Rust fearless concurrency. Fearless concurrency allows you to write code that is free of subtle bugs and is easy to refactor without introducing new bugs.
Note: For simplicity’s sake, we’ll refer to many of the problems as concurrent rather than being more precise by saying concurrent and/or parallel. For this chapter, please mentally substitute concurrent and/or parallel whenever we use concurrent. In the next chapter, where the distinction matters more, we’ll be more specific.
Many languages are dogmatic about the solutions they offer for handling concurrent problems. For example, Erlang has elegant functionality for message-passing concurrency but has only obscure ways to share state between threads. Supporting only a subset of possible solutions is a reasonable strategy for higher-level languages because a higher-level language promises benefits from giving up some control to gain abstractions. However, lower-level languages are expected to provide the solution with the best performance in any given situation and have fewer abstractions over the hardware. Therefore, Rust offers a variety of tools for modeling problems in whatever way is appropriate for your situation and requirements.
Here are the topics we’ll cover in this chapter:
- How to create threads to run multiple pieces of code at the same time
- Message-passing concurrency, where channels send messages between threads
- Shared-state concurrency, where multiple threads have access to some piece of data
- The
SyncandSendtraits, which extend Rust’s concurrency guarantees to user-defined types as well as types provided by the standard library
使用线程同时运行代码
Using Threads to Run Code Simultaneously
In most current operating systems, an executed program’s code is run in a process, and the operating system will manage multiple processes at once. Within a program, you can also have independent parts that run simultaneously. The features that run these independent parts are called threads. For example, a web server could have multiple threads so that it can respond to more than one request at the same time.
Splitting the computation in your program into multiple threads to run multiple tasks at the same time can improve performance, but it also adds complexity. Because threads can run simultaneously, there’s no inherent guarantee about the order in which parts of your code on different threads will run. This can lead to problems, such as:
- Race conditions, in which threads are accessing data or resources in an inconsistent order
- Deadlocks, in which two threads are waiting for each other, preventing both threads from continuing
- Bugs that only happen in certain situations and are hard to reproduce and fix reliably
Rust attempts to mitigate the negative effects of using threads, but programming in a multithreaded context still takes careful thought and requires a code structure that is different from that in programs running in a single thread.
Programming languages implement threads in a few different ways, and many operating systems provide an API the programming language can call for creating new threads. The Rust standard library uses a 1:1 model of thread implementation, whereby a program uses one operating system thread per one language thread. There are crates that implement other models of threading that make different trade-offs to the 1:1 model. (Rust’s async system, which we will see in the next chapter, provides another approach to concurrency as well.)
Creating a New Thread with spawn
To create a new thread, we call the thread::spawn function and pass it a
closure (we talked about closures in Chapter 13) containing the code we want to
run in the new thread. The example in Listing 16-1 prints some text from a main
thread and other text from a new thread.
use std::thread;
use std::time::Duration;
fn main() {
thread::spawn(|| {
for i in 1..10 {
println!("hi number {i} from the spawned thread!");
thread::sleep(Duration::from_millis(1));
}
});
for i in 1..5 {
println!("hi number {i} from the main thread!");
thread::sleep(Duration::from_millis(1));
}
}Note that when the main thread of a Rust program completes, all spawned threads are shut down, whether or not they have finished running. The output from this program might be a little different every time, but it will look similar to the following:
hi number 1 from the main thread!
hi number 1 from the spawned thread!
hi number 2 from the main thread!
hi number 2 from the spawned thread!
hi number 3 from the main thread!
hi number 3 from the spawned thread!
hi number 4 from the main thread!
hi number 4 from the spawned thread!
hi number 5 from the spawned thread!
The calls to thread::sleep force a thread to stop its execution for a short
duration, allowing a different thread to run. The threads will probably take
turns, but that isn’t guaranteed: It depends on how your operating system
schedules the threads. In this run, the main thread printed first, even though
the print statement from the spawned thread appears first in the code. And even
though we told the spawned thread to print until i is 9, it only got to 5
before the main thread shut down.
If you run this code and only see output from the main thread, or don’t see any overlap, try increasing the numbers in the ranges to create more opportunities for the operating system to switch between the threads.
Waiting for All Threads to Finish
The code in Listing 16-1 not only stops the spawned thread prematurely most of the time due to the main thread ending, but because there is no guarantee on the order in which threads run, we also can’t guarantee that the spawned thread will get to run at all!
We can fix the problem of the spawned thread not running or of it ending
prematurely by saving the return value of thread::spawn in a variable. The
return type of thread::spawn is JoinHandle<T>. A JoinHandle<T> is an
owned value that, when we call the join method on it, will wait for its
thread to finish. Listing 16-2 shows how to use the JoinHandle<T> of the
thread we created in Listing 16-1 and how to call join to make sure the
spawned thread finishes before main exits.
use std::thread;
use std::time::Duration;
fn main() {
let handle = thread::spawn(|| {
for i in 1..10 {
println!("hi number {i} from the spawned thread!");
thread::sleep(Duration::from_millis(1));
}
});
for i in 1..5 {
println!("hi number {i} from the main thread!");
thread::sleep(Duration::from_millis(1));
}
handle.join().unwrap();
}JoinHandle<T> from thread::spawn to guarantee the thread is run to completionCalling join on the handle blocks the thread currently running until the
thread represented by the handle terminates. Blocking a thread means that
thread is prevented from performing work or exiting. Because we’ve put the call
to join after the main thread’s for loop, running Listing 16-2 should
produce output similar to this:
hi number 1 from the main thread!
hi number 2 from the main thread!
hi number 1 from the spawned thread!
hi number 3 from the main thread!
hi number 2 from the spawned thread!
hi number 4 from the main thread!
hi number 3 from the spawned thread!
hi number 4 from the spawned thread!
hi number 5 from the spawned thread!
hi number 6 from the spawned thread!
hi number 7 from the spawned thread!
hi number 8 from the spawned thread!
hi number 9 from the spawned thread!
The two threads continue alternating, but the main thread waits because of the
call to handle.join() and does not end until the spawned thread is finished.
But let’s see what happens when we instead move handle.join() before the
for loop in main, like this:
use std::thread;
use std::time::Duration;
fn main() {
let handle = thread::spawn(|| {
for i in 1..10 {
println!("hi number {i} from the spawned thread!");
thread::sleep(Duration::from_millis(1));
}
});
handle.join().unwrap();
for i in 1..5 {
println!("hi number {i} from the main thread!");
thread::sleep(Duration::from_millis(1));
}
}The main thread will wait for the spawned thread to finish and then run its
for loop, so the output won’t be interleaved anymore, as shown here:
hi number 1 from the spawned thread!
hi number 2 from the spawned thread!
hi number 3 from the spawned thread!
hi number 4 from the spawned thread!
hi number 5 from the spawned thread!
hi number 6 from the spawned thread!
hi number 7 from the spawned thread!
hi number 8 from the spawned thread!
hi number 9 from the spawned thread!
hi number 1 from the main thread!
hi number 2 from the main thread!
hi number 3 from the main thread!
hi number 4 from the main thread!
Small details, such as where join is called, can affect whether or not your
threads run at the same time.
Using move Closures with Threads
We’ll often use the move keyword with closures passed to thread::spawn
because the closure will then take ownership of the values it uses from the
environment, thus transferring ownership of those values from one thread to
another. In “Capturing References or Moving Ownership” in Chapter 13, we discussed move in the context of closures. Now we’ll
concentrate more on the interaction between move and thread::spawn.
Notice in Listing 16-1 that the closure we pass to thread::spawn takes no
arguments: We’re not using any data from the main thread in the spawned
thread’s code. To use data from the main thread in the spawned thread, the
spawned thread’s closure must capture the values it needs. Listing 16-3 shows
an attempt to create a vector in the main thread and use it in the spawned
thread. However, this won’t work yet, as you’ll see in a moment.
use std::thread;
fn main() {
let v = vec![1, 2, 3];
let handle = thread::spawn(|| {
println!("Here's a vector: {v:?}");
});
handle.join().unwrap();
}The closure uses v, so it will capture v and make it part of the closure’s
environment. Because thread::spawn runs this closure in a new thread, we
should be able to access v inside that new thread. But when we compile this
example, we get the following error:
$ cargo run
Compiling threads v0.1.0 (file:///projects/threads)
error[E0373]: closure may outlive the current function, but it borrows `v`, which is owned by the current function
--> src/main.rs:6:32
|
6 | let handle = thread::spawn(|| {
| ^^ may outlive borrowed value `v`
7 | println!("Here's a vector: {v:?}");
| - `v` is borrowed here
|
note: function requires argument type to outlive `'static`
--> src/main.rs:6:18
|
6 | let handle = thread::spawn(|| {
| __________________^
7 | | println!("Here's a vector: {v:?}");
8 | | });
| |______^
help: to force the closure to take ownership of `v` (and any other referenced variables), use the `move` keyword
|
6 | let handle = thread::spawn(move || {
| ++++
For more information about this error, try `rustc --explain E0373`.
error: could not compile `threads` (bin "threads") due to 1 previous error
Rust infers how to capture v, and because println! only needs a reference
to v, the closure tries to borrow v. However, there’s a problem: Rust can’t
tell how long the spawned thread will run, so it doesn’t know whether the
reference to v will always be valid.
Listing 16-4 provides a scenario that’s more likely to have a reference to v
that won’t be valid.
use std::thread;
fn main() {
let v = vec![1, 2, 3];
let handle = thread::spawn(|| {
println!("Here's a vector: {v:?}");
});
drop(v); // oh no!
handle.join().unwrap();
}v from a main thread that drops vIf Rust allowed us to run this code, there’s a possibility that the spawned
thread would be immediately put in the background without running at all. The
spawned thread has a reference to v inside, but the main thread immediately
drops v, using the drop function we discussed in Chapter 15. Then, when the
spawned thread starts to execute, v is no longer valid, so a reference to it
is also invalid. Oh no!
To fix the compiler error in Listing 16-3, we can use the error message’s advice:
help: to force the closure to take ownership of `v` (and any other referenced variables), use the `move` keyword
|
6 | let handle = thread::spawn(move || {
| ++++
By adding the move keyword before the closure, we force the closure to take
ownership of the values it’s using rather than allowing Rust to infer that it
should borrow the values. The modification to Listing 16-3 shown in Listing
16-5 will compile and run as we intend.
use std::thread;
fn main() {
let v = vec![1, 2, 3];
let handle = thread::spawn(move || {
println!("Here's a vector: {v:?}");
});
handle.join().unwrap();
}move keyword to force a closure to take ownership of the values it usesWe might be tempted to try the same thing to fix the code in Listing 16-4 where
the main thread called drop by using a move closure. However, this fix will
not work because what Listing 16-4 is trying to do is disallowed for a
different reason. If we added move to the closure, we would move v into the
closure’s environment, and we could no longer call drop on it in the main
thread. We would get this compiler error instead:
$ cargo run
Compiling threads v0.1.0 (file:///projects/threads)
error[E0382]: use of moved value: `v`
--> src/main.rs:10:10
|
4 | let v = vec![1, 2, 3];
| - move occurs because `v` has type `Vec<i32>`, which does not implement the `Copy` trait
5 |
6 | let handle = thread::spawn(move || {
| ------- value moved into closure here
7 | println!("Here's a vector: {v:?}");
| - variable moved due to use in closure
...
10 | drop(v); // oh no!
| ^ value used here after move
|
help: consider cloning the value before moving it into the closure
|
6 ~ let value = v.clone();
7 ~ let handle = thread::spawn(move || {
8 ~ println!("Here's a vector: {value:?}");
|
For more information about this error, try `rustc --explain E0382`.
error: could not compile `threads` (bin "threads") due to 1 previous error
Rust’s ownership rules have saved us again! We got an error from the code in
Listing 16-3 because Rust was being conservative and only borrowing v for the
thread, which meant the main thread could theoretically invalidate the spawned
thread’s reference. By telling Rust to move ownership of v to the spawned
thread, we’re guaranteeing to Rust that the main thread won’t use v anymore.
If we change Listing 16-4 in the same way, we’re then violating the ownership
rules when we try to use v in the main thread. The move keyword overrides
Rust’s conservative default of borrowing; it doesn’t let us violate the
ownership rules.
Now that we’ve covered what threads are and the methods supplied by the thread API, let’s look at some situations in which we can use threads.
使用消息传递在线程间传输数据
Transfer Data Between Threads with Message Passing
One increasingly popular approach to ensuring safe concurrency is message passing, where threads or actors communicate by sending each other messages containing data. Here’s the idea in a slogan from the Go language documentation: “Do not communicate by sharing memory; instead, share memory by communicating.”
To accomplish message-sending concurrency, Rust’s standard library provides an implementation of channels. A channel is a general programming concept by which data is sent from one thread to another.
You can imagine a channel in programming as being like a directional channel of water, such as a stream or a river. If you put something like a rubber duck into a river, it will travel downstream to the end of the waterway.
A channel has two halves: a transmitter and a receiver. The transmitter half is the upstream location where you put the rubber duck into the river, and the receiver half is where the rubber duck ends up downstream. One part of your code calls methods on the transmitter with the data you want to send, and another part checks the receiving end for arriving messages. A channel is said to be closed if either the transmitter or receiver half is dropped.
Here, we’ll work up to a program that has one thread to generate values and send them down a channel, and another thread that will receive the values and print them out. We’ll be sending simple values between threads using a channel to illustrate the feature. Once you’re familiar with the technique, you could use channels for any threads that need to communicate with each other, such as a chat system or a system where many threads perform parts of a calculation and send the parts to one thread that aggregates the results.
First, in Listing 16-6, we’ll create a channel but not do anything with it. Note that this won’t compile yet because Rust can’t tell what type of values we want to send over the channel.
use std::sync::mpsc;
fn main() {
let (tx, rx) = mpsc::channel();
}tx and rxWe create a new channel using the mpsc::channel function; mpsc stands for
multiple producer, single consumer. In short, the way Rust’s standard library
implements channels means a channel can have multiple sending ends that
produce values but only one receiving end that consumes those values. Imagine
multiple streams flowing together into one big river: Everything sent down any
of the streams will end up in one river at the end. We’ll start with a single
producer for now, but we’ll add multiple producers when we get this example
working.
The mpsc::channel function returns a tuple, the first element of which is the
sending end—the transmitter—and the second element of which is the receiving
end—the receiver. The abbreviations tx and rx are traditionally used in
many fields for transmitter and receiver, respectively, so we name our
variables as such to indicate each end. We’re using a let statement with a
pattern that destructures the tuples; we’ll discuss the use of patterns in
let statements and destructuring in Chapter 19. For now, know that using a
let statement in this way is a convenient approach to extract the pieces of
the tuple returned by mpsc::channel.
Let’s move the transmitting end into a spawned thread and have it send one string so that the spawned thread is communicating with the main thread, as shown in Listing 16-7. This is like putting a rubber duck in the river upstream or sending a chat message from one thread to another.
use std::sync::mpsc;
use std::thread;
fn main() {
let (tx, rx) = mpsc::channel();
thread::spawn(move || {
let val = String::from("hi");
tx.send(val).unwrap();
});
}tx to a spawned thread and sending "hi"Again, we’re using thread::spawn to create a new thread and then using move
to move tx into the closure so that the spawned thread owns tx. The spawned
thread needs to own the transmitter to be able to send messages through the
channel.
The transmitter has a send method that takes the value we want to send. The
send method returns a Result<T, E> type, so if the receiver has already
been dropped and there’s nowhere to send a value, the send operation will
return an error. In this example, we’re calling unwrap to panic in case of an
error. But in a real application, we would handle it properly: Return to
Chapter 9 to review strategies for proper error handling.
In Listing 16-8, we’ll get the value from the receiver in the main thread. This is like retrieving the rubber duck from the water at the end of the river or receiving a chat message.
use std::sync::mpsc;
use std::thread;
fn main() {
let (tx, rx) = mpsc::channel();
thread::spawn(move || {
let val = String::from("hi");
tx.send(val).unwrap();
});
let received = rx.recv().unwrap();
println!("Got: {received}");
}"hi" in the main thread and printing itThe receiver has two useful methods: recv and try_recv. We’re using recv,
short for receive, which will block the main thread’s execution and wait
until a value is sent down the channel. Once a value is sent, recv will
return it in a Result<T, E>. When the transmitter closes, recv will return
an error to signal that no more values will be coming.
The try_recv method doesn’t block, but will instead return a Result<T, E>
immediately: an Ok value holding a message if one is available and an Err
value if there aren’t any messages this time. Using try_recv is useful if
this thread has other work to do while waiting for messages: We could write a
loop that calls try_recv every so often, handles a message if one is
available, and otherwise does other work for a little while until checking
again.
We’ve used recv in this example for simplicity; we don’t have any other work
for the main thread to do other than wait for messages, so blocking the main
thread is appropriate.
When we run the code in Listing 16-8, we’ll see the value printed from the main thread:
Got: hi
Perfect!
Transferring Ownership Through Channels
The ownership rules play a vital role in message sending because they help you
write safe, concurrent code. Preventing errors in concurrent programming is the
advantage of thinking about ownership throughout your Rust programs. Let’s do
an experiment to show how channels and ownership work together to prevent
problems: We’ll try to use a val value in the spawned thread after we’ve
sent it down the channel. Try compiling the code in Listing 16-9 to see why
this code isn’t allowed.
use std::sync::mpsc;
use std::thread;
fn main() {
let (tx, rx) = mpsc::channel();
thread::spawn(move || {
let val = String::from("hi");
tx.send(val).unwrap();
println!("val is {val}");
});
let received = rx.recv().unwrap();
println!("Got: {received}");
}val after we’ve sent it down the channelHere, we try to print val after we’ve sent it down the channel via tx.send.
Allowing this would be a bad idea: Once the value has been sent to another
thread, that thread could modify or drop it before we try to use the value
again. Potentially, the other thread’s modifications could cause errors or
unexpected results due to inconsistent or nonexistent data. However, Rust gives
us an error if we try to compile the code in Listing 16-9:
$ cargo run
Compiling message-passing v0.1.0 (file:///projects/message-passing)
error[E0382]: borrow of moved value: `val`
--> src/main.rs:10:27
|
8 | let val = String::from("hi");
| --- move occurs because `val` has type `String`, which does not implement the `Copy` trait
9 | tx.send(val).unwrap();
| --- value moved here
10 | println!("val is {val}");
| ^^^ value borrowed here after move
|
= note: this error originates in the macro `$crate::format_args_nl` which comes from the expansion of the macro `println` (in Nightly builds, run with -Z macro-backtrace for more info)
For more information about this error, try `rustc --explain E0382`.
error: could not compile `message-passing` (bin "message-passing") due to 1 previous error
Our concurrency mistake has caused a compile-time error. The send function
takes ownership of its parameter, and when the value is moved the receiver
takes ownership of it. This stops us from accidentally using the value again
after sending it; the ownership system checks that everything is okay.
Sending Multiple Values
The code in Listing 16-8 compiled and ran, but it didn’t clearly show us that two separate threads were talking to each other over the channel.
In Listing 16-10, we’ve made some modifications that will prove the code in Listing 16-8 is running concurrently: The spawned thread will now send multiple messages and pause for a second between each message.
use std::sync::mpsc;
use std::thread;
use std::time::Duration;
fn main() {
let (tx, rx) = mpsc::channel();
thread::spawn(move || {
let vals = vec![
String::from("hi"),
String::from("from"),
String::from("the"),
String::from("thread"),
];
for val in vals {
tx.send(val).unwrap();
thread::sleep(Duration::from_secs(1));
}
});
for received in rx {
println!("Got: {received}");
}
}This time, the spawned thread has a vector of strings that we want to send to
the main thread. We iterate over them, sending each individually, and pause
between each by calling the thread::sleep function with a Duration value of
one second.
In the main thread, we’re not calling the recv function explicitly anymore:
Instead, we’re treating rx as an iterator. For each value received, we’re
printing it. When the channel is closed, iteration will end.
When running the code in Listing 16-10, you should see the following output with a one-second pause in between each line:
Got: hi
Got: from
Got: the
Got: thread
Because we don’t have any code that pauses or delays in the for loop in the
main thread, we can tell that the main thread is waiting to receive values from
the spawned thread.
Creating Multiple Producers
Earlier we mentioned that mpsc was an acronym for multiple producer, single
consumer. Let’s put mpsc to use and expand the code in Listing 16-10 to
create multiple threads that all send values to the same receiver. We can do so
by cloning the transmitter, as shown in Listing 16-11.
use std::sync::mpsc;
use std::thread;
use std::time::Duration;
fn main() {
// --snip--
let (tx, rx) = mpsc::channel();
let tx1 = tx.clone();
thread::spawn(move || {
let vals = vec![
String::from("hi"),
String::from("from"),
String::from("the"),
String::from("thread"),
];
for val in vals {
tx1.send(val).unwrap();
thread::sleep(Duration::from_secs(1));
}
});
thread::spawn(move || {
let vals = vec![
String::from("more"),
String::from("messages"),
String::from("for"),
String::from("you"),
];
for val in vals {
tx.send(val).unwrap();
thread::sleep(Duration::from_secs(1));
}
});
for received in rx {
println!("Got: {received}");
}
// --snip--
}This time, before we create the first spawned thread, we call clone on the
transmitter. This will give us a new transmitter we can pass to the first
spawned thread. We pass the original transmitter to a second spawned thread.
This gives us two threads, each sending different messages to the one receiver.
When you run the code, your output should look something like this:
Got: hi
Got: more
Got: from
Got: messages
Got: for
Got: the
Got: thread
Got: you
You might see the values in another order, depending on your system. This is
what makes concurrency interesting as well as difficult. If you experiment with
thread::sleep, giving it various values in the different threads, each run
will be more nondeterministic and create different output each time.
Now that we’ve looked at how channels work, let’s look at a different method of concurrency.
共享状态并发
Shared-State Concurrency
Message passing is a fine way to handle concurrency, but it’s not the only way. Another method would be for multiple threads to access the same shared data. Consider this part of the slogan from the Go language documentation again: “Do not communicate by sharing memory.”
What would communicating by sharing memory look like? In addition, why would message-passing enthusiasts caution not to use memory sharing?
In a way, channels in any programming language are similar to single ownership because once you transfer a value down a channel, you should no longer use that value. Shared-memory concurrency is like multiple ownership: Multiple threads can access the same memory location at the same time. As you saw in Chapter 15, where smart pointers made multiple ownership possible, multiple ownership can add complexity because these different owners need managing. Rust’s type system and ownership rules greatly assist in getting this management correct. For an example, let’s look at mutexes, one of the more common concurrency primitives for shared memory.
Controlling Access with Mutexes
Mutex is an abbreviation for mutual exclusion, as in a mutex allows only one thread to access some data at any given time. To access the data in a mutex, a thread must first signal that it wants access by asking to acquire the mutex’s lock. The lock is a data structure that is part of the mutex that keeps track of who currently has exclusive access to the data. Therefore, the mutex is described as guarding the data it holds via the locking system.
Mutexes have a reputation for being difficult to use because you have to remember two rules:
- You must attempt to acquire the lock before using the data.
- When you’re done with the data that the mutex guards, you must unlock the data so that other threads can acquire the lock.
For a real-world metaphor for a mutex, imagine a panel discussion at a conference with only one microphone. Before a panelist can speak, they have to ask or signal that they want to use the microphone. When they get the microphone, they can talk for as long as they want to and then hand the microphone to the next panelist who requests to speak. If a panelist forgets to hand the microphone off when they’re finished with it, no one else is able to speak. If management of the shared microphone goes wrong, the panel won’t work as planned!
Management of mutexes can be incredibly tricky to get right, which is why so many people are enthusiastic about channels. However, thanks to Rust’s type system and ownership rules, you can’t get locking and unlocking wrong.
The API of Mutex<T>
As an example of how to use a mutex, let’s start by using a mutex in a single-threaded context, as shown in Listing 16-12.
use std::sync::Mutex;
fn main() {
let m = Mutex::new(5);
{
let mut num = m.lock().unwrap();
*num = 6;
}
println!("m = {m:?}");
}Mutex<T> in a single-threaded context for simplicityAs with many types, we create a Mutex<T> using the associated function new.
To access the data inside the mutex, we use the lock method to acquire the
lock. This call will block the current thread so that it can’t do any work
until it’s our turn to have the lock.
The call to lock would fail if another thread holding the lock panicked. In
that case, no one would ever be able to get the lock, so we’ve chosen to
unwrap and have this thread panic if we’re in that situation.
After we’ve acquired the lock, we can treat the return value, named num in
this case, as a mutable reference to the data inside. The type system ensures
that we acquire a lock before using the value in m. The type of m is
Mutex<i32>, not i32, so we must call lock to be able to use the i32
value. We can’t forget; the type system won’t let us access the inner i32
otherwise.
The call to lock returns a type called MutexGuard, wrapped in a
LockResult that we handled with the call to unwrap. The MutexGuard type
implements Deref to point at our inner data; the type also has a Drop
implementation that releases the lock automatically when a MutexGuard goes
out of scope, which happens at the end of the inner scope. As a result, we
don’t risk forgetting to release the lock and blocking the mutex from being
used by other threads because the lock release happens automatically.
After dropping the lock, we can print the mutex value and see that we were able
to change the inner i32 to 6.
Shared Access to Mutex<T>
Now let’s try to share a value between multiple threads using Mutex<T>. We’ll
spin up 10 threads and have them each increment a counter value by 1, so the
counter goes from 0 to 10. The example in Listing 16-13 will have a compiler
error, and we’ll use that error to learn more about using Mutex<T> and how
Rust helps us use it correctly.
use std::sync::Mutex;
use std::thread;
fn main() {
let counter = Mutex::new(0);
let mut handles = vec![];
for _ in 0..10 {
let handle = thread::spawn(move || {
let mut num = counter.lock().unwrap();
*num += 1;
});
handles.push(handle);
}
for handle in handles {
handle.join().unwrap();
}
println!("Result: {}", *counter.lock().unwrap());
}Mutex<T>We create a counter variable to hold an i32 inside a Mutex<T>, as we did
in Listing 16-12. Next, we create 10 threads by iterating over a range of
numbers. We use thread::spawn and give all the threads the same closure: one
that moves the counter into the thread, acquires a lock on the Mutex<T> by
calling the lock method, and then adds 1 to the value in the mutex. When a
thread finishes running its closure, num will go out of scope and release the
lock so that another thread can acquire it.
In the main thread, we collect all the join handles. Then, as we did in Listing
16-2, we call join on each handle to make sure all the threads finish. At
that point, the main thread will acquire the lock and print the result of this
program.
We hinted that this example wouldn’t compile. Now let’s find out why!
$ cargo run
Compiling shared-state v0.1.0 (file:///projects/shared-state)
error[E0382]: borrow of moved value: `counter`
--> src/main.rs:21:29
|
5 | let counter = Mutex::new(0);
| ------- move occurs because `counter` has type `std::sync::Mutex<i32>`, which does not implement the `Copy` trait
...
8 | for _ in 0..10 {
| -------------- inside of this loop
9 | let handle = thread::spawn(move || {
| ------- value moved into closure here, in previous iteration of loop
...
21 | println!("Result: {}", *counter.lock().unwrap());
| ^^^^^^^ value borrowed here after move
|
help: consider moving the expression out of the loop so it is only moved once
|
8 ~ let mut value = counter.lock();
9 ~ for _ in 0..10 {
10 | let handle = thread::spawn(move || {
11 ~ let mut num = value.unwrap();
|
For more information about this error, try `rustc --explain E0382`.
error: could not compile `shared-state` (bin "shared-state") due to 1 previous error
The error message states that the counter value was moved in the previous
iteration of the loop. Rust is telling us that we can’t move the ownership of
lock counter into multiple threads. Let’s fix the compiler error with the
multiple-ownership method we discussed in Chapter 15.
Multiple Ownership with Multiple Threads
In Chapter 15, we gave a value to multiple owners by using the smart pointer
Rc<T> to create a reference-counted value. Let’s do the same here and see
what happens. We’ll wrap the Mutex<T> in Rc<T> in Listing 16-14 and clone
the Rc<T> before moving ownership to the thread.
use std::rc::Rc;
use std::sync::Mutex;
use std::thread;
fn main() {
let counter = Rc::new(Mutex::new(0));
let mut handles = vec![];
for _ in 0..10 {
let counter = Rc::clone(&counter);
let handle = thread::spawn(move || {
let mut num = counter.lock().unwrap();
*num += 1;
});
handles.push(handle);
}
for handle in handles {
handle.join().unwrap();
}
println!("Result: {}", *counter.lock().unwrap());
}Rc<T> to allow multiple threads to own the Mutex<T>Once again, we compile and get… different errors! The compiler is teaching us a lot:
$ cargo run
Compiling shared-state v0.1.0 (file:///projects/shared-state)
error[E0277]: `Rc<std::sync::Mutex<i32>>` cannot be sent between threads safely
--> src/main.rs:11:36
|
11 | let handle = thread::spawn(move || {
| ------------- ^------
| | |
| ______________________|_____________within this `{closure@src/main.rs:11:36: 11:43}`
| | |
| | required by a bound introduced by this call
12 | | let mut num = counter.lock().unwrap();
13 | |
14 | | *num += 1;
15 | | });
| |_________^ `Rc<std::sync::Mutex<i32>>` cannot be sent between threads safely
|
= help: within `{closure@src/main.rs:11:36: 11:43}`, the trait `Send` is not implemented for `Rc<std::sync::Mutex<i32>>`
note: required because it's used within this closure
--> src/main.rs:11:36
|
11 | let handle = thread::spawn(move || {
| ^^^^^^^
note: required by a bound in `spawn`
--> /rustc/1159e78c4747b02ef996e55082b704c09b970588/library/std/src/thread/mod.rs:723:1
For more information about this error, try `rustc --explain E0277`.
error: could not compile `shared-state` (bin "shared-state") due to 1 previous error
Wow, that error message is very wordy! Here’s the important part to focus on:
`Rc<Mutex<i32>>` cannot be sent between threads safely. The compiler is
also telling us the reason why: the trait `Send` is not implemented for `Rc<Mutex<i32>>`. We’ll talk about Send in the next section: It’s one of
the traits that ensures that the types we use with threads are meant for use in
concurrent situations.
Unfortunately, Rc<T> is not safe to share across threads. When Rc<T>
manages the reference count, it adds to the count for each call to clone and
subtracts from the count when each clone is dropped. But it doesn’t use any
concurrency primitives to make sure that changes to the count can’t be
interrupted by another thread. This could lead to wrong counts—subtle bugs that
could in turn lead to memory leaks or a value being dropped before we’re done
with it. What we need is a type that is exactly like Rc<T>, but that makes
changes to the reference count in a thread-safe way.
Atomic Reference Counting with Arc<T>
Fortunately, Arc<T> is a type like Rc<T> that is safe to use in
concurrent situations. The a stands for atomic, meaning it’s an atomically
reference-counted type. Atomics are an additional kind of concurrency
primitive that we won’t cover in detail here: See the standard library
documentation for std::sync::atomic for more
details. At this point, you just need to know that atomics work like primitive
types but are safe to share across threads.
You might then wonder why all primitive types aren’t atomic and why standard
library types aren’t implemented to use Arc<T> by default. The reason is that
thread safety comes with a performance penalty that you only want to pay when
you really need to. If you’re just performing operations on values within a
single thread, your code can run faster if it doesn’t have to enforce the
guarantees atomics provide.
Let’s return to our example: Arc<T> and Rc<T> have the same API, so we fix
our program by changing the use line, the call to new, and the call to
clone. The code in Listing 16-15 will finally compile and run.
use std::sync::{Arc, Mutex};
use std::thread;
fn main() {
let counter = Arc::new(Mutex::new(0));
let mut handles = vec![];
for _ in 0..10 {
let counter = Arc::clone(&counter);
let handle = thread::spawn(move || {
let mut num = counter.lock().unwrap();
*num += 1;
});
handles.push(handle);
}
for handle in handles {
handle.join().unwrap();
}
println!("Result: {}", *counter.lock().unwrap());
}Arc<T> to wrap the Mutex<T> to be able to share ownership across multiple threadsThis code will print the following:
Result: 10
We did it! We counted from 0 to 10, which may not seem very impressive, but it
did teach us a lot about Mutex<T> and thread safety. You could also use this
program’s structure to do more complicated operations than just incrementing a
counter. Using this strategy, you can divide a calculation into independent
parts, split those parts across threads, and then use a Mutex<T> to have each
thread update the final result with its part.
Note that if you are doing simple numerical operations, there are types simpler
than Mutex<T> types provided by the std::sync::atomic module of the
standard library. These types provide safe, concurrent,
atomic access to primitive types. We chose to use Mutex<T> with a primitive
type for this example so that we could concentrate on how Mutex<T> works.
Comparing RefCell<T>/Rc<T> and Mutex<T>/Arc<T>
You might have noticed that counter is immutable but that we could get a
mutable reference to the value inside it; this means Mutex<T> provides
interior mutability, as the Cell family does. In the same way we used
RefCell<T> in Chapter 15 to allow us to mutate contents inside an Rc<T>, we
use Mutex<T> to mutate contents inside an Arc<T>.
Another detail to note is that Rust can’t protect you from all kinds of logic
errors when you use Mutex<T>. Recall from Chapter 15 that using Rc<T> came
with the risk of creating reference cycles, where two Rc<T> values refer to
each other, causing memory leaks. Similarly, Mutex<T> comes with the risk of
creating deadlocks. These occur when an operation needs to lock two resources
and two threads have each acquired one of the locks, causing them to wait for
each other forever. If you’re interested in deadlocks, try creating a Rust
program that has a deadlock; then, research deadlock mitigation strategies for
mutexes in any language and have a go at implementing them in Rust. The
standard library API documentation for Mutex<T> and MutexGuard offers
useful information.
We’ll round out this chapter by talking about the Send and Sync traits and
how we can use them with custom types.
使用 Send 和 Sync 实现可扩展的并发
Extensible Concurrency with Send and Sync
Interestingly, almost every concurrency feature we’ve talked about so far in this chapter has been part of the standard library, not the language. Your options for handling concurrency are not limited to the language or the standard library; you can write your own concurrency features or use those written by others.
However, among the key concurrency concepts that are embedded in the language
rather than the standard library are the std::marker traits Send and Sync.
Transferring Ownership Between Threads
The Send marker trait indicates that ownership of values of the type
implementing Send can be transferred between threads. Almost every Rust type
implements Send, but there are some exceptions, including Rc<T>: This
cannot implement Send because if you cloned an Rc<T> value and tried to
transfer ownership of the clone to another thread, both threads might update
the reference count at the same time. For this reason, Rc<T> is implemented
for use in single-threaded situations where you don’t want to pay the
thread-safe performance penalty.
Therefore, Rust’s type system and trait bounds ensure that you can never
accidentally send an Rc<T> value across threads unsafely. When we tried to do
this in Listing 16-14, we got the error the trait `Send` is not implemented for `Rc<Mutex<i32>>`. When we switched to Arc<T>, which does implement
Send, the code compiled.
Any type composed entirely of Send types is automatically marked as Send as
well. Almost all primitive types are Send, aside from raw pointers, which
we’ll discuss in Chapter 20.
Accessing from Multiple Threads
The Sync marker trait indicates that it is safe for the type implementing
Sync to be referenced from multiple threads. In other words, any type T
implements Sync if &T (an immutable reference to T) implements Send,
meaning the reference can be sent safely to another thread. Similar to Send,
primitive types all implement Sync, and types composed entirely of types that
implement Sync also implement Sync.
The smart pointer Rc<T> also doesn’t implement Sync for the same reasons
that it doesn’t implement Send. The RefCell<T> type (which we talked about
in Chapter 15) and the family of related Cell<T> types don’t implement
Sync. The implementation of borrow checking that RefCell<T> does at runtime
is not thread-safe. The smart pointer Mutex<T> implements Sync and can be
used to share access with multiple threads, as you saw in “Shared Access to
Mutex<T>”.
Implementing Send and Sync Manually Is Unsafe
Because types composed entirely of other types that implement the Send and
Sync traits also automatically implement Send and Sync, we don’t have to
implement those traits manually. As marker traits, they don’t even have any
methods to implement. They’re just useful for enforcing invariants related to
concurrency.
Manually implementing these traits involves implementing unsafe Rust code.
We’ll talk about using unsafe Rust code in Chapter 20; for now, the important
information is that building new concurrent types not made up of Send and
Sync parts requires careful thought to uphold the safety guarantees. “The
Rustonomicon” has more information about these guarantees and how to
uphold them.
Summary
This isn’t the last you’ll see of concurrency in this book: The next chapter focuses on async programming, and the project in Chapter 21 will use the concepts in this chapter in a more realistic situation than the smaller examples discussed here.
As mentioned earlier, because very little of how Rust handles concurrency is part of the language, many concurrency solutions are implemented as crates. These evolve more quickly than the standard library, so be sure to search online for the current, state-of-the-art crates to use in multithreaded situations.
The Rust standard library provides channels for message passing and smart
pointer types, such as Mutex<T> and Arc<T>, that are safe to use in
concurrent contexts. The type system and the borrow checker ensure that the
code using these solutions won’t end up with data races or invalid references.
Once you get your code to compile, you can rest assured that it will happily
run on multiple threads without the kinds of hard-to-track-down bugs common in
other languages. Concurrent programming is no longer a concept to be afraid of:
Go forth and make your programs concurrent, fearlessly!
异步编程基础:Async、Await、Future 与 Stream
我们要求计算机执行的许多操作可能会花一段时间才能完成。如果能在等待这些长时间运行的进程完成的同时做点别的事情就好了。现代计算机提供了两种技术来同时处理多个操作:并行(parallelism)与并发(concurrency)。然而,我们程序的逻辑大多是以线性方式编写的。我们希望能够指定程序应当执行的操作,以及函数可能在哪些位置暂停、让程序的其他部分转而运行,而无需预先指定每段代码运行的确切顺序和方式。异步编程(Asynchronous programming) 是一种抽象,它让我们能够用潜在的暂停点和最终结果来表达代码,而协调的细节则由它来帮我们处理。
本章建立在第 16 章使用线程实现并行与并发的基础之上,介绍另一种编写代码的方法:Rust 的 future、stream,以及 async 和 await 语法,让我们能够表达操作如何以异步方式进行,此外还有实现异步运行时(asynchronous runtime)的第三方 crate——即管理和协调异步操作执行的代码。
让我们来看一个例子。假设你正在导出一个自己制作的家庭庆典视频,这个操作可能耗时几分钟到几小时不等。视频导出会尽可能多地占用 CPU 和 GPU 资源。如果你的电脑只有一个 CPU 核心,并且操作系统在导出完成之前不会暂停该导出——也就是说,如果它以*同步(synchronous)*方式执行导出——那么在该任务运行期间,你就无法在电脑上做任何其他事情。这将是相当令人沮丧的体验。幸运的是,你的计算机操作系统能够——而且确实——在后台不可见地频繁中断导出,让你能够同时完成其他工作。
现在假设你正在下载别人分享的视频,这也可能花一些时间,但不会占用太多 CPU 时间。在这种情况下,CPU 需要等待数据从网络到达。虽然一旦数据开始到达就可以开始读取,但可能还需要一些时间才能全部传输完毕。即使所有数据都已就位,如果视频非常大,加载全部数据也可能需要至少一两秒。这听起来可能不算什么,但对于每秒能执行数十亿次操作的现代处理器来说,这是非常长的时间。同样,你的操作系统会在后台不可见地中断你的程序,让 CPU 在等待网络调用完成的同时执行其他工作。
视频导出是*CPU 密集型(CPU-bound)或计算密集型(compute-bound)操作的例子。它受限于计算机在 CPU 或 GPU 内的潜在数据处理速度,以及它能为此操作分配多少速度。视频下载是I/O 密集型(I/O-bound)操作的例子,因为它受限于计算机输入输出(input and output)*的速度;它只能以数据通过网络传输的速度来进行。
在这两个例子中,操作系统的不可见中断提供了一种并发形式。不过,这种并发只发生在整个程序的层面:操作系统中断一个程序,让其他程序得以完成工作。在很多情况下,由于我们对程序的理解比操作系统要精细得多,我们能够发现操作系统看不到的并发机会。
例如,如果我们正在构建一个管理文件下载的工具,我们应该能够编写程序,使得开始一个下载不会锁死 UI,并且用户应该能够同时启动多个下载。然而,许多与网络交互的操作系统 API 是*阻塞(blocking)*的;也就是说,它们会阻塞程序的进展,直到正在处理的数据完全就绪。
注意:仔细想想,大多数函数调用都是这样工作的。然而,阻塞这个术语通常专用于与文件、网络或计算机上其他资源交互的函数调用,因为在这些情况下,单个程序会从操作变为非阻塞中获益。
我们可以通过为每个文件下载生成一个专用线程来避免阻塞主线程。然而,这些线程所使用的系统资源开销最终会成为一个问题。更好的做法是,调用本身就不阻塞,并且我们可以定义一些希望程序完成的任务,然后让运行时选择运行它们的最佳顺序和方式。
这正是 Rust 的 async(异步的缩写)抽象为我们提供的。在本章中,你将全面学习 async,涵盖以下主题:
- 如何使用 Rust 的
async和await语法,以及如何通过运行时执行异步函数 - 如何使用 async 模型解决我们在第 16 章中遇到的一些相同挑战
- 多线程与 async 如何提供互补的解决方案,你可以在许多情况下将它们结合使用
不过,在我们了解 async 的实际工作原理之前,需要先绕一个小弯,讨论一下并行与并发之间的区别。
并行与并发
到目前为止,我们基本将并行和并发视为可以互换的概念。现在我们需要更精确地区分它们,因为在我们开始工作时,这些差异会显现出来。
考虑一个团队拆分软件项目工作的不同方式。你可以将多个任务分配给一个成员,为每个成员分配一个任务,或者混合使用这两种方法。
当一个人在几个不同任务都未完成之前同时处理它们时,这就是并发(concurrency)。实现并发的一种方式类似于在电脑上检出两个不同的项目,当你在一个项目上感到无聊或卡住时,就切换到另一个。你只是一个人,所以无法在完全相同的时刻在两个任务上取得进展,但你可以多任务处理,通过在它们之间切换来逐个取得进展(参见图 17-1)。
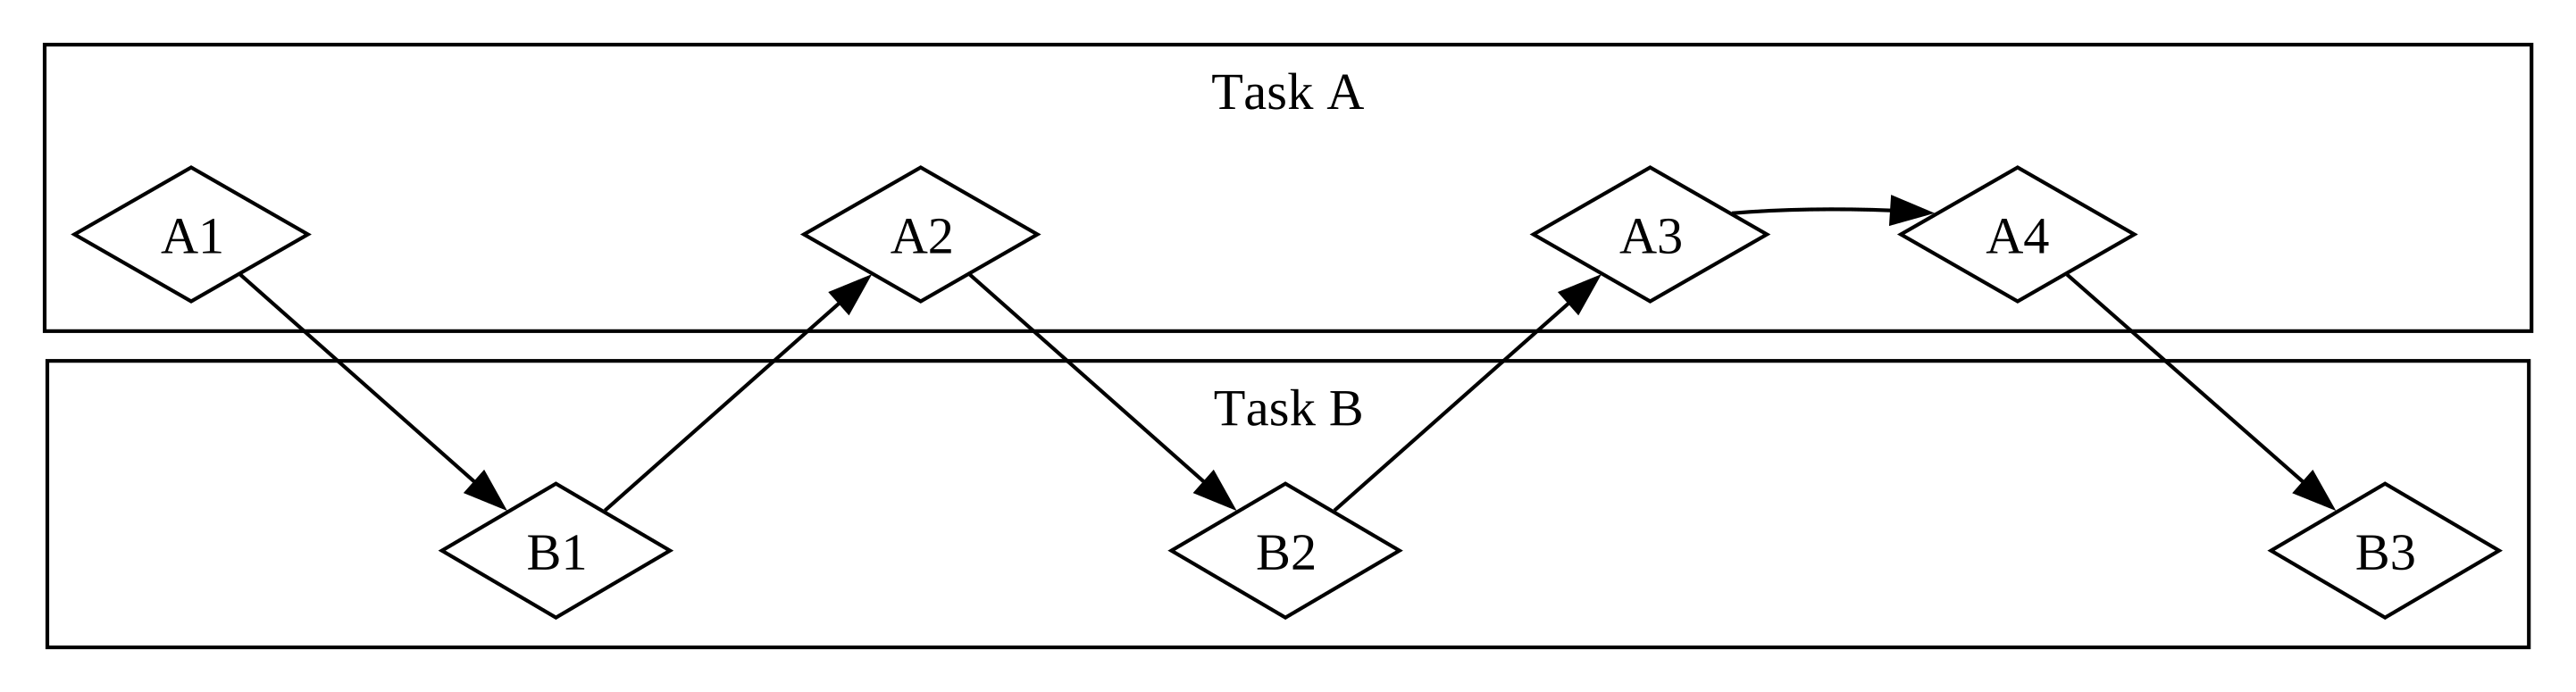
当团队将一组任务拆分,让每个成员各自承担一个任务并独立完成时,这就是并行(parallelism)。团队中的每个人可以在完全相同的时刻取得进展(参见图 17-2)。
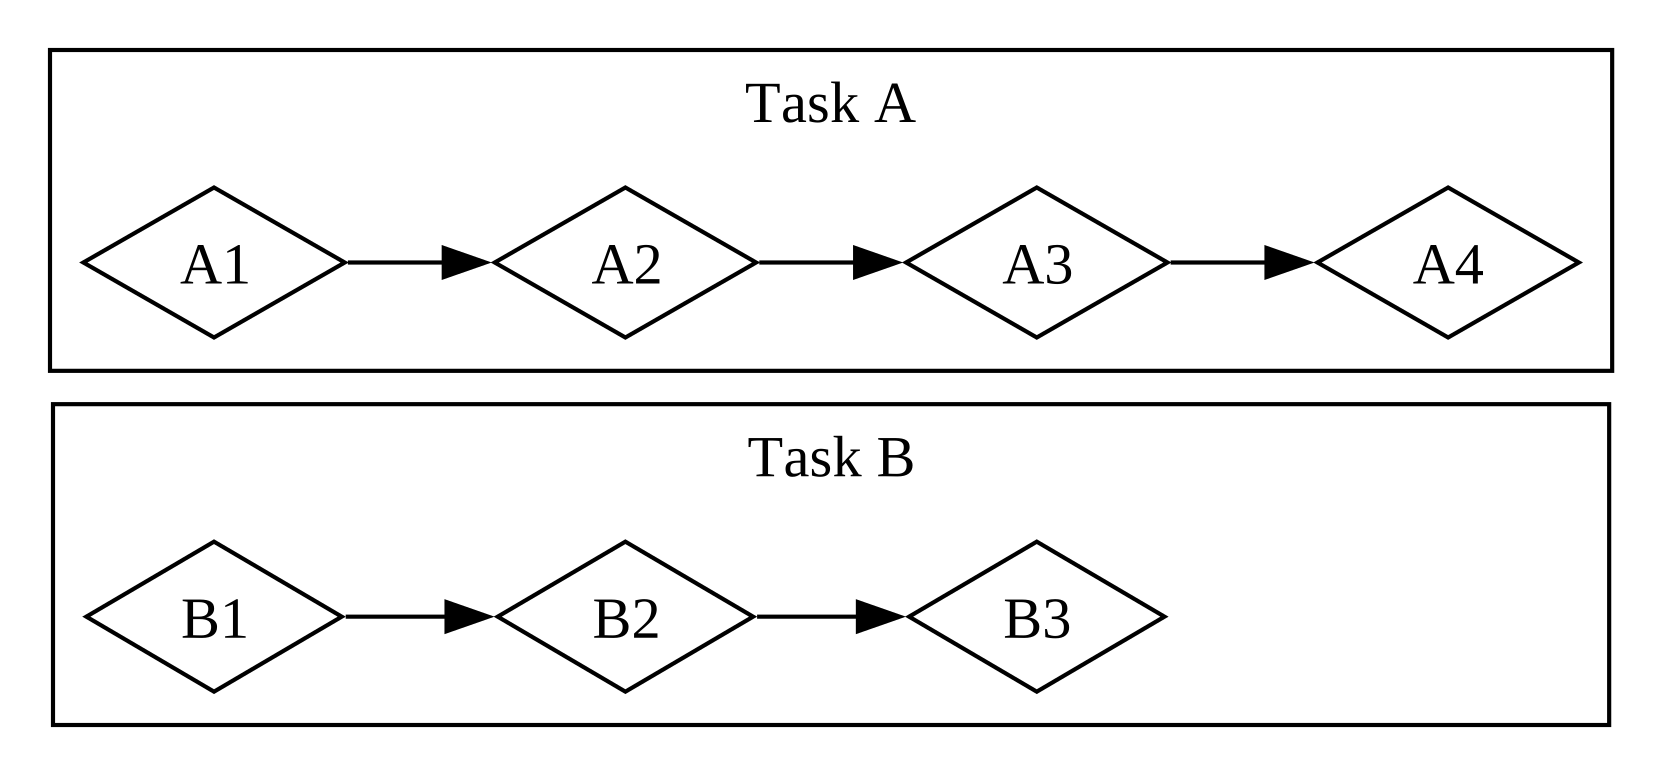
在这两种工作流中,你可能都需要在不同的任务之间进行协调。也许你以为分配给一个人的任务完全独立于其他人的工作,但实际上需要团队中的另一个人先完成他的任务。有些工作可以并行完成,但有些实际上是*串行(serial)*的:只能按顺序进行,一个任务接着另一个任务完成,如图 17-3 所示。
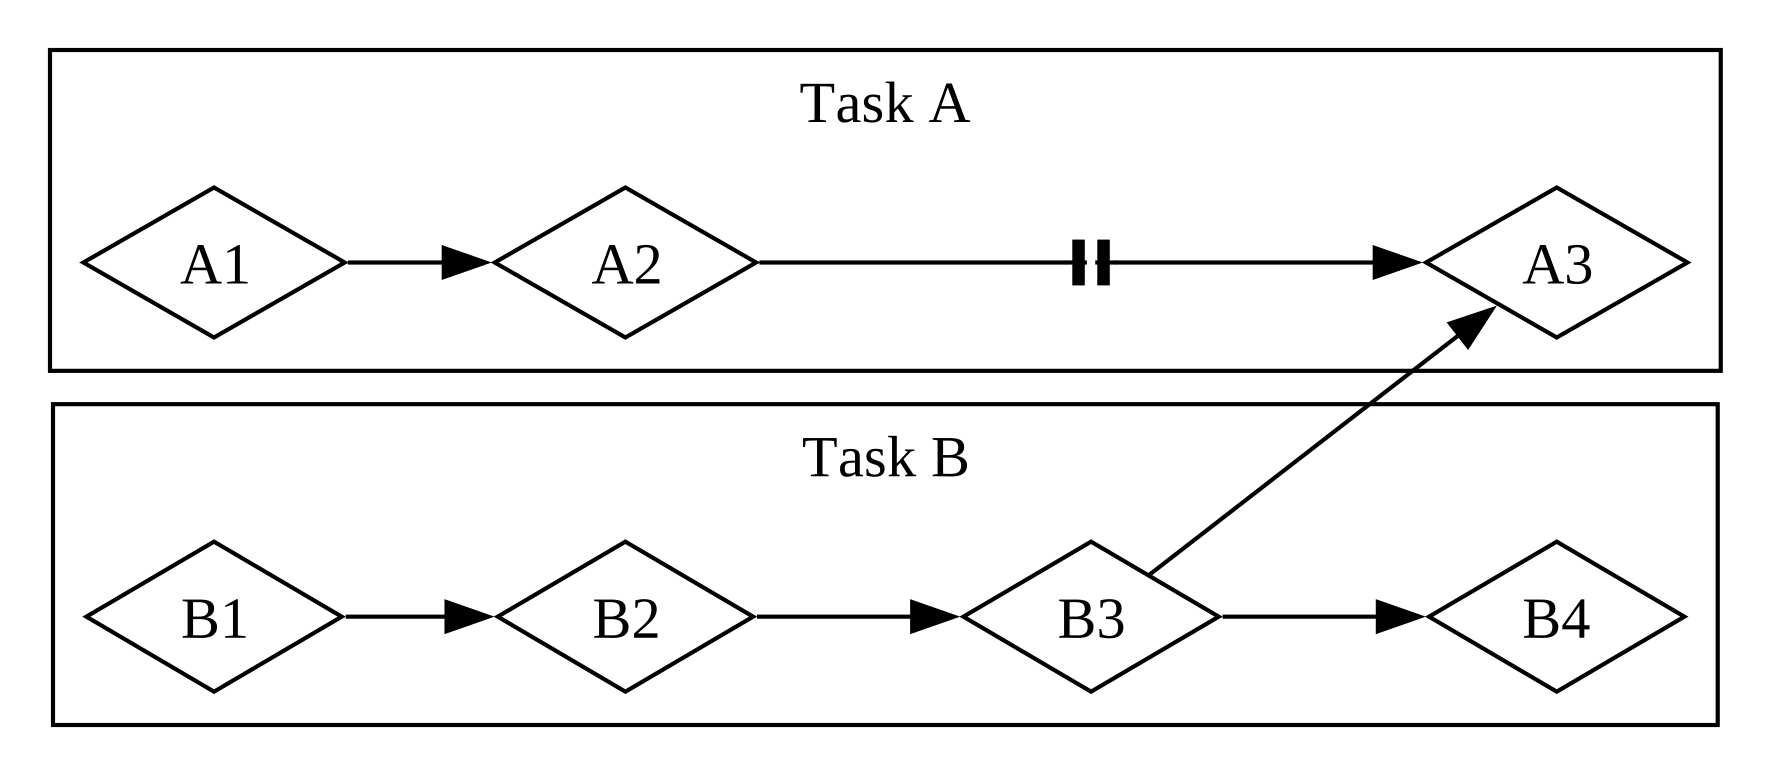
同样地,你可能会意识到自己的某个任务依赖于你的另一个任务。此时你原本并发进行的工作也变成了串行的。
并行和并发也可以相互交叉。如果你得知某个同事因为等你完成某个任务而被卡住了,你大概会把所有精力集中在该任务上,以“解除阻塞“你的同事。你和同事不再能并行工作,你也不再能并发处理自己的各个任务。
同样的基本动态在软件和硬件中也发挥着作用。在只有一个 CPU 核心的机器上,CPU 一次只能执行一个操作,但它仍然可以并发工作。使用线程、进程和 async 等工具,计算机可以暂停一个活动并切换到其他活动,最终再循环回到第一个活动。在拥有多个 CPU 核心的机器上,它还可以并行工作。一个核心可以在执行一个任务的同时,另一个核心执行一个完全无关的任务,这些操作确实同时发生。
在 Rust 中运行 async 代码通常是以并发方式进行的。根据硬件、操作系统以及我们使用的 async 运行时(稍后将详细介绍 async 运行时),这种并发在底层也可能利用并行。
现在,让我们深入了解 Rust 中的异步编程到底是如何工作的。
Future 与异步语法
Future 与 Async 语法
Rust 中异步编程的关键元素是 future 以及 Rust 的 async 和 await 关键字。
一个 future 是一个现在可能尚未就绪,但在将来某个时刻会变为就绪的值。(同样的概念出现在许多语言中,有时以其他名称出现,如 task 或 promise。)Rust 提供了 Future trait 作为构建块,以便不同的异步操作可以用不同的数据结构实现,但共享一个公共接口。在 Rust 中,future 是实现 Future trait 的类型。每个 future 都持有自己的关于已取得进展以及“就绪“意味着什么的信息。
你可以将 async 关键字应用于代码块和函数,以指定它们可以被中断和恢复。在一个 async 代码块或 async 函数内部,你可以使用 await 关键字来等待(await)一个 future(即,等待它变为就绪)。你在 async 代码块或函数中等待 future 的任何位置,都是该代码块或函数可能暂停和恢复的潜在位置。检查一个 future 以查看其值是否可用的过程称为轮询(polling)。
其他一些语言(如 C# 和 JavaScript)也使用 async 和 await 关键字进行异步编程。如果你熟悉这些语言,你可能会注意到 Rust 在处理这些语法方面有一些显著的不同。这是有充分理由的,我们稍后就会看到!
在编写异步 Rust 代码时,我们大多数时候都使用 async 和 await 关键字。Rust 将它们编译为使用 Future trait 的等效代码,就像它将 for 循环编译为使用 Iterator trait 的等效代码一样。不过,由于 Rust 提供了 Future trait,你也可以在需要时为自定义数据类型实现它。我们在本章中会看到的许多函数,返回的类型都带有它们自己对 Future 的实现。我们将在本章末尾回到该 trait 的定义,深入探讨其工作原理,但这些细节已经足够我们继续前进了。
这一切可能感觉有点抽象,所以让我们来编写第一个异步程序:一个小型网页抓取器。我们将从命令行传入两个 URL,并发地获取它们,并返回最先完成那个的结果。这个例子会有不少新语法,但不用担心——我们会一路解释你所需了解的一切。
我们的第一个异步程序
为了让本章聚焦于学习 async 而非在生态系统的各个部分之间周旋,我们创建了 trpl crate(trpl 是“The Rust Programming Language“的缩写)。它重新导出了你需要的所有类型、trait 和函数,主要来自 futures 和 tokio crate。futures crate 是 Rust 异步代码实验的官方家园,实际上 Future trait 最初就是在此处设计的。Tokio 是当今 Rust 中使用最广泛的异步运行时,尤其适用于 Web 应用。还有其他优秀的运行时存在,它们可能更适合你的目的。我们在 trpl 底层使用了 tokio crate,因为它经过了充分测试且广泛使用。
在某些情况下,trpl 还会重命名或包装原始 API,以让你专注于与本章相关的细节。如果你想了解该 crate 的实际工作,我们鼓励你查看其源代码。你将能够看到它调用了哪个 crate 以及重新导出了什么。
创建一个小型命令行工具,读取两个 URL,并发获取两者,并返回最先完成那个的名称,向我们展示了很多关键部分。在之前的章节中,我们采用自底向上的方式,先讲授细节再将其组合成一个综合示例,但在这里,我们将以相反的方式进行。我们将先编写一个函数,然后逐步处理过程中遇到的编译器错误,直到一切就绪。我们从示例 17-1 中显示的函数开始。
extern crate trpl; // required for mdbook test
fn main() {
// TODO: we'll add this next!
}
use trpl::Html;
async fn page_title(url: &str) -> Option<String> {
let response = trpl::get(url).await;
let response_text = response.text().await;
Html::parse(&response_text)
.select_first("title")
.map(|title| title.inner_html())
}在示例 17-1 中,我们定义了一个名为 page_title 的函数,并将其标记为 async。然后我们使用 trpl::get 来获取传入的任何 URL,并使用 await 关键字来等待(await)响应。然后我们调用 text 获取响应的文本内容,并再次使用 await 关键字来等待它。这两步都是异步的。对于 get,我们需要等待服务器发送其响应的第一部分,其中包括标头(headers)、连接信息等,并且在完整响应通过线路传输时,主体数据的一部分可能已经到达。即使整个响应已经到达,之后的 text 也需要等待整个响应主体作为一个 String 返回。我们必须显式等待这两个 future,因为 Rust 中的 future 是*惰性(lazy)*的:在你等待它们之前,它们不会做任何事情。(实际上,如果你使用一个 future 而不等待它,Rust 会发出一个编译器警告。)
当我们等待完对 text 的调用后,我们有了一个 String。我们用 Html::parse 将其包装为一个 Html 类型。我们没有定义原始字符串作为 Html 的解析,而是使用 trpl crate 将 scraper crate 的 Html 类型重新导出为 trpl::Html。然后我们使用 select_first 方法查找第一个匹配指定 CSS 选择器的元素。我们传入字符串 "title",并得到一个 Option,包含一个表示匹配到元素的项(如果有匹配的话)。然后我们调用 inner_html 方法获取该元素的内容,它是一个 String。最终,我们得到一个 Option<String>。
请注意,Rust 的 await 关键字位于你要等待的表达式之后,而不是之前。也就是说,它是一个*后置(postfix)*关键字。这可能与你在其他语言中使用 async 的习惯不同,但在 Rust 中,这使得方法链的编写更加顺畅。因此,我们可以将 page_title 的函数体修改为将 trpl::get 和 text 函数调用串联在一起,并在它们之间使用 await,如示例 17-2 所示。
extern crate trpl; // required for mdbook test
use trpl::Html;
fn main() {
// TODO: we'll add this next!
}
async fn page_title(url: &str) -> Option<String> {
let response_text = trpl::get(url).await.text().await;
Html::parse(&response_text)
.select_first("title")
.map(|title| title.inner_html())
}await 关键字进行链式调用至此,我们已成功编写了第一个异步函数!在 main 中添加调用它的代码之前,让我们再多谈一些关于我们所写内容及其含义。
当 Rust 看到一个标记有 async 关键字的代码块时,它将其编译为一个实现了 Future trait 的唯一的匿名数据类型。当 Rust 看到一个标记有 async 的函数时,它将编译为一个非异步函数,其函数体是一个 async 代码块。异步函数的返回类型是编译器为该 async 代码块创建的匿名数据类型的类型。
因此,编写 async fn 等同于编写一个返回该返回类型的 future 的函数。对编译器来说,像示例 17-1 中的 async fn page_title 这样的函数定义大致等同于如下定义的非异步函数:
#![allow(unused)]
fn main() {
extern crate trpl; // required for mdbook test
use std::future::Future;
use trpl::Html;
fn page_title(url: &str) -> impl Future<Output = Option<String>> {
async move {
let text = trpl::get(url).await.text().await;
Html::parse(&text)
.select_first("title")
.map(|title| title.inner_html())
}
}
}让我们逐一分析转换后版本的各个部分:
- 它使用了我们在第 10 章“将 Trait 作为参数“一节中讨论过的
impl Trait语法。 - 返回值实现了
Futuretrait,其关联类型为Output。请注意,Output类型是Option<String>,这与async fn版本中page_title的原始返回类型相同。 - 原始函数体中调用的所有代码都被包裹在一个
async move代码块中。请记住,代码块也是表达式。整个代码块就是从函数返回的表达式。 - 这个 async 代码块产生一个类型为
Option<String>的值,如上所述。该值与返回类型中的Output类型匹配。这与你之前见过的其他代码块一样。 - 新的函数体是一个
async move代码块,这是因为它使用了url参数。(我们将在本章后面更多地讨论async与async move的区别。)
现在我们可以从 main 中调用 page_title 了。
使用运行时执行异步函数
首先,我们将获取单个页面的标题,如示例 17-3 所示。不幸的是,这段代码目前还无法编译。
extern crate trpl; // required for mdbook test
use trpl::Html;
async fn main() {
let args: Vec<String> = std::env::args().collect();
let url = &args[1];
match page_title(url).await {
Some(title) => println!("The title for {url} was {title}"),
None => println!("{url} had no title"),
}
}
async fn page_title(url: &str) -> Option<String> {
let response_text = trpl::get(url).await.text().await;
Html::parse(&response_text)
.select_first("title")
.map(|title| title.inner_html())
}main 中使用用户提供的参数调用 page_title 函数我们遵循与第 12 章中接受命令行参数小节相同的模式来获取命令行参数。然后我们将 URL 参数传递给 page_title,并等待结果。因为 future 产生的值是一个 Option<String>,所以我们使用 match 表达式来打印不同的消息,以反映页面是否包含 <title>。
我们只能在使用 await 关键字的 async 函数或代码块中使用它,而 Rust 不允许我们将特殊的 main 函数标记为 async。
error[E0752]: `main` function is not allowed to be `async`
--> src/main.rs:6:1
|
6 | async fn main() {
| ^^^^^^^^^^^^^^^ `main` function is not allowed to be `async`
main 不能标记为 async 的原因是,异步代码需要一个运行时(runtime):一个管理所有异步代码执行细节的 Rust crate。程序的 main 函数可以初始化一个运行时,但它本身不是一个运行时。(稍后我们将更详细地介绍这是为什么。)每个执行异步代码的 Rust 程序至少有一个位置设置了执行 future 的运行时。
大多数支持 async 的语言都捆绑了一个运行时,但 Rust 没有。相反,有许多不同的异步运行时可用,每个都在其目标用例适用的权衡之间做出不同的选择。例如,一个具有多个 CPU 核心和大量 RAM 的高吞吐量 Web 服务器,与一个单核、少量 RAM 且没有堆分配能力的微控制器,有非常不同的需求。提供这些运行时的 crate 也常常提供常用功能(如文件或网络 I/O)的异步版本。
在这里以及本章的其余部分,我们将使用 trpl crate 中的 block_on 函数,它接受一个 future 作为参数,并阻塞当前线程直到该 future 运行完毕。在幕后,调用 block_on 会使用 tokio crate 设置一个运行时,用于运行传入的 future(trpl crate 的 block_on 行为类似于其他运行时 crate 的 block_on 函数)。一旦 future 完成,block_on 返回该 future 产生的任何值。
我们可以将 page_title 返回的 future 直接传递给 block_on,一旦完成,我们可以像在示例 17-3 中尝试做的那样,对结果 Option<String> 进行 match。然而,对于本章的大多数示例(以及现实世界中的大多数异步代码),我们要做的不仅仅是调用一个异步函数,所以我们将传入一个 async 代码块,并显式地等待 page_title 调用的结果,如示例 17-4 所示。
extern crate trpl; // required for mdbook test
use trpl::Html;
fn main() {
let args: Vec<String> = std::env::args().collect();
trpl::block_on(async {
let url = &args[1];
match page_title(url).await {
Some(title) => println!("The title for {url} was {title}"),
None => println!("{url} had no title"),
}
})
}
async fn page_title(url: &str) -> Option<String> {
let response_text = trpl::get(url).await.text().await;
Html::parse(&response_text)
.select_first("title")
.map(|title| title.inner_html())
}trpl::block_on 等待一个 async 代码块当我们运行这段代码时,得到了最初预期的行为:
$ cargo run -- "https://www.rust-lang.org"
Finished `dev` profile [unoptimized + debuginfo] target(s) in 0.05s
Running `target/debug/async_await 'https://www.rust-lang.org'`
The title for https://www.rust-lang.org was
Rust Programming Language
呼——我们终于有了一些可工作的异步代码!但在添加让两个站点相互竞速的代码之前,让我们先简要地将注意力转回到 future 的工作原理上。
每个等待点(await point)——即代码使用 await 关键字的每个位置——都代表控制权被交还给运行时的位置。为了实现这一点,Rust 需要跟踪 async 代码块中涉及的状态,以便运行时可以启动其他工作,然后在准备好再次尝试推进第一个工作时回来。这是一个不可见的状态机,就好像你编写了一个类似如下的枚举来保存每个等待点的当前状态:
#![allow(unused)]
fn main() {
extern crate trpl; // required for mdbook test
enum PageTitleFuture<'a> {
Initial { url: &'a str },
GetAwaitPoint { url: &'a str },
TextAwaitPoint { response: trpl::Response },
}
}然而,手动编写在每个状态之间转换的代码将是繁琐且容易出错的,尤其是当你以后需要向代码中添加更多功能和更多状态时。幸运的是,Rust 编译器会自动创建和管理异步代码的状态机数据结构。通常的借用和所有权规则仍然适用于数据结构,值得高兴的是,编译器也会处理这些检查,并提供有用的错误信息。我们将在本章后面处理其中一些。
最终,必须由某个东西来执行这个状态机,而那个东西就是运行时。(这就是为什么你在查阅运行时相关资料时可能会遇到*执行器(executor)*这个词:执行器是运行时负责执行异步代码的那部分。)
现在你可以看到为什么编译器在示例 17-3 中阻止我们将 main 本身设为异步函数了。如果 main 是一个异步函数,那么就需要其他东西来管理 main 返回的任何 future 的状态机,但 main 是程序的起点!相反,我们在 main 中调用了 trpl::block_on 函数,以设置一个运行时,并运行 async 代码块返回的 future,直到它完成。
注意:一些运行时提供了宏,因此你可以编写一个异步
main函数。这些宏将async fn main() { ... }重写为一个普通的fn main,其所做的与我们手动在示例 17-4 中所做的相同:调用一个函数来运行 future 直到完成,就像trpl::block_on所做的那样。
现在,让我们把这些部分组合起来,看看如何编写并发代码。
并发地让两个 URL 相互竞速
在示例 17-5 中,我们使用从命令行传入的两个不同 URL 调用 page_title,并通过选择先完成哪个 future 让它们竞速。
extern crate trpl; // required for mdbook test
use trpl::{Either, Html};
fn main() {
let args: Vec<String> = std::env::args().collect();
trpl::block_on(async {
let title_fut_1 = page_title(&args[1]);
let title_fut_2 = page_title(&args[2]);
let (url, maybe_title) =
match trpl::select(title_fut_1, title_fut_2).await {
Either::Left(left) => left,
Either::Right(right) => right,
};
println!("{url} returned first");
match maybe_title {
Some(title) => println!("Its page title was: '{title}'"),
None => println!("It had no title."),
}
})
}
async fn page_title(url: &str) -> (&str, Option<String>) {
let response_text = trpl::get(url).await.text().await;
let title = Html::parse(&response_text)
.select_first("title")
.map(|title| title.inner_html());
(url, title)
}page_title 以查看哪个先返回我们首先为用户提供的每个 URL 调用 page_title。我们将生成的 future 保存为 title_fut_1 和 title_fut_2。请记住,这些尚未做任何事情,因为 future 是惰性的,而且我们尚未等待它们。然后我们将这些 future 传递给 trpl::select,它返回一个值来指示传入的哪个 future 最先完成。
注意:在底层,
trpl::select是基于futurescrate 中定义的一个更通用的select函数构建的。futurescrate 的select函数可以做很多trpl::select函数做不到的事情,但它也有一些额外的复杂性,我们现在可以跳过不管。
任意一个 future 都可以合法地“胜出“,因此返回 Result 没有意义。相反,trpl::select 返回一个我们之前没见过的类型——trpl::Either。Either 类型在某种程度上类似于 Result,它也有两种情况。但与 Result 不同的是,Either 中没有内置成功或失败的概念。相反,它使用 Left 和 Right 来表示“非此即彼“:
#![allow(unused)]
fn main() {
enum Either<A, B> {
Left(A),
Right(B),
}
}select 函数在第一个参数胜出时返回包含该 future 输出的 Left,在第二个 future 参数胜出时返回包含该 future 输出的 Right。这与参数在调用函数时的顺序一致:第一个参数位于第二个参数的左侧。
我们还更新了 page_title,使其返回传入的相同 URL。这样,如果首先返回的页面没有可解析的 <title>,我们仍然可以打印一条有意义的消息。有了这些可用信息,我们更新 println! 输出,以指示哪个 URL 最先完成,以及该 URL 对应网页的 <title> 是什么(如果有的话)。
现在你已经构建了一个可以工作的小型网页抓取器!选几个 URL 并运行命令行工具。你可能会发现某些站点始终比其他站点更快,而在其他情况下,更快的站点因运行而异。更重要的是,你已经学习了使用 future 的基础知识,现在我们可以更深入地探讨 async 能做什么。
使用 Async 应用并发
使用 Async 实现并发
在本节中,我们将把 async 应用于第 16 章中用线程处理过的一些相同的并发挑战。由于我们已经在那里讨论了很多关键思想,本节将重点放在线程与 future 之间的不同之处上。
在许多情况下,使用 async 处理并发的 API 与使用线程的 API 非常相似。而在其他情况下,它们最终会相当不同。即使线程和 async 的 API 看起来相似,它们的行为往往也不同——而且它们的性能特性几乎总是不一样。
使用 spawn_task 创建新任务
我们在第 16 章“使用 spawn 创建新线程” 一节中处理的第一个操作是在两个独立的线程上计数。让我们用 async 来做同样的事情。trpl crate 提供了一个 spawn_task 函数,看起来与 thread::spawn API 非常相似,还提供了一个 sleep 函数,它是 thread::sleep API 的异步版本。我们可以将它们组合起来实现计数示例,如示例 17-6 所示。
extern crate trpl; // required for mdbook test
use std::time::Duration;
fn main() {
trpl::block_on(async {
trpl::spawn_task(async {
for i in 1..10 {
println!("hi number {i} from the first task!");
trpl::sleep(Duration::from_millis(500)).await;
}
});
for i in 1..5 {
println!("hi number {i} from the second task!");
trpl::sleep(Duration::from_millis(500)).await;
}
});
}作为起点,我们使用 trpl::block_on 设置 main 函数,以便顶层函数可以是异步的。
注意:从本章此处开始,每个示例都将在
main中包含这份完全相同的trpl::block_on包裹代码,因此我们通常会像省略main一样省略它。请记住在你的代码中包含它!
然后我们在该代码块中编写两个循环,每个循环都包含一个 trpl::sleep 调用,该调用等待半秒(500 毫秒)后再发送下一条消息。我们将一个循环放在 trpl::spawn_task 的函数体中,另一个放在顶层的 for 循环中。我们还在 sleep 调用之后添加了 await。
这段代码的行为类似于基于线程的实现——包括你在运行它时可能在终端中看到消息以不同顺序出现的事实:
hi number 1 from the second task!
hi number 1 from the first task!
hi number 2 from the first task!
hi number 2 from the second task!
hi number 3 from the first task!
hi number 3 from the second task!
hi number 4 from the first task!
hi number 4 from the second task!
hi number 5 from the first task!
这个版本会在主 async 代码块中的 for 循环完成时立即停止,因为当 main 函数结束时,由 spawn_task 生成的任务会被关闭。如果你想让它一直运行到任务完成,你需要使用 join 句柄(join handle)来等待第一个任务完成。在线程中,我们使用 join 方法来“阻塞“,直到线程完成运行。在示例 17-7 中,我们可以使用 await 来做同样的事情,因为任务句柄本身就是一个 future。其 Output 类型是 Result,所以我们在等待它之后还要对其解包。
extern crate trpl; // required for mdbook test
use std::time::Duration;
fn main() {
trpl::block_on(async {
let handle = trpl::spawn_task(async {
for i in 1..10 {
println!("hi number {i} from the first task!");
trpl::sleep(Duration::from_millis(500)).await;
}
});
for i in 1..5 {
println!("hi number {i} from the second task!");
trpl::sleep(Duration::from_millis(500)).await;
}
handle.await.unwrap();
});
}await 配合 join 句柄来运行任务到完成这个更新后的版本会运行到两个循环都完成:
hi number 1 from the second task!
hi number 1 from the first task!
hi number 2 from the first task!
hi number 2 from the second task!
hi number 3 from the first task!
hi number 3 from the second task!
hi number 4 from the first task!
hi number 4 from the second task!
hi number 5 from the first task!
hi number 6 from the first task!
hi number 7 from the first task!
hi number 8 from the first task!
hi number 9 from the first task!
到目前为止,async 和线程看起来给出了相似的结果,只是语法不同:使用 await 而不是在 join 句柄上调用 join,以及等待 sleep 调用。
更大的区别在于,我们不需要为此生成另一个操作系统线程。事实上,我们甚至不需要在这里生成一个任务。因为 async 代码块编译为匿名 future,我们可以将每个循环放入一个 async 代码块中,并让运行时使用 trpl::join 函数将两者运行到完成。
在第 16 章的“等待所有线程完成” 一节中,我们展示了如何在调用 std::thread::spawn 时返回的 JoinHandle 类型上使用 join 方法。trpl::join 函数与之类似,但是针对 future 的。当你给它两个 future 时,它产生一个新的 future,其输出是一个元组,包含你传入的每个 future 在两者都完成后的输出。因此,在示例 17-8 中,我们使用 trpl::join 等待 fut1 和 fut2 都完成。我们不等待 fut1 和 fut2,而是等待由 trpl::join 产生的新 future。我们忽略了输出,因为它只是一个包含两个单元值的元组。
extern crate trpl; // required for mdbook test
use std::time::Duration;
fn main() {
trpl::block_on(async {
let fut1 = async {
for i in 1..10 {
println!("hi number {i} from the first task!");
trpl::sleep(Duration::from_millis(500)).await;
}
};
let fut2 = async {
for i in 1..5 {
println!("hi number {i} from the second task!");
trpl::sleep(Duration::from_millis(500)).await;
}
};
trpl::join(fut1, fut2).await;
});
}trpl::join 等待两个匿名 future当我们运行它时,我们看到两个 future 都运行到完成:
hi number 1 from the first task!
hi number 1 from the second task!
hi number 2 from the first task!
hi number 2 from the second task!
hi number 3 from the first task!
hi number 3 from the second task!
hi number 4 from the first task!
hi number 4 from the second task!
hi number 5 from the first task!
hi number 6 from the first task!
hi number 7 from the first task!
hi number 8 from the first task!
hi number 9 from the first task!
现在,你每次都会看到完全相同的顺序,这与我们在示例 17-7 中看到的线程和 trpl::spawn_task 非常不同。这是因为 trpl::join 函数是*公平(fair)*的,意味着它以相同的频率检查每个 future,在它们之间交替,并且永远不会让其中一个在另一个就绪时遥遥领先。对于线程,操作系统决定检查哪个线程以及让它运行多长时间。对于异步 Rust,运行时决定检查哪个任务。(在实践中,细节变得复杂,因为异步运行时在底层可能会使用操作系统线程作为管理并发方式的一部分,因此保证公平性对运行时来说可能需要更多工作——但这仍然是可能的!)运行时不必为任何给定操作保证公平性,它们通常提供不同的 API 让你选择是否想要公平性。
尝试以下这些等待 future 的变体,看看它们的效果:
- 从任意一个或两个循环周围移除 async 代码块。
- 在定义每个 async 代码块后立即等待它。
- 仅将第一个循环包裹在 async 代码块中,并在第二个循环体之后等待生成的 future。
作为额外挑战,看看你是否能在运行代码之前弄清楚每种情况下的输出会是什么!
使用消息传递在两个任务之间发送数据
在 future 之间共享数据也会是熟悉的:我们将再次使用消息传递(message passing),但这次使用的是类型和函数的异步版本。我们将采取与第 16 章“使用消息传递在线程之间传输数据” 一节中稍有不同的路径,以说明基于线程的并发和基于 future 的并发之间的一些关键差异。在示例 17-9 中,我们将从单个 async 代码块开始——不像生成一个单独线程那样生成一个单独任务。
extern crate trpl; // required for mdbook test
fn main() {
trpl::block_on(async {
let (tx, mut rx) = trpl::channel();
let val = String::from("hi");
tx.send(val).unwrap();
let received = rx.recv().await.unwrap();
println!("received '{received}'");
});
}tx 和 rx在这里,我们使用 trpl::channel,这是我们在第 16 章中与线程一起使用的多生产者、单消费者通道(multiple-producer, single-consumer channel)API 的异步版本。该 API 的异步版本与基于线程的版本只有一点不同:它使用可变的接收者 rx,而不是不可变的,并且其 recv 方法产生一个我们需要等待的 future,而不是直接产生值。现在我们可以从发送者向接收者发送消息。注意,我们不需要生成单独的线程甚至任务;我们只需要等待 rx.recv 调用。
std::mpsc::channel 中的同步 Receiver::recv 方法会阻塞,直到收到消息。trpl::Receiver::recv 方法不会阻塞,因为它是异步的。它不会阻塞,而是将控制权交还给运行时,直到收到消息或通道的发送端关闭。相比之下,我们不等待 send 调用,因为它不会阻塞。它不需要阻塞,因为我们发送到的通道是无界的(unbounded)。
注意:因为所有这些异步代码都运行在
trpl::block_on调用的 async 代码块中,所以其中的所有内容都可以避免阻塞。然而,外部的代码会在block_on函数返回时被阻塞。这正是trpl::block_on函数的要点:它让你选择在何处阻塞某些异步代码集,从而在何处进行同步和异步代码之间的转换。
注意这个示例的两个方面。首先,消息将立即到达。其次,虽然我们在这里使用了一个 future,但还没有并发。示例中的所有内容都是顺序发生的,就像没有涉及 future 一样。
让我们通过发送一系列消息并在它们之间休眠来解决第一部分,如示例 17-10 所示。
extern crate trpl; // required for mdbook test
use std::time::Duration;
fn main() {
trpl::block_on(async {
let (tx, mut rx) = trpl::channel();
let vals = vec![
String::from("hi"),
String::from("from"),
String::from("the"),
String::from("future"),
];
for val in vals {
tx.send(val).unwrap();
trpl::sleep(Duration::from_millis(500)).await;
}
while let Some(value) = rx.recv().await {
println!("received '{value}'");
}
});
}await 进行休眠除了发送消息之外,我们还需要接收它们。在这种情况下,因为我们知道有多少消息传入,我们可以通过调用四次 rx.recv().await 来手动处理。然而在现实世界中,我们通常会等待一些未知数量的消息,因此我们需要一直等待,直到确定没有更多消息。
在示例 16-10 中,我们使用 for 循环来处理从同步通道接收的所有项目。然而,Rust 目前还没有办法对异步生成的系列项目使用 for 循环,因此我们需要使用一种我们之前未见过的循环:while let 条件循环。这是我们在第 6 章“使用 if let 和 let...else 进行简洁的控制流” 一节中看到的 if let 结构的循环版本。只要它指定的模式继续与该值匹配,该循环就会继续执行。
rx.recv 调用产生一个 future,我们等待它。运行时将暂停该 future 直到它就绪。一旦消息到达,future 将解析为 Some(message),每次消息到达时都是如此。当通道关闭时,无论是因为任何发送者被丢弃还是因为接收者已耗尽所有值,future 将解析为 None,表明再也没有值了,因此我们应该停止轮询——即停止循环。
$ cargo run
Compiling async_await v0.1.0 (/Users/chris/dev/rust-lang/book/listings/ch17-async-await/listing-17-10)
Finished `dev` profile [unoptimized + debuginfo] target(s) in 4.63s
Running `target/debug/async_await`
received 'hi'
received 'from'
received 'the'
received 'future'
请注意,这段代码不会关闭!这是因为我们在这里对代码的构造方式。部分原因是有意为之,部分原因则是由于 async 代码块与线程的不同行为。
回到示例 17-10,我们已将异步代码块全部放入 trpl::block_on 调用内。这意味着其中的所有内容都是线性运行的——这里没有并发,因此没有发生任何其他事情。这也是发送调用的原因:它们是整个(单个)future 中唯一的代码,因此在发送的最后一条消息之后,没有第二对最后一条消息的接收调用。以下是对应的同步版本会做的:
fn main() {
let (tx, mut rx) = trpl::channel();
let val = String::from("hi");
tx.send(val).unwrap();
let received = rx.recv().await.unwrap();
println!("received '{received}'");
}那么是什么导致它永远不关闭呢?我们缺少的是一个循环来接收每条消息的代码。让我们在示例 17-11 中添加它。
extern crate trpl; // required for mdbook test
use std::time::Duration;
fn main() {
trpl::block_on(async {
let (tx, mut rx) = trpl::channel();
let tx_fut = async {
let vals = vec![
String::from("hi"),
String::from("from"),
String::from("the"),
String::from("future"),
];
for val in vals {
tx.send(val).unwrap();
trpl::sleep(Duration::from_millis(500)).await;
}
};
let rx_fut = async {
while let Some(value) = rx.recv().await {
println!("received '{value}'");
}
};
trpl::join(tx_fut, rx_fut).await;
});
}while let 循环持续接收消息这段代码仍然不会关闭,但它产生了一个错误,这有助于我们理解问题的根源:
$ cargo run
Compiling async_await v0.1.0 (/Users/chris/dev/rust-lang/book/listings/ch17-async-await/listing-17-11)
error: the async block may outlive the current function, but it borrows `rx`, which is owned by the current function
--> src/main.rs:41:76
|
40 | let fut = async {
| ----- this async block may hold a reference to the current function
41 | while let Some(message) = rx.recv().await {
| ^^ `rx` is borrowed here. The async block may outlive the current function;
note: it may outlive the current function because nothing here keeps the async block alive
--> src/main.rs:52:27
|
52 | });
| - the async block could outlive this function call
help: to force the async block to take ownership of `rx` (and any other referenced variables), use the `move` keyword
|
40 | let fut = async move {
| ++++
error: could not compile `async_await` (bin "async_await") due to 1 previous error
当我们在将 channel 接收代码放入 while let 循环后尝试编译时,编译器给我们指出了一个问题。一个 async 代码块可以比当前函数存在得更久,因此编译器无法确定变量 rx 在你的 async 代码块使用它时是否仍然有效。在 async 代码块中借用 rx 意味着借用必须至少与 async 代码块一样长。像这里的代码有可能工作,但回想一下,Rust 编译器检查内存安全性意味着它不能允许这种代码。为了解决这个问题,我们将告诉编译器我们选择将 rx 移动到 async 代码块中,使用我们在线程场景中使用的相同 move 关键字——这是我们在第 13 章中闭包的“捕获引用还是移动所有权“ 部分首次看到的。正如我们在第 16 章“在线程中使用 move 闭包” 一节中看到的,在使用线程时,我们经常需要将数据移入闭包。同样的基本动态也适用于 async 代码块,因此 move 关键字的工作方式与闭包中的一样。
在示例 17-12 中,我们将用于发送消息的代码块从 async 更改为 async move。
extern crate trpl; // required for mdbook test
use std::time::Duration;
fn main() {
trpl::block_on(async {
let (tx, mut rx) = trpl::channel();
let tx_fut = async move {
// --snip--
let vals = vec![
String::from("hi"),
String::from("from"),
String::from("the"),
String::from("future"),
];
for val in vals {
tx.send(val).unwrap();
trpl::sleep(Duration::from_millis(500)).await;
}
};
let rx_fut = async {
while let Some(value) = rx.recv().await {
println!("received '{value}'");
}
};
trpl::join(tx_fut, rx_fut).await;
});
}当我们运行这个版本的代码时,它在最后一条消息发送和接收后优雅地关闭。接下来,让我们看看要从多个 future 发送数据需要做哪些改变。
使用 join! 宏连接多个 Future
这个异步通道也是一个多生产者通道,所以如果我们想从多个 future 发送消息,可以在 tx 上调用 clone,如示例 17-13 所示。
extern crate trpl; // required for mdbook test
use std::time::Duration;
fn main() {
trpl::block_on(async {
let (tx, mut rx) = trpl::channel();
let tx1 = tx.clone();
let tx1_fut = async move {
let vals = vec![
String::from("hi"),
String::from("from"),
String::from("the"),
String::from("future"),
];
for val in vals {
tx1.send(val).unwrap();
trpl::sleep(Duration::from_millis(500)).await;
}
};
let rx_fut = async {
while let Some(value) = rx.recv().await {
println!("received '{value}'");
}
};
let tx_fut = async move {
let vals = vec![
String::from("more"),
String::from("messages"),
String::from("for"),
String::from("you"),
];
for val in vals {
tx.send(val).unwrap();
trpl::sleep(Duration::from_millis(1500)).await;
}
};
trpl::join!(tx1_fut, tx_fut, rx_fut);
});
}首先,我们克隆 tx,在第一个 async 代码块外部创建 tx1。我们将 tx1 移入该代码块,就像我们之前对 tx 所做的那样。然后,稍后我们将原始的 tx 移入一个新的 async 代码块,在那里我们以稍慢的延迟发送更多消息。我们恰好将这个新的 async 代码块放在用于接收消息的 async 代码块之后,但它放在之前也一样。关键是 future 被等待的顺序,而不是它们被创建的顺序。
两个用于发送消息的 async 代码块都需要是 async move 代码块,这样当这些代码块完成时,tx 和 tx1 才会被丢弃。否则,我们将再次陷入最初的那个无限循环。
最后,我们从 trpl::join 切换到 trpl::join! 来处理额外的 future:join! 宏可以等待任意数量的 future,其中 future 的数量在编译时已知。我们将在本章后面讨论如何等待未知数量的 future 集合。
现在我们看到了来自两个发送 future 的所有消息,并且由于发送 future 在发送后使用稍有不同的延迟,消息也以这些不同的间隔被接收:
received 'hi'
received 'more'
received 'from'
received 'the'
received 'messages'
received 'future'
received 'for'
received 'you'
我们已经探索了如何使用消息传递在 future 之间发送数据,async 代码块内的代码如何顺序运行,如何将所有权移入 async 代码块,以及如何连接多个 future。接下来,让我们讨论如何以及为什么要告诉运行时它可以切换到另一个任务。
处理任意数量的 Future
向运行时让出控制权
回想一下“我们的第一个异步程序” 一节,在每个等待点,如果被等待的 future 尚未就绪,Rust 会给运行时一个机会来暂停任务并切换到另一个任务。反之亦然:Rust 仅在等待点暂停 async 代码块并将控制权交还给运行时。等待点之间的所有内容都是同步的。
这意味着如果你在一个 async 代码块中做了大量工作而没有等待点,该 future 将阻止任何其他 future 取得进展。你有时可能会听到这被称为一个 future *饿死(starving)*其他 future。在某些情况下,这可能没什么大不了的。然而,如果你在进行某种昂贵的初始化或长时间运行的工作,或者你有一个 future 将无限期地持续完成某个特定任务,你就需要考虑在何时何地将控制权交还给运行时。
让我们模拟一个长时间运行的操作来说明饿死问题,然后探索如何解决它。示例 17-14 引入了一个 slow 函数。
extern crate trpl; // required for mdbook test
use std::{thread, time::Duration};
fn main() {
trpl::block_on(async {
// We will call `slow` here later
});
}
fn slow(name: &str, ms: u64) {
thread::sleep(Duration::from_millis(ms));
println!("'{name}' ran for {ms}ms");
}thread::sleep 模拟慢速操作这段代码使用 std::thread::sleep 而不是 trpl::sleep,因此调用 slow 将阻塞当前线程一段毫秒数。我们可以用 slow 来代表现实世界中既长时间运行又阻塞的操作。
在示例 17-15 中,我们使用 slow 来模拟在一对 future 中进行此类 CPU 密集型工作。
extern crate trpl; // required for mdbook test
use std::{thread, time::Duration};
fn main() {
trpl::block_on(async {
let a = async {
println!("'a' started.");
slow("a", 30);
slow("a", 10);
slow("a", 20);
trpl::sleep(Duration::from_millis(50)).await;
println!("'a' finished.");
};
let b = async {
println!("'b' started.");
slow("b", 75);
slow("b", 10);
slow("b", 15);
slow("b", 350);
trpl::sleep(Duration::from_millis(50)).await;
println!("'b' finished.");
};
trpl::select(a, b).await;
});
}
fn slow(name: &str, ms: u64) {
thread::sleep(Duration::from_millis(ms));
println!("'{name}' ran for {ms}ms");
}slow 函数来模拟慢速操作每个 future 只有在执行了一堆慢速操作之后才将控制权交还给运行时。如果你运行这段代码,你将看到如下输出:
'a' started.
'a' ran for 30ms
'a' ran for 10ms
'a' ran for 20ms
'b' started.
'b' ran for 75ms
'b' ran for 10ms
'b' ran for 15ms
'b' ran for 350ms
'a' finished.
与示例 17-5 中我们使用 trpl::select 让获取两个 URL 的 future 竞速类似,select 仍然在 a 完成后立即结束。不过,两个 future 中对 slow 的调用之间没有交错。a future 完成其所有工作,直到 trpl::sleep 调用被等待,然后 b future 完成其所有工作,直到它自己的 trpl::sleep 调用被等待,最后 a future 完成。为了让两个 future 都能在它们的慢速任务之间取得进展,我们需要等待点,这样我们才能将控制权交还给运行时。这意味着我们需要一个可以等待的东西!
我们已经在示例 17-15 中看到了这种交接发生:如果我们在 a future 的末尾移除了 trpl::sleep,它将完成而 b future 完全不运行。让我们尝试使用 trpl::sleep 函数作为让操作轮流取得进展的起点,如示例 17-16 所示。
extern crate trpl; // required for mdbook test
use std::{thread, time::Duration};
fn main() {
trpl::block_on(async {
let one_ms = Duration::from_millis(1);
let a = async {
println!("'a' started.");
slow("a", 30);
trpl::sleep(one_ms).await;
slow("a", 10);
trpl::sleep(one_ms).await;
slow("a", 20);
trpl::sleep(one_ms).await;
println!("'a' finished.");
};
let b = async {
println!("'b' started.");
slow("b", 75);
trpl::sleep(one_ms).await;
slow("b", 10);
trpl::sleep(one_ms).await;
slow("b", 15);
trpl::sleep(one_ms).await;
slow("b", 350);
trpl::sleep(one_ms).await;
println!("'b' finished.");
};
trpl::select(a, b).await;
});
}
fn slow(name: &str, ms: u64) {
thread::sleep(Duration::from_millis(ms));
println!("'{name}' ran for {ms}ms");
}trpl::sleep 让操作轮流取得进展我们在每次 slow 调用之间添加了带等待点的 trpl::sleep 调用。现在两个 future 的工作交错进行了:
'a' started.
'a' ran for 30ms
'b' started.
'b' ran for 75ms
'a' ran for 10ms
'b' ran for 10ms
'a' ran for 20ms
'b' ran for 15ms
'a' finished.
a future 在将控制权交给 b 之前仍然运行了一小段,因为它在调用 trpl::sleep 之前调用了 slow,但在此之后,每当其中一个 future 到达等待点时,它们就会来回切换。在这个例子中,我们在每次 slow 调用之后都这样做了,但我们可以以任何对我们最有意义的方式分解工作。
不过,我们并不真正想在这里休眠:我们想尽快取得进展。我们只需要将控制权交还给运行时。我们可以使用 trpl::yield_now 函数直接做到这一点。在示例 17-17 中,我们将所有 trpl::sleep 调用替换为 trpl::yield_now。
extern crate trpl; // required for mdbook test
use std::{thread, time::Duration};
fn main() {
trpl::block_on(async {
let a = async {
println!("'a' started.");
slow("a", 30);
trpl::yield_now().await;
slow("a", 10);
trpl::yield_now().await;
slow("a", 20);
trpl::yield_now().await;
println!("'a' finished.");
};
let b = async {
println!("'b' started.");
slow("b", 75);
trpl::yield_now().await;
slow("b", 10);
trpl::yield_now().await;
slow("b", 15);
trpl::yield_now().await;
slow("b", 350);
trpl::yield_now().await;
println!("'b' finished.");
};
trpl::select(a, b).await;
});
}
fn slow(name: &str, ms: u64) {
thread::sleep(Duration::from_millis(ms));
println!("'{name}' ran for {ms}ms");
}yield_now 让操作轮流取得进展这段代码既更清晰地表达了实际意图,又可以比使用 sleep 快得多,因为像 sleep 使用的定时器通常对粒度的精细程度有上限。例如,我们使用的 sleep 版本始终会休眠至少一毫秒,即使我们传入一纳秒的 Duration 也是如此。再说一遍,现代计算机非常快:它们可以在一毫秒内完成很多工作!
这意味着 async 甚至对于计算密集型任务也有用,这取决于你程序还在做哪些其他事情,因为它提供了一种有用的工具来构建程序不同部分之间的关系(代价是异步状态机的开销)。这是一种协作式多任务处理(cooperative multitasking),其中每个 future 都有能力通过等待点来决定何时交还控制权。因此,每个 future 也负有责任避免阻塞过长时间。在一些基于 Rust 的嵌入式操作系统中,这是唯一一种多任务处理方式!
当然,在实际代码中,你通常不会在每一行都交替使用函数调用和等待点。虽然以这种方式让出控制权相对廉价,但它并非没有成本。在许多情况下,试图分解计算密集型任务可能会使其显著变慢,因此有时为了整体性能,让操作短暂阻塞反而更好。始终进行测量,以确定代码的实际性能瓶颈是什么。不过,如果你确实看到大量本应并发发生的工作却以串行方式进行了,那么底层动态是很重要的,需要牢记在心!
构建我们自己的异步抽象
我们还可以将 future 组合在一起创建新的模式。例如,我们可以用已有的异步构建块来构建一个 timeout 函数。完成后,结果将是另一个构建块,我们可以用它来创建更多的异步抽象。
示例 17-18 展示了我们期望这个 timeout 如何与一个慢速 future 一起工作。
extern crate trpl; // required for mdbook test
use std::time::Duration;
fn main() {
trpl::block_on(async {
let slow = async {
trpl::sleep(Duration::from_secs(5)).await;
"Finally finished"
};
match timeout(slow, Duration::from_secs(2)).await {
Ok(message) => println!("Succeeded with '{message}'"),
Err(duration) => {
println!("Failed after {} seconds", duration.as_secs())
}
}
});
}timeout 在时间限制下运行一个慢速操作让我们来实现这个!首先,思考一下 timeout 的 API:
- 它本身需要是一个异步函数,这样我们才能等待它。
- 它的第一个参数应该是一个待运行的 future。我们可以将其设为泛型,以便它适用于任何 future。
- 它的第二个参数将是等待的最长时间。如果我们使用
Duration,这将便于传递给trpl::sleep。 - 它应该返回一个
Result。如果 future 成功完成,Result将是包含该 future 产生的值的Ok。如果超时先到,Result将是包含超时等待时长的Err。
示例 17-19 展示了这个声明。
extern crate trpl; // required for mdbook test
use std::time::Duration;
fn main() {
trpl::block_on(async {
let slow = async {
trpl::sleep(Duration::from_secs(5)).await;
"Finally finished"
};
match timeout(slow, Duration::from_secs(2)).await {
Ok(message) => println!("Succeeded with '{message}'"),
Err(duration) => {
println!("Failed after {} seconds", duration.as_secs())
}
}
});
}
async fn timeout<F: Future>(
future_to_try: F,
max_time: Duration,
) -> Result<F::Output, Duration> {
// Here is where our implementation will go!
}timeout 的函数签名这满足了我们对类型的目标。现在让我们思考所需的行为:我们想要让传入的 future 与时长进行竞速。我们可以使用 trpl::sleep 从时长创建一个定时器 future,并使用 trpl::select 将该定时器与调用者传入的 future 一起运行。
在示例 17-20 中,我们通过对 trpl::select 的结果进行匹配来实现 timeout。
extern crate trpl; // required for mdbook test
use std::time::Duration;
use trpl::Either;
// --snip--
fn main() {
trpl::block_on(async {
let slow = async {
trpl::sleep(Duration::from_secs(5)).await;
"Finally finished"
};
match timeout(slow, Duration::from_secs(2)).await {
Ok(message) => println!("Succeeded with '{message}'"),
Err(duration) => {
println!("Failed after {} seconds", duration.as_secs())
}
}
});
}
async fn timeout<F: Future>(
future_to_try: F,
max_time: Duration,
) -> Result<F::Output, Duration> {
match trpl::select(future_to_try, trpl::sleep(max_time)).await {
Either::Left(output) => Ok(output),
Either::Right(_) => Err(max_time),
}
}select 和 sleep 定义 timeouttrpl::select 的实现不是公平的:它始终按参数传入的顺序进行轮询(其他 select 实现会随机选择先轮询哪个参数)。因此,我们首先将 future_to_try 传递给 select,以便即使 max_time 是非常短的时长,它也有机会完成。如果 future_to_try 先完成,select 将返回包含 future_to_try 输出的 Left。如果 timer 先完成,select 将返回包含定时器输出 () 的 Right。
如果 future_to_try 成功并且我们得到 Left(output),则返回 Ok(output)。如果休眠定时器反而先到期并且我们得到 Right(()),我们用 _ 忽略 (),转而返回 Err(max_time)。
至此,我们有了一个由另外两个异步辅助工具构建而成的可工作的 timeout。如果我们运行代码,它将在超时后打印失败模式:
Failed after 2 seconds
由于 future 可以与其他 future 组合,你可以使用较小的异步构建块构建非常强大的工具。例如,你可以使用相同的方法将超时与重试结合起来,进而将它们与诸如网络调用(如示例 17-5 中的那些)之类的操作结合使用。
在实践中,你通常直接使用 async 和 await,其次使用像 select 这样的函数和像 join! 这样的宏来控制最外层 future 的执行方式。
我们现在已经看到了一些同时处理多个 future 的方法。接下来,我们将看看如何使用*流(streams)*在一段时间内按顺序处理多个 future。
Stream:按序排列的 Future
流(Streams):顺序处理的 Future
回想一下我们在本章前面的“消息传递” 部分中是如何使用异步通道的接收者的。异步 recv 方法随时间推移产生一系列项目。这是一种更通用模式的实例,称为流(stream)。许多概念自然地表示为流:队列中可用的项目、当完整数据集过大无法容纳计算机内存时从文件系统增量拉取的数据块,或者随时间推移从网络到达的数据。由于流是 future,我们可以将它们与任何其他类型的 future 一起使用,并以有趣的方式组合它们。例如,我们可以将事件批量处理以避免触发太多网络调用,为一连串长时间运行的操作设置超时,或者对用户界面事件进行节流以避免做不必要的工作。
我们在第 13 章的“Iterator Trait 和 next 方法” 部分中看到过一系列项目,当时我们研究了 Iterator trait,但迭代器与异步通道接收者之间有两个区别。第一个区别是时间:迭代器是同步的,而通道接收者是异步的。第二个区别是 API。当直接使用 Iterator 时,我们调用其同步的 next 方法。而特别是对于 trpl::Receiver 流,我们调用了异步的 recv 方法。除此之外,这些 API 感觉非常相似,这种相似性并非巧合。流就像是异步形式的迭代。然而,trpl::Receiver 专门等待接收消息,而通用流 API 则广泛得多:它以 Iterator 的方式提供下一个项目,但是以异步的方式。
迭代器和流在 Rust 中的相似性意味着我们实际上可以从任何迭代器创建一个流。与迭代器一样,我们可以通过调用其 next 方法并等待输出来处理流,如示例 17-21 所示,但这段代码还无法编译。
extern crate trpl; // required for mdbook test
fn main() {
trpl::block_on(async {
let values = [1, 2, 3, 4, 5, 6, 7, 8, 9, 10];
let iter = values.iter().map(|n| n * 2);
let mut stream = trpl::stream_from_iter(iter);
while let Some(value) = stream.next().await {
println!("The value was: {value}");
}
});
}我们从一个数字数组开始,将其转换为迭代器,然后调用 map 将所有值加倍。然后我们使用 trpl::stream_from_iter 函数将迭代器转换为流。接下来,当项目到达时,我们使用 while let 循环遍历流中的项目。
不幸的是,当我们尝试运行代码时,它无法编译,而是报告没有可用的 next 方法:
error[E0599]: no method named `next` found for struct `tokio_stream::iter::Iter` in the current scope
--> src/main.rs:10:40
|
10 | while let Some(value) = stream.next().await {
| ^^^^
|
= help: items from traits can only be used if the trait is in scope
help: the following traits which provide `next` are implemented but not in scope; perhaps you want to import one of them
|
1 + use crate::trpl::StreamExt;
|
1 + use futures_util::stream::stream::StreamExt;
|
1 + use std::iter::Iterator;
|
1 + use std::str::pattern::Searcher;
|
help: there is a method `try_next` with a similar name
|
10 | while let Some(value) = stream.try_next().await {
| ~~~~~~~~
如这个输出所解释的,编译器错误的原因是我们需要将正确的 trait 引入作用域才能使用 next 方法。根据我们目前的讨论,你可能合理地预期那个 trait 是 Stream,但它实际上是 StreamExt。Ext 是*扩展(extension)*的缩写,这是 Rust 社区中用另一个 trait 扩展一个 trait 的常见模式。
Stream trait 定义了一个底层接口,有效地结合了 Iterator 和 Future trait。StreamExt 在 Stream 之上提供了一组更高层的 API,包括 next 方法以及其他类似于 Iterator trait 提供的实用方法。Stream 和 StreamExt 尚未成为 Rust 标准库的一部分,但大多数生态 crate 使用类似的定义。
编译器错误的修复方法是添加一个针对 trpl::StreamExt 的 use 语句,如示例 17-22 所示。
extern crate trpl; // required for mdbook test
use trpl::StreamExt;
fn main() {
trpl::block_on(async {
let values = [1, 2, 3, 4, 5, 6, 7, 8, 9, 10];
// --snip--
let iter = values.iter().map(|n| n * 2);
let mut stream = trpl::stream_from_iter(iter);
while let Some(value) = stream.next().await {
println!("The value was: {value}");
}
});
}将所有部分组合在一起后,这段代码按照我们期望的方式工作了!而且,现在我们将 StreamExt 引入作用域,我们可以使用它的所有实用方法,就像对迭代器一样。
深入了解 Async 的 Trait
深入探究 Async 的 Trait
在本章中,我们以各种方式使用了 Future、Stream 和 StreamExt trait。不过,到目前为止,我们一直避免过于深入地探讨它们的工作原理或它们如何组合在一起,对于日常 Rust 工作来说,这在大多数情况下是没问题的。但有时,你会遇到需要更多了解这些 trait 细节的情况,以及 Pin 类型和 Unpin trait。在本节中,我们将深入探究到足以帮助应对这些场景的程度,但仍将真正深入的探讨留给其他文档。
Future Trait
让我们首先仔细看看 Future trait 是如何工作的。以下是 Rust 对其的定义:
#![allow(unused)]
fn main() {
use std::pin::Pin;
use std::task::{Context, Poll};
pub trait Future {
type Output;
fn poll(self: Pin<&mut Self>, cx: &mut Context<'_>) -> Poll<Self::Output>;
}
}这个 trait 定义包含了一堆新类型以及一些我们之前未见过的语法,所以让我们逐个部分地分析这个定义。
首先,Future 的关联类型 Output 表示该 future 解析成的结果。这类似于 Iterator trait 的 Item 关联类型。其次,Future 有一个 poll 方法,该方法为 self 参数接受一个特殊的 Pin 引用,以及一个对 Context 类型的可变引用,并返回 Poll<Self::Output>。我们稍后会更多地讨论 Pin 和 Context。现在,让我们关注该方法返回的内容,即 Poll 类型:
#![allow(unused)]
fn main() {
pub enum Poll<T> {
Ready(T),
Pending,
}
}这个 Poll 类型类似于 Option。它有一个带值的变体 Ready(T),和一个不带值的变体 Pending。然而,Poll 的含义与 Option 相当不同!Pending 变体表示 future 仍有工作要做,因此调用者稍后需要再次检查。Ready 变体表示 Future 已完成其工作,T 值现在可用。
注意:很少需要直接调用
poll,但如果确实需要,请记住,对于大多数 future 来说,调用者在 future 返回Ready之后不应再次调用poll。许多 future 在变为就绪后如果再次被轮询会 panic。可以安全地再次轮询的 future 会在其文档中明确说明。这与Iterator::next的行为类似。
当你看到使用 await 的代码时,Rust 在底层将其编译为调用 poll 的代码。如果你回顾示例 17-4,我们在其中等待单个 URL 解析后打印页面标题,Rust 将其编译为类似(虽然不完全相同)以下这样的代码:
match page_title(url).poll() {
Ready(page_title) => match page_title {
Some(title) => println!("The title for {url} was {title}"),
None => println!("{url} had no title"),
}
Pending => {
// 但这里应该放什么?
}
}当 future 仍然是 Pending 时我们应该做什么?我们需要某种方式一次又一次地重试,直到 future 最终就绪。换句话说,我们需要一个循环:
let mut page_title_fut = page_title(url);
loop {
match page_title_fut.poll() {
Ready(value) => match page_title {
Some(title) => println!("The title for {url} was {title}"),
None => println!("{url} had no title"),
}
Pending => {
// continue
}
}
}然而,如果 Rust 将其编译为完全那样的代码,那么每个 await 都会是阻塞的——与我们想要达到的目标恰恰相反!相反,Rust 确保该循环可以将控制权交给某个可以暂停此 future 工作、处理其他 future 然后稍后再次检查这个 future 的东西。正如我们所看到的,那个东西就是异步运行时,而这种调度和协调工作是它的主要职责之一。
在“使用消息传递在两个任务之间发送数据”部分中,我们描述了等待 rx.recv。recv 调用返回一个 future,而等待该 future 会对其进行轮询。我们注意到,运行时将暂停该 future,直到它就绪,此时要么是 Some(message) 要么是通道关闭时的 None。凭借我们对 Future trait 更深入的理解,特别是 Future::poll,我们可以看到其工作原理。当运行时返回 Poll::Pending 时,它知道 future 尚未就绪。相反,当 poll 返回 Poll::Ready(Some(message)) 或 Poll::Ready(None) 时,运行时知道 future 已就绪并推进它。
运行时如何做到这一点的确切细节超出了本书的范围,但关键是理解 future 的基本机制:运行时轮询它负责的每个 future,当 future 尚未就绪时将其重新置于休眠状态。
Pin 类型与 Unpin Trait
回到示例 17-13,我们使用了 trpl::join! 宏来等待三个 future。然而,常见的情况是拥有一个包含若干数量 future 的集合(如向量),而这些数量在运行时之前是未知的。让我们将示例 17-13 更改为示例 17-23 中的代码,将三个 future 放入一个向量中,并改用 trpl::join_all 函数,这段代码还无法编译。
extern crate trpl; // required for mdbook test
use std::time::Duration;
fn main() {
trpl::block_on(async {
let (tx, mut rx) = trpl::channel();
let tx1 = tx.clone();
let tx1_fut = async move {
let vals = vec![
String::from("hi"),
String::from("from"),
String::from("the"),
String::from("future"),
];
for val in vals {
tx1.send(val).unwrap();
trpl::sleep(Duration::from_secs(1)).await;
}
};
let rx_fut = async {
while let Some(value) = rx.recv().await {
println!("received '{value}'");
}
};
let tx_fut = async move {
// --snip--
let vals = vec![
String::from("more"),
String::from("messages"),
String::from("for"),
String::from("you"),
];
for val in vals {
tx.send(val).unwrap();
trpl::sleep(Duration::from_secs(1)).await;
}
};
let futures: Vec<Box<dyn Future<Output = ()>>> =
vec![Box::new(tx1_fut), Box::new(rx_fut), Box::new(tx_fut)];
trpl::join_all(futures).await;
});
}我们将每个 future 放入 Box 中以将其变为trait 对象(trait object),就像我们在第 12 章“从 run 返回错误”部分中所做的那样。(我们将在第 18 章中详细介绍 trait 对象。)使用 trait 对象让我们可以将这些类型产生的每个匿名 future 视为同一类型,因为它们都实现了 Future trait。
这可能令人惊讶。毕竟,没有一个 async 代码块返回任何值,所以每个都产生 Future<Output = ()>。然而请记住,Future 是一个 trait,编译器为每个 async 代码块创建一个唯一的枚举,即使它们具有相同的输出类型也是如此。就像你不能将两个不同的手写结构体放入 Vec 中一样,你也不能混合编译器生成的枚举。
然后我们将 future 的集合传递给 trpl::join_all 函数并等待结果。然而,这无法编译;以下是错误消息的相关部分。
error[E0277]: `dyn Future<Output = ()>` cannot be unpinned
--> src/main.rs:48:33
|
48 | trpl::join_all(futures).await;
| ^^^^^ the trait `Unpin` is not implemented for `dyn Future<Output = ()>`
|
= note: consider using the `pin!` macro
consider using `Box::pin` if you need to access the pinned value outside of the current scope
= note: required for `Box<dyn Future<Output = ()>>` to implement `Future`
note: required by a bound in `futures_util::future::join_all::JoinAll`
--> file:///home/.cargo/registry/src/index.crates.io-1949cf8c6b5b557f/futures-util-0.3.30/src/future/join_all.rs:29:8
|
27 | pub struct JoinAll<F>
| ------- required by a bound in this struct
28 | where
29 | F: Future,
| ^^^^^^ required by this bound in `JoinAll`
此错误消息中的注释告诉我们,应该使用 pin! 宏来*固定(pin)*这些值,这意味着将它们放入 Pin 类型中,该类型保证值不会在内存中被移动。错误消息说需要固定(pinning)是因为 dyn Future<Output = ()> 需要实现 Unpin trait,而它目前并没有。
trpl::join_all 函数返回一个名为 JoinAll 的结构体。该结构体在类型 F 上是泛型的,该类型被约束为实现 Future trait。直接用 await 等待一个 future 会隐式地固定该 future。这就是为什么我们不需要在想要等待 future 的每个地方都使用 pin!。
然而,我们在这里并不是直接等待一个 future。相反,我们通过将 future 的集合传递给 join_all 函数构造了一个新的 future,即 JoinAll。join_all 的签名要求集合中各项的类型都实现 Future trait,而 Box<T> 实现 Future 的条件是它所包裹的 T 是一个实现了 Unpin trait 的 future。
这需要消化很多!为了真正理解它,让我们稍微深入探究 Future trait 实际上是如何工作的,特别是围绕固定(pinning)。再次查看 Future trait 的定义:
#![allow(unused)]
fn main() {
use std::pin::Pin;
use std::task::{Context, Poll};
pub trait Future {
type Output;
// Required method
fn poll(self: Pin<&mut Self>, cx: &mut Context<'_>) -> Poll<Self::Output>;
}
}cx 参数及其 Context 类型是运行时如何知道何时检查任何给定 future 同时仍然保持惰性的关键。同样,其工作细节超出了本章的范围,你通常只需在编写自定义 Future 实现时才需要考虑这个。我们将转而关注 self 的类型,因为这是我们第一次看到 self 带有类型注解的方法。self 的类型注解与其他函数参数的类型注解类似,但有两个关键区别:
- 它告诉 Rust
self必须是什么类型才能调用该方法。 - 它不能是任意类型。它被限制为方法实现所在的类型、该类型的引用或智能指针,或者包裹对该类型的引用的
Pin。
我们将在第 18 章中看到更多关于此语法的内容。目前,知道如果我们想要轮询一个 future 以检查它是 Pending 还是 Ready(Output),我们需要一个对该类型的 Pin 包裹的可变引用就足够了。
Pin 是一个用于类似指针的类型(如 &、&mut、Box 和 Rc)的包装器。(从技术上讲,Pin 适用于实现了 Deref 或 DerefMut trait 的类型,但这实际上等效于仅适用于引用和智能指针。)Pin 本身不是一个指针,也没有像 Rc 和 Arc 那样的引用计数行为;它纯粹是编译器可以用来对指针使用强制约束的工具。
回想一下 await 是基于对 poll 的调用来实现的,这开始解释我们之前看到的错误消息,但那条消息是关于 Unpin 而不是 Pin 的。那么 Pin 究竟如何与 Unpin 相关联,为什么 Future 需要 self 在 Pin 类型中才能调用 poll?
回想本章前面部分,一个 future 中的一系列等待点会被编译成一个状态机,编译器确保该状态机遵循 Rust 关于安全性的所有常规规则,包括借用和所有权。为了实现这一点,Rust 会查看从一个等待点到下一个等待点或到 async 代码块末尾之间需要哪些数据,然后在编译后的状态机中创建相应的变体。每个变体获得了对源代码该部分中将使用的数据所需的访问权,无论是通过获取该数据的所有权,还是通过获取其可变或不可变引用。
到目前为止都很好:如果我们在给定 async 代码块中的所有权或引用方面出了任何错误,借用检查器会告诉我们。当我们想要移动该 async 代码块对应的 future 时——例如将其移入一个 Vec 以供传递给 join_all——事情就变得更加棘手。
当一个 future 被移动时——无论是通过将其推入数据结构用作迭代器,还是通过从函数返回——这实际上意味着 Rust 没有足够的信息来保证借用检查器所依赖的安全性。这让我们回到了前面做出的关于编译后的 async 代码块生成匿名枚举以保存其状态的观察。现在假设我们有一个这样的 async 代码块:
#![allow(unused)]
fn main() {
async {
let mut x = [];
let y = &x;
let z = &y;
*z = 3_i32;
x
}
}为了管理状态,Rust 创建一个匿名枚举,其第一个变体具有 x、y 和 z,第二个变体具有 y 和 z,最后一个变体只有 z。这是一个简化版,但它举例说明了基本思想。
现在想象如果我们将该 async 代码块产生的 future 移动到不同的内存位置会发生什么。移动意味着实际位的复制,就像任何其他情况一样。因为编译器将引用替换为 offset,移动后该数据的位置发生了偏移,尽管该数据中的值被精确复制。结果是,该 future 内的所有自引用都指向内存中的旧位置,而不是新位置。它们现在是悬垂的(dangling)。为了防止这种情况,在 poll 调用中,self 必须是 Pin<&mut Self> 而不是普通的 &mut self。
这引出了一个问题:为什么这个提议中 poll 定义的第一个版本(完全正常的 &mut self)就足够呢?答案是:最初确实足够——直到 Rust 开发者试图真正使用它为止。现在类型系统允许你在调用 poll 之间移动 futures,但所有这些自引用都导致了问题。这就是为什么我们现在必须使用 Pin 和 Unpin。
现在考虑如果我们有一个像 let cx = ... 这样的引用,指向我们刚才看到的 future 内部的 x,情况会怎样。当 future 被移动后,cx 现在将指向一个完全错误的位置。这是个坏消息。然而,Pin 让我们可以向编译器保证我们不打算将值移动到不同的内存位置。Pin 做了它名字所暗示的事:它将一个值固定(pin)在内存中的原位,使其无法移动。这正是用来确保在 async 代码块中创建的自引用保持有效所需的条件。
但是等等:编译器已经为我们自动创建了所有这些状态机枚举。它为什么不能为我们自动处理 Pin 呢?实际上,它确实可以……在有限的情况下。当使用 await 关键字时——编译器确实通过代码生成来处理 Pin。然而,大多数类型自动实现了 Unpin(我们马上会更详细地讨论这一点)。编译器不能自动在任何地方都为你使用 Pin,因为在某些情况下这样做不安全,因此编写代码的人需要选择加入。但是,有些类型除了固定之外永远不能安全使用,在这些情况下,作者必须确保固定发生。不过,要遇到这些极端情况,你通常必须深入底层工作。
大多数时候,你不需要担心 Pin 和 Unpin 的具体细节。然而,在数据库、Web 服务器和其他在运行时处理大量 future 的工具的库代码中,你通常会使用像 Box::pin 这样的组合,其中 Box<T> 使你能够将其放在堆上,而 Pin 固定其位置。然后,你可以使用 Pin<Box<T>> 类型来固定类型 T 的 future。
还有另一种使用 Pin 的方法,我们在前面的 join_all 错误消息中也看到过:pin! 宏。你可以调用 pin!,传入要固定的值,它会返回一个固定到栈上的值。你现在会得到一个 Pin<&mut T> 类型的值。Pin<&mut T> 类型之所以有意义,是因为你无法移动 &mut,但可以移动引用指向的 T。Pin 保证 T 本身的内存位置是固定的,因此你的代码是安全的。
回到未来:现在我们对 Pin 有了一定的了解,让我们更仔细地看看 Unpin。Pin 防止类型被移动。同时,Unpin 的作用正如其名称所暗示的那样:它表示一个类型可以安全移动,即使它已被固定。正如你可能期望的那样,Unpin 和 Pin 可以结合使用。
所以,你在本章示例的编译器错误消息中看到了 Unpin,因为它以一种间接的方式出现在背景中。请记住,Future 的错误消息(即 “the trait Unpin is not implemented for dyn Future<Output = ()>”)指的是我们最初尝试在 Vec<Box<dyn Future<Output = ()>>> 中收集由 async 代码块产生的 future。编译器在这里看到的需要 Unpin 的原因,是因为这些 future 的内部引用。编译器正在保护我们免受这个问题的影响。我们需要告诉编译器,我们不会在将它们放入 Vec 后移动它们,这样它就可以放心这些引用不会失效。我们通过固定(pinning)它们来做到这一点,这正是 pin! 宏所做的。当我们固定它们之后,我们得到的是固定类型 Pin<Box<dyn Future<Output = ()>>>。这给了我们一个指向实现了 Future 的类型 dyn Future<Output = ()> 的 Pin<Box<T>>。当这样的类型实现 Unpin 时,编译器知道可以移动值而不会有任何风险。当我们固定一个指针后,如果该指针指向的类型实现了 !Unpin(即不实现 Unpin),编译器知道如果移动它将会出错,因此不允许移动它。这正是我们想要的行为。
因此,Unpin 是一个标记 trait(marker trait),类似于我们在第 16 章中看到的 Send 和 Sync trait,因此本身没有任何功能。标记 trait 的存在仅仅是为了告诉编译器在特定上下文中使用实现给定 trait 的类型是安全的。Unpin 通知编译器,给定类型不需要维护关于所涉值是否可以安全移动的任何保证。
与 Send 和 Sync 一样,编译器会自动为所有它可以证明是安全的类型实现 Unpin。一种特殊情况,同样类似于 Send 和 Sync,是 Unpin 对某个类型没有被实现的情况。其表示法是 impl !Unpin for SomeType,其中 SomeType 是一种确实需要维护这些保证以确保安全的类型的名称,此类类型在 Pin 中使用的指针指向它时尤甚。
换句话说,关于 Pin 和 Unpin 之间的关系,需要记住两件事。首先,Unpin 是“正常“情况,而 !Unpin 是特殊情况。其次,类型是否实现 Unpin 或 !Unpin,仅在你使用指向该类型的固定指针(如 Pin<&mut SomeType>)时才重要。
为了具体说明,考虑一个 String:它有长度和组成它的 Unicode 字符。我们可以将 String 包裹在 Pin 中,如图 17-8 所示。然而,String 自动实现 Unpin,就像 Rust 中大多数其他类型一样。
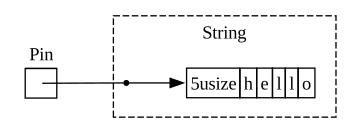
因此,我们可以做一些在 String 实现 !Unpin 的情况下会非法的操作,例如在同一内存位置将一个字符串替换为另一个字符串,如图 17-9 所示。这不会违反 Pin 的约定,因为 String 没有内部引用使其移动不安全。这正是它实现 Unpin 而非 !Unpin 的原因。
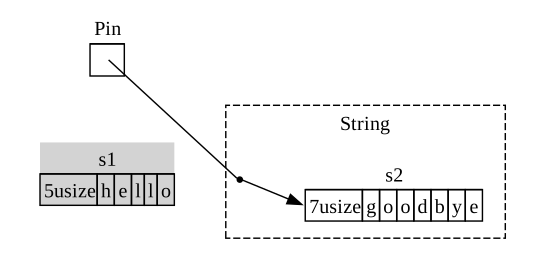
现在我们已经掌握了足够的知识来理解示例 17-23 中那个 join_all 调用报告的错误。我们最初尝试将由 async 代码块产生的 future 移入一个 Vec<Box<dyn Future<Output = ()>>> 中,但正如我们看到的,这些 future 可能具有内部引用,因此它们不会自动实现 Unpin。一旦我们将它们固定,就可以将得到的 Pin 类型传递给 Vec,确信 future 中的底层数据不会被移动。示例 17-24 展示了如何通过定义三个 future 的位置调用 pin! 宏并调整 trait 对象类型来修复代码。
extern crate trpl; // required for mdbook test
use std::pin::{Pin, pin};
// --snip--
use std::time::Duration;
fn main() {
trpl::block_on(async {
let (tx, mut rx) = trpl::channel();
let tx1 = tx.clone();
let tx1_fut = pin!(async move {
// --snip--
let vals = vec![
String::from("hi"),
String::from("from"),
String::from("the"),
String::from("future"),
];
for val in vals {
tx1.send(val).unwrap();
trpl::sleep(Duration::from_secs(1)).await;
}
});
let rx_fut = pin!(async {
// --snip--
while let Some(value) = rx.recv().await {
println!("received '{value}'");
}
});
let tx_fut = pin!(async move {
// --snip--
let vals = vec![
String::from("more"),
String::from("messages"),
String::from("for"),
String::from("you"),
];
for val in vals {
tx.send(val).unwrap();
trpl::sleep(Duration::from_secs(1)).await;
}
});
let futures: Vec<Pin<&mut dyn Future<Output = ()>>> =
vec![tx1_fut, rx_fut, tx_fut];
trpl::join_all(futures).await;
});
}此示例现在可以编译和运行了,我们可以在运行时向向量中添加或移除 future,并将它们全部连接起来。
Pin 和 Unpin 主要用于构建底层库,或者当你构建运行时本身时,而非用于日常 Rust 代码。不过,当你在错误消息中看到这些 trait 时,现在你将更好地了解如何修复你的代码!
注意:
Pin和Unpin的组合使得在 Rust 中安全地实现一整类复杂的类型成为可能,否则这些类型由于其自引用(self-referential)性质而难以实现。需要Pin的类型在当今的异步 Rust 中最常见,但偶尔你也会在其他上下文中看到它们。
Pin和Unpin如何工作的具体细节以及它们需要遵守的规则在std::pin的 API 文档中有广泛涵盖,因此如果你有兴趣了解更多,这是一个很好的起点。如果你想更详细地了解事物在底层是如何工作的,请参阅 Asynchronous Programming in Rust 的第 2 章和第 4 章。
Stream Trait
现在你对 Future、Pin 和 Unpin trait 有了更深入的掌握,我们可以将注意力转向 Stream trait。正如你在本章前面所学到的,流类似于异步迭代器。然而,与 Iterator 和 Future 不同,截至本文撰写之时,Stream 在标准库中没有定义,但是确实有一个来自 futures crate 的非常通用的定义,在整个生态系统中广泛使用。
让我们在查看 Stream trait 如何将它们合并之前,先回顾一下 Iterator 和 Future trait 的定义。从 Iterator 中,我们得到了序列的概念:其 next 方法提供 Option<Self::Item>。从 Future 中,我们得到了随时间推移变成就绪的概念:其 poll 方法提供 Poll<Self::Output>。为了表示随时间推移变成就绪的项目序列,我们定义了一个将这两个特性结合在一起的 Stream trait:
#![allow(unused)]
fn main() {
use std::pin::Pin;
use std::task::{Context, Poll};
trait Stream {
type Item;
fn poll_next(
self: Pin<&mut Self>,
cx: &mut Context<'_>
) -> Poll<Option<Self::Item>>;
}
}Stream trait 定义了一个名为 Item 的关联类型,表示流产生的项目的类型。这类似于 Iterator,其中可能有零到多个项目,而不像 Future,其中总是有一个单一的 Output(即使它是单元类型 ())。
Stream 还定义了一个方法来获取这些项目。我们称其为 poll_next,以明确它以与 Future::poll 相同的方式进行轮询,并以与 Iterator::next 相同的方式产生项目序列。其返回类型将 Poll 与 Option 结合在一起。外层类型是 Poll,因为它必须像 future 一样检查就绪状态。内层类型是 Option,因为它需要像迭代器一样指示是否还有更多消息。
类似于此定义的版本很可能最终会成为 Rust 标准库的一部分。与此同时,它是大多数运行时工具包的一部分,因此你可以依赖它,我们接下来讨论的所有内容通常都适用!
然而,在我们在“流:顺序处理的 Future” 部分中看到的示例中,我们并没有使用 poll_next 或 Stream,而是使用了 next 和 StreamExt。当然,我们可以直接以 poll_next API 的方式来工作,手动编写我们自己的 Stream 状态机,就像我们可以直接通过 future 的 poll 方法来使用 future 一样。不过,使用 await 要好得多,而 StreamExt trait 提供了 next 方法,因此我们可以这样做:
#![allow(unused)]
fn main() {
use std::pin::Pin;
use std::task::{Context, Poll};
trait Stream {
type Item;
fn poll_next(
self: Pin<&mut Self>,
cx: &mut Context<'_>,
) -> Poll<Option<Self::Item>>;
}
trait StreamExt: Stream {
async fn next(&mut self) -> Option<Self::Item>
where
Self: Unpin;
// other methods...
}
}注意:我们在本章前面使用的实际定义看起来与此略有不同,因为它支持的 Rust 版本尚未支持在 trait 中使用异步函数。因此,它看起来像这样:
fn next(&mut self) -> Next<'_, Self> where Self: Unpin;那个
Next类型是一个实现了Future的struct,并允许我们使用Next<'_, Self>来命名对self引用的生命周期,以便await可以与这个方法一起使用。
StreamExt trait 也是所有可用的有趣方法的归属地。StreamExt 会为每个实现 Stream 的类型自动实现,但这些 trait 是分开定义的,以使社区能够在便利性 API 上进行迭代而不影响基础 trait。
在 trpl crate 使用的 StreamExt 版本中,该 trait 不仅定义了 next 方法,还提供了一个正确调用 Stream::poll_next 细节的 next 默认实现。这意味着即使你需要编写自己的流数据类型,你只需实现 Stream,然后任何使用你数据类型的人都可以自动使用 StreamExt 及其方法。
这就是我们要介绍的关于这些 trait 的底层细节的全部内容。总结一下,让我们考虑 future(包括 stream)、任务和线程是如何协同工作的!
Future、任务与线程
融会贯通:Future、任务与线程
正如我们在第 16 章中看到的,线程提供了一种实现并发的方法。我们在本章中看到了另一种方法:使用 async 配合 future 和 stream。如果你想知道何时选择一种方法而不是另一种,答案是:视情况而定!而且在很多情况下,选择并非线程或 async,而是线程和 async。
许多操作系统几十年来一直提供基于线程的并发模型,许多编程语言也因此支持它们。然而,这些模型并非没有权衡。在许多操作系统上,它们为每个线程使用相当多的内存。线程也仅在操作系统和硬件支持它们时才是一种选择。与主流桌面和移动计算机不同,一些嵌入式系统根本没有操作系统,因此也不会有线程。
异步模型提供了一种不同的——最终是互补的——权衡集合。在异步模型中,并发操作不需要自己的线程。相反,它们可以运行在任务上,就像我们在 stream 部分中使用 trpl::spawn_task 从同步函数启动工作时那样。任务类似于线程,但它不是由操作系统管理的,而是由库级别的代码——即运行时——来管理的。
生成线程和生成任务的 API 如此相似是有原因的。线程充当了一组同步操作的边界;并发可以在线程之间实现。任务充当了一组异步操作的边界;并发可以同时在任务之间和任务内部实现,因为任务可以在其函数体中的 future 之间切换。最后,future 是 Rust 中最细粒度的并发单元,每个 future 可以表示一个由其他 future 组成的树。运行时——具体地说,其执行器——管理任务,而任务管理 future。在这方面,任务类似于轻量级的、由运行时管理的线程,并且由于由运行时而不是操作系统管理而具有额外的能力。
这并不意味着异步任务总是比线程更好(反之亦然)。在某些方面,使用线程的并发比使用 async 的并发是一种更简单的编程模型。这可能是优点,也可能是缺点。线程在某种程度上是“发射后不管“的;它们没有与 future 对等的原生概念,所以它们只是运行到完成,除了被操作系统本身中断之外不会被中断。
而且事实证明,线程和任务通常配合得非常好,因为任务可以(至少在某些运行时中)在线程之间移动。事实上,在底层,我们一直在使用的运行时——包括 spawn_blocking 和 spawn_task 函数——默认是多线程的!许多运行时使用一种称为工作窃取(work stealing)的方法,根据线程当前的使用情况,透明地将任务在线程之间移动,以提高系统的整体性能。这种方法实际上需要线程和任务,因此也需要 future。
当考虑何时使用哪种方法时,可以参考以下经验法则:
- 如果工作是高度可并行化的(即 CPU 密集型),例如处理大量数据,其中每个部分可以单独处理,那么线程是更好的选择。
- 如果工作是高度并发的(即 I/O 密集型),例如处理来自多个不同来源的消息,这些消息可能以不同的间隔或不同的速率到达,那么 async 是更好的选择。
如果你既需要并行又需要并发,你不必在线程和 async 之间做选择。你可以自由地将它们一起使用,让每个发挥其最擅长的部分。例如,示例 17-25 展示了现实世界 Rust 代码中这种混合的一个相当常见的例子。
extern crate trpl; // for mdbook test
use std::{thread, time::Duration};
fn main() {
let (tx, mut rx) = trpl::channel();
thread::spawn(move || {
for i in 1..11 {
tx.send(i).unwrap();
thread::sleep(Duration::from_secs(1));
}
});
trpl::block_on(async {
while let Some(message) = rx.recv().await {
println!("{message}");
}
});
}我们首先创建一个异步通道,然后生成一个线程,使用 move 关键字获取通道发送端的所有权。在线程内,我们发送数字 1 到 10,每次发送之间休眠一秒。最后,我们运行一个由传入 trpl::block_on 的 async 代码块创建的 future,就像我们在本章中一直做的那样。在那个 future 中,我们等待这些消息,就像我们在其他消息传递示例中看到的那样。
回到我们在本章开头提出的场景,想象使用专用线程运行一组视频编码任务(因为视频编码是计算密集型的),但使用异步通道通知 UI 这些操作已完成。在实际用例中有无数这种组合的例子。
总结
这不是你在本书中最后一次看到并发。第 21 章第 21 章 中的项目将在比这里讨论的更简单的示例更现实的情况下应用这些概念,并更直接地比较使用线程与使用任务和 future 解决问题的方式。
无论你选择哪种方法,Rust 都为你提供了编写安全、快速、并发代码所需的工具——无论是用于高吞吐量的 Web 服务器还是嵌入式操作系统。
接下来,我们将讨论随着你的 Rust 程序变得更大,建模问题和构建解决方案的惯用方式。此外,我们还将讨论 Rust 的习语(idiom)与你可能从面向对象编程中熟悉的习语之间的关系。
面向对象编程特性
面向对象编程(Object-oriented programming,OOP)是一种对程序进行建模的方式。作为编程概念的对象(Object)最早在 20 世纪 60 年代被引入编程语言 Simula 中。这些对象影响了 Alan Kay 的编程架构,在该架构中对象之间通过传递消息进行通信。为了描述这种架构,他在 1967 年创造了术语 面向对象编程(object-oriented programming)。有许多相互竞争的定义描述了什么是 OOP,根据其中一些定义,Rust 是面向对象的,但根据另一些定义,它又不是。在本章中,我们将探讨一些通常被认为是面向对象的特性,以及这些特性如何转化为符合 Rust 惯用写法(idiomatic)的风格。然后,我们将向你展示如何在 Rust 中实现一个面向对象的设计模式(design pattern),并讨论这样做与利用 Rust 的一些优势来提供解决方案之间的权衡。
面向对象语言的特点
面向对象语言的特点
在编程社区中,对于一门语言必须具备哪些特性才能被视为面向对象,并没有共识。Rust 受到了许多编程范式的影响,包括 OOP;例如,我们在第 13 章中探讨了来自函数式编程的特性。可以说,OOP 语言共享了一些共同的特性——即对象(objects)、封装(encapsulation)和继承(inheritance)。让我们来看看这些特性各自意味着什么,以及 Rust 是否支持它们。
对象包含数据和行为
由 Erich Gamma、Richard Helm、Ralph Johnson 和 John Vlissides 合著的《设计模式:可复用面向对象软件的基础》(Design Patterns: Elements of Reusable Object-Oriented Software,Addison-Wesley,1994 年),俗称“四人组“(The Gang of Four)一书,是一本面向对象设计模式的目录。它这样定义 OOP:
面向对象的程序由对象组成。一个对象(object)封装了数据以及操作这些数据的流程(procedures)。这些流程通常被称为方法(methods)或操作(operations)。
根据这个定义,Rust 是面向对象的:结构体(struct)和枚举(enum)包含数据,而 impl 块为结构体和枚举提供方法。尽管带有方法的结构体和枚举并不叫做对象,但根据四人组对对象的定义,它们提供了相同的功能。
封装隐藏了实现细节
另一个与 OOP 相关的常见方面是*封装(encapsulation)*的概念,这意味着对象的实现细节对于使用该对象的代码来说是不可访问的。因此,与对象交互的唯一方式是通过其公有 API(public API);使用该对象的代码不应该能够直接访问对象的内部并更改数据或行为。这使得程序员可以更改和重构对象的内部实现,而无需修改使用该对象的代码。
我们在第 7 章中讨论了如何控制封装:我们可以使用 pub 关键字来决定代码中的哪些模块、类型、函数和方法应该是公有的,而其他所有内容默认都是私有的。例如,我们可以定义一个 AveragedCollection 结构体,它有一个包含 i32 值向量的字段。该结构体还可以有一个字段用于保存这些值的平均值,这意味着平均值不需要在每次有人需要时都重新计算。换句话说,AveragedCollection 会为我们缓存计算好的平均值。清单 18-1 展示了 AveragedCollection 结构体的定义。
pub struct AveragedCollection {
list: Vec<i32>,
average: f64,
}AveragedCollection 结构体,维护一个整数列表以及集合中元素的平均值该结构体被标记为 pub,以便其他代码可以使用它,但结构体内部的字段保持私有。在这种情况下,这一点很重要,因为我们希望确保每当从列表中添加或删除值时,平均值也会被更新。我们通过在结构体上实现 add、remove 和 average 方法来实现这一点,如清单 18-2 所示。
pub struct AveragedCollection {
list: Vec<i32>,
average: f64,
}
impl AveragedCollection {
pub fn add(&mut self, value: i32) {
self.list.push(value);
self.update_average();
}
pub fn remove(&mut self) -> Option<i32> {
let result = self.list.pop();
match result {
Some(value) => {
self.update_average();
Some(value)
}
None => None,
}
}
pub fn average(&self) -> f64 {
self.average
}
fn update_average(&mut self) {
let total: i32 = self.list.iter().sum();
self.average = total as f64 / self.list.len() as f64;
}
}AveragedCollection 上实现公有方法 add、remove 和 average公有方法 add、remove 和 average 是访问或修改 AveragedCollection 实例中数据的唯一方式。当使用 add 方法向 list 添加一个元素,或使用 remove 方法移除一个元素时,这两个方法的实现都会调用私有的 update_average 方法来处理 average 字段的更新。
我们将 list 和 average 字段设为私有,这样外部代码就无法直接向 list 字段添加或移除元素;否则,当 list 发生变化时,average 字段可能会不同步。average 方法返回 average 字段的值,允许外部代码读取平均值但不能修改它。
由于我们封装了 AveragedCollection 结构体的实现细节,我们可以在未来轻松地更改某些方面,例如数据结构。举例来说,我们可以使用 HashSet<i32> 而不是 Vec<i32> 作为 list 字段。只要 add、remove 和 average 这些公有方法的签名保持不变,使用 AveragedCollection 的代码就不需要更改。如果我们把 list 改为公有,情况就不一定了:HashSet<i32> 和 Vec<i32> 有不同的添加和移除元素的方法,因此如果外部代码直接修改 list,很可能也需要更改。
如果封装被认为是面向对象语言的必要条件,那么 Rust 满足这个要求。在代码的不同部分选择是否使用 pub,使得实现细节的封装成为可能。
继承作为类型系统和代码共享
*继承(Inheritance)*是一种机制,通过这种机制,一个对象可以继承另一个对象定义中的元素,从而无需重新定义即可获得父对象的数据和行为。
如果一门语言必须支持继承才能被认为是面向对象的,那么 Rust 不是这样的语言。没有一种方式可以在不使用宏的情况下定义继承父结构体字段和方法实现的结构体。
然而,如果你习惯于在编程工具箱中使用继承,你可以根据当初使用继承的原因,在 Rust 中找到其他解决方案。
选择继承主要有两个原因。一是代码复用:你可以为一种类型实现特定的行为,而继承使你能够为另一种类型复用该实现。在 Rust 中,你可以通过默认 trait 方法实现(default trait method implementations)以有限的方式做到这一点,正如你在清单 10-14 中看到的那样,我们为 Summary trait 上的 summarize 方法添加了默认实现。任何实现了 Summary trait 的类型都会自动拥有 summarize 方法,无需再编写任何额外代码。这类似于父类拥有一个方法的实现,而继承的子类也拥有该方法的实现。我们也可以在实现 Summary trait 时覆盖 summarize 方法的默认实现,这类似于子类覆盖从父类继承的方法的实现。
使用继承的另一个原因与类型系统有关:使子类型能够在与父类型相同的地方使用。这也被称为多态(polymorphism),这意味着如果多个对象在运行时共享某些特征,它们可以相互替换。
多态
对于许多人来说,多态是继承的同义词。但实际上它是一个更通用的概念,指的是可以处理多种类型数据的代码。对于继承而言,这些类型通常是子类(subclasses)。
Rust 则使用泛型(generics)来抽象不同的可能类型,并使用 trait 约束(trait bounds)来限制这些类型必须提供什么。这有时被称为有界参数化多态(bounded parametric polymorphism)。
Rust 通过不提供继承选择了另一套权衡方案。继承常常存在共享比所需更多代码的风险。子类不一定应该共享其父类的所有特征,但在继承中却会如此。这可能会使程序的设计灵活性降低。它还可能导致在子类上调用没有意义或引起错误的方法,因为这些方法不适用于子类。此外,有些语言只允许单一继承(single inheritance)(即子类只能从一个类继承),进一步限制了程序设计的灵活性。
由于这些原因,Rust 采用了不同的方法,使用 trait 对象(trait objects)而不是继承来实现运行时的多态。让我们来看看 trait 对象是如何工作的。
使用 Trait 对象对共享行为进行抽象
使用 Trait 对象对共享行为进行抽象
在第 8 章中,我们提到向量(vector)的一个局限是它们只能存储一种类型的元素。我们在清单 8-9 中创建了一个变通方案,我们定义了一个 SpreadsheetCell 枚举,其变体(variant)可以持有整数、浮点数和文本。这意味着我们可以在每个单元格中存储不同类型的数据,同时仍然拥有一个表示一行单元格的向量。当我们的可互换元素是在代码编译时已知的一组固定类型时,这是一个非常好的解决方案。
然而,有时我们希望库的用户能够扩展在特定情况下有效的类型集合。为了展示如何实现这一点,我们将创建一个示例性的图形用户界面(GUI)工具,它遍历一个项目列表,对每个项目调用 draw 方法将其绘制到屏幕上——这是 GUI 工具常用的一种技术。我们将创建一个名为 gui 的库 crate,其中包含一个 GUI 库的结构。这个 crate 可能包含一些供人们使用的类型,例如 Button 或 TextField。此外,gui 的用户将希望创建他们自己的可绘制类型:例如,一个程序员可能会添加一个 Image,而另一个程序员可能会添加一个 SelectBox。
在编写这个库的时候,我们无法知道并定义其他程序员可能想要创建的所有类型。但我们确实知道 gui 需要跟踪许多不同类型的不同值,并且它需要对这些不同类型的每个值调用 draw 方法。它不需要确切知道调用 draw 方法时会发生什么,只需要知道该值会有可供调用的 draw 方法。
在具有继承的语言中,要完成这个功能,我们可能会定义一个名为 Component 的类,其上有一个名为 draw 的方法。其他类,如 Button、Image 和 SelectBox,将从 Component 继承,从而继承 draw 方法。它们每个都可以覆盖 draw 方法来定义自己的自定义行为,而框架可以将所有类型视为 Component 的实例并对它们调用 draw。但由于 Rust 没有继承,我们需要另一种方式来构建 gui 库,以允许用户创建与库兼容的新类型。
定义公共行为的 Trait
为了实现我们希望 gui 拥有的行为,我们将定义一个名为 Draw 的 trait,它有一个名为 draw 的方法。然后,我们可以定义一个接受 trait 对象的向量。一个*trait 对象(trait object)*既指向一个实现了我们指定 trait 的类型的实例,也指向一个用于在运行时查找该类型上的 trait 方法的表。我们通过指定某种指针(如引用或 Box<T> 智能指针),然后跟 dyn 关键字,再指定相关的 trait 来创建 trait 对象。(关于 trait 对象为什么必须使用指针的原因,我们将在第 20 章的“动态大小类型和 Sized Trait”中讨论。)我们可以在泛型或具体类型的位置使用 trait 对象。无论我们在何处使用 trait 对象,Rust 的类型系统都将在编译时确保在该上下文中使用的任何值都实现了该 trait 对象的 trait。因此,我们不需要在编译时知道所有可能的类型。
我们在第 8 章中提到,向量只能存储一种类型的一个限制。我们可以通过使用 trait 对象绕过这个限制:我们在向量中可以存储实现了给定 trait 的不同类型的具体类型。例如,在清单 18-3 中,我们定义了一个名为 Screen 的结构体,它有一个名为 components 的字段,该字段包含一个 Box<dyn Draw> 的向量。这个以 Box<dyn Draw> 作为元素的向量将容纳任何实现了 Draw trait 的类型,并且我们可以在其上调用 draw 方法。
pub trait Draw {
fn draw(&self);
}Screen 结构体,其 components 字段包含实现了 Draw trait 的类型的 trait 对象在 Screen 结构体上,我们将定义一个名为 run 的方法,该方法将对其 components 中的每个元素调用 draw 方法,如清单 18-4 所示。
pub trait Draw {
fn draw(&self);
}
pub struct Screen {
pub components: Vec<Box<dyn Draw>>,
}Screen 上的 run 方法,它在每个组件上调用 draw 方法这与定义一个使用泛型类型参数(generic type parameter)加上 trait 约束(trait bound)的结构体不同。泛型类型参数一次只能被一个具体类型替代,而 trait 对象则允许在运行时容纳多个具体类型。例如,我们可以使用泛型类型参数来定义 Screen 结构体,如清单 18-5 所示。
pub trait Draw {
fn draw(&self);
}
pub struct Screen {
pub components: Vec<Box<dyn Draw>>,
}
// ANCHOR: here
impl Screen {
pub fn run(&self) {
for component in self.components.iter() {
component.draw();
}
}
}
// ANCHOR_END: hereScreen 结构体替代实现这个限制在大多数情况下是合适的,因为使用泛型的定义已经覆盖了我们所遇到的大多数情况。然而,对于清单 18-4 中的实现,Screen 实例可以容纳实现 Draw 的多种不同类型的 Vec<T>,而在清单 18-5 中,Screen 实例只能容纳一种具体类型的 Vec<T>。也就是说,清单 18-4 中的 Screen(没有泛型)适用于需要容纳不同类型的情况;而清单 18-5 中的 Screen(使用泛型)则适用于 components 集合都是同一类型的情况。
实现 Trait
现在我们添加了一些实现了 Draw trait 的类型。我们将提供 Button 类型。再次强调,实际上编写 GUI 库超出了本书的范围,所以 draw 方法体内不会有任何有用的实现。为了想象这个实现可能是什么样子,Button 结构体可能包含 width、height 和 label 字段,如清单 18-7 所示。
pub trait Draw {
fn draw(&self);
}
pub struct Screen {
pub components: Vec<Box<dyn Draw>>,
}
impl Screen {
pub fn run(&self) {
for component in self.components.iter() {
component.draw();
}
}
}
pub struct Button {
pub width: u32,
pub height: u32,
pub label: String,
}
impl Draw for Button {
fn draw(&self) {
// code to actually draw a button
}
}Draw trait 的 Button 结构体Button 上的 width、height 和 label 字段将与其他组件上的字段不同;例如,一个 TextField 类型可能具有相同的字段,外加一个 placeholder 字段。我们想要在屏幕上绘制的每种类型都会实现 Draw trait,但在 draw 方法中使用不同的代码来定义如何绘制该特定类型,就像这里的 Button 一样(如前所述,没有实际的 GUI 代码)。例如,Button 类型可能还有一个额外的 impl 块,其中包含与用户点击按钮时发生的事件相关的方法。这类方法不适用于 TextField 等类型。
如果有人使用我们的库决定实现一个具有 width、height 和 options 字段的 SelectBox 结构体,他们也将在 SelectBox 类型上实现 Draw trait,如清单 18-8 所示。
use gui::Draw;
struct SelectBox {
width: u32,
height: u32,
options: Vec<String>,
}
impl Draw for SelectBox {
fn draw(&self) {
// code to actually draw a select box
}
}
fn main() {}gui 并且在 SelectBox 结构体上实现 Draw trait 的 crate库的用户现在可以编写他们的 main 函数来创建一个 Screen 实例。对于 Screen 实例,他们可以通过将 SelectBox 和 Button 分别放入 Box<T> 中使其成为 trait 对象,从而将它们添加进去。然后他们可以调用 Screen 实例上的 run 方法,该方法将对每个组件调用 draw 方法。清单 18-9 展示了这个实现。
use gui::Draw;
struct SelectBox {
width: u32,
height: u32,
options: Vec<String>,
}
impl Draw for SelectBox {
fn draw(&self) {
// code to actually draw a select box
}
}
use gui::{Button, Screen};
fn main() {
let screen = Screen {
components: vec![
Box::new(SelectBox {
width: 75,
height: 10,
options: vec![
String::from("Yes"),
String::from("Maybe"),
String::from("No"),
],
}),
Box::new(Button {
width: 50,
height: 10,
label: String::from("OK"),
}),
],
};
screen.run();
}在我们编写这个库时,我们并不知道有人可能会添加 SelectBox 类型,但是我们的 Screen 实现仍然能够操作这个新类型并绘制它,因为 SelectBox 实现了 Draw trait,这意味着它实现了 draw 方法。
这种概念——只关心一个值响应哪些消息(messages),而不关心该值的具体类型——类似于动态类型语言中的鸭子类型(duck typing):如果它走路像鸭子、叫起来像鸭子,那么它就是鸭子!在清单 18-5 中 Screen 上的 run 实现中,run 不需要知道每个组件的具体类型是什么。它不检查某个组件是 Button 的实例还是 SelectBox 的实例,它只是在组件上调用 draw 方法。通过将 Box<dyn Draw> 指定为 components 向量中值的类型,我们将 Screen 定义为需要那些我们可以在其上调用 draw 方法的值。
使用 trait 对象和 Rust 的类型系统来编写类似于使用鸭子类型的代码的好处在于,我们永远不必在运行时检查某个值是否实现了特定的方法,也不必担心如果某个值没有实现某个方法但我们调用了它会出现错误。如果这些值没有实现 trait 对象所需的 trait,Rust 将不会编译我们的代码。
例如,清单 18-10 展示了如果我们尝试使用 String 作为组件来创建 Screen 会发生什么。
use gui::Screen;
fn main() {
let screen = Screen {
components: vec![Box::new(String::from("Hi"))],
};
screen.run();
}我们会得到这个错误,因为 String 没有实现 Draw trait:
$ cargo run
Compiling gui v0.1.0 (file:///projects/gui)
error[E0277]: the trait bound `String: Draw` is not satisfied
--> src/main.rs:5:26
|
5 | components: vec![Box::new(String::from("Hi"))],
| ^^^^^^^^^^^^^^^^^^^^^^^^^^^^ the trait `Draw` is not implemented for `String`
|
= help: the trait `Draw` is implemented for `Button`
= note: required for the cast from `Box<String>` to `Box<dyn Draw>`
For more information about this error, try `rustc --explain E0277`.
error: could not compile `gui` (bin "gui") due to 1 previous error
这个错误告诉我们,要么我们传递了不想要的东西给 Screen,所以应该传递一个不同的类型;要么我们应该在 String 上实现 Draw,这样 Screen 才能在其上调用 draw。
执行动态派发
回想一下我们在第 10 章中的“使用泛型代码的性能”部分讨论的编译器对泛型执行的单态化(monomorphization)过程:编译器为我们在泛型类型参数位置上使用的每种具体类型生成非泛型的函数和方法实现。单态化产生的代码执行的是静态派发(static dispatch),即编译器在编译时就知道你在调用哪个方法。与此相对的是动态派发(dynamic dispatch),即编译器在编译时无法判断你在调用哪个方法。在动态派发的情况下,编译器生成的代码会在运行时知道该调用哪个方法。
当我们使用 trait 对象时,Rust 必须使用动态派发。编译器不知道使用 trait 对象的代码中可能会出现哪些类型,因此它不知道调用哪个类型上实现的哪个方法。相反,在运行时,Rust 使用 trait 对象内部的指针来知道该调用哪个方法。这种查找会产生静态派发所没有的运行时开销。动态派发还会阻止编译器选择内联(inline)方法的代码,从而进一步阻止某些优化,并且 Rust 有一些关于可以在何处以及不能使用动态派发的规则,称为dyn 兼容性(dyn compatibility)。这些规则超出了本次讨论的范围,但你可以在参考文档中阅读更多相关信息。然而,我们在清单 18-5 中编写的代码确实获得了额外的灵活性,并能够支持清单 18-9 中的功能,所以这是一个需要权衡的取舍。
实现面向对象设计模式
实现面向对象设计模式
*状态模式(state pattern)是一种面向对象的设计模式。该模式的核心是,我们定义一组值在内部可以具有的状态。这些状态由一组状态对象(state objects)*表示,值的行为会根据其状态发生变化。我们将通过一个博客文章结构体的示例来实践一下,该结构体有一个用于保存其状态的字段,该状态将是“草稿(draft)“、“审核(review)“或“已发布(published)“集合中的一个状态对象。
状态对象共享功能:在 Rust 中,当然,我们使用结构体和 trait,而不是对象和继承。每个状态对象负责自己的行为,并负责控制何时应该转换为另一种状态。持有状态对象的值对状态的不同行为以及状态之间的转换时机一无所知。
使用状态模式的好处是,当程序的业务需求发生变化时,我们不需要更改持有状态的值的代码或使用该值的代码。我们只需要更新某个状态对象内部的代码来改变其规则,或者可能添加更多的状态对象。
首先,我们将以更传统的面向对象方式实现状态模式。然后,我们将使用一种在 Rust 中更为自然的方法。让我们深入了解一下,使用状态模式逐步实现一个博客文章工作流。
最终的功能将如下所示:
- 博客文章以空白草稿开始。
- 草稿完成后,请求对文章进行审核。
- 文章批准后,它就会被发布。
- 只有已发布的博客文章才会返回要打印的内容,因此未经批准的文章不会意外发布。
任何其他对文章的更改尝试都无效。例如,如果我们试图在请求审核之前就批准一篇草稿博客文章,该文章应保持为未发布的草稿。
尝试传统面向对象风格
解决同一个问题有无数种代码组织方式,每种方式都有不同的权衡。本章节的实现更接近传统的面向对象风格,这在 Rust 中是可以实现的,但并没有充分利用 Rust 的一些优势。稍后,我们将展示另一种解决方案,它仍然使用面向对象的设计模式,但组织方式对于有面向对象经验的程序员来说可能看起来不那么熟悉。我们将比较这两种方案,以体验在 Rust 中设计代码与在其他语言中设计代码的权衡。
清单 18-11 以代码形式展示了这个工作流:这是一个在名为 blog 的库 crate 中实现 API 的使用示例。由于我们还没有实现 blog crate,这段代码还不能编译。
use blog::Post;
fn main() {
let mut post = Post::new();
post.add_text("I ate a salad for lunch today");
assert_eq!("", post.content());
post.request_review();
assert_eq!("", post.content());
post.approve();
assert_eq!("I ate a salad for lunch today", post.content());
}blog crate 具有的所需行为的代码我们希望允许用户使用 Post::new 创建一个新的草稿博客文章。我们希望允许向博客文章添加文本。如果我们尝试在审批之前立即获取文章的内容,我们不应该得到任何文本,因为该文章仍处于草稿状态。我们在代码中添加了 assert_eq! 用于演示目的。一个优秀的单元测试应该是断言草稿博客文章的 content 方法返回空字符串,但本示例中我们不打算编写测试。
接下来,我们希望能够为文章请求审核,并且在等待审核期间,content 方法应返回空字符串。当文章获得批准后,它应该被发布,这意味着当调用 content 时,将返回文章的文本。
请注意,我们从 crate 中交互的唯一类型是 Post 类型。该类型将使用状态模式,并持有一个值,该值将是三个状态对象中的一个,表示文章可能处于的各种状态——草稿(draft)、审核(review)或已发布(published)。从一个状态到另一个状态的更改将在 Post 类型内部进行管理。状态的改变是响应库用户对 Post 实例调用的方法,但他们不必直接管理状态转换。此外,用户不会在状态上犯错,例如在审核之前发布文章。
定义 Post 并创建新实例
让我们开始实现这个库!我们知道需要一个持有一些内容的公有 Post 结构体,因此我们将从结构体的定义和一个关联的公有 new 函数开始,用于创建 Post 的实例,如清单 18-12 所示。我们还将创建一个私有的 State trait,它将定义所有 Post 的状态对象必须具有的行为。
然后,Post 将在名为 state 的私有字段中持有一个 Box<dyn State> 的 trait 对象,并将其包装在 Option<T> 中,用于保存状态对象。稍后你会明白为什么 Option<T> 是必需的。
pub struct Post {
state: Option<Box<dyn State>>,
content: String,
}
impl Post {
pub fn new() -> Post {
Post {
state: Some(Box::new(Draft {})),
content: String::new(),
}
}
}
trait State {}
struct Draft {}
impl State for Draft {}Post 结构体的定义、创建新 Post 实例的 new 函数、State trait 以及 Draft 结构体State trait 定义了不同文章状态共享的行为。状态对象是 Draft、PendingReview 和 Published,它们都将实现 State trait。目前,该 trait 没有任何方法,我们将从仅定义 Draft 状态开始,因为这是我们希望文章开始所处的状态。
当我们创建一个新的 Post 时,将其 state 字段设置为一个包含 Box 的 Some 值。这个 Box 指向一个新的 Draft 结构体实例。这确保了每当我们创建新的 Post 实例时,它都会以草稿状态开始。由于 Post 的 state 字段是私有的,因此无法以任何其他状态创建 Post!在 Post::new 函数中,我们将 content 字段设置为一个新的空 String。
存储文章内容的文本
我们在清单 18-11 中看到,我们希望能够调用一个名为 add_text 的方法,并向其传递一个 &str,然后将其添加为博客文章的文本内容。我们将其实现为一个方法,而不是将 content 字段暴露为 pub,以便稍后可以实现一个控制 content 字段数据读取方式的方法。add_text 方法非常简单明了,因此让我们在清单 18-13 中将该实现添加到 impl Post 块中。
pub struct Post {
state: Option<Box<dyn State>>,
content: String,
}
impl Post {
// --snip--
pub fn new() -> Post {
Post {
state: Some(Box::new(Draft {})),
content: String::new(),
}
}
pub fn add_text(&mut self, text: &str) {
self.content.push_str(text);
}
}
trait State {}
struct Draft {}
impl State for Draft {}add_text 方法以向文章的内容添加文本add_text 方法获取 self 的可变引用,因为我们正在更改调用 add_text 的 Post 实例。然后我们在 content 中的 String 上调用 push_str,并将 text 参数传递进去以添加到保存的 content 中。此行为不依赖于文章所处的状态,因此它不是状态模式的一部分。add_text 方法完全不与 state 字段交互,但它确实是我们希望支持的行为的一部分。
确保草稿文章的内容为空
即使在我们调用了 add_text 并向文章添加了一些内容之后,我们仍然希望 content 方法返回一个空字符串切片,因为该文章仍处于草稿状态,如清单 18-11 中的第一个 assert_eq! 所示。现在,让我们以最简单的方式来满足这个要求:始终返回一个空字符串切片。稍后,一旦我们实现了更改文章状态以便其可以发布的功能时,再对此进行修改。到目前为止,文章只能处于草稿状态,因此文章内容应始终为空。清单 18-14 显示了这个占位实现。
pub struct Post {
state: Option<Box<dyn State>>,
content: String,
}
impl Post {
// --snip--
pub fn new() -> Post {
Post {
state: Some(Box::new(Draft {})),
content: String::new(),
}
}
pub fn add_text(&mut self, text: &str) {
self.content.push_str(text);
}
pub fn content(&self) -> &str {
""
}
}
trait State {}
struct Draft {}
impl State for Draft {}Post 上的 content 方法添加一个始终返回空字符串切片的占位实现通过添加这个 content 方法,清单 18-11 中直到第一个 assert_eq! 的所有内容都能如预期工作了。
请求审核,改变文章状态
接下来,我们需要添加请求审核文章的功能,这应将其状态从 Draft 改为 PendingReview。清单 18-15 展示了这段代码。
pub struct Post {
state: Option<Box<dyn State>>,
content: String,
}
impl Post {
// --snip--
pub fn new() -> Post {
Post {
state: Some(Box::new(Draft {})),
content: String::new(),
}
}
pub fn add_text(&mut self, text: &str) {
self.content.push_str(text);
}
pub fn content(&self) -> &str {
""
}
pub fn request_review(&mut self) {
if let Some(s) = self.state.take() {
self.state = Some(s.request_review())
}
}
}
trait State {
fn request_review(self: Box<Self>) -> Box<dyn State>;
}
struct Draft {}
impl State for Draft {
fn request_review(self: Box<Self>) -> Box<dyn State> {
Box::new(PendingReview {})
}
}
struct PendingReview {}
impl State for PendingReview {
fn request_review(self: Box<Self>) -> Box<dyn State> {
self
}
}Post 和 State trait 上实现 request_review 方法我们为 Post 赋予一个名为 request_review 的公有方法,该方法接受 self 的可变引用。然后,我们在 Post 的当前状态上调用一个内部的 request_review 方法,而这个第二个 request_review 方法会消费当前状态并返回一个新状态。
我们将 request_review 方法添加到 State trait;所有实现该 trait 的类型现在都需要实现 request_review 方法。请注意,该方法的第一个参数不是 self、&self 或 &mut self,而是 self: Box<Self>。这种语法意味着该方法仅在持有该类型的 Box 上调用时才有效。这种语法获取 Box<Self> 的所有权,使旧状态失效,从而 Post 的状态值可以转换为新状态。
为了消费旧状态,request_review 方法需要获取状态值的所有权。这就是 Post 的 state 字段中 Option 的用武之地:我们调用 take 方法将 Some 值从 state 字段中取出,并在其位置留下一个 None,因为 Rust 不允许我们在结构体中存在未填充的字段。这样我们就可以将 state 值从 Post 中移出,而不是借用它。然后,我们将 Post 的 state 值设置为此操作的结果。
我们需要将 state 临时设置为 None,而不是使用像 self.state = self.state.request_review(); 这样的代码来直接获取 state 值的所有权。这确保了在我们将其转换为新状态之后,Post 不能再使用旧的 state 值。
Draft 上的 request_review 方法返回一个新的、装箱的 PendingReview 结构体实例,该结构体表示文章正在等待审核的状态。PendingReview 结构体也实现了 request_review 方法,但不执行任何转换。相反,它返回自身,因为当我们对已经处于 PendingReview 状态的文章请求审核时,它应保持在 PendingReview 状态。
现在我们可以开始看到状态模式的优势:无论 state 的值是什么,Post 上的 request_review 方法都是相同的。每个状态都负责自己的规则。
我们将保持 Post 上的 content 方法不变,返回一个空字符串切片。现在,Post 既可以处于 PendingReview 状态,也可以处于 Draft 状态,但我们希望在 PendingReview 状态下也具有相同的行为。清单 18-11 现在可以工作到第二个 assert_eq! 调用了!
添加 approve 以改变 content 的行为
approve 方法将与 request_review 方法类似:它将 state 设置为当前状态在该状态被批准时应该具有的值,如清单 18-16 所示。
pub struct Post {
state: Option<Box<dyn State>>,
content: String,
}
impl Post {
// --snip--
pub fn new() -> Post {
Post {
state: Some(Box::new(Draft {})),
content: String::new(),
}
}
pub fn add_text(&mut self, text: &str) {
self.content.push_str(text);
}
pub fn content(&self) -> &str {
""
}
pub fn request_review(&mut self) {
if let Some(s) = self.state.take() {
self.state = Some(s.request_review())
}
}
pub fn approve(&mut self) {
if let Some(s) = self.state.take() {
self.state = Some(s.approve())
}
}
}
trait State {
fn request_review(self: Box<Self>) -> Box<dyn State>;
fn approve(self: Box<Self>) -> Box<dyn State>;
}
struct Draft {}
impl State for Draft {
// --snip--
fn request_review(self: Box<Self>) -> Box<dyn State> {
Box::new(PendingReview {})
}
fn approve(self: Box<Self>) -> Box<dyn State> {
self
}
}
struct PendingReview {}
impl State for PendingReview {
// --snip--
fn request_review(self: Box<Self>) -> Box<dyn State> {
self
}
fn approve(self: Box<Self>) -> Box<dyn State> {
Box::new(Published {})
}
}
struct Published {}
impl State for Published {
fn request_review(self: Box<Self>) -> Box<dyn State> {
self
}
fn approve(self: Box<Self>) -> Box<dyn State> {
self
}
}Post 和 State trait 上实现 approve 方法我们将 approve 方法添加到 State trait,并添加一个新的实现了 State 的结构体——Published 状态。
类似于 PendingReview 上的 request_review 的工作方式,如果我们在 Draft 上调用 approve 方法,它将没有效果,因为 approve 将返回 self。当我们在 PendingReview 上调用 approve 时,它返回一个新的、装箱的 Published 结构体实例。Published 结构体实现了 State trait,并且对于 request_review 方法和 approve 方法,它都返回自身,因为在这两种情况下,文章应保持为已发布状态。
现在我们需要更新 Post 上的 content 方法:如果状态是 Published,我们想要返回 content 字段中的值;否则,我们想要返回一个空字符串切片。清单 18-17 展示了这一点。
pub struct Post {
state: Option<Box<dyn State>>,
content: String,
}
impl Post {
// --snip--
pub fn new() -> Post {
Post {
state: Some(Box::new(Draft {})),
content: String::new(),
}
}
pub fn add_text(&mut self, text: &str) {
self.content.push_str(text);
}
pub fn content(&self) -> &str {
self.state.as_ref().unwrap().content(self)
}
// --snip--
pub fn request_review(&mut self) {
if let Some(s) = self.state.take() {
self.state = Some(s.request_review())
}
}
pub fn approve(&mut self) {
if let Some(s) = self.state.take() {
self.state = Some(s.approve())
}
}
}
trait State {
fn request_review(self: Box<Self>) -> Box<dyn State>;
fn approve(self: Box<Self>) -> Box<dyn State>;
}
struct Draft {}
impl State for Draft {
fn request_review(self: Box<Self>) -> Box<dyn State> {
Box::new(PendingReview {})
}
fn approve(self: Box<Self>) -> Box<dyn State> {
self
}
}
struct PendingReview {}
impl State for PendingReview {
fn request_review(self: Box<Self>) -> Box<dyn State> {
self
}
fn approve(self: Box<Self>) -> Box<dyn State> {
Box::new(Published {})
}
}
struct Published {}
impl State for Published {
fn request_review(self: Box<Self>) -> Box<dyn State> {
self
}
fn approve(self: Box<Self>) -> Box<dyn State> {
self
}
}Post 上的 content 方法以委托给 State 的 content 方法因为目标是将所有这些行为委托给状态,所以我们在 State trait 上定义了一个名为 content 的方法,它接受一个博客文章的结构体引用作为参数并返回一个可选的字符串切片值。为 content 方法创建默认实现,返回 None,这表示我们不需要在每个状态对象上都实现 content。Published 结构体将覆盖 content 方法来返回 post.content 中的值。
评估状态模式
我们已经展示了 Rust 能够实现面向对象的状态模式,以封装文章在每个状态下应具有的不同类型的行为。Post 上的方法对各种行为一无所知。由于我们组织代码的方式,我们只需要在一个地方就知道已发布文章可以表现出的不同方式:在 Published 结构体上实现的 State trait。
如果我们创建一个不使用状态模式的替代实现,我们可能会在 Post 的方法中使用 match 表达式,甚至会在 main 代码中检查文章的状态并更改那些位置的行为。这将意味着我们需要查看多个地方才能理解文章处于已发布状态的所有含义。
使用状态模式,Post 的方法以及我们使用 Post 的地方都不需要 match 表达式,而要添加一个新状态,我们只需要添加一个新结构体并在一个位置为该结构体实现 trait 方法。
使用状态模式的实现很容易扩展以添加更多功能。为了了解使用状态模式维护代码的简洁性,试试以下几个建议:
- 添加一个
reject方法,将文章的状态从PendingReview改回Draft。 - 在状态可以更改为
Published之前,需要两次调用approve。 - 仅当文章处于
Draft状态时,才允许用户添加文本内容。提示:让状态对象负责可能更改的内容,但不负责修改Post。
状态模式的一个缺点是,由于状态实现了状态之间的转换,某些状态会相互耦合。如果我们在 PendingReview 和 Published 之间添加另一个状态,例如 Scheduled,我们将不得不更改 PendingReview 中的代码以转换到 Scheduled 而不是 Published。如果 PendingReview 不需要随新状态的添加而更改,那工作量会少一些,但这意味着要切换到另一种设计模式。
另一个缺点是,我们重复了一些逻辑。为了消除部分重复,我们可以尝试在 State trait 上为 request_review 和 approve 方法提供返回 self 的默认实现。然而,这种方法行不通:当使用 State 作为 trait 对象时,trait 并不知道具体的 self 究竟是什么,因此返回类型在编译时是未知的。(这是前面提到的 dyn 兼容性规则之一。)
其他的重复包括 Post 上 request_review 和 approve 方法的类似实现。两个方法都在 Post 的 state 字段上使用 Option::take,并且如果 state 是 Some,它们将委托给包装值的相同方法的实现,并将 state 字段的新值设置为结果。如果 Post 上有许多方法遵循这种模式,我们可能会考虑定义一个宏来消除重复(请参阅第 20 章的“宏”部分)。
按照面向对象语言中定义的状态模式精确实现,我们并没有尽可能充分利用 Rust 的优势。让我们来看看我们可以对 blog crate 做出的一些更改,这些更改可以将无效状态和转换变成编译时错误。
将状态和行为编码为类型
我们将向你展示如何重新思考状态模式以获得另一套权衡方案。与其完全封装状态和转换以使外部代码对它们一无所知,不如将状态编码到不同的类型中。因此,Rust 的类型检查系统将阻止尝试使用草稿文章(而只允许已发布的文章)的行为,并发出编译器错误。
让我们考虑清单 18-11 中 main 的第一部分:
use blog::Post;
fn main() {
let mut post = Post::new();
post.add_text("I ate a salad for lunch today");
assert_eq!("", post.content());
post.request_review();
assert_eq!("", post.content());
post.approve();
assert_eq!("I ate a salad for lunch today", post.content());
}我们仍然允许使用 Post::new 创建草稿状态的新文章,并允许向文章内容添加文本。但是,我们不希望草稿文章有一个返回空字符串的 content 方法,而是让它根本没有 content 方法。这样,如果我们尝试获取草稿文章的内容,将会得到一个编译器错误,告诉我们该方法不存在。因此,我们不可能在生产中意外显示草稿文章的内容,因为那段代码甚至无法编译。清单 18-19 展示了 Post 结构体和 DraftPost 结构体的定义,以及各自的方法。
pub struct Post {
content: String,
}
pub struct DraftPost {
content: String,
}
impl Post {
pub fn new() -> DraftPost {
DraftPost {
content: String::new(),
}
}
pub fn content(&self) -> &str {
&self.content
}
}
impl DraftPost {
pub fn add_text(&mut self, text: &str) {
self.content.push_str(text);
}
}content 方法的 Post 和一个没有 content 方法的 DraftPostPost 和 DraftPost 结构体都有一个私有的 content 字段,用于存储博客文章的文本。结构体不再有 state 字段,因为我们正在将状态的编码转移到结构体的类型上。Post 结构体表示已发布的文章,并且它有一个返回 content 的 content 方法。
我们仍然有一个 Post::new 函数,但它不再返回 Post 的实例,而是返回 DraftPost 的实例。由于 content 是私有的,并且没有返回 Post 的函数,因此目前无法创建 Post 的实例。
DraftPost 结构体有一个 add_text 方法,因此我们可以像以前一样向 content 添加文本,但是请注意,DraftPost 没有定义 content 方法!因此,现在程序确保所有文章都以草稿文章开始,而草稿文章的内容不可用于显示。任何绕过这些约束的尝试都会导致编译器错误。
那么,我们如何获得已发布的文章呢?我们希望强制执行规则:草稿文章必须先经过审核和批准才能发布。处于待审核状态的文章仍然不应显示任何内容。让我们通过添加另一个结构体 PendingReviewPost 来实现这些约束,在 DraftPost 上定义 request_review 方法以返回 PendingReviewPost,并在 PendingReviewPost 上定义 approve 方法以返回 Post,如清单 18-20 所示。
pub struct Post {
content: String,
}
pub struct DraftPost {
content: String,
}
impl Post {
pub fn new() -> DraftPost {
DraftPost {
content: String::new(),
}
}
pub fn content(&self) -> &str {
&self.content
}
}
impl DraftPost {
// --snip--
pub fn add_text(&mut self, text: &str) {
self.content.push_str(text);
}
pub fn request_review(self) -> PendingReviewPost {
PendingReviewPost {
content: self.content,
}
}
}
pub struct PendingReviewPost {
content: String,
}
impl PendingReviewPost {
pub fn approve(self) -> Post {
Post {
content: self.content,
}
}
}DraftPost 上调用 request_review 创建的 PendingReviewPost,以及将 PendingReviewPost 转换为已发布的 Post 的 approve 方法request_review 和 approve 方法获取 self 的所有权,从而消费 DraftPost 和 PendingReviewPost 实例,并分别将它们转换为 PendingReviewPost 和已发布的 Post。这样,在我们对其调用 request_review 之后,就不会再有任何 DraftPost 实例残留,依此类推。PendingReviewPost 结构体上没有定义 content 方法,因此尝试读取其内容会导致编译器错误,就像 DraftPost 一样。由于获得已发布 Post 实例(其上定义了 content 方法)的唯一方法是调用 PendingReviewPost 上的 approve 方法,而获得 PendingReviewPost 的唯一方法是调用 DraftPost 上的 request_review 方法,我们现在已将博客文章工作流编码到类型系统中了。
但我们也需要对 main 做一些小的更改。request_review 和 approve 方法返回新实例,而不是修改它们所调用的结构体,因此我们需要添加更多 let post = 的变量遮蔽(shadowing)赋值来保存返回的实例。我们也不需要关于草稿和待审核文章内容为空字符串的断言了:我们也不再需要它们;我们无法再编译试图使用那些状态下文章内容的代码。更新后的 main 代码如清单 18-21 所示。
use blog::Post;
fn main() {
let mut post = Post::new();
post.add_text("I ate a salad for lunch today");
let post = post.request_review();
let post = post.approve();
assert_eq!("I ate a salad for lunch today", post.content());
}main 以使用博客文章工作流的新实现我们需要对 main 做出更改来重新赋值 post,这意味着此实现不再完全遵循面向对象的状态模式:状态之间的转换不再完全封装在 Post 实现内部。然而,我们的收获是,由于类型系统以及编译时发生的类型检查,无效状态现在是不可能的了!这确保了某些 bug,例如显示未发布文章的内容,将在它们进入生产环境之前被发现。
尝试在本节开始时对 blog crate 建议的任务,就像它在清单 18-21 之后的状态一样,看看你对这个版本代码的设计看法。请注意,在此设计中,某些任务可能已经完成了。
我们已经看到,尽管 Rust 能够实现面向对象的设计模式,但其他模式(例如将状态编码到类型系统中)在 Rust 中也是可用的。这些模式有不同的权衡。虽然你可能对面向对象模式非常熟悉,但重新思考问题以利用 Rust 的特性可以带来好处,例如在编译时防止某些 bug。由于 Rust 拥有像所有权这样面向对象语言不具备的某些特性,面向对象的模式并不总是 Rust 中的最佳解决方案。
总结
不管你读完本章后认为 Rust 是不是面向对象的语言,你现在知道你可以使用 trait 对象在 Rust 中获得一些面向对象的特性。动态派发可以为你的代码提供一些灵活性,但代价是少量的运行时性能。你可以利用这种灵活性来实现面向对象的模式,从而有助于代码的可维护性。Rust 还具有其他面向对象语言所没有的特性,例如所有权。面向对象模式并不总是利用 Rust 优势的最佳方式,但它是一个可用的选项。
接下来,我们将探讨模式(patterns),这是 Rust 的另一个特性,它提供了很大的灵活性。我们在本书中已经简短地看过它们,但还没有看到它们的全部能力。让我们开始吧!
模式与匹配
模式(Patterns)是 Rust 中的一种特殊语法,用于匹配类型(无论是复杂还是简单)的结构。将模式与 match 表达式以及其他结构结合使用,可以让你对程序的控制流有更多的控制。模式由以下元素的某种组合构成:
- 字面量(Literals)
- 解构的数组、枚举、结构体或元组
- 变量(Variables)
- 通配符(Wildcards)
- 占位符(Placeholders)
一些示例模式包括 x、(a, 3) 和 Some(Color::Red)。在模式有效的上下文中,这些组件描述了数据的形状。然后,我们的程序将值与模式进行匹配,以确定其是否具有继续运行特定代码段所需的正确数据形状。
要使用模式,我们将其与某个值进行比较。如果模式匹配该值,我们就可以在代码中使用该值的各个部分。回想一下第 6 章中使用模式的 match 表达式,例如硬币分类机示例。如果值的形状符合模式,我们可以使用已命名的部分。如果不符合,则与模式关联的代码不会运行。
本章是关于模式所有相关内容的参考。我们将介绍使用模式的有效位置、可反驳模式(refutable patterns)与不可反驳模式(irrefutable patterns)之间的区别,以及你可能见到的各种模式语法。到本章结束时,你将知道如何使用模式以清晰的方式表达许多概念。
模式可以使用的所有位置
模式可以使用的所有位置
模式在 Rust 中的许多地方都会出现,你一直在使用它们却没有意识到!本节讨论模式有效的所有位置。
match 分支
如第 6 章所述,我们在 match 表达式的分支中使用模式。形式上,match 表达式定义为关键字 match、要匹配的值,以及一个或多个匹配分支,每个分支由一个模式和一个在该值匹配该分支模式时运行的表达式组成,如下所示:
match VALUE {
PATTERN => EXPRESSION,
PATTERN => EXPRESSION,
PATTERN => EXPRESSION,
}例如,下面是来自清单 6-5 的 match 表达式,它匹配变量 x 中的 Option<i32> 值:
match x {
None => None,
Some(i) => Some(i + 1),
}这个 match 表达式中的模式是每个箭头左侧的 None 和 Some(i)。
match 表达式的一个要求是它们必须是穷尽的(exhaustive),即必须考虑到 match 表达式中值的所有可能性。确保覆盖所有可能性的一种方法是在最后一个分支中使用一个万能模式(catch-all pattern):例如,一个匹配任何值的变量名永远不会失败,因此覆盖了所有剩余情况。
特定的模式 _ 将匹配任何内容,但从不绑定到变量,因此它经常用于最后一个匹配分支。当你想要忽略任何未指定的值时,_ 模式非常有用。我们将在本章后面的“忽略模式中的值”中更详细地介绍 _ 模式。
let 语句
在本章之前,我们只明确讨论了在 match 和 if let 中使用模式,但事实上,我们也在其他地方使用了模式,包括在 let 语句中。例如,考虑这个使用 let 的简单变量赋值:
#![allow(unused)]
fn main() {
let x = 5;
}每次你使用像这样的 let 语句时,你都在使用模式,尽管你可能没有意识到!更正式地说,let 语句看起来像这样:
let PATTERN = EXPRESSION;
在像 let x = 5; 这样的语句中,变量名在 PATTERN(模式)位置上只是一个特别简单的模式形式。Rust 将表达式与模式进行比较,并分配它找到的任何名称。因此,在 let x = 5; 示例中,x 是一个模式,意思是“将这里匹配的内容绑定到变量 x。“由于名称 x 就是整个模式,这个模式实际上意思是“将所有内容绑定到变量 x,无论值是什么。”
为了更清楚地看到 let 的模式匹配方面,考虑清单 19-1,它使用带有模式的 let 来解构一个元组。
fn main() {
let (x, y, z) = (1, 2, 3);
}这里,我们将一个元组与一个模式进行匹配。Rust 将值 (1, 2, 3) 与模式 (x, y, z) 进行比较,发现该值匹配该模式——也就是说,它看到两者的元素数量相同——因此 Rust 将 1 绑定到 x,2 绑定到 y,3 绑定到 z。你可以将这个元组模式看作在其内部嵌套了三个单独的变量模式。
如果模式中的元素数量与元组中的元素数量不匹配,则整体类型将不匹配,我们将得到一个编译器错误。例如,清单 19-2 显示了一次尝试将具有三个元素的元组解构为两个变量,这是行不通的。
fn main() {
let (x, y) = (1, 2, 3);
}尝试编译此代码会导致以下类型错误:
$ cargo run
Compiling patterns v0.1.0 (file:///projects/patterns)
error[E0308]: mismatched types
--> src/main.rs:2:9
|
2 | let (x, y) = (1, 2, 3);
| ^^^^^^ --------- this expression has type `({integer}, {integer}, {integer})`
| |
| expected a tuple with 3 elements, found one with 2 elements
|
= note: expected tuple `({integer}, {integer}, {integer})`
found tuple `(_, _)`
For more information about this error, try `rustc --explain E0308`.
error: could not compile `patterns` (bin "patterns") due to 1 previous error
要修复这个错误,我们可以使用 _ 或 .. 忽略元组中的一个或多个值,如“忽略模式中的值”部分所述。如果问题是模式中的变量太多,解决方案是通过删除变量使类型匹配,使变量数量等于元组中的元素数量。
条件 if let 表达式
在第 6 章中,我们讨论过如何使用 if let 表达式,主要是作为编写只匹配一种情况的 match 的更简短方式。可选地,if let 可以有一个对应的 else,其中包含在 if let 中的模式不匹配时要运行的代码。
清单 19-3 展示了也可以混合和匹配 if let、else if 和 else if let 表达式。这样做比 match 表达式给了我们更多的灵活性,因为 match 中我们只能表达一个值与模式进行比较。此外,Rust 不要求一系列 if let、else if 和 else if let 分支中的条件相互关联。
清单 19-3 中的代码基于一系列针对多个条件的检查来决定背景颜色。在此示例中,我们创建了具有硬编码值的变量,而在实际程序中可能从用户输入接收这些值。
fn main() {
let favorite_color: Option<&str> = None;
let is_tuesday = false;
let age: Result<u8, _> = "34".parse();
if let Some(color) = favorite_color {
println!("Using your favorite color, {color}, as the background");
} else if is_tuesday {
println!("Tuesday is green day!");
} else if let Ok(age) = age {
if age > 30 {
println!("Using purple as the background color");
} else {
println!("Using orange as the background color");
}
} else {
println!("Using blue as the background color");
}
}if let、else if、else if let 和 else如果用户指定了喜欢的颜色,则使用该颜色作为背景。如果没有指定喜欢的颜色,并且今天是星期二,则背景颜色是绿色。否则,如果用户将年龄指定为字符串,并且我们可以成功地将其解析为数字,则颜色根据该数字的值是紫色还是橙色。如果这些条件都不适用,背景颜色是蓝色。
这种条件结构让我们能够支持复杂的需求。使用这里的硬编码值,此示例将打印 Using purple as the background color。
你可以看到 if let 也可以像 match 分支那样引入新的变量来遮蔽现有变量:if let Ok(age) = age 这一行引入了一个新的 age 变量,其中包含 Ok 变体内部的值,遮蔽了现有的 age 变量。这意味着我们需要将 if age > 30 条件放在该块内:我们不能将这两个条件组合成 if let Ok(age) = age && age > 30。我们想要与 30 比较的新 age 变量,在新的作用域以花括号开始时才是有效的。
使用 if let 表达式的缺点是编译器不会检查穷尽性(exhaustiveness),而 match 表达式会检查。如果我们省略了最后一个 else 块,因此错过了处理某些情况,编译器不会提醒我们可能的逻辑错误。
while let 条件循环
与 if let 结构类似,while let 条件循环允许 while 循环在模式持续匹配的情况下持续运行。在清单 19-4 中,我们展示了一个 while let 循环,它等待线程之间发送的消息,但这里检查的是 Result 而不是 Option。
fn main() {
let (tx, rx) = std::sync::mpsc::channel();
std::thread::spawn(move || {
for val in [1, 2, 3] {
tx.send(val).unwrap();
}
});
while let Ok(value) = rx.recv() {
println!("{value}");
}
}while let 循环在 rx.recv() 返回 Ok 时持续打印值此示例打印 1、2,然后打印 3。recv 方法从通道的接收端取出第一条消息并返回 Ok(value)。当我们第一次在第 16 章中看到 recv 时,我们直接展开了错误,或者使用 for 循环将其作为迭代器与之交互。然而,如清单 19-4 所示,我们也可以使用 while let,因为只要发送端存在,recv 方法每次有消息到达时都会返回 Ok,然后在发送端断开连接后产生一个 Err。
for 循环
在 for 循环中,紧跟在关键字 for 之后的值是一个模式。例如,在 for x in y 中,x 就是模式。清单 19-5 展示了如何在 for 循环中使用模式来解构或分解元组。
fn main() {
let v = vec!['a', 'b', 'c'];
for (index, value) in v.iter().enumerate() {
println!("{value} is at index {index}");
}
}for 循环中使用模式解构元组清单 19-5 中的代码将打印以下内容:
$ cargo run
Compiling patterns v0.1.0 (file:///projects/patterns)
Finished `dev` profile [unoptimized + debuginfo] target(s) in 0.52s
Running `target/debug/patterns`
a is at index 0
b is at index 1
c is at index 2
我们使用 enumerate 方法来适配迭代器,使其产生一个值和该值的索引,并放入一个元组中。第一个产生的值是元组 (0, 'a')。当该值与模式 (index, value) 匹配时,index 将是 0,value 将是 'a',打印输出的第一行。
函数参数
函数参数也可以是模式。清单 19-6 中的代码声明了一个名为 foo 的函数,它接受一个名为 x 的 i32 类型参数,到现在你应该已经熟悉了。
fn foo(x: i32) {
// code goes here
}
fn main() {}x 部分就是一个模式!就像我们使用 let 一样,我们可以将函数参数中的元组与模式进行匹配。清单 19-7 在我们向函数传递元组时将其中的值拆分出来。
fn print_coordinates(&(x, y): &(i32, i32)) {
println!("Current location: ({x}, {y})");
}
fn main() {
let point = (3, 5);
print_coordinates(&point);
}此代码打印 Current location: (3, 5)。值 &(3, 5) 匹配模式 &(x, y),因此 x 是值 3,y 是值 5。
我们也可以以与函数参数列表相同的方式在闭包参数列表中使用模式,因为闭包类似于函数,如第 13 章所述。
到目前为止,你已经看到了几种使用模式的方式,但模式并非在我们能使用它们的每个地方都以相同的方式工作。在某些地方,模式必须是不可反驳的(irrefutable);在其他情况下,它们可以是可反驳的(refutable)。我们接下来将讨论这两个概念。
可反驳性:模式是否可能匹配失败
可反驳性:模式是否可能匹配失败
模式有两种形式:可反驳的(refutable)和不可反驳的(irrefutable)。对于任何可能传递的值都会匹配的模式称为不可反驳的(irrefutable)。一个例子是 let x = 5; 语句中的 x,因为 x 匹配任何东西,因此不可能匹配失败。对于某些可能的值可能会匹配失败的模式称为可反驳的(refutable)。一个例子是 if let Some(x) = a_value 表达式中的 Some(x),因为如果 a_value 变量中的值是 None 而不是 Some,那么 Some(x) 模式将不会匹配。
函数参数、let 语句和 for 循环只能接受不可反驳的模式,因为当值不匹配时,程序无法做任何有意义的事情。if let 和 while let 表达式以及 let...else 语句可以接受可反驳和不可反驳的模式,但编译器会对不可反驳的模式发出警告,因为根据定义,它们本意是处理可能的失败:条件语句的功能在于它能够根据成功或失败执行不同的操作。
一般来说,你不需要担心可反驳和不可反驳模式之间的区别;然而,你需要熟悉可反驳性这个概念,以便在看到错误信息时能够应对。在这些情况下,你需要根据代码的预期行为,更改模式或使用该模式的结构。
让我们看一个例子,了解当我们尝试在 Rust 要求不可反驳模式的地方使用可反驳模式,以及反之会发生什么。清单 19-8 展示了一个 let 语句,但对于模式,我们指定了 Some(x),这是一个可反驳模式。正如你可能预料的,这段代码将无法编译。
fn main() {
let some_option_value: Option<i32> = None;
let Some(x) = some_option_value;
}let 中使用可反驳模式如果 some_option_value 是 None 值,它将无法匹配模式 Some(x),这意味着该模式是可反驳的。然而,let 语句只能接受不可反驳的模式,因为代码无法对 None 值做任何有效的事情。在编译时,Rust 会抱怨我们在需要不可反驳模式的地方使用了可反驳模式:
$ cargo run
Compiling patterns v0.1.0 (file:///projects/patterns)
error[E0005]: refutable pattern in local binding
--> src/main.rs:3:9
|
3 | let Some(x) = some_option_value;
| ^^^^^^^ pattern `None` not covered
|
= note: `let` bindings require an "irrefutable pattern", like a `struct` or an `enum` with only one variant
= note: for more information, visit https://doc.rust-lang.org/book/ch19-02-refutability.html
= note: the matched value is of type `Option<i32>`
help: you might want to use `let else` to handle the variant that isn't matched
|
3 | let Some(x) = some_option_value else { todo!() };
| ++++++++++++++++
For more information about this error, try `rustc --explain E0005`.
error: could not compile `patterns` (bin "patterns") due to 1 previous error
因为我们没有(也无法!)用模式 Some(x) 覆盖每一个有效值,Rust 理所应当地产生了一个编译器错误。
如果我们在需要不可反驳模式的地方有一个可反驳模式,我们可以通过更改使用该模式的代码来修复它:不使用 let,而使用 let...else。这样,如果模式不匹配,花括号中的代码将处理该值。清单 19-9 展示了如何修复清单 19-8 中的代码。
fn main() {
let some_option_value: Option<i32> = None;
let Some(x) = some_option_value else {
return;
};
}let...else 和一个包含可反驳模式的代码块替代 let我们给了代码一个出路!这段代码是完全有效的,尽管这意味着我们不能在不收到警告的情况下使用不可反驳的模式。如果我们给 let...else 一个始终会匹配的模式,例如 x,如清单 19-10 所示,编译器会给出一个警告。
fn main() {
let x = 5 else {
return;
};
}let...else 中使用不可反驳模式Rust 会抱怨使用 let...else 配合不可反驳模式没有意义:
$ cargo run
Compiling patterns v0.1.0 (file:///projects/patterns)
warning: irrefutable `let...else` pattern
--> src/main.rs:2:5
|
2 | let x = 5 else {
| ^^^^^^^^^
|
= note: this pattern will always match, so the `else` clause is useless
= help: consider removing the `else` clause
= note: `#[warn(irrefutable_let_patterns)]` on by default
warning: `patterns` (bin "patterns") generated 1 warning
Finished `dev` profile [unoptimized + debuginfo] target(s) in 0.39s
Running `target/debug/patterns`
由于这个原因,match 分支必须使用可反驳模式,除了最后一个分支,它应该使用不可反驳的模式来匹配所有剩余的值。Rust 允许我们在只有一个分支的 match 中使用不可反驳模式,但这种语法并不是特别有用,可以用更简单的 let 语句替代。
现在你已经知道在哪里使用模式,以及可反驳和不可反驳模式之间的区别,让我们来介绍所有可以用来创建模式的语法。
模式语法
模式语法
在本节中,我们汇总了所有在模式中有效的语法,并讨论为什么以及何时你可能想要使用每一种。
匹配字面量
正如你在第 6 章中看到的,你可以直接将模式与字面量进行匹配。以下代码给出了一些示例:
fn main() {
let x = 1;
match x {
1 => println!("one"),
2 => println!("two"),
3 => println!("three"),
_ => println!("anything"),
}
}这段代码打印 one,因为 x 中的值是 1。当你希望代码在接收到某个特定的具体值时采取行动,这种语法非常有用。
匹配命名变量
命名变量是不可反驳的模式,可以匹配任何值,我们在本书中已经多次使用过它们。然而,当你在 match、if let 或 while let 表达式中使用命名变量时,会遇到一个复杂情况。因为这些表达式都会开启一个新的作用域,在这些表达式内部作为模式一部分声明的变量,会像所有变量一样遮蔽外部的同名变量。在清单 19-11 中,我们声明了一个值为 Some(5) 的变量 x,以及一个值为 10 的变量 y。然后,我们在值 x 上创建了一个 match 表达式。请查看匹配分支中的模式和末尾的 println!,并在运行此代码或继续阅读之前,试着弄清楚代码会打印什么。
fn main() {
let x = Some(5);
let y = 10;
match x {
Some(50) => println!("Got 50"),
Some(y) => println!("Matched, y = {y}"),
_ => println!("Default case, x = {x:?}"),
}
println!("at the end: x = {x:?}, y = {y}");
}match 表达式,其中一个分支引入了一个遮蔽现有变量 y 的新变量让我们来逐步分析 match 表达式运行时发生了什么。第一个匹配分支的模式不匹配 x 的定义值,因此代码继续执行。
第二个匹配分支的模式引入了一个名为 y 的新变量,它将匹配 Some 值中的任何值。因为我们处于 match 表达式内部的新作用域中,这是一个新的 y 变量,不是我们在开头声明的值为 10 的那个 y。这个新的 y 绑定会匹配 Some 中的任何值,而这正是 x 中的情况。因此,这个新的 y 绑定到了 x 中 Some 的内部值。该值为 5,因此该分支的表达式执行并打印 Matched, y = 5。
如果 x 是 None 值而不是 Some(5),前两个分支的模式都不会匹配,因此值将匹配下划线。我们没有在下划线分支的模式中引入 x 变量,因此表达式中的 x 仍然是未被遮蔽的外部 x。在这种假设情况下,match 将打印 Default case, x = None。
当 match 表达式结束时,它的作用域也随之结束,内部 y 的作用域也是如此。最后的 println! 输出 at the end: x = Some(5), y = 10。
要创建一个 match 表达式来比较外部 x 和 y 的值,而不是引入一个遮蔽现有 y 变量的新变量,我们需要改用匹配守卫(match guard)条件。我们将在后面的“使用匹配守卫添加条件”部分讨论匹配守卫。
匹配多个模式
在 match 表达式中,你可以使用 | 语法匹配多个模式,这是模式的或(or)运算符。例如,在以下代码中,我们将 x 的值与匹配分支进行匹配,第一个分支有一个或选项,意味着如果 x 的值匹配该分支中的任何一个值,该分支的代码就会运行:
fn main() {
let x = 1;
match x {
1 | 2 => println!("one or two"),
3 => println!("three"),
_ => println!("anything"),
}
}这段代码打印 one or two。
使用 ..= 匹配值的范围
..= 语法允许我们匹配一个包含的范围(inclusive range)内的值。在以下代码中,当模式匹配给定范围内的任何一个值时,该分支将执行:
fn main() {
let x = 5;
match x {
1..=5 => println!("one through five"),
_ => println!("something else"),
}
}如果 x 是 1、2、3、4 或 5,第一个分支将匹配。这种语法对于多个匹配值来说,比使用 | 运算符表达相同的意思更方便;如果我们使用 |,将不得不指定 1 | 2 | 3 | 4 | 5。指定范围要简短得多,特别是如果我们想要匹配,比如,1 到 1,000 之间的任何数字!
编译器在编译时会检查范围是否为空,由于 Rust 唯一能判断范围是否为空或非空的类型是 char 和数值类型,因此范围只允许用于数值或 char 值。
以下是一个使用 char 值范围的示例:
fn main() {
let x = 'c';
match x {
'a'..='j' => println!("early ASCII letter"),
'k'..='z' => println!("late ASCII letter"),
_ => println!("something else"),
}
}Rust 可以判断出 'c' 位于第一个模式的范围内,并打印 early ASCII letter。
解构以分解值
我们还可以使用模式来解构结构体、枚举和元组,以便使用这些值的不同部分。让我们逐一介绍每种值。
结构体
清单 19-12 展示了一个具有两个字段 x 和 y 的 Point 结构体,我们可以使用带有模式的 let 语句将其分解。
struct Point {
x: i32,
y: i32,
}
fn main() {
let p = Point { x: 0, y: 7 };
let Point { x: a, y: b } = p;
assert_eq!(0, a);
assert_eq!(7, b);
}这段代码创建了变量 a 和 b,它们匹配 p 结构体的 x 和 y 字段的值。这个示例表明,模式中变量的名称不必与结构体的字段名称相同。然而,通常的做法是让变量名称与字段名称匹配,以便更容易记住哪些变量来自哪些字段。由于这种常见用法,并且编写 let Point { x: x, y: y } = p; 包含大量重复,Rust 为匹配结构体字段的模式提供了一种简写形式:你只需列出结构体字段的名称,从模式中创建的变量将具有相同的名称。清单 19-13 的行为与清单 19-12 中的代码相同,但 let 模式中创建的变量是 x 和 y,而不是 a 和 b。
struct Point {
x: i32,
y: i32,
}
fn main() {
let p = Point { x: 0, y: 7 };
let Point { x, y } = p;
assert_eq!(0, x);
assert_eq!(7, y);
}此代码创建了变量 x 和 y,它们匹配 p 变量的 x 和 y 字段。结果是变量 x 和 y 包含了来自 p 结构体的值。
我们还可以在结构体模式中使用字面量值进行解构,而不是为所有字段创建变量。这样做允许我们测试某些字段是否为特定值,同时为其他字段创建变量以进行解构。
在清单 19-14 中,我们有一个 match 表达式,它将 Point 值分为三种情况:位于 x 轴上的点(当 y = 0 时为真)、位于 y 轴上的点(x = 0),以及不在任一轴上的点。
struct Point {
x: i32,
y: i32,
}
fn main() {
let p = Point { x: 0, y: 7 };
match p {
Point { x, y: 0 } => println!("On the x axis at {x}"),
Point { x: 0, y } => println!("On the y axis at {y}"),
Point { x, y } => {
println!("On neither axis: ({x}, {y})");
}
}
}第一个分支通过指定当 y 字段的值匹配字面量 0 时匹配,从而匹配任何位于 x 轴上的点。该模式仍然创建了一个 x 变量,我们可以在该分支的代码中使用它。
类似地,第二个分支通过指定当 x 字段的值为 0 时匹配,从而匹配任何位于 y 轴上的点,并为 y 字段的值创建一个变量 y。第三个分支没有指定任何字面量,因此它匹配任何其他 Point,并为 x 和 y 字段都创建变量。
在这个示例中,值 p 因为 x 包含 0 而匹配了第二个分支,因此这段代码将打印 On the y axis at 7。
请记住,match 表达式一旦找到第一个匹配的模式就会停止检查分支,因此即使 Point { x: 0, y: 0 } 同时位于 x 轴和 y 轴上,这段代码也只会打印 On the x axis at 0。
枚举
我们在本书中已经解构过枚举(例如,第 6 章的清单 6-5),但尚未明确讨论的是,用于解构枚举的模式对应于枚举内部存储数据的定义方式。例如,在清单 19-15 中,我们使用了清单 6-2 中的 Message 枚举,并编写了一个 match,其模式将解构每个内部值。
enum Message {
Quit,
Move { x: i32, y: i32 },
Write(String),
ChangeColor(i32, i32, i32),
}
fn main() {
let msg = Message::ChangeColor(0, 160, 255);
match msg {
Message::Quit => {
println!("The Quit variant has no data to destructure.");
}
Message::Move { x, y } => {
println!("Move in the x direction {x} and in the y direction {y}");
}
Message::Write(text) => {
println!("Text message: {text}");
}
Message::ChangeColor(r, g, b) => {
println!("Change color to red {r}, green {g}, and blue {b}");
}
}
}这段代码将打印 Change color to red 0, green 160, and blue 255。尝试更改 msg 的值,以查看其他分支的代码运行情况。
对于没有数据的枚举变体,例如 Message::Quit,我们无法进一步解构该值。我们只能匹配字面量 Message::Quit 值,并且该模式中没有变量。
对于类似结构体的枚举变体,例如 Message::Move,我们可以使用类似于匹配结构体时指定的模式。在变体名称之后,我们放置花括号,然后列出带有变量的字段,以便分解出各个部分用于该分支的代码中。这里我们使用了与清单 19-13 中相同的简写形式。
对于类似元组的枚举变体,例如持有一个包含一个元素的元组的 Message::Write 和持有一个包含三个元素的元组的 Message::ChangeColor,其模式类似于我们指定用于匹配元组的模式。模式中的变量数量必须匹配我们要匹配的变体中的元素数量。
嵌套的结构体和枚举
到目前为止,我们的示例都只匹配一层深度的结构体或枚举,但匹配也可以作用于嵌套项!例如,我们可以重构清单 19-15 中的代码,以支持 ChangeColor 消息中的 RGB 和 HSV 颜色,如清单 19-16 所示。
enum Color {
Rgb(i32, i32, i32),
Hsv(i32, i32, i32),
}
enum Message {
Quit,
Move { x: i32, y: i32 },
Write(String),
ChangeColor(Color),
}
fn main() {
let msg = Message::ChangeColor(Color::Hsv(0, 160, 255));
match msg {
Message::ChangeColor(Color::Rgb(r, g, b)) => {
println!("Change color to red {r}, green {g}, and blue {b}");
}
Message::ChangeColor(Color::Hsv(h, s, v)) => {
println!("Change color to hue {h}, saturation {s}, value {v}");
}
_ => (),
}
}match 表达式中第一个分支的模式匹配一个包含 Color::Rgb 变体的 Message::ChangeColor 枚举变体;然后,该模式绑定到三个内部的 i32 值。第二个分支的模式也匹配一个 Message::ChangeColor 枚举变体,但内部的枚举匹配的是 Color::Hsv。我们可以在一个 match 表达式中指定这些复杂的条件,即使涉及两个枚举。
结构体和元组
我们可以以更复杂的方式混合、匹配和嵌套解构模式。以下示例展示了一个复杂的解构,我们在元组内嵌套了结构体和元组,并将所有基本类型的值解构出来:
fn main() {
struct Point {
x: i32,
y: i32,
}
let ((feet, inches), Point { x, y }) = ((3, 10), Point { x: 3, y: -10 });
}这段代码让我们将复杂类型分解为其组成部分,以便我们可以分别使用我们感兴趣的值。
使用模式解构是一种方便的方式,可以将值的各个部分(例如结构体中每个字段的值)彼此分开使用。
忽略模式中的值
你已经看到,有时忽略模式中的值是很有用的,例如在 match 的最后一个分支中,使用一个实际上不执行任何操作但又占用了所有剩余可能值的万能分支。有几种方法可以忽略模式中的整个值或部分值:使用 _ 模式(你已见过)、在另一个模式中使用 _ 模式、使用以下划线开头的名称,或者使用 .. 来忽略值的剩余部分。让我们探讨如何使用以及为什么使用这些模式中的每一种。
使用 _ 忽略整个值
我们已经使用下划线作为通配符模式,它将匹配任何值但不会绑定到该值。这在 match 表达式的最后一个分支中特别有用,但我们也可以在任何模式中使用它,包括函数参数,如清单 19-17 所示。
fn foo(_: i32, y: i32) {
println!("This code only uses the y parameter: {y}");
}
fn main() {
foo(3, 4);
}_这段代码将完全忽略作为第一个参数传递的值 3,并打印 This code only uses the y parameter: 4。
在大多数情况下,当你不再需要某个特定的函数参数时,你应该更改签名,使其不包含未使用的参数。但在某些情况下,忽略函数参数特别有用,例如当你正在实现一个 trait,需要某个特定的类型签名,但你的实现中的函数体并不需要其中一个参数时。这样你就可以避免得到关于未使用函数参数的编译器警告,而如果你使用一个名称,就会得到警告。
使用嵌套的 _ 忽略值的部分
我们还可以在另一个模式内部使用 _ 来忽略值的某一部分,例如当我们只想测试值的某一部分,而对其他部分在相应要运行的代码中没有使用时。清单 19-18 展示了负责管理设置值的代码。业务要求是,用户不应允许覆盖设置的现有自定义值,但如果设置当前未设置,则可以取消设置并为其赋予一个值。
fn main() {
let mut setting_value = Some(5);
let new_setting_value = Some(10);
match (setting_value, new_setting_value) {
(Some(_), Some(_)) => {
println!("Can't overwrite an existing customized value");
}
_ => {
setting_value = new_setting_value;
}
}
println!("setting is {setting_value:?}");
}Some 内部的值时,在匹配 Some 变体的模式中使用下划线这段代码将打印 Can't overwrite an existing customized value,然后打印 setting is Some(5)。在第一个匹配分支中,我们不需要匹配或使用任一 Some 变体内部的值,但我们需要测试 setting_value 和 new_setting_value 都是 Some 变体的情况。在这种情况下,我们打印不更改 setting_value 的原因,并且它不会被更改。
在所有其他情况下(如果 setting_value 或 new_setting_value 中有一个是 None),由第二个分支中的 _ 模式表示,我们希望允许 new_setting_value 成为 setting_value。
我们还可以在一个模式中的多个位置使用下划线来忽略特定的值。清单 19-19 展示了一个忽略五个元素元组中第二个和第四个值的示例。
fn main() {
let numbers = (2, 4, 8, 16, 32);
match numbers {
(first, _, third, _, fifth) => {
println!("Some numbers: {first}, {third}, {fifth}");
}
}
}这段代码将打印 Some numbers: 2, 8, 32,而值 4 和 16 将被忽略。
通过以下划线开头名称来忽略未使用的变量
如果你创建了一个变量但从未使用过它,Rust 通常会发出警告,因为未使用的变量可能是一个 bug。然而,有时能够创建一个你暂时还不会使用的变量是有用的,例如当你正在做原型设计或刚开始一个项目时。在这种情况下,你可以通过以_下划线开头_的变量名来告诉 Rust 不要警告你未使用的变量。在清单 19-20 中,我们创建了两个未使用的变量,但当我们编译这段代码时,我们只应收到关于其中一个变量的警告。
fn main() {
let _x = 5;
let y = 10;
}在这里,我们收到了一个关于未使用变量 y 的警告,但没有收到关于未使用 _x 的警告。
请注意,仅使用 _ 和使用以下划线开头的名称之间存在细微差别。语法 _x 仍然将值绑定到变量,而 _ 根本不会绑定。为了说明这种区别重要的情况,清单 19-21 将给我们一个错误。
fn main() {
let s = Some(String::from("Hello!"));
if let Some(_s) = s {
println!("found a string");
}
println!("{s:?}");
}我们会收到一个错误,因为 s 值仍然会被移动到 _s 中,这阻止了我们再次使用 s。然而,仅使用下划线本身永远不会绑定到值。清单 19-22 将编译通过且没有任何错误,因为 s 没有被移动到 _ 中。
fn main() {
let s = Some(String::from("Hello!"));
if let Some(_) = s {
println!("found a string");
}
println!("{s:?}");
}这段代码运行得很好,因为我们从未将 s 绑定到任何东西;它没有被移动。
使用 .. 忽略值的剩余部分
对于具有许多部分的值,我们可以使用 .. 语法来使用特定部分并忽略其余部分,从而避免为每个忽略的值列出下划线。.. 模式会忽略模式中未显式匹配的值的任何部分。在清单 19-23 中,我们有一个 Point 结构体,它保存了三维空间中的坐标。在 match 表达式中,我们只想操作 x 坐标,并忽略 y 和 z 字段的值。
fn main() {
struct Point {
x: i32,
y: i32,
z: i32,
}
let origin = Point { x: 0, y: 0, z: 0 };
match origin {
Point { x, .. } => println!("x is {x}"),
}
}.. 忽略 Point 中除 x 之外的所有字段我们列出了 x 的值,然后仅包含 .. 模式。这比必须列出 y: _ 和 z: _ 更快捷,特别是当我们处理具有大量字段的结构体,而只有一两个字段相关时。
.. 语法会展开为它所需要匹配的任意数量的值。清单 19-24 展示了如何将 .. 与元组一起使用。
fn main() {
let numbers = (2, 4, 8, 16, 32);
match numbers {
(first, .., last) => {
println!("Some numbers: {first}, {last}");
}
}
}在这段代码中,第一个和最后一个值被匹配为 first 和 last。.. 将匹配并忽略中间的所有内容。
然而,使用 .. 必须是明确的。如果不清楚哪些值用于匹配、哪些应该被忽略,Rust 会给我们一个错误。清单 19-25 展示了一个模糊使用 .. 的示例,因此它不会编译。
fn main() {
let numbers = (2, 4, 8, 16, 32);
match numbers {
(.., second, ..) => {
println!("Some numbers: {second}")
},
}
}..当我们编译这个示例时,会得到以下错误:
$ cargo run
Compiling patterns v0.1.0 (file:///projects/patterns)
error: `..` can only be used once per tuple pattern
--> src/main.rs:5:22
|
5 | (.., second, ..) => {
| -- ^^ can only be used once per tuple pattern
| |
| previously used here
error: could not compile `patterns` (bin "patterns") due to 1 previous error
Rust 无法确定在匹配 second 值之前要忽略元组中的多少个值,然后再忽略之后还有多少个值。这段代码可能意味着我们希望忽略 2,将 second 绑定到 4,然后忽略 8、16 和 32;或者我们希望忽略 2 和 4,将 second 绑定到 8,然后忽略 16 和 32;等等。变量名 second 对 Rust 没有任何特殊含义,因此我们得到一个编译器错误,因为在两个位置像这样使用 .. 是模糊的。
使用匹配守卫添加条件
*匹配守卫(match guard)*是 match 分支中模式之后指定的额外 if 条件,也必须满足该条件才能选择该分支。匹配守卫对于表达比单独模式更复杂的想法非常有用。但请注意,它们仅在 match 表达式中可用,不能在 if let 或 while let 表达式中使用。
该条件可以使用模式中创建的变量。清单 19-26 展示了一个 match,其中第一个分支的模式是 Some(x),并且还有一个匹配守卫 if x % 2 == 0(如果该数字是偶数,则为 true)。
fn main() {
let num = Some(4);
match num {
Some(x) if x % 2 == 0 => println!("The number {x} is even"),
Some(x) => println!("The number {x} is odd"),
None => (),
}
}此示例将打印 The number 4 is even。当 num 与第一个分支中的模式进行比较时,它匹配是因为 Some(4) 匹配 Some(x)。然后,匹配守卫检查 x 除以 2 的余数是否等于 0,由于的确如此,因此选择了第一个分支。
如果 num 是 Some(5),第一个分支中的匹配守卫将是 false,因为 5 除以 2 的余数是 1,不等于 0。然后 Rust 将转到第二个分支,它会匹配,因为第二个分支没有匹配守卫,因此匹配任何 Some 变体。
无法在模式内部表达 if x % 2 == 0 条件,因此匹配守卫赋予了我们表达这种逻辑的能力。这种额外表达能力的缺点是,当涉及匹配守卫表达式时,编译器不会尝试检查穷尽性。
在讨论清单 19-11 时,我们提到可以使用匹配守卫来解决模式遮蔽问题。回想一下,我们在 match 表达式的模式中创建了一个新变量,而不是使用 match 外部的变量。那个新变量意味着我们无法测试外部变量的值。清单 19-27 展示了如何使用匹配守卫来解决这个问题。
fn main() {
let x = Some(5);
let y = 10;
match x {
Some(50) => println!("Got 50"),
Some(n) if n == y => println!("Matched, n = {n}"),
_ => println!("Default case, x = {x:?}"),
}
println!("at the end: x = {x:?}, y = {y}");
}这段代码现在将打印 Default case, x = Some(5)。第二个匹配分支中的模式没有引入新的变量 y 来遮蔽外部的 y,这意味着我们可以在匹配守卫中使用外部的 y。我们不将模式指定为 Some(y)(这会遮蔽外部的 y),而是指定为 Some(n)。这创建了一个新的变量 n,它不会遮蔽任何东西,因为在 match 外部没有 n 变量。
匹配守卫 if n == y 不是一个模式,因此不会引入新变量。这个 y 就是外部的 y,而不是一个遮蔽它的新 y,我们可以通过比较 n 和 y 来查找与外部 y 具有相同值的值。
你也可以在匹配守卫中使用或运算符 | 来指定多个模式;匹配守卫条件将应用于所有模式。清单 19-28 展示了将使用 | 的模式与匹配守卫结合时的优先级。此示例的重要部分是 if y 匹配守卫应用于 4、5 和 6,即使可能看起来 if y 只应用于 6。
fn main() {
let x = 4;
let y = false;
match x {
4 | 5 | 6 if y => println!("yes"),
_ => println!("no"),
}
}匹配条件表明,只有在 x 的值等于 4、5 或 6 并且 y 为 true 时,该分支才匹配。当这段代码运行时,第一个分支的模式匹配,因为 x 是 4,但匹配守卫 if y 是 false,因此没有选择第一个分支。代码继续到第二个分支,它确实匹配,此程序打印 no。原因是 if 条件应用于整个模式 4 | 5 | 6,而不仅仅是最后一个值 6。换句话说,匹配守卫相对于模式的优先级行为如下:
(4 | 5 | 6) if y => ...
而不是这样:
4 | 5 | (6 if y) => ...
运行代码后,优先级行为就很明显了:如果匹配守卫仅应用于使用 | 运算符指定的值列表中的最后一个值,那么该分支将匹配,程序将打印 yes。
使用 @ 绑定
at 运算符 @ 让我们在测试值是否匹配模式的同时,创建一个持有该值的变量。在清单 19-29 中,我们想测试 Message::Hello 的 id 字段是否在范围 3..=7 内。我们还希望将该值绑定到变量 id,以便在关联分支的代码中使用它。
fn main() {
enum Message {
Hello { id: i32 },
}
let msg = Message::Hello { id: 5 };
match msg {
Message::Hello { id: id @ 3..=7 } => {
println!("Found an id in range: {id}")
}
Message::Hello { id: 10..=12 } => {
println!("Found an id in another range")
}
Message::Hello { id } => println!("Found some other id: {id}"),
}
}@ 在测试值的同时将其绑定到模式中的变量此示例将打印 Found an id in range: 5。通过在范围 3..=7 之前指定 id @,我们在测试该值是否匹配范围模式的同时,将匹配到范围的值捕获到一个名为 id 的变量中。
在第二个分支中,我们只在模式中指定了一个范围,该分支关联的代码没有一个包含 id 字段实际值的变量。id 字段的值可能是 10、11 或 12,但该模式关联的代码并不知道它是哪一个。模式代码无法使用 id 字段的值,因为我们没有将 id 值保存到变量中。
在最后一个分支中,我们指定了一个没有范围的变量,我们确实有一个可在分支代码中使用的变量 id 中的值。原因是我们使用了结构体字段简写语法。但是,我们在这个分支中没有像前两个分支那样对 id 字段中的值进行任何测试:任何值都会匹配这个模式。
使用 @ 让我们可以在一个模式中测试值并将其保存到变量中。
总结
Rust 的模式在区分不同类型的数据时非常有用。当在 match 表达式中使用时,Rust 确保你的模式覆盖了所有可能的值,否则你的程序将无法编译。let 语句和函数参数中的模式使这些结构更加有用,支持将值解构为更小的部分并将这些部分赋值给变量。我们可以创建简单或复杂的模式来满足我们的需求。
接下来,作为本书倒数第二章,我们将探讨 Rust 各种特性的一些高级方面。
高级特性
到目前为止,你已经学习了 Rust 编程语言中最常用的部分。在第 21 章开始另一个项目之前,我们将探讨你偶尔会遇到但可能不会每天都用到的一些语言方面。你可以将本章作为遇到任何未知时的参考。这里介绍的特性在非常特定的情况下非常有用。尽管你可能不会经常用到它们,但我们希望确保你掌握 Rust 所提供的所有特性。
在本章中,我们将涵盖:
- Unsafe Rust:如何选择退出 Rust 的某些保证,并自行负责手动维护这些保证
- 高级 Trait(Advanced traits):关联类型(associated types)、默认类型参数(default type parameters)、完全限定语法(fully qualified syntax)、超 trait(supertraits)以及与 trait 相关的新类型模式(newtype pattern)
- 高级类型(Advanced types):关于新类型模式、类型别名(type aliases)、永不返回类型(never type)和动态大小类型(dynamically sized types)的更多内容
- 高级函数与闭包(Advanced functions and closures):函数指针(function pointers)和返回闭包(returning closures)
- 宏(Macros):定义在编译时生成更多代码的代码的方法
这是 Rust 特性的一个盛宴,每个人都能找到适合自己的内容!让我们开始吧。
Unsafe Rust
Unsafe Rust
到目前为止,我们讨论的所有代码在编译时都强制实施了 Rust 的内存安全保证。然而,Rust 内部隐藏着第二种不强制实施这些内存安全保证的语言:它被称为 unsafe Rust(不安全的 Rust),其工作方式与常规 Rust 一样,但给了我们额外的超能力。
Unsafe Rust 之所以存在,是因为静态分析本质上是保守的。当编译器试图确定代码是否遵守保证时,它宁可拒绝一些有效程序,也比接受一些无效程序要好。尽管代码可能是没问题的,但如果 Rust 编译器没有足够的信息来确信,它会拒绝这段代码。在这些情况下,你可以使用 unsafe 代码告诉编译器:“相信我,我知道我在做什么。” 然而,请注意,你使用 unsafe Rust 需要自担风险:如果你错误地使用了 unsafe 代码,可能会因为内存不安全导致问题,例如空指针解引用。
Rust 有 unsafe 另一面的另一个原因是,底层的计算机硬件本质上是不安全的。如果 Rust 不让你执行不安全的操作,你就无法完成某些任务。Rust 需要允许你进行底层系统编程,例如直接与操作系统交互,甚至编写你自己的操作系统。与底层系统编程打交道是这门语言的目标之一。让我们探讨一下我们可以用 unsafe Rust 做什么以及如何做。
执行不安全的超能力
要切换到 unsafe Rust,请使用 unsafe 关键字,然后开始一个包含不安全代码的新块。在 unsafe Rust 中,你可以执行在安全 Rust 中无法执行的五种操作,我们称之为不安全超能力(unsafe superpowers)。这些超能力包括:
- 解引用裸指针(Dereference a raw pointer)
- 调用不安全的函数或方法(Call an unsafe function or method)
- 访问或修改可变静态变量(Access or modify a mutable static variable)
- 实现不安全 trait(Implement an unsafe trait)
- 访问
union的字段(Access fields ofunions)
理解 unsafe 不会关闭借用检查器或禁用 Rust 的任何其他安全检查是很重要的:如果你在不安全代码中使用了引用,它仍然会被检查。unsafe 关键字只让你能够访问这五个特性,编译器不会对这些特性进行内存安全检查。你仍然会在 unsafe 块内获得一定程度的安全性。
此外,unsafe 并不意味着块内的代码一定是危险的,或者它肯定会有内存安全问题:其意图是,作为程序员,你将确保 unsafe 块内的代码以有效的方式访问内存。
人都会犯错,错误总会发生,但通过要求这五种不安全操作位于用 unsafe 标注的块内,你将知道任何与内存安全相关的错误一定在 unsafe 块内。保持 unsafe 块小巧;当你以后调查内存错误时,你会感谢自己这样做的。
为了尽可能隔离不安全代码,最好将此类代码封装在一个安全抽象(safe abstraction)中并提供安全的 API,我们将在本章后面讨论不安全的函数和方法时介绍这一点。标准库的某些部分就是作为经过审计的不安全代码之上的安全抽象来实现的。将不安全代码包装在安全抽象中可以防止 unsafe 的使用泄露到你或你的用户可能想要使用用 unsafe 代码实现的功能的所有地方,因为使用安全抽象是安全的。
让我们逐一看看这五种不安全超能力。我们还将介绍一些为不安全代码提供安全接口的抽象。
解引用裸指针
在第 4 章的“悬垂引用”部分,我们提到编译器确保引用始终有效。Unsafe Rust 有两种新的类型,称为裸指针(raw pointers),与引用类似。与引用一样,裸指针可以是不可变的或可变的,分别写为 *const T 和 *mut T。星号不是解引用运算符;它是类型名称的一部分。在裸指针的上下文中,*不可变(immutable)*意味着指针在解引用后不能直接被赋值。
与引用和智能指针不同,裸指针:
- 允许忽略借用规则,可以同时拥有不可变和可变的指针,或指向同一位置的多个可变指针
- 不保证指向有效的内存
- 允许为 null
- 不实现任何自动清理
通过选择退出 Rust 强制执行这些保证,你可以放弃有保证的安全性,以换取更高的性能或与其他语言或硬件交互的能力(Rust 的保证在那里不适用)。
清单 20-1 展示了如何创建不可变和可变的裸指针。
fn main() {
let mut num = 5;
let r1 = &raw const num;
let r2 = &raw mut num;
}请注意,这段代码中没有包含 unsafe 关键字。我们可以在安全代码中创建裸指针;只是不能在 unsafe 块之外解引用裸指针,你稍后会看到。
我们通过使用原始借用运算符创建裸指针:&raw const num 创建一个 *const i32 不可变裸指针,而 &raw mut num 创建一个 *mut i32 可变裸指针。因为我们是直接从局部变量创建的,我们知道这些特定的裸指针是有效的,但我们不能对任意裸指针做出这样的假设。
为了演示这一点,接下来我们将创建一个对其有效性不那么确定的裸指针,使用关键字 as 来转换一个值,而不是使用原始借用运算符。清单 20-2 展示了如何创建一个指向内存中任意地址的裸指针。尝试使用任意内存是未定义行为:该地址可能有数据也可能没有,编译器可能优化代码以致没有内存访问,或者程序可能因段错误而终止。通常,没有充分的理由编写这样的代码,尤其是在你可以使用原始借用运算符的情况下,但这是可能的。
fn main() {
let address = 0x012345usize;
let r = address as *const i32;
}回想一下,我们可以在安全代码中创建裸指针,但不能解引用裸指针并读取所指向的数据。在清单 20-3 中,我们在需要 unsafe 块的裸指针上使用了解引用运算符 *。
fn main() {
let mut num = 5;
let r1 = &raw const num;
let r2 = &raw mut num;
unsafe {
println!("r1 is: {}", *r1);
println!("r2 is: {}", *r2);
}
}unsafe 块内解引用裸指针创建指针本身没有害处;只有当我们试图访问它所指向的值时,才可能最终处理无效值。
还要注意,在清单 20-1 和 20-3 中,我们创建了指向同一内存位置(存储 num 的地方)的 *const i32 和 *mut i32 裸指针。如果我们尝试改为创建对 num 的不可变和可变引用,代码将无法编译,因为 Rust 的所有权规则不允许同时存在可变引用和任何不可变引用。使用裸指针,我们可以创建指向同一位置的可变指针和不可变指针,并通过可变指针更改数据,这可能导致数据竞争(data race)。请小心!
尽管有所有这些危险,你为什么还要使用裸指针呢?一个主要用例是与 C 代码交互时,你将在下一节中看到。另一个用例是构建借用检查器无法理解的安全抽象。我们将介绍不安全函数,然后看一个使用不安全代码的安全抽象示例。
调用不安全函数或方法
你可以在 unsafe 块中执行的第二种操作是调用不安全的函数。不安全的函数和方法看起来与常规函数和方法完全一样,但在定义的其余部分之前多了一个 unsafe。此上下文中的 unsafe 关键字表示该函数有一些我们在调用该函数时需要保证满足的要求,因为 Rust 无法保证我们已经满足了这些要求。通过在 unsafe 块中调用不安全函数,我们是在说我们已经阅读了该函数的文档,并且我们承担了履行该函数契约的责任。
这是一个名为 dangerous 的不安全函数,其函数体内不执行任何操作:
fn main() {
unsafe fn dangerous() {}
unsafe {
dangerous();
}
}我们必须在一个单独的 unsafe 块中调用 dangerous 函数。如果我们尝试在没有 unsafe 块的情况下调用 dangerous,将会收到一个错误:
$ cargo run
Compiling unsafe-example v0.1.0 (file:///projects/unsafe-example)
error[E0133]: call to unsafe function `dangerous` is unsafe and requires unsafe block
--> src/main.rs:4:5
|
4 | dangerous();
| ^^^^^^^^^^^ call to unsafe function
|
= note: consult the function's documentation for information on how to avoid undefined behavior
For more information about this error, try `rustc --explain E0133`.
error: could not compile `unsafe-example` (bin "unsafe-example") due to 1 previous error
使用 unsafe 块,我们向 Rust 断言我们已经阅读了该函数的文档,我们理解如何正确使用它,并且我们已经验证了我们正在履行该函数的契约。
要在 unsafe 函数的函数体中执行不安全操作,你仍然需要使用 unsafe 块,就像在常规函数中一样,如果忘记使用,编译器会警告你。这有助于我们保持 unsafe 块尽可能小,因为不安全操作可能不需要跨越整个函数体。
在不安全代码之上创建安全抽象
仅仅因为一个函数包含不安全代码,并不意味着我们需要将整个函数标记为 unsafe。事实上,将不安全代码包装在安全函数中是一种常见的抽象。例如,让我们研究一下来自标准库的 split_at_mut 函数,它需要一些不安全代码。我们将探讨如何实现它。这个安全方法定义在可变切片上:它接受一个切片,并通过在给定索引处分割切片将其一分为二。清单 20-4 展示了如何使用 split_at_mut。
fn main() {
let mut v = vec![1, 2, 3, 4, 5, 6];
let r = &mut v[..];
let (a, b) = r.split_at_mut(3);
assert_eq!(a, &mut [1, 2, 3]);
assert_eq!(b, &mut [4, 5, 6]);
}split_at_mut 函数我们不能仅使用安全 Rust 来实现这个函数。一次尝试可能看起来像清单 20-5,它无法编译。为简单起见,我们将 split_at_mut 实现为一个函数而不是方法,并且仅针对 i32 值的切片,而不是针对泛型类型 T。
fn split_at_mut(values: &mut [i32], mid: usize) -> (&mut [i32], &mut [i32]) {
let len = values.len();
assert!(mid <= len);
(&mut values[..mid], &mut values[mid..])
}
fn main() {
let mut vector = vec![1, 2, 3, 4, 5, 6];
let (left, right) = split_at_mut(&mut vector, 3);
}split_at_mut这个函数首先获取切片的长度。然后,它通过检查索引是否小于等于长度来断言作为参数给定的索引在切片内。断言意味着,如果我们传递一个大于长度的索引来分割切片,函数会在尝试使用该索引之前 panic。
然后,我们返回一个包含两个可变切片的元组:一个从原切片开头到 mid 索引,另一个从 mid 到切片末尾。
当我们尝试编译清单 20-5 中的代码时,会得到一个错误:
$ cargo run
Compiling unsafe-example v0.1.0 (file:///projects/unsafe-example)
error[E0499]: cannot borrow `*values` as mutable more than once at a time
--> src/main.rs:6:31
|
1 | fn split_at_mut(values: &mut [i32], mid: usize) -> (&mut [i32], &mut [i32]) {
| - let's call the lifetime of this reference `'1`
...
6 | (&mut values[..mid], &mut values[mid..])
| --------------------------^^^^^^--------
| | | |
| | | second mutable borrow occurs here
| | first mutable borrow occurs here
| returning this value requires that `*values` is borrowed for `'1`
|
= help: use `.split_at_mut(position)` to obtain two mutable non-overlapping sub-slices
For more information about this error, try `rustc --explain E0499`.
error: could not compile `unsafe-example` (bin "unsafe-example") due to 1 previous error
Rust 的借用检查器无法理解我们在借用切片的不同部分;它只知道我们在两次借用同一个切片。借用切片的不同部分从根本上说是没问题的,因为这两个切片不重叠,但 Rust 不够聪明,无法知道这一点。当我们知道代码没问题,但 Rust 不知道时,就该使用不安全代码了。
清单 20-6 展示了如何使用 unsafe 块、裸指针和一些对不安全函数的调用来使 split_at_mut 的实现工作。
use std::slice;
fn split_at_mut(values: &mut [i32], mid: usize) -> (&mut [i32], &mut [i32]) {
let len = values.len();
let ptr = values.as_mut_ptr();
assert!(mid <= len);
unsafe {
(
slice::from_raw_parts_mut(ptr, mid),
slice::from_raw_parts_mut(ptr.add(mid), len - mid),
)
}
}
fn main() {
let mut vector = vec![1, 2, 3, 4, 5, 6];
let (left, right) = split_at_mut(&mut vector, 3);
}split_at_mut 函数的实现中使用不安全代码回顾第 4 章中的“切片类型”部分,切片是一个指向某些数据的指针以及切片的长度。我们使用 len 方法获取切片的长度,使用 as_mut_ptr 方法访问切片的裸指针。在这种情况下,因为我们有一个指向 i32 值的可变切片,as_mut_ptr 返回一个类型为 *mut i32 的裸指针,我们将其存储在变量 ptr 中。
我们保留了 mid 索引在切片内的断言。然后,我们进入不安全代码:slice::from_raw_parts_mut 函数接受一个裸指针和一个长度,并创建一个切片。我们使用这个函数创建一个从 ptr 开始、长度为 mid 个元素的切片。然后,我们在 ptr 上调用 add 方法,以 mid 为参数,获得一个从 mid 开始的裸指针,并使用该指针和 mid 之后的剩余元素数量作为长度来创建另一个切片。
函数 slice::from_raw_parts_mut 是不安全的,因为它接受一个裸指针,并且必须相信这个指针是有效的。裸指针上的 add 方法也是不安全的,因为它必须相信偏移量位置也是一个有效的指针。因此,我们必须在调用 slice::from_raw_parts_mut 和 add 的周围放一个 unsafe 块,才能调用它们。通过查看代码并添加 mid 必须小于等于 len 的断言,我们可以判断 unsafe 块中使用的所有裸指针都是指向切片内数据的有效指针。这是对 unsafe 的可接受且适当的使用。
请注意,我们不需要将最终的 split_at_mut 函数标记为 unsafe,我们可以从安全 Rust 中调用这个函数。我们为不安全代码创建了一个安全抽象,通过以安全的方式使用 unsafe 代码的函数实现,因为它只从该函数有权访问的数据中创建有效的指针。
相比之下,清单 20-7 中对 slice::from_raw_parts_mut 的使用在切片被使用时很可能会导致崩溃。这段代码接受一个任意的内存位置,并创建一个 10,000 个元素的切片。
fn main() {
use std::slice;
let address = 0x01234usize;
let r = address as *mut i32;
let values: &[i32] = unsafe { slice::from_raw_parts_mut(r, 10000) };
}我们并不拥有这个任意位置的内存,并且无法保证这段代码创建的切片包含有效的 i32 值。尝试将 values 当作有效切片来使用会导致未定义行为。
使用 extern 函数调用外部代码
有时你的 Rust 代码可能需要与用其他语言编写的代码交互。为此,Rust 有关键字 extern,它有助于创建和使用外部函数接口(Foreign Function Interface,FFI),这是一种编程语言定义函数并使另一种(外部的)编程语言能够调用这些函数的方式。
清单 20-8 演示了如何设置与 C 标准库中的 abs 函数的集成。在 extern 块中声明的函数通常从 Rust 代码调用是不安全的,因此 extern 块也必须标记为 unsafe。原因是其他语言不强制执行 Rust 的规则和保证,而 Rust 无法检查它们,因此确保安全性的责任落在了程序员身上。
unsafe extern "C" {
fn abs(input: i32) -> i32;
}
fn main() {
unsafe {
println!("Absolute value of -3 according to C: {}", abs(-3));
}
}extern 函数在 unsafe extern "C" 块内,我们列出了想从另一种语言调用的外部函数的名称和签名。"C" 部分定义了外部函数使用的应用程序二进制接口(application binary interface,ABI):ABI 定义了如何在汇编层面调用该函数。"C" ABI 是最常见的,遵循 C 编程语言的 ABI。关于 Rust 支持的所有 ABI 的信息,请参阅Rust 参考文档。
在 unsafe extern 块中声明的每个项都隐式地是不安全的。然而,某些 FFI 函数是可以安全调用的。例如,C 标准库中的 abs 函数没有任何内存安全方面的考虑,并且我们知道可以用任何 i32 来调用它。在这种情况下,我们可以使用 safe 关键字来说明这个特定函数即使在 unsafe extern 块中也是可以安全调用的。一旦我们做出这个更改,调用它就不再需要 unsafe 块,如清单 20-9 所示。
unsafe extern "C" {
safe fn abs(input: i32) -> i32;
}
fn main() {
println!("Absolute value of -3 according to C: {}", abs(-3));
}unsafe extern 块中明确将一个函数标记为 safe 并安全调用它将一个函数标记为 safe 并不会从本质上使其变得安全!相反,它就像是你在向 Rust 承诺它是安全的。你仍然有责任确保这个承诺得到履行!
从其他语言调用 Rust 函数
我们也可以使用 extern 来创建允许其他语言调用 Rust 函数的接口。我们不必创建整个 extern 块,而是在相关函数的 fn 关键字之前添加 extern 关键字并指定要使用的 ABI。我们还需要添加 #[unsafe(no_mangle)] 标注来告诉 Rust 编译器不要混淆(mangle)这个函数的名称。*混淆(Mangling)*是指编译器将我们给定的函数名称更改为另一个名称,该名称包含供编译过程的其他部分使用的更多信息,但可读性较差。每种编程语言编译器混淆名称的方式略有不同,因此要使 Rust 函数能被其他语言通过名称调用,我们必须禁用 Rust 编译器的名称混淆。这是不安全的,因为如果没有内置的混淆机制,库之间可能会存在名称冲突,因此我们有责任确保我们选择的名称在没有混淆的情况下安全导出。
在以下示例中,我们将 call_from_c 函数编译为共享库并从 C 链接后,使其可以从 C 代码访问:
#[unsafe(no_mangle)]
pub extern "C" fn call_from_c() {
println!("Just called a Rust function from C!");
}
这种 extern 的使用仅在属性中需要 unsafe,而不在 extern 块上。
访问或修改可变静态变量
在本书中,我们还没有讨论过全局变量,Rust 确实支持全局变量,但它们可能给 Rust 的所有权规则带来问题。如果两个线程正在访问同一个可变全局变量,可能导致数据竞争。
在 Rust 中,全局变量被称为*静态(static)*变量。清单 20-10 展示了以字符串切片为值的静态变量的声明和使用示例。
static HELLO_WORLD: &str = "Hello, world!";
fn main() {
println!("value is: {HELLO_WORLD}");
}静态变量类似于常量(constants),我们在第 3 章的“声明常量”部分讨论过。按照惯例,静态变量的名称使用 SCREAMING_SNAKE_CASE。静态变量只能存储具有 'static 生命周期的引用,这意味着 Rust 编译器可以推断出生命周期,我们不需要显式标注。访问不可变静态变量是安全的。
常量和不可变静态变量之间的一个细微区别是,静态变量中的值在内存中具有固定的地址。使用该值将始终访问相同的数据。另一方面,常量在每次使用时可以复制它们的数据。另一个区别是,静态变量可以是可变的。访问和修改可变静态变量是不安全的。清单 20-11 展示了如何声明、访问和修改一个名为 COUNTER 的可变静态变量。
static mut COUNTER: u32 = 0;
/// SAFETY: Calling this from more than a single thread at a time is undefined
/// behavior, so you *must* guarantee you only call it from a single thread at
/// a time.
unsafe fn add_to_count(inc: u32) {
unsafe {
COUNTER += inc;
}
}
fn main() {
unsafe {
// SAFETY: This is only called from a single thread in `main`.
add_to_count(3);
println!("COUNTER: {}", *(&raw const COUNTER));
}
}与常规变量一样,我们使用 mut 关键字指定可变性。任何读取或写入 COUNTER 的代码都必须在 unsafe 块内。清单 20-11 中的代码可以编译并按照我们预期打印 COUNTER: 3,因为它是单线程的。让多个线程访问 COUNTER 很可能导致数据竞争,因此这是未定义行为。因此,我们需要将整个函数标记为 unsafe 并记录安全限制,以便任何调用该函数的人都知道他们可以安全地做什么和不能做什么。
每当我们编写不安全函数时,习惯上要编写一个以 SAFETY 开头的注释,解释调用者需要做什么来安全地调用该函数。同样,每当我们执行不安全操作时,习惯上要编写一个以 SAFETY 开头的注释,解释安全规则是如何得到维护的。
此外,编译器默认会通过编译器 lint(compiler lint)拒绝任何尝试创建对可变静态变量的引用的操作。你必须通过添加 #[allow(static_mut_refs)] 标注来显式退出该 lint 的保护,或者通过使用原始借用运算符之一创建的裸指针来访问可变静态变量。这包括引用被不可见地创建的情况,例如在本代码清单中的 println! 中使用它时。要求通过裸指针创建对静态可变变量的引用,有助于使使用它们的安全要求更加明显。
对于全局可访问的可变数据,很难确保没有数据竞争,这就是为什么 Rust 认为可变静态变量是不安全的。在可能的情况下,最好使用我们在第 16 章讨论的并发技术和线程安全智能指针,以便编译器检查来自不同线程的数据访问是否安全进行。
实现不安全 Trait
我们可以使用 unsafe 来实现一个不安全的 trait。当某个 trait 的至少一个方法具有编译器无法验证的某种不变性(invariant)时,该 trait 就是不安全的。我们通过在 trait 之前添加 unsafe 关键字来声明 trait 是 unsafe 的,并将 trait 的实现也标记为 unsafe,如清单 20-12 所示。
unsafe trait Foo {
// methods go here
}
unsafe impl Foo for i32 {
// method implementations go here
}
fn main() {}通过使用 unsafe impl,我们承诺我们将会维护编译器无法验证的那些不变性。
例如,回想一下我们在第 16 章中的“使用 Send 和 Sync 实现可扩展的并发”部分讨论的 Send 和 Sync 标记 trait:如果我们的类型完全由其他实现 Send 和 Sync 的类型组成,编译器会自动实现这些 trait。如果我们实现了一个包含未实现 Send 或 Sync 的类型(例如裸指针)的类型,并且我们希望将该类型标记为 Send 或 Sync,我们必须使用 unsafe。Rust 无法验证我们的类型是否维护了它可以安全地在线程间发送或从多个线程访问的保证;因此,我们需要手动进行这些检查,并用 unsafe 来表明这一点。
访问 Union 的字段
仅在使用 unsafe 时才能执行的最后一个操作是访问 union(联合体)的字段。union 类似于 struct,但在特定实例中一次只使用一个声明的字段。Union 主要用于与 C 代码中的 union 交互。访问 union 字段是不安全的,因为 Rust 无法保证当前存储在 union 实例中的数据的类型。你可以在 Rust 参考文档中了解更多关于 union 的信息。
使用 Miri 检查不安全代码
在编写不安全代码时,你可能想要检查你所写的内容是否确实安全且正确。最好的方法之一是使用 Miri,这是一个用于检测未定义行为的官方 Rust 工具。借用检查器是一种在编译时工作的*静态(static)工具,而 Miri 是一种在运行时工作的动态(dynamic)*工具。它通过运行你的程序或其测试套件来检查你的代码,并在你违反它理解的关于 Rust 应该如何工作的规则时进行检测。
使用 Miri 需要 Rust 的 nightly 构建版本(我们在附录 G:Rust 的开发和“Nightly Rust“中会详细讨论)。你可以通过输入 rustup +nightly component add miri 来同时安装 nightly 版本的 Rust 和 Miri 工具。这不会更改你的项目使用的 Rust 版本;它只是将工具添加到你的系统中,以便你想用时可以使用它。你可以通过输入 cargo +nightly miri run 或 cargo +nightly miri test 在项目上运行 Miri。
为了举例说明这有多有用,考虑一下我们在清单 20-7 上运行 Miri 时会发生什么。
$ cargo +nightly miri run
Compiling unsafe-example v0.1.0 (file:///projects/unsafe-example)
Finished `dev` profile [unoptimized + debuginfo] target(s) in 0.01s
Running `file:///home/.rustup/toolchains/nightly/bin/cargo-miri runner target/miri/debug/unsafe-example`
warning: integer-to-pointer cast
--> src/main.rs:5:13
|
5 | let r = address as *mut i32;
| ^^^^^^^^^^^^^^^^^^^ integer-to-pointer cast
|
= help: this program is using integer-to-pointer casts or (equivalently) `ptr::with_exposed_provenance`, which means that Miri might miss pointer bugs in this program
= help: see https://doc.rust-lang.org/nightly/std/ptr/fn.with_exposed_provenance.html for more details on that operation
= help: to ensure that Miri does not miss bugs in your program, use Strict Provenance APIs (https://doc.rust-lang.org/nightly/std/ptr/index.html#strict-provenance, https://crates.io/crates/sptr) instead
= help: you can then set `MIRIFLAGS=-Zmiri-strict-provenance` to ensure you are not relying on `with_exposed_provenance` semantics
= help: alternatively, `MIRIFLAGS=-Zmiri-permissive-provenance` disables this warning
= note: BACKTRACE:
= note: inside `main` at src/main.rs:5:13: 5:32
error: Undefined Behavior: pointer not dereferenceable: pointer must be dereferenceable for 40000 bytes, but got 0x1234[noalloc] which is a dangling pointer (it has no provenance)
--> src/main.rs:7:35
|
7 | let values: &[i32] = unsafe { slice::from_raw_parts_mut(r, 10000) };
| ^^^^^^^^^^^^^^^^^^^^^^^^^^^^^^^^^^^ Undefined Behavior occurred here
|
= help: this indicates a bug in the program: it performed an invalid operation, and caused Undefined Behavior
= help: see https://doc.rust-lang.org/nightly/reference/behavior-considered-undefined.html for further information
= note: BACKTRACE:
= note: inside `main` at src/main.rs:7:35: 7:70
note: some details are omitted, run with `MIRIFLAGS=-Zmiri-backtrace=full` for a verbose backtrace
error: aborting due to 1 previous error; 1 warning emitted
Miri 正确地警告我们正在将一个整数转换为指针,这可能是个问题,但 Miri 无法确定是否存在问题,因为它不知道指针的来源。然后,Miri 返回一个错误,因为清单 20-7 存在未定义行为——我们有一个悬垂指针。多亏了 Miri,我们现在知道存在未定义行为的风险,并且我们可以思考如何使代码安全。在某些情况下,Miri 甚至可以就如何修复错误提出建议。
Miri 并不能捕捉到你在编写不安全代码时可能犯的所有错误。Miri 是一个动态分析工具,因此它只能捕捉到实际运行的代码的问题。这意味着你需要将其与良好的测试技术结合使用,以增强你对所编写不安全代码的信心。Miri 也没有涵盖你的代码可能不健全的每一种方式。
换句话说:如果 Miri 确实发现了问题,你就知道存在 bug,但仅仅因为 Miri 没有发现 bug 并不意味着就没有问题。不过,它可以捕捉到很多问题。尝试在本章的其他不安全代码示例上运行它,看看它会说什么!
你可以在其 GitHub 仓库中了解更多关于 Miri 的信息。
正确使用不安全代码
使用 unsafe 来使用刚才讨论的五种超能力之一并没有错,甚至也不会被反对,但要正确编写 unsafe 代码更加棘手,因为编译器无法帮助维护内存安全。当你有理由使用 unsafe 代码时,你可以这样做,并且拥有显式的 unsafe 标注使得在出现问题时分清问题根源更加容易。每当你编写不安全代码时,你可以使用 Miri 来帮助你更确信所编写的代码遵守了 Rust 的规则。
要更深入地探索如何有效地使用 unsafe Rust,请阅读 Rust 官方的 unsafe 指南:The Rustonomicon。
高级 Trait
高级 Trait
我们第一次介绍 trait 是在第 10 章的“使用 Trait 定义共享行为”部分,但当时我们没有讨论更高级的细节。既然你对 Rust 有了更多了解,我们可以深入探讨其细节了。
使用关联类型定义 Trait
*关联类型(Associated types)*将一个类型占位符与 trait 连接起来,使得 trait 方法定义可以在其签名中使用这些占位符类型。trait 的实现者将为特定实现指定要使用的具体类型,以替代占位符类型。这样,我们可以定义一个使用某些类型的 trait,而无需在 trait 被实现之前确切知道这些类型是什么。
我们在本章中将大多数高级特性描述为很少需要用到。关联类型处于中间位置:它们的使用比本书其余部分解释的特性更少,但比本章讨论的许多其他特性更常见。
一个具有关联类型的 trait 的例子是标准库提供的 Iterator trait。关联类型名为 Item,代表实现 Iterator trait 的类型正在迭代的值的类型。Iterator trait 的定义如清单 20-13 所示。
pub trait Iterator {
type Item;
fn next(&mut self) -> Option<Self::Item>;
}Item 的 Iterator trait 的定义类型 Item 是一个占位符,next 方法的定义表明它将返回 Option<Self::Item> 类型的值。Iterator trait 的实现者将为 Item 指定具体类型,并且 next 方法将返回一个包含该具体类型值的 Option。
关联类型可能看起来与泛型概念相似,因为后者允许我们定义函数而不指定它可以处理什么类型。为了检查这两个概念之间的区别,我们来看一个在名为 Counter 的类型上实现 Iterator trait 的例子,该类型指定 Item 类型为 u32:
struct Counter {
count: u32,
}
impl Counter {
fn new() -> Counter {
Counter { count: 0 }
}
}
impl Iterator for Counter {
type Item = u32;
fn next(&mut self) -> Option<Self::Item> {
// --snip--
if self.count < 5 {
self.count += 1;
Some(self.count)
} else {
None
}
}
}这种语法看起来与泛型语法类似。那么,为什么不像清单 20-14 那样直接用泛型定义 Iterator trait 呢?
pub trait Iterator<T> {
fn next(&mut self) -> Option<T>;
}Iterator trait 定义区别在于,当使用泛型时(如清单 20-14),我们必须在每个实现中标注类型;因为我们也可以为 Counter 实现 Iterator<String> 或任何其他类型,我们可能为 Counter 拥有多个 Iterator 的实现。换句话说,当 trait 有一个泛型参数时,它可以为一个类型实现多次,每次改变泛型类型参数的具体类型。当我们在 Counter 上使用 next 方法时,我们必须提供类型标注,以指示我们想要使用哪个 Iterator 实现。
使用关联类型,我们不需要标注类型,因为我们不能为一个类型多次实现一个 trait。在清单 20-13 使用关联类型的定义中,我们只能选择一次 Item 的类型,因为只能有一个 impl Iterator for Counter。我们不必在每次对 Counter 调用 next 时都指定我们想要一个 u32 值的迭代器。
关联类型也成为了 trait 契约的一部分:trait 的实现者必须提供一个类型来替代关联类型占位符。关联类型通常有一个描述该类型将如何被使用的名称,并且在 API 文档中记录关联类型是一个好的做法。
使用默认泛型参数和运算符重载
当我们使用泛型类型参数时,我们可以为泛型类型指定一个默认的具体类型。如果默认类型可行,这就消除了 trait 的实现者指定具体类型的需要。你可以使用 <PlaceholderType=ConcreteType> 语法在声明泛型类型时指定一个默认类型。
一个这种技术有用的情况很好的例子是运算符重载(operator overloading),其中你在特定情况下自定义运算符(例如 +)的行为。
Rust 不允许你创建自己的运算符或重载任意运算符。但你可以通过实现与运算符关联的 trait 来重载 std::ops 中列出的操作和相应的 trait。例如,在清单 20-15 中,我们重载了 + 运算符来将两个 Point 实例相加。我们通过在 Point 结构体上实现 Add trait 来实现这一点。
use std::ops::Add;
#[derive(Debug, Copy, Clone, PartialEq)]
struct Point {
x: i32,
y: i32,
}
impl Add for Point {
type Output = Point;
fn add(self, other: Point) -> Point {
Point {
x: self.x + other.x,
y: self.y + other.y,
}
}
}
fn main() {
assert_eq!(
Point { x: 1, y: 0 } + Point { x: 2, y: 3 },
Point { x: 3, y: 3 }
);
}Add trait 以重载 Point 实例的 + 运算符add 方法将两个 Point 实例的 x 值和两个 Point 实例的 y 值相加,创建一个新的 Point。Add trait 有一个名为 Output 的关联类型,它决定了从 add 方法返回的类型。
这段代码中的默认泛型类型在 Add trait 内部。以下是它的定义:
#![allow(unused)]
fn main() {
trait Add<Rhs=Self> {
type Output;
fn add(self, rhs: Rhs) -> Self::Output;
}
}这段代码看起来应该大致熟悉:一个带有一个方法和一个关联类型的 trait。新的部分是 Rhs=Self:这种语法被称为默认类型参数(default type parameters)。Rhs 泛型类型参数(“右操作数(right-hand side)“的缩写)定义了 add 方法中 rhs 参数的类型。如果我们在实现 Add trait 时没有为 Rhs 指定具体类型,Rhs 的类型将默认为 Self,也就是我们正在实现 Add 的类型。
当我们为 Point 实现 Add 时,我们使用了 Rhs 的默认值,因为我们想要添加两个 Point 实例。让我们看一个想要自定义 Rhs 类型而不是使用默认值的 Add trait 实现示例。
我们有两个结构体 Millimeters 和 Meters,它们持有不同单位的值。这种将现有类型薄薄地包装在另一个结构体中的方式被称为新类型模式(newtype pattern),我们将在“使用新类型模式实现外部 Trait”部分更详细地描述。我们想将毫米(Millimeters)值加到米(Meters)值上,并且让 Add 的实现正确地进行转换。我们可以用 Meters 作为 Rhs 为 Millimeters 实现 Add,如清单 20-16 所示。
use std::ops::Add;
struct Millimeters(u32);
struct Meters(u32);
impl Add<Meters> for Millimeters {
type Output = Millimeters;
fn add(self, other: Meters) -> Millimeters {
Millimeters(self.0 + (other.0 * 1000))
}
}Millimeters 上实现 Add trait 以将 Millimeters 和 Meters 相加要相加 Millimeters 和 Meters,我们指定 impl Add<Meters> 来设置 Rhs 类型参数的值,而不是使用默认的 Self。
你将在两种主要情况下使用默认类型参数:
- 在不破坏现有代码的情况下扩展类型
- 在大多数用户不需要的特定情况下允许自定义
标准库的 Add trait 是第二个目的的示例:通常,你会将两个同类类型相加,但 Add trait 提供了超越这一点的自定义能力。在 Add trait 定义中使用默认类型参数意味着大多数情况下你不需要指定额外的参数。换句话说,不需要一些实现样板,使得使用 trait 更容易。
第一个目的与第二个类似,但是反向的:如果你想向一个现有 trait 添加类型参数,你可以给它一个默认值,从而允许扩展 trait 的功能而不破坏现有的实现代码。
消除同名方法之间的歧义
在 Rust 中,没有什么能阻止一个 trait 拥有与另一个 trait 方法同名的方法,Rust 也不阻止你在同一类型上实现这两个 trait。在同一类型上直接实现一个与 trait 方法同名的方法也是可能的。
当调用同名的方法时,你需要告诉 Rust 你想要使用哪一个。考虑清单 20-17 中的代码,我们定义了两个 trait Pilot 和 Wizard,它们都有一个名为 fly 的方法。然后,我们在一个已经直接实现了一个名为 fly 的方法的 Human 类型上实现这两个 trait。每个 fly 方法做的事情都不同。
trait Pilot {
fn fly(&self);
}
trait Wizard {
fn fly(&self);
}
struct Human;
impl Pilot for Human {
fn fly(&self) {
println!("This is your captain speaking.");
}
}
impl Wizard for Human {
fn fly(&self) {
println!("Up!");
}
}
impl Human {
fn fly(&self) {
println!("*waving arms furiously*");
}
}
fn main() {}fly 方法的 trait,在 Human 类型上实现了它们,并且在 Human 上直接实现了一个 fly 方法。当我们在 Human 实例上调用 fly 时,编译器默认会调用直接实现在该类型上的方法,如清单 20-18 所示。
trait Pilot {
fn fly(&self);
}
trait Wizard {
fn fly(&self);
}
struct Human;
impl Pilot for Human {
fn fly(&self) {
println!("This is your captain speaking.");
}
}
impl Wizard for Human {
fn fly(&self) {
println!("Up!");
}
}
impl Human {
fn fly(&self) {
println!("*waving arms furiously*");
}
}
fn main() {
let person = Human;
person.fly();
}Human 实例上调用 fly运行这段代码将打印 *waving arms furiously*,表明 Rust 直接调用了实现在 Human 上的 fly 方法。
要调用 Pilot trait 或 Wizard trait 中的 fly 方法,我们需要使用更明确的语法来指定我们指的是哪个 fly 方法。清单 20-19 演示了这种语法。
trait Pilot {
fn fly(&self);
}
trait Wizard {
fn fly(&self);
}
struct Human;
impl Pilot for Human {
fn fly(&self) {
println!("This is your captain speaking.");
}
}
impl Wizard for Human {
fn fly(&self) {
println!("Up!");
}
}
impl Human {
fn fly(&self) {
println!("*waving arms furiously*");
}
}
fn main() {
let person = Human;
Pilot::fly(&person);
Wizard::fly(&person);
person.fly();
}fly 方法在方法名称之前指定 trait 名称,向 Rust 阐明了我们想要调用哪个 fly 实现。我们也可以写成 Human::fly(&person),这与我们在清单 20-19 中使用的 person.fly() 等效,但如果我们不需要消除歧义,这写起来会长一些。
运行这段代码会打印以下内容:
$ cargo run
Compiling traits-example v0.1.0 (file:///projects/traits-example)
Finished `dev` profile [unoptimized + debuginfo] target(s) in 0.46s
Running `target/debug/traits-example`
This is your captain speaking.
Up!
*waving arms furiously*
因为 fly 方法接受一个 self 参数,如果我们有两个实现了同一个 trait 的类型,Rust 可以根据 self 的类型确定要使用哪个 trait 实现。
然而,不是方法的关联函数没有 self 参数。当有多个类型或 trait 定义具有相同函数名的非方法函数时,Rust 并不总是知道你的意思,除非你使用完全限定语法。例如,在清单 20-20 中,我们为一家动物收容所创建了一个 trait,该收容所想给所有幼犬取名为 Spot。我们创建了一个 Animal trait,其中包含一个关联的非方法函数 baby_name。Animal trait 为 Dog 结构体实现,同时我们也在 Dog 上直接提供了一个同名的关联非方法函数 baby_name。
trait Animal {
fn baby_name() -> String;
}
struct Dog;
impl Dog {
fn baby_name() -> String {
String::from("Spot")
}
}
impl Animal for Dog {
fn baby_name() -> String {
String::from("puppy")
}
}
fn main() {
println!("A baby dog is called a {}", Dog::baby_name());
}我们在定义在 Dog 上的 baby_name 关联函数中实现了给所有小狗命名为 Spot 的代码。Dog 类型也实现了 Animal trait,它描述了所有动物都具有的特征。幼犬被称为 puppy,这是在 Dog 上实现的 Animal trait 中、与 Animal trait 关联的 baby_name 函数中表达的。
在 main 中,我们调用了 Dog::baby_name 函数,它直接调用了定义在 Dog 上的关联函数。这段代码打印如下:
$ cargo run
Compiling traits-example v0.1.0 (file:///projects/traits-example)
Finished `dev` profile [unoptimized + debuginfo] target(s) in 0.54s
Running `target/debug/traits-example`
A baby dog is called a Spot
这个输出不是我们想要的。我们想要调用作为 Animal trait 一部分的 baby_name 函数,该 trait 我们在 Dog 上实现了,这样代码会打印 A baby dog is called a puppy。我们在清单 20-19 中使用的指定 trait 名称的技术在这里没有帮助;如果我们把 main 改成清单 20-21 中的代码,我们会得到一个编译错误。
trait Animal {
fn baby_name() -> String;
}
struct Dog;
impl Dog {
fn baby_name() -> String {
String::from("Spot")
}
}
impl Animal for Dog {
fn baby_name() -> String {
String::from("puppy")
}
}
fn main() {
println!("A baby dog is called a {}", Animal::baby_name());
}Animal trait 调用 baby_name 函数,但 Rust 不知道要使用哪个实现因为 Animal::baby_name 没有 self 参数,并且可能还有其他类型实现了 Animal trait,Rust 无法确定我们想要哪个 Animal::baby_name 实现。我们将会得到这个编译器错误:
$ cargo run
Compiling traits-example v0.1.0 (file:///projects/traits-example)
error[E0790]: cannot call associated function on trait without specifying the corresponding `impl` type
--> src/main.rs:20:43
|
2 | fn baby_name() -> String;
| ------------------------- `Animal::baby_name` defined here
...
20 | println!("A baby dog is called a {}", Animal::baby_name());
| ^^^^^^^^^^^^^^^^^^^ cannot call associated function of trait
|
help: use the fully-qualified path to the only available implementation
|
20 | println!("A baby dog is called a {}", <Dog as Animal>::baby_name());
| +++++++ +
For more information about this error, try `rustc --explain E0790`.
error: could not compile `traits-example` (bin "traits-example") due to 1 previous error
为了消除歧义并告诉 Rust 我们想要使用 Animal 对 Dog 的实现,而不是 Animal 对其他类型的实现,我们需要使用完全限定语法。清单 20-22 演示了如何使用完全限定语法。
trait Animal {
fn baby_name() -> String;
}
struct Dog;
impl Dog {
fn baby_name() -> String {
String::from("Spot")
}
}
impl Animal for Dog {
fn baby_name() -> String {
String::from("puppy")
}
}
fn main() {
println!("A baby dog is called a {}", <Dog as Animal>::baby_name());
}Animal trait 的 baby_name 函数在 Dog 上的实现我们在尖括号内为 Rust 提供了一个类型标注,通过说我们想将 Dog 类型在此函数调用中视为 Animal,来指示我们想要调用 Animal trait 在 Dog 上实现的 baby_name 方法。这段代码现在将打印我们想要的内容:
$ cargo run
Compiling traits-example v0.1.0 (file:///projects/traits-example)
Finished `dev` profile [unoptimized + debuginfo] target(s) in 0.48s
Running `target/debug/traits-example`
A baby dog is called a puppy
通常来说,完全限定语法定义如下:
<Type as Trait>::function(receiver_if_method, next_arg, ...);对于不是方法的关联函数,不会有 receiver:只有其他参数的列表。你可以在任何调用函数或方法的地方使用完全限定语法。然而,对于 Rust 可以从程序中的其他信息确定的部分,你可以省略此语法。你只需要在存在多个使用相同名称的实现,并且 Rust 需要帮助才能识别你想要的实现的情况下使用这种更冗长的语法。
使用超 Trait
有时你可能会编写一个依赖于另一个 trait 的 trait 定义:要一个类型实现第一个 trait,你想要求该类型也必须实现第二个 trait。你这样做是为了让你的 trait 定义能够使用第二个 trait 的关联项。你的 trait 定义所依赖的 trait 被称为你的 trait 的超 trait(supertrait)。
例如,假设我们想要创建一个 OutlinePrint trait,它有一个 outline_print 方法,将给定值格式化为带星号边框的形式打印出来。也就是说,给定一个实现了标准库 Display trait 的 Point 结构体,其结果格式为 (x, y),当我们在一个 x 为 1、y 为 3 的 Point 实例上调用 outline_print 时,它应该打印如下:
**********
* *
* (1, 3) *
* *
**********
在 outline_print 方法的实现中,我们想要使用 Display trait 的功能。因此,我们需要指定 OutlinePrint trait 只对也实现了 Display 并提供 OutlinePrint 所需功能的类型起作用。我们可以在 trait 定义中通过指定 OutlinePrint: Display 来实现这一点。这种技术类似于向 trait 添加一个 trait 约束。清单 20-23 展示了 OutlinePrint trait 的实现。
use std::fmt;
trait OutlinePrint: fmt::Display {
fn outline_print(&self) {
let output = self.to_string();
let len = output.len();
println!("{}", "*".repeat(len + 4));
println!("*{}*", " ".repeat(len + 2));
println!("* {output} *");
println!("*{}*", " ".repeat(len + 2));
println!("{}", "*".repeat(len + 4));
}
}
fn main() {}Display 功能的 OutlinePrint trait因为我们指定了 OutlinePrint 需要 Display trait,我们可以使用 to_string 函数,该函数会自动为任何实现了 Display 的类型实现。如果我们试图使用 to_string 而没有在 trait 名称后面添加冒号和指定 Display trait,我们会得到一个错误,指出在当前作用域中未找到类型 &Self 的名为 to_string 的方法。
让我们看看当我们尝试在不实现 Display 的类型(例如 Point 结构体)上实现 OutlinePrint 时会发生什么:
use std::fmt;
trait OutlinePrint: fmt::Display {
fn outline_print(&self) {
let output = self.to_string();
let len = output.len();
println!("{}", "*".repeat(len + 4));
println!("*{}*", " ".repeat(len + 2));
println!("* {output} *");
println!("*{}*", " ".repeat(len + 2));
println!("{}", "*".repeat(len + 4));
}
}
struct Point {
x: i32,
y: i32,
}
impl OutlinePrint for Point {}
fn main() {
let p = Point { x: 1, y: 3 };
p.outline_print();
}我们得到一个错误,说需要 Display 但没有实现:
$ cargo run
Compiling traits-example v0.1.0 (file:///projects/traits-example)
error[E0277]: `Point` doesn't implement `std::fmt::Display`
--> src/main.rs:20:23
|
20 | impl OutlinePrint for Point {}
| ^^^^^ the trait `std::fmt::Display` is not implemented for `Point`
|
note: required by a bound in `OutlinePrint`
--> src/main.rs:3:21
|
3 | trait OutlinePrint: fmt::Display {
| ^^^^^^^^^^^^ required by this bound in `OutlinePrint`
error[E0277]: `Point` doesn't implement `std::fmt::Display`
--> src/main.rs:24:7
|
24 | p.outline_print();
| ^^^^^^^^^^^^^ the trait `std::fmt::Display` is not implemented for `Point`
|
note: required by a bound in `OutlinePrint::outline_print`
--> src/main.rs:3:21
|
3 | trait OutlinePrint: fmt::Display {
| ^^^^^^^^^^^^ required by this bound in `OutlinePrint::outline_print`
4 | fn outline_print(&self) {
| ------------- required by a bound in this associated function
For more information about this error, try `rustc --explain E0277`.
error: could not compile `traits-example` (bin "traits-example") due to 2 previous errors
要修复这个问题,我们在 Point 上实现 Display 并满足 OutlinePrint 所需的条件,如下所示:
trait OutlinePrint: fmt::Display {
fn outline_print(&self) {
let output = self.to_string();
let len = output.len();
println!("{}", "*".repeat(len + 4));
println!("*{}*", " ".repeat(len + 2));
println!("* {output} *");
println!("*{}*", " ".repeat(len + 2));
println!("{}", "*".repeat(len + 4));
}
}
struct Point {
x: i32,
y: i32,
}
impl OutlinePrint for Point {}
use std::fmt;
impl fmt::Display for Point {
fn fmt(&self, f: &mut fmt::Formatter) -> fmt::Result {
write!(f, "({}, {})", self.x, self.y)
}
}
fn main() {
let p = Point { x: 1, y: 3 };
p.outline_print();
}然后,在 Point 上实现 OutlinePrint trait 将成功编译,我们可以在 Point 实例上调用 outline_print 来在星号边框内显示它。
使用新类型模式实现外部 Trait
在第 10 章的“在类型上实现 Trait”部分,我们提到了孤儿规则(orphan rule),该规则规定我们只有在 trait 或类型(或两者)位于我们自己的 crate 中时,才能在该类型上实现该 trait。可以使用新类型模式绕过这一限制,这涉及在元组结构体中创建一个新类型。(我们在第 5 章的“使用元组结构体创建不同类型”部分介绍了元组结构体。)元组结构体将有一个字段,并成为我们希望在其上实现 trait 的类型的薄包装。然后,包装类型位于我们的 crate 中,我们可以在包装器上实现 trait。*新类型(Newtype)*是一个源自 Haskell 编程语言的术语。使用这种模式没有运行时性能损失,并且包装类型在编译时会被优化掉。
例如,假设我们想在 Vec<T> 上实现 Display,孤儿规则阻止我们直接这样做,因为 Display trait 和 Vec<T> 类型都定义在我们的 crate 之外。我们可以创建一个持有 Vec<T> 实例的 Wrapper 结构体;然后,我们可以在 Wrapper 上实现 Display 并使用 Vec<T> 值,如清单 20-24 所示。
use std::fmt;
struct Wrapper(Vec<String>);
impl fmt::Display for Wrapper {
fn fmt(&self, f: &mut fmt::Formatter) -> fmt::Result {
write!(f, "[{}]", self.0.join(", "))
}
}
fn main() {
let w = Wrapper(vec![String::from("hello"), String::from("world")]);
println!("w = {w}");
}Vec<String> 的 Wrapper 类型以实现 DisplayDisplay 的实现使用 self.0 来访问内部的 Vec<T>,因为 Wrapper 是一个元组结构体,而 Vec<T> 是元组中索引为 0 的元素。然后,我们可以在 Wrapper 上使用 Display trait 的功能。
使用这种技术的缺点是 Wrapper 是一个新类型,因此它没有所持有的值的方法。我们必须直接在 Wrapper 上实现 Vec<T> 的所有方法,以便这些方法委托给 self.0,这将允许我们将 Wrapper 完全当作 Vec<T> 来对待。如果我们希望新类型具有内部类型的每一个方法,在 Wrapper 上实现 Deref trait 以返回内部类型是一个解决方案(我们在第 15 章的“将智能指针视为常规引用”部分讨论了实现 Deref trait)。如果我们不希望 Wrapper 类型拥有内部类型的所有方法——例如,为了限制 Wrapper 类型的行为——我们就必须手动实现我们想要的那些方法。
这种新类型模式即使在涉及 trait 时也很有用。让我们切换焦点,来看看与 Rust 的类型系统交互的一些高级方式。
高级类型
高级类型
Rust 的类型系统有一些我们到目前为止已经提到但尚未讨论的特性。我们将首先讨论新类型(newtypes)的一般概念,探讨它们作为类型的用处。然后,我们将转向类型别名(type aliases),这是一个类似于新类型但语义略有不同的特性。我们还将讨论 ! 类型和动态大小的类型(dynamically sized types)。
使用新类型模式实现类型安全和抽象
本节假定你已经阅读了前面的“使用新类型模式实现外部 Trait”部分。新类型模式对于除了我们目前讨论之外的任务也很有用,包括在静态层面上确保值永远不会混淆,以及指示值的单位。你在清单 20-16 中看到了使用新类型指示单位的例子:回想一下,Millimeters 和 Meters 结构体将 u32 值包装在了新类型中。如果我们编写一个接受 Millimeters 类型参数的函数,我们将无法编译一个错误地尝试使用 Meters 类型的值或普通的 u32 值来调用该函数的程序。
我们还可以使用新类型模式来抽象掉某个类型的一些实现细节:新类型可以公开一个与私有内部类型的 API 不同的公有 API。
新类型还可以隐藏内部实现。例如,我们可以提供一个 People 类型来包装一个 HashMap<i32, String>,该哈希映射存储人的 ID 与其姓名的关联。使用 People 的代码只与我们提供的公有 API 交互,例如向 People 集合添加姓名字符串的方法;这些代码不需要知道我们在内部将 i32 ID 分配给姓名。新类型模式是一种轻量级的实现封装以隐藏实现细节的方式,我们在第 18 章的“封装隐藏了实现细节”部分讨论过。
类型同义词与类型别名
Rust 提供了声明*类型别名(type alias)*的功能,为现有类型赋予另一个名称。为此我们使用 type 关键字。例如,我们可以像这样创建 Kilometers 作为 i32 的别名:
fn main() {
type Kilometers = i32;
let x: i32 = 5;
let y: Kilometers = 5;
println!("x + y = {}", x + y);
}现在别名 Kilometers 是 i32 的同义词(synonym);与我们之前在清单 20-16 中创建的 Millimeters 和 Meters 类型不同,Kilometers 不是一个独立的、新的类型。类型为 Kilometers 的值将与类型为 i32 的值一视同仁:
fn main() {
type Kilometers = i32;
let x: i32 = 5;
let y: Kilometers = 5;
println!("x + y = {}", x + y);
}因为 Kilometers 和 i32 是同一类型,我们可以将这两种类型的值相加,并且可以将 Kilometers 值传递给接受 i32 参数的函数。然而,使用这种方法,我们不会获得之前讨论的新类型模式带来的类型检查好处。换句话说,如果我们把 Kilometers 和 i32 值混用了,编译器不会给我们报错。
类型同义词的主要用途是减少重复。例如,我们可能会有像这样冗长的类型:
Box<dyn Fn() + Send + 'static>在函数签名和类型标注中到处编写这个冗长的类型可能既繁琐又容易出错。想象一下一个充满类似清单 20-25 中的代码的项目。
fn main() {
let f: Box<dyn Fn() + Send + 'static> = Box::new(|| println!("hi"));
fn takes_long_type(f: Box<dyn Fn() + Send + 'static>) {
// --snip--
}
fn returns_long_type() -> Box<dyn Fn() + Send + 'static> {
// --snip--
Box::new(|| ())
}
}类型别名通过减少重复来使代码更易于管理。在清单 20-26 中,我们为这个冗长的类型引入了一个名为 Thunk 的别名,并且可以用更短的别名 Thunk 替换所有该类型的使用。
fn main() {
type Thunk = Box<dyn Fn() + Send + 'static>;
let f: Thunk = Box::new(|| println!("hi"));
fn takes_long_type(f: Thunk) {
// --snip--
}
fn returns_long_type() -> Thunk {
// --snip--
Box::new(|| ())
}
}Thunk 以减少重复这段代码更易于读写!为类型别名选择一个有意义的名称也有助于传达你的意图(thunk 是一个表示要在以后求值的代码的词,因此对于要存储的闭包来说是一个合适的名称)。
类型别名也常与 Result<T, E> 类型一起使用以减少重复。考虑标准库中的 std::io 模块。I/O 操作经常返回 Result<T, E> 来处理操作失败的情况。这个库有一个 std::io::Error 结构体,表示所有可能的 I/O 错误。std::io 中的许多函数会返回 Result<T, E>,其中 E 就是 std::io::Error,例如 Write trait 中的这些函数:
use std::fmt;
use std::io::Error;
pub trait Write {
fn write(&mut self, buf: &[u8]) -> Result<usize, Error>;
fn flush(&mut self) -> Result<(), Error>;
fn write_all(&mut self, buf: &[u8]) -> Result<(), Error>;
fn write_fmt(&mut self, fmt: fmt::Arguments) -> Result<(), Error>;
}Result<..., Error> 被大量重复。因此,std::io 有这个类型别名声明:
use std::fmt;
type Result<T> = std::result::Result<T, std::io::Error>;
pub trait Write {
fn write(&mut self, buf: &[u8]) -> Result<usize>;
fn flush(&mut self) -> Result<()>;
fn write_all(&mut self, buf: &[u8]) -> Result<()>;
fn write_fmt(&mut self, fmt: fmt::Arguments) -> Result<()>;
}因为此声明位于 std::io 模块中,我们可以使用完全限定别名 std::io::Result<T>;也就是说,一个 E 被填充为 std::io::Error 的 Result<T, E>。Write trait 的函数签名最终看起来像这样:
use std::fmt;
type Result<T> = std::result::Result<T, std::io::Error>;
pub trait Write {
fn write(&mut self, buf: &[u8]) -> Result<usize>;
fn flush(&mut self) -> Result<()>;
fn write_all(&mut self, buf: &[u8]) -> Result<()>;
fn write_fmt(&mut self, fmt: fmt::Arguments) -> Result<()>;
}类型别名在两个方面有帮助:它使代码更易于编写,并且它给了我们在整个 std::io 中一致的接口。因为它是一个别名,所以它只是另一个 Result<T, E>,这意味着我们可以对它使用任何适用于 Result<T, E> 的方法,以及像 ? 运算符这样的特殊语法。
永不返回的 Never 类型
Rust 有一个名为 ! 的特殊类型,在类型理论术语中被称为空类型(empty type),因为它没有值。我们更喜欢称它为永不返回类型(never type),因为当函数永远不会返回时,它站在返回类型的位置上。这里有一个例子:
fn bar() -> ! {
// --snip--
panic!();
}这段代码被解读为“函数 bar 返回 never“。返回 never 的函数被称为发散函数(diverging functions)。我们不能创建 ! 类型的值,因此 bar 永远不可能返回。
但是你永远不能创建值的类型有什么用呢?回想一下清单 2-5 中的代码,这是猜数字游戏的一部分;我们在清单 20-27 中重现了其中的一部分。
use std::cmp::Ordering;
use std::io;
use rand::Rng;
fn main() {
println!("Guess the number!");
let secret_number = rand::thread_rng().gen_range(1..=100);
println!("The secret number is: {secret_number}");
loop {
println!("Please input your guess.");
let mut guess = String::new();
// --snip--
io::stdin()
.read_line(&mut guess)
.expect("Failed to read line");
let guess: u32 = match guess.trim().parse() {
Ok(num) => num,
Err(_) => continue,
};
println!("You guessed: {guess}");
// --snip--
match guess.cmp(&secret_number) {
Ordering::Less => println!("Too small!"),
Ordering::Greater => println!("Too big!"),
Ordering::Equal => {
println!("You win!");
break;
}
}
}
}continue 结尾的分支的 match当时,我们跳过了这段代码中的一些细节。在第 6 章中的“match 控制流结构”部分,我们讨论了 match 分支必须都返回相同的类型。因此,例如,以下代码无法工作:
fn main() {
let guess = "3";
let guess = match guess.trim().parse() {
Ok(_) => 5,
Err(_) => "hello",
};
}这段代码中 guess 的类型必须既是整数又是字符串,而 Rust 要求 guess 只能有一个类型。那么,continue 返回了什么?我们怎么能在清单 20-27 中从一个分支返回 u32,而另一个分支以 continue 结尾呢?
正如你可能已经猜到的,continue 具有 ! 值。也就是说,当 Rust 计算 guess 的类型时,它会查看两个匹配分支,前者具有 u32 值,后者具有 ! 值。因为 ! 永远不可能有值,Rust 判定 guess 的类型是 u32。
描述这种行为的正式方式是,! 类型的表达式可以被强制转换为任何其他类型。我们允许用 continue 结束这个 match 分支,因为 continue 不返回值;相反,它将控制权移回到循环的顶部,因此在 Err 的情况下,我们从未给 guess 赋值。
never 类型在 panic! 宏中也很有用。回想一下我们在 Option<T> 值上调用的 unwrap 函数,它要么产生一个值,要么 panic,其定义如下:
enum Option<T> {
Some(T),
None,
}
use crate::Option::*;
impl<T> Option<T> {
pub fn unwrap(self) -> T {
match self {
Some(val) => val,
None => panic!("called `Option::unwrap()` on a `None` value"),
}
}
}在这段代码中,发生与清单 20-27 的 match 相同的事情:Rust 看到 val 的类型是 T,panic! 的类型是 !,因此整个 match 表达式的结果类型是 T。这段代码之所以工作,是因为 panic! 不产生值;它结束程序。在 None 的情况下,我们不会从 unwrap 返回值,因此这段代码是有效的。
最后一个具有 ! 类型的表达式是循环:
fn main() {
print!("forever ");
loop {
print!("and ever ");
}
}这里,循环永远不会结束,因此 ! 是该表达式的值。然而,如果我们包含了一个 break,情况就不是这样了,因为循环在到达 break 时会终止。
动态大小类型和 Sized Trait
Rust 需要知道其类型的某些细节,例如为特定类型的值分配多少空间。这使得其类型系统的一个角落一开始有些令人困惑:动态大小类型(dynamically sized types)的概念。有时被称为 DST 或不定大小类型(unsized types),这些类型让我们可以编写使用那些我们只能在运行时才知道其大小的值的代码。
让我们深入了解一下名为 str 的动态大小类型的细节,我们在本书中一直在使用它。没错,不是 &str,而是单独的 str,就是一种 DST。在许多情况下,例如存储用户输入的文本时,我们直到运行时才知道字符串有多长。这意味着我们不能创建 str 类型的变量,也不能接受 str 类型的参数。考虑以下无法工作的代码:
fn main() {
let s1: str = "Hello there!";
let s2: str = "How's it going?";
}Rust 需要知道如何为特定类型的任何值分配内存,并且一个类型的所有值必须使用相同大小的内存。如果 Rust 允许我们编写这段代码,这两个 str 值将需要占用相同的空间。但它们的长度不同:s1 需要 12 字节的存储空间,而 s2 需要 15 字节。这就是为什么不可能创建一个持有动态大小类型的变量。
那么,我们该怎么办?在这种情况下,你已经知道答案了:我们将 s1 和 s2 的类型设为字符串切片(&str)而不是 str。回顾第 4 章中的“字符串切片”部分,切片数据结构只存储起始位置和切片的长度。因此,虽然 &T 是一个存储 T 所在内存地址的单一值,但一个字符串切片是两个值:str 的地址和它的长度。因此,我们可以在编译时知道一个字符串切片值的大小:它是 usize 长度的两倍。也就是说,无论它所引用的字符串有多长,我们始终知道字符串切片的大小。通常,这就是在 Rust 中使用动态大小类型的方式:它们有一些额外的元数据来存储动态信息的大小。动态大小类型的黄金法则是,我们总是必须将动态大小类型的值放在某种指针的后面。
我们可以将 str 与各种指针组合:例如 Box<str> 或 Rc<str>。实际上,你以前见过这个,但用的是不同的动态大小类型:trait。每个 trait 都是一个动态大小类型,我们可以通过使用 trait 的名称来引用它。在第 18 章的“使用 Trait 对象对共享行为进行抽象”部分,我们提到要将 trait 用作 trait 对象,必须将它们放在指针后面,例如 &dyn Trait 或 Box<dyn Trait>(Rc<dyn Trait> 也可以)。
为了处理 DST,Rust 提供了 Sized trait 来确定一个类型的大小是否在编译时已知。对于所有大小在编译时已知的类型,该 trait 会自动实现。此外,Rust 隐式地为每个泛型函数添加一个 Sized 约束。也就是说,一个像这样的泛型函数定义:
fn generic<T>(t: T) {
// --snip--
}实际上被视为我们编写了这样:
fn generic<T: Sized>(t: T) {
// --snip--
}默认情况下,泛型函数只能用于那些在编译时具有已知大小的类型。然而,你可以使用以下特殊语法来放松这一限制:
fn generic<T: ?Sized>(t: &T) {
// --snip--
}?Sized 上的 trait 约束意味着“T 可能是 Sized,也可能不是“,这种表示法覆盖了泛型类型必须在编译时具有已知大小的默认值。具有此含义的 ?Trait 语法仅适用于 Sized,不适用于任何其他 trait。
还要注意,我们将 t 参数的类型从 T 改为了 &T。因为类型可能不是 Sized,我们需要将其放在某种指针的后面。在这种情况下,我们选择了引用。
接下来,我们将讨论函数和闭包!
高级函数与闭包
高级函数与闭包
本节探讨与函数和闭包相关的一些高级特性,包括函数指针和返回闭包。
函数指针
我们已经讨论过如何将闭包传递给函数;你也可以将常规函数传递给函数!当你想要传递一个已经定义好的函数而不是定义一个新的闭包时,这种技术很有用。函数会强制转换为 fn 类型(小写 f),不要与 Fn 闭包 trait 混淆。fn 类型被称为函数指针(function pointer)。使用函数指针传递函数可以让你将函数作为其他函数的参数使用。
指定参数是函数指针的语法类似于闭包,如清单 20-28 所示,我们定义了一个函数 add_one,它将参数加 1。函数 do_twice 接受两个参数:一个函数指针,指向任何接受 i32 参数并返回 i32 的函数;以及一个 i32 值。do_twice 函数调用函数 f 两次,每次传递 arg 值,然后将两次函数调用的结果相加。main 函数使用参数 add_one 和 5 调用 do_twice。
fn add_one(x: i32) -> i32 {
x + 1
}
fn do_twice(f: fn(i32) -> i32, arg: i32) -> i32 {
f(arg) + f(arg)
}
fn main() {
let answer = do_twice(add_one, 5);
println!("The answer is: {answer}");
}fn 类型接受函数指针作为参数此代码打印 The answer is: 12。我们指定 do_twice 中的参数 f 是一个 fn,它接受一个 i32 类型的参数并返回一个 i32。然后我们可以在 do_twice 的函数体中调用 f。在 main 中,我们可以将函数名 add_one 作为第一个参数传递给 do_twice。
与闭包不同,fn 是一种类型而不是 trait,因此我们直接指定 fn 作为参数类型,而不是用某个 Fn trait 作为 trait 约束来声明泛型类型参数。
函数指针实现了所有三种闭包 trait(Fn、FnMut 和 FnOnce),这意味着你始终可以将函数指针作为参数传递给期望闭包的函数。最好使用泛型类型和其中一个闭包 trait 来编写函数,这样你的函数就可以接受函数或闭包。
话虽如此,你只想接受 fn 而不接受闭包的一个例子是与没有闭包的外部代码交互时:C 函数可以接受函数作为参数,但 C 没有闭包。
作为一个可以使用内联定义的闭包或命名函数的例子,我们来看一下标准库中 Iterator trait 提供的 map 方法的一个用法。要使用 map 方法将数字向量转换为字符串向量,我们可以使用闭包,如清单 20-29 所示。
fn main() {
let list_of_numbers = vec![1, 2, 3];
let list_of_strings: Vec<String> =
list_of_numbers.iter().map(|i| i.to_string()).collect();
}map 方法一起使用,将数字转换为字符串或者,我们可以将一个命名函数作为 map 的参数,而不是闭包。清单 20-30 展示了这种形式。
fn main() {
let list_of_numbers = vec![1, 2, 3];
let list_of_strings: Vec<String> =
list_of_numbers.iter().map(ToString::to_string).collect();
}String::to_string 函数结合 map 方法将数字转换为字符串请注意,我们必须使用在“高级 Trait”部分中讨论的完全限定语法,因为有多个名为 to_string 的函数可用。
在这里,我们使用了定义在 ToString trait 中的 to_string 函数,标准库为任何实现了 Display 的类型实现了该 trait。
回顾第 6 章中的“枚举值”部分,我们定义的每个枚举变体的名称也是一个初始化函数。我们可以将这些初始化函数用作实现闭包 trait 的函数指针,这意味着我们可以将初始化函数指定为接受闭包的方法的参数,如清单 20-31 所示。
fn main() {
enum Status {
Value(u32),
Stop,
}
let list_of_statuses: Vec<Status> = (0u32..20).map(Status::Value).collect();
}map 方法从数字创建 Status 实例在这里,我们通过使用 Status::Value 的初始化函数,使用 map 调用的范围内每个 u32 值创建了 Status::Value 实例。有些人喜欢这种风格,有些人则喜欢使用闭包。它们编译成相同的代码,因此使用你觉得更清晰的风格即可。
返回闭包
闭包由 trait 表示,这意味着你不能直接返回闭包。在大多数情况下,你可能想要返回一个 trait,你可以使用实现了该 trait 的具体类型作为函数的返回值。但通常你不能对闭包这样做,因为它们没有可以返回的具体类型;例如,如果闭包从其作用域捕获了任何值,则不允许使用函数指针 fn 作为返回类型。
相反,你通常会使用我们在第 10 章学到的 impl Trait 语法。你可以使用 Fn、FnOnce 和 FnMut 返回任何函数类型。例如,清单 20-32 中的代码将编译通过。
#![allow(unused)]
fn main() {
fn returns_closure() -> impl Fn(i32) -> i32 {
|x| x + 1
}
}impl Trait 语法从函数返回闭包然而,正如我们在第 13 章的“推断和标注闭包类型”部分中指出的,每个闭包也是其自身的独特类型。如果你需要处理多个具有相同签名但不同实现的函数,则需要对它们使用 trait 对象。考虑如果你编写类似清单 20-33 所示的代码会发生什么。
fn main() {
let handlers = vec![returns_closure(), returns_initialized_closure(123)];
for handler in handlers {
let output = handler(5);
println!("{output}");
}
}
fn returns_closure() -> impl Fn(i32) -> i32 {
|x| x + 1
}
fn returns_initialized_closure(init: i32) -> impl Fn(i32) -> i32 {
move |x| x + init
}impl Fn 类型的函数定义的闭包的 Vec<T>这里我们有两个函数,returns_closure 和 returns_initialized_closure,它们都返回 impl Fn(i32) -> i32。请注意,它们返回的闭包是不同的,即使它们实现了相同的类型。如果我们尝试编译,Rust 会告诉我们它无法工作:
$ cargo build
Compiling functions-example v0.1.0 (file:///projects/functions-example)
error[E0308]: mismatched types
--> src/main.rs:2:44
|
2 | let handlers = vec![returns_closure(), returns_initialized_closure(123)];
| ^^^^^^^^^^^^^^^^^^^^^^^^^^^^^^^^ expected opaque type, found a different opaque type
...
9 | fn returns_closure() -> impl Fn(i32) -> i32 {
| ------------------- the expected opaque type
...
13 | fn returns_initialized_closure(init: i32) -> impl Fn(i32) -> i32 {
| ------------------- the found opaque type
|
= note: expected opaque type `impl Fn(i32) -> i32`
found opaque type `impl Fn(i32) -> i32`
= note: distinct uses of `impl Trait` result in different opaque types
For more information about this error, try `rustc --explain E0308`.
error: could not compile `functions-example` (bin "functions-example") due to 1 previous error
错误消息告诉我们,每当我们返回 impl Trait 时,Rust 会创建一个唯一的不透明类型(opaque type),这是一种我们无法看到 Rust 为我们构造的细节的类型,也无法猜测 Rust 会生成什么类型来自己编写。因此,即使这些函数返回实现相同 trait Fn(i32) -> i32 的闭包,Rust 为每个函数生成的不透明类型也是不同的。(这类似于 Rust 如何为不同的异步块生成不同的具体类型,即使它们具有相同的输出类型,正如我们在第 17 章的“Pin 类型和 Unpin Trait”中看到的。)我们已经见过这个问题的解决方案几次了:我们可以使用 trait 对象,如清单 20-34 所示。
fn main() {
let handlers = vec![returns_closure(), returns_initialized_closure(123)];
for handler in handlers {
let output = handler(5);
println!("{output}");
}
}
fn returns_closure() -> Box<dyn Fn(i32) -> i32> {
Box::new(|x| x + 1)
}
fn returns_initialized_closure(init: i32) -> Box<dyn Fn(i32) -> i32> {
Box::new(move |x| x + init)
}Box<dyn Fn> 的函数定义的闭包的 Vec<T>,使它们具有相同的类型这段代码将编译通过。有关 trait 对象的更多信息,请参阅第 18 章中的“使用 Trait 对象对共享行为进行抽象”部分。
接下来,让我们看看宏!
宏
宏
在本书中,我们一直在使用像 println! 这样的宏,但我们还没有完全探讨什么是宏以及它是如何工作的。术语*宏(macro)*指的是 Rust 中的一系列特性——使用 macro_rules! 的声明式宏(declarative macros)和三种过程宏(procedural macros):
- 自定义
#[derive]宏,指定用derive属性添加的代码,用于结构体和枚举 - 类属性宏(Attribute-like macros),定义可用于任何项的自定义属性
- 类函数宏(Function-like macros),看起来像函数调用但操作指定为参数的标记(tokens)
我们将依次讨论每种宏,但首先,让我们看看为什么在已经有函数的情况下还需要宏。
宏与函数的区别
从根本上说,宏是一种编写能生成其他代码的代码的方式,这被称为元编程(metaprogramming)。在附录 C 中,我们讨论了 derive 属性,它会为你生成各种 trait 的实现。我们在本书中也使用了 println! 和 vec! 宏。所有这些宏都会展开(expand),生成比你手动编写的更多的代码。
元编程对于减少你必须编写和维护的代码量非常有用,这也是函数的作用之一。然而,宏具有一些函数没有的额外能力。
函数签名必须声明函数的参数数量和类型。而宏则可以接受可变数量的参数:我们可以用一个参数调用 println!("hello"),或者用两个参数调用 println!("hello {}", name)。此外,宏在编译器解释代码含义之前展开,因此宏可以例如在给定类型上实现 trait。函数不能这样做,因为它在运行时被调用,而 trait 需要在编译时实现。
实现宏而非函数的缺点是,宏定义比函数定义更复杂,因为你编写的是生成 Rust 代码的 Rust 代码。由于这种间接性,宏定义通常比函数定义更难阅读、理解和维护。
宏和函数之间的另一个重要区别是,你必须在文件中之前定义宏或将其引入作用域,然后才能调用它,而函数则可以在任何位置定义并在任何位置调用。
用于通用元编程的声明式宏
Rust 中应用最广泛的宏形式是声明式宏(declarative macro)。这些有时也被称为“示例宏(macros by example)“、”macro_rules! 宏“或简称为“宏“。其核心是,声明式宏允许你编写类似于 Rust match 表达式的东西。如第 6 章所述,match 表达式是一种控制结构,它接受一个表达式,将表达式的结果值与模式进行比较,然后运行与匹配模式关联的代码。宏也将一个值与与特定代码关联的模式进行比较:在这种情况下,该值是传递给宏的字面 Rust 源代码;模式与这些源代码的结构进行比较;当匹配时,与每个模式关联的代码会替换传递给宏的代码。这一切都发生在编译期间。
要定义一个宏,你可以使用 macro_rules! 结构。让我们通过查看 vec! 宏的定义来探索如何使用 macro_rules!。第 8 章介绍了如何使用 vec! 宏创建一个包含特定值的新向量。例如,以下宏创建一个包含三个整数的新向量:
#![allow(unused)]
fn main() {
let v: Vec<u32> = vec![1, 2, 3];
}我们也可以使用 vec! 宏创建包含两个整数或五个字符串切片的向量。我们不能使用函数来做同样的事情,因为我们无法预先知道值的数量或类型。
清单 20-35 显示了 vec! 宏的一个略微简化的定义。
#[macro_export]
macro_rules! vec {
( $( $x:expr ),* ) => {
{
let mut temp_vec = Vec::new();
$(
temp_vec.push($x);
)*
temp_vec
}
};
}vec! 宏定义注意:标准库中
vec!宏的实际定义包括预先分配正确内存量的代码。我们在这里不包含这些代码,它是一个优化,以使示例更简单。
#[macro_export] 标注表明,只要定义了该宏的 crate 被引入作用域,该宏就应该可用。如果没有这个标注,宏就不能被引入作用域。
然后,我们以 macro_rules! 和我们正在定义的宏名称(不带感叹号)开始宏定义。名称(本例中为 vec)后面跟着花括号,表示宏定义的主体。
vec! 主体中的结构类似于 match 表达式的结构。这里我们有一个分支,模式为 ( $( $x:expr ),* ),后跟 => 和与此模式关联的代码块。如果模式匹配,将发出关联的代码块。由于这是此宏中唯一的模式,因此只有一种有效的匹配方式;任何其他模式都会导致错误。更复杂的宏会有多个分支。
宏定义中有效的模式语法与第 19 章中介绍的模式语法不同,因为宏模式是与 Rust 代码结构而不是值进行匹配。让我们逐步分析清单 20-29 中的模式各部分含义;完整的宏模式语法请参阅 Rust 参考文档。
首先,我们使用一组圆括号来包含整个模式。我们使用美元符号($)在宏系统中声明一个变量,该变量将包含与模式匹配的 Rust 代码。美元符号使这一点很明确:这是宏变量而非常规 Rust 变量。接下来是一组圆括号,用于捕获与括号内模式匹配的值,以便在替换代码中使用。在 $() 内部是 $x:expr,它匹配任何 Rust 表达式,并将该表达式命名为 $x。
$() 后面的逗号表示,在匹配 $() 内代码的每个实例之间必须出现一个字面逗号分隔符字符。* 指定该模式匹配零个或多个 * 之前的任何内容。
当我们使用 vec![1, 2, 3]; 调用此宏时,$x 模式会与三个表达式 1、2 和 3 匹配三次。
现在让我们看看与此分支关联的代码体内的模式:$()* 内的 temp_vec.push() 会为每个匹配 $() 的部分生成,次数取决于模式匹配的次数(零次或多次)。$x 被替换为每个匹配的表达式。当我们使用 vec![1, 2, 3]; 调用此宏时,替换此宏调用生成的代码如下:
{
let mut temp_vec = Vec::new();
temp_vec.push(1);
temp_vec.push(2);
temp_vec.push(3);
temp_vec
}我们定义了一个可以接受任意数量任意类型参数的宏,并且可以生成创建包含指定元素的向量的代码。
要了解更多关于如何编写宏的信息,请查阅在线文档或其他资源,例如 Daniel Keep 始创、Lukas Wirth 继续维护的“The Little Book of Rust Macros”。
用于从属性生成代码的过程宏
第二种宏形式是过程宏(procedural macro),它更像一个函数(并且是一种过程)。过程宏接受一些代码作为输入,对这些代码进行操作,并产生一些代码作为输出,而不是像声明式宏那样匹配模式并用其他代码替换代码。三种过程宏是自定义 derive 宏、类属性宏和类函数宏,它们都以类似的方式工作。
创建过程宏时,定义必须位于具有特殊 crate 类型的自己的 crate 中。这是因为复杂的技术原因,我们希望在将来消除这些原因。在清单 20-36 中,我们展示了如何定义一个过程宏,其中 some_attribute 是使用特定宏变种的占位符。
use proc_macro::TokenStream;
#[some_attribute]
pub fn some_name(input: TokenStream) -> TokenStream {
}定义过程宏的函数接受一个 TokenStream 作为输入,并产生一个 TokenStream 作为输出。TokenStream 类型由 Rust 自带的 proc_macro crate 定义,表示一系列标记(tokens)。这是宏的核心:宏操作的源代码构成输入 TokenStream,而宏产生的代码是输出 TokenStream。该函数还附加了一个属性,指定我们正在创建哪种过程宏。我们可以在同一个 crate 中拥有多种过程宏。
让我们看看不同类型的过程宏。我们将从自定义 derive 宏开始,然后解释使其他形式不同的细微差异。
自定义 derive 宏
让我们创建一个名为 hello_macro 的 crate,它定义了一个名为 HelloMacro 的 trait,其中带有一个名为 hello_macro 的关联函数。我们不会让用户为他们的每种类型都实现 HelloMacro trait,而是提供一个过程宏,以便用户可以用 #[derive(HelloMacro)] 标注其类型,从而获得 hello_macro 函数的默认实现。默认实现将打印 Hello, Macro! My name is TypeName!,其中 TypeName 是定义了该 trait 的类型名称。换句话说,我们将编写一个 crate,使另一个程序员能够使用我们的 crate 编写类似清单 20-37 的代码。
use hello_macro::HelloMacro;
use hello_macro_derive::HelloMacro;
#[derive(HelloMacro)]
struct Pancakes;
fn main() {
Pancakes::hello_macro();
}当我们完成时,这段代码将打印 Hello, Macro! My name is Pancakes!。第一步是创建一个新的库 crate,如下所示:
$ cargo new hello_macro --lib
接下来,在清单 20-38 中,我们将定义 HelloMacro trait 及其关联函数。
pub trait HelloMacro {
fn hello_macro();
}derive 宏一起使用的简单 trait我们有一个 trait 及其函数。此时,我们的 crate 用户可以实现该 trait 以获得所需功能,如清单 20-39 所示。
use hello_macro::HelloMacro;
struct Pancakes;
impl HelloMacro for Pancakes {
fn hello_macro() {
println!("Hello, Macro! My name is Pancakes!");
}
}
fn main() {
Pancakes::hello_macro();
}HelloMacro trait 会是什么样子然而,他们需要为每个想要使用 hello_macro 的类型编写实现块;我们希望免去他们做这项工作。
此外,我们还不能提供能够打印实现该 trait 的类型名称的 hello_macro 函数默认实现:Rust 没有反射(reflection)能力,因此它无法在运行时查找类型名称。我们需要一个宏在编译时生成代码。
下一步是定义过程宏。在撰写本文时,过程宏需要位于它们自己的 crate 中。最终,这个限制可能会被解除。组织 crate 和宏 crate 的约定如下:对于一个名为 foo 的 crate,自定义 derive 过程宏 crate 称为 foo_derive。让我们在 hello_macro 项目中启动一个名为 hello_macro_derive 的新 crate:
$ cargo new hello_macro_derive --lib
我们的两个 crate 紧密相关,因此我们在 hello_macro crate 的目录中创建过程宏 crate。如果我们更改 hello_macro 中的 trait 定义,我们将不得不同时更改 hello_macro_derive 中过程宏的实现。这两个 crate 需要分别发布,使用这些 crate 的程序员需要将两者都添加为依赖并将它们都引入作用域。我们也可以让 hello_macro crate 将 hello_macro_derive 作为依赖并使用并重新导出过程宏代码。然而,我们这样组织项目的方式使得即使程序员不想使用 derive 功能,也可以使用 hello_macro。
我们需要将 hello_macro_derive crate 声明为过程宏 crate。我们还需要来自 syn 和 quote crate 的功能,你稍后会看到,因此我们需要将它们添加为依赖。将以下内容添加到 hello_macro_derive 的 Cargo.toml 文件中:
[lib]
proc-macro = true
[dependencies]
syn = "2.0"
quote = "1.0"
要开始定义过程宏,请将清单 20-40 中的代码放入 hello_macro_derive crate 的 src/lib.rs 文件中。请注意,在添加 impl_hello_macro 函数的定义之前,此代码将无法编译。
use proc_macro::TokenStream;
use quote::quote;
#[proc_macro_derive(HelloMacro)]
pub fn hello_macro_derive(input: TokenStream) -> TokenStream {
// Construct a representation of Rust code as a syntax tree
// that we can manipulate.
let ast = syn::parse(input).unwrap();
// Build the trait implementation.
impl_hello_macro(&ast)
}注意,我们将代码拆分为 hello_macro_derive 函数(负责解析 TokenStream)和 impl_hello_macro 函数(负责转换语法树):这使得编写过程宏更加方便。外部函数(这里指 hello_macro_derive)中的代码对于你看到或创建的大多数过程宏 crate 来说都是相同的。你在内部函数(这里指 impl_hello_macro)主体中指定的代码将根据你的过程宏目的而有所不同。
我们引入了三个新的 crate:proc_macro、syn 和 quote。proc_macro crate 随 Rust 自带,因此我们不需要将其添加到 Cargo.toml 的依赖中。proc_macro crate 是编译器的 API,允许我们从我们的代码中读取和操作 Rust 代码。
syn crate 将 Rust 代码从字符串解析为我们可以执行操作的数据结构。quote crate 将 syn 的数据结构转换回 Rust 代码。这些 crate 使得解析我们可能想要处理的任何类型的 Rust 代码变得更加简单:为 Rust 代码编写完整的解析器不是一项简单的任务。
当我们的库用户在一个类型上指定 #[derive(HelloMacro)] 时,hello_macro_derive 函数将被调用。这是可能的,因为我们在这里用 proc_macro_derive 标注了 hello_macro_derive 函数,并指定了名称 HelloMacro,它与我们的 trait 名称匹配;这是大多数过程宏遵循的约定。
hello_macro_derive 函数首先将 input 从 TokenStream 转换为我们能够解释并执行操作的数据结构。这就是 syn 发挥作用的地方。syn 中的 parse 函数接受一个 TokenStream 并返回一个 DeriveInput 结构体,表示解析后的 Rust 代码。清单 20-41 显示了从解析 struct Pancakes; 字符串得到的 DeriveInput 结构体的相关部分。
DeriveInput {
// --snip--
ident: Ident {
ident: "Pancakes",
span: #0 bytes(95..103)
},
data: Struct(
DataStruct {
struct_token: Struct,
fields: Unit,
semi_token: Some(
Semi
)
}
)
}DeriveInput 实例该结构体的字段显示我们解析的 Rust 代码是一个标识符(ident,即名称)为 Pancakes 的单元结构体(unit struct)。该结构体上还有更多用于描述各种 Rust 代码的字段;请查看 syn 文档中的 DeriveInput 以获取更多信息。
稍后我们将定义 impl_hello_macro 函数,这是我们构建想要包含的新 Rust 代码的地方。但在此之前,请注意,我们的 derive 宏的输出也是一个 TokenStream。返回的 TokenStream 被添加到我们的 crate 用户编写的代码中,因此当他们编译自己的 crate 时,他们将获得我们在修改后的 TokenStream 中提供的额外功能。
你可能已经注意到,我们在这里调用 unwrap 来使 hello_macro_derive 函数在调用 syn::parse 函数失败时 panic。过程宏在错误时 panic 是必要的,因为 proc_macro_derive 函数必须返回 TokenStream 而不是 Result,以符合过程宏 API。我们通过使用 unwrap 简化了此示例;在生产代码中,你应该使用 panic! 或 expect 提供关于出错的更具体错误消息。
现在我们有了将标注的 Rust 代码从 TokenStream 转换为 DeriveInput 实例的代码,让我们生成在被标注类型上实现 HelloMacro trait 的代码,如清单 20-42 所示。
use proc_macro::TokenStream;
use quote::quote;
#[proc_macro_derive(HelloMacro)]
pub fn hello_macro_derive(input: TokenStream) -> TokenStream {
// Construct a representation of Rust code as a syntax tree
// that we can manipulate
let ast = syn::parse(input).unwrap();
// Build the trait implementation
impl_hello_macro(&ast)
}
fn impl_hello_macro(ast: &syn::DeriveInput) -> TokenStream {
let name = &ast.ident;
let generated = quote! {
impl HelloMacro for #name {
fn hello_macro() {
println!("Hello, Macro! My name is {}!", stringify!(#name));
}
}
};
generated.into()
}HelloMacro trait我们使用 ast.ident 获取一个包含被标注类型名称(标识符)的 Ident 结构体实例。清单 20-41 中的结构体显示,当我们在清单 20-37 的代码上运行 impl_hello_macro 函数时,我们得到的 ident 将具有值为 "Pancakes" 的 ident 字段。因此,清单 20-42 中的 name 变量将包含一个 Ident 结构体实例,打印时将是字符串 "Pancakes",即清单 20-37 中结构体的名称。
quote! 宏让我们定义想要返回的 Rust 代码。编译器期望的结果与 quote! 宏直接执行的结果不同,因此我们需要将其转换为 TokenStream。我们通过调用 into 方法来实现,该方法消费这个中间表示并返回所需的 TokenStream 类型值。
quote! 宏还提供了一些非常酷的模板机制:我们可以输入 #name,quote! 将用变量 name 中的值替换它。你甚至可以做一些类似于常规宏工作的重复。请查看 quote crate 的文档以获取全面的介绍。
我们希望我们的过程宏为用户标注的类型生成 HelloMacro trait 的实现,我们可以通过使用 #name 来获得。trait 实现有一个函数 hello_macro,其函数体包含我们想要提供的功能:打印 Hello, Macro! My name is,然后是被标注类型的名称。
这里使用的 stringify! 宏是 Rust 内置的。它获取一个 Rust 表达式,例如 1 + 2,并在编译时将该表达式转换为字符串字面量,例如 "1 + 2"。这与 format! 或 println! 不同,后两者是求值表达式然后将结果转换为 String 的宏。#name 输入有可能是一个要逐字打印的表达式,因此我们使用 stringify!。使用 stringify! 还通过在编译时将 #name 转换为字符串字面量来节省一次分配。
此时,cargo build 应该在 hello_macro 和 hello_macro_derive 中都成功完成。让我们将这些 crate 连接到清单 20-37 中的代码,看看过程宏的运行效果!使用 cargo new pancakes 在你的 projects 目录中创建一个新的二进制项目。我们需要在 pancakes crate 的 Cargo.toml 中将 hello_macro 和 hello_macro_derive 添加为依赖。如果你将你的 hello_macro 和 hello_macro_derive 版本发布到 crates.io,它们将是常规依赖;如果没有,你可以将它们指定为 path 依赖,如下所示:
[dependencies]
hello_macro = { path = "../hello_macro" }
hello_macro_derive = { path = "../hello_macro/hello_macro_derive" }
将清单 20-37 中的代码放入 src/main.rs 中,然后运行 cargo run:它应该打印 Hello, Macro! My name is Pancakes!。来自过程宏的 HelloMacro trait 的实现已被包含,而无需 pancakes crate 自行实现;#[derive(HelloMacro)] 添加了 trait 的实现。
接下来,让我们探讨其他类型的过程宏与自定义 derive 宏的不同之处。
类属性宏
类属性宏(Attribute-like macros)类似于自定义 derive 宏,但它们允许你创建新的属性,而不是为 derive 属性生成代码。它们也更加灵活:derive 仅适用于结构体和枚举;属性也可以应用于其他项,例如函数。以下是一个使用类属性宏的示例。假设你有一个名为 route 的属性,在使用 Web 应用程序框架时标注函数:
#[route(GET, "/")]
fn index() {这个 #[route] 属性将由框架定义为过程宏。宏定义函数的签名如下所示:
#[proc_macro_attribute]
pub fn route(attr: TokenStream, item: TokenStream) -> TokenStream {这里,我们有两个 TokenStream 类型的参数。第一个用于属性的内容:GET, "/" 部分。第二个是属性所附加的项的主体:这里指 fn index() {} 以及函数体的其余部分。
除此之外,类属性宏的工作方式与自定义 derive 宏相同:你需要创建一个具有 proc-macro crate 类型的 crate,并实现一个生成你所需代码的函数!
类函数宏
类函数宏(Function-like macros)定义了看起来像函数调用的宏。与 macro_rules! 宏类似,它们比函数更灵活;例如,它们可以接受未知数量的参数。然而,macro_rules! 宏只能使用我们之前在“用于通用元编程的声明式宏”部分讨论的类似匹配的语法来定义。类函数宏接受一个 TokenStream 参数,并且它们的定义使用 Rust 代码操作该 TokenStream,正如其他两种过程宏所做的那样。类函数宏的一个例子是 sql! 宏,它可能像这样被调用:
let sql = sql!(SELECT * FROM posts WHERE id=1);这个宏将解析其中的 SQL 语句并检查其语法是否正确,这比 macro_rules! 宏能做的处理要复杂得多。sql! 宏的定义如下:
#[proc_macro]
pub fn sql(input: TokenStream) -> TokenStream {这个定义类似于自定义 derive 宏的签名:我们接收括号内的标记(tokens),并返回我们想要生成的代码。
总结
呼!现在你的工具箱中有了一些你可能不常用的 Rust 特性,但你会知道它们在非常特定的情况下是可用的。我们介绍了几个复杂的主题,这样当你在错误消息建议中或他人的代码中遇到它们时,你将能够识别这些概念和语法。将本章作为指导你找到解决方案的参考。
接下来,我们将把本书中讨论的所有内容付诸实践,再做最后一个项目!
最终项目:构建多线程 Web 服务器
这是一段漫长的旅程,但我们终于到达了本书的结尾。在本章中,我们将一起构建另一个项目,以演示我们在最后几章中涵盖的一些概念,并回顾之前的一些课程。
对于我们的最终项目,我们将制作一个显示“Hello!“的 Web 服务器,在 Web 浏览器中看起来像图 21-1。
以下是构建 Web 服务器的计划:
- 了解一点 TCP 和 HTTP。
- 在套接字(socket)上监听 TCP 连接。
- 解析少量的 HTTP 请求。
- 创建正确的 HTTP 响应。
- 通过线程池(thread pool)提高服务器的吞吐量。
<img alt=“Web 浏览器访问地址 127.0.0.1:8080 的截图,显示一个包含文本内容“Hello! Hi from Rust“的网页” src=“img/trpl21-01.png” class=“center” style=“width: 50%;” />
图 21-1:我们最后的共享项目
在开始之前,我们应该提及两点。首先,我们将使用的方法不是用 Rust 构建 Web 服务器的最佳方式。社区成员已经在 crates.io 上发布了许多生产就绪的 crate,提供了比我们将要构建的更完整的 Web 服务器和线程池实现。然而,我们在本章中的目的是帮助你学习,而不是走捷径。因为 Rust 是一种系统编程语言,我们可以选择我们想要工作的抽象级别,并且可以深入到其他语言中可能或实际无法实现的更低级别。
其次,我们这里不会使用 async 和 await。构建线程池本身就是一个足够大的挑战,更不用说还要构建异步运行时了!然而,我们将指出 async 和 await 可能如何适用于我们将在本章中看到的某些相同问题。最终,正如我们在第 17 章中指出的,许多异步运行时使用线程池来管理工作。
因此,我们将手动编写基础的 HTTP 服务器和线程池,以便你能够了解你将来可能使用的 crate 背后的一般思路和技术。
构建单线程 Web 服务器
构建单线程 Web 服务器
我们将从让一个单线程 Web 服务器开始工作。在开始之前,让我们快速浏览一下构建 Web 服务器所涉及的协议。这些协议的细节超出了本书的范围,但一个简要的概述将为你提供所需的信息。
构建 Web 服务器涉及的两个主要协议是超文本传输协议(Hypertext Transfer Protocol,HTTP)和传输控制协议(Transmission Control Protocol,TCP)。这两个协议都是*请求-响应(request-response)协议,意味着客户端(client)*发起请求,*服务器(server)*监听请求并向客户端提供响应。这些请求和响应的内容由协议定义。
TCP 是较低层的协议,描述了信息如何从一个服务器传输到另一个服务器,但不指定这些信息是什么。HTTP 建立在 TCP 之上,通过定义请求和响应的内容来实现。从技术上讲,可以将 HTTP 与其他协议一起使用,但在绝大多数情况下,HTTP 通过 TCP 发送其数据。我们将处理 TCP 和 HTTP 请求与响应的原始字节。
监听 TCP 连接
我们的 Web 服务器需要监听 TCP 连接,因此这是我们首先要处理的部分。标准库提供了一个 std::net 模块,让我们可以做到这一点。让我们按照通常的方式创建一个新项目:
$ cargo new hello
Created binary (application) `hello` project
$ cd hello
现在在 src/main.rs 中输入清单 21-1 中的代码来开始。这段代码将在本地地址 127.0.0.1:7878 上监听传入的 TCP 流。当它接收到一个传入流时,会打印 Connection established!。
use std::net::TcpListener;
fn main() {
let listener = TcpListener::bind("127.0.0.1:7878").unwrap();
for stream in listener.incoming() {
let stream = stream.unwrap();
println!("Connection established!");
}
}使用 TcpListener,我们可以在地址 127.0.0.1:7878 上监听 TCP 连接。在地址中,冒号之前的部分是代表你计算机的 IP 地址(这在每台计算机上都是相同的,并不特指作者的计算机),而 7878 是端口。我们选择这个端口有两个原因:HTTP 通常不接受此端口上的连接,因此我们的服务器不太可能与你可能在机器上运行的其他 Web 服务器冲突,而且 7878 是电话键盘上拼写为 rust 的数字。
这个场景中的 bind 函数类似于 new 函数,它会返回一个新的 TcpListener 实例。这个函数被称为 bind,因为在网络中,连接到一个端口进行监听被称为“绑定到一个端口(binding to a port)“。
bind 函数返回一个 Result<T, E>,这表明绑定可能失败,例如,如果我们运行了两个程序实例并导致两个程序监听同一个端口。由于我们只是为了学习目的而编写一个基础服务器,我们不会担心处理这类错误;相反,如果发生错误,我们使用 unwrap 来停止程序。
TcpListener 上的 incoming 方法返回一个迭代器,为我们提供一连串的流(更具体地说,是 TcpStream 类型的流)。一个*流(stream)*表示客户端和服务器之间的开放连接。*连接(connection)*是指完整的请求和响应过程,其中客户端连接到服务器,服务器生成响应,然后服务器关闭连接。因此,我们将从 TcpStream 读取以查看客户端发送了什么,然后将我们的响应写入流以将数据发送回客户端。总的来说,这个 for 循环将依次处理每个连接,并产生一连串的流供我们处理。
目前,我们对流的处理包括调用 unwrap 来在流出现任何错误时终止程序;如果没有错误,程序会打印一条消息。我们将在下一个清单中添加针对成功情况的更多功能。当客户端连接到服务器时,我们可能从 incoming 方法收到错误的原因是我们实际上不是在遍历连接。相反,我们是在遍历连接尝试(connection attempts)。连接可能由于多种原因而不成功,其中许多原因与操作系统有关。例如,许多操作系统对它们可以同时支持的开放连接数量有限制;超过该数量的新连接尝试将产生错误,直到一些开放连接被关闭。
让我们尝试运行这段代码!在终端中调用 cargo run,然后在 Web 浏览器中加载 127.0.0.1:7878。浏览器应该显示一条错误消息,比如“Connection reset(连接重置)“,因为服务器目前还没有发送任何数据。但是当你查看终端时,应该会看到浏览器连接到服务器时打印的几条消息!
Running `target/debug/hello`
Connection established!
Connection established!
Connection established!
有时你会看到一次浏览器请求打印多条消息;原因可能是浏览器在请求页面的同时,也在请求其他资源,比如浏览器标签中出现的 favicon.ico 图标。
也可能是浏览器试图多次连接服务器,因为服务器没有响应任何数据。当 stream 在循环结束时超出作用域并被丢弃时,连接会作为 drop 实现的一部分被关闭。浏览器有时会通过重试来处理关闭的连接,因为问题可能是暂时的。
浏览器有时也会打开多个到服务器的连接而不发送任何请求,以便如果它们确实稍后发送请求,这些请求可以更快地发生。当这种情况发生时,我们的服务器会看到每个连接,无论该连接上是否有任何请求。例如,许多基于 Chrome 的浏览器版本都会这样做;你可以通过使用隐私浏览模式或使用不同的浏览器来禁用该优化。
关键是我们已经成功获得了一个 TCP 连接的句柄!
请记住在运行完特定版本的代码后按 ctrl-C 停止程序。然后,在进行每组代码更改后,通过调用 cargo run 命令重新启动程序,以确保你正在运行最新的代码。
读取请求
让我们实现从浏览器读取请求的功能!为了分离“先获取连接“和“然后对连接执行某些操作“这两个关注点,我们将启动一个新的函数来处理连接。在这个新的 handle_connection 函数中,我们将从 TCP 流中读取数据并打印出来,以便我们可以看到从浏览器发送的数据。将代码改为清单 21-2 所示。
use std::{
io::{BufReader, prelude::*},
net::{TcpListener, TcpStream},
};
fn main() {
let listener = TcpListener::bind("127.0.0.1:7878").unwrap();
for stream in listener.incoming() {
let stream = stream.unwrap();
handle_connection(stream);
}
}
fn handle_connection(mut stream: TcpStream) {
let buf_reader = BufReader::new(&stream);
let http_request: Vec<_> = buf_reader
.lines()
.map(|result| result.unwrap())
.take_while(|line| !line.is_empty())
.collect();
println!("Request: {http_request:#?}");
}TcpStream 读取并打印数据我们将 std::io::BufReader 和 std::io::prelude 引入作用域,以便访问允许我们从流读取和写入的 trait 和类型。在 main 函数的 for 循环中,我们不再打印表示建立连接的消息,而是调用新的 handle_connection 函数并将 stream 传递给它。
在 handle_connection 函数中,我们创建了一个新的 BufReader 实例,它包装了对 stream 的引用。BufReader 通过为我们管理对 std::io::Read trait 方法的调用来添加缓冲功能。
我们创建一个名为 http_request 的变量来收集浏览器发送给服务器的请求行。我们通过添加 Vec<_> 类型标注来表示我们希望将所有这些行收集到一个向量中。
BufReader 实现了 std::io::BufRead trait,它提供了 lines 方法。lines 方法每当遇到换行字节时就将数据流分割,返回一个 Result<String, std::io::Error> 的迭代器。为了获取每个 String,我们对每个 Result 进行 map 和 unwrap。如果数据不是有效的 UTF-8,或者从流中读取时出现问题,Result 可能是错误。同样,生产程序应更优雅地处理这些错误,但为简单起见,我们选择在出错时停止程序。
浏览器通过连续发送两个换行符来表示 HTTP 请求的结束,因此要从流中获取一个请求,我们逐行读取,直到得到一个空字符串行。一旦我们将这些行收集到向量中,就使用漂亮的调试格式将其打印出来,以便查看 Web 浏览器发送给我们的服务器的指令。
让我们尝试这段代码!启动程序,再次在 Web 浏览器中发起请求。请注意,浏览器中仍然会显示错误页面,但我们的程序在终端中的输出现在将类似于这样:
$ cargo run
Compiling hello v0.1.0 (file:///projects/hello)
Finished `dev` profile [unoptimized + debuginfo] target(s) in 0.42s
Running `target/debug/hello`
Request: [
"GET / HTTP/1.1",
"Host: 127.0.0.1:7878",
"User-Agent: Mozilla/5.0 (Macintosh; Intel Mac OS X 10.15; rv:99.0) Gecko/20100101 Firefox/99.0",
"Accept: text/html,application/xhtml+xml,application/xml;q=0.9,image/avif,image/webp,*/*;q=0.8",
"Accept-Language: en-US,en;q=0.5",
"Accept-Encoding: gzip, deflate, br",
"DNT: 1",
"Connection: keep-alive",
"Upgrade-Insecure-Requests: 1",
"Sec-Fetch-Dest: document",
"Sec-Fetch-Mode: navigate",
"Sec-Fetch-Site: none",
"Sec-Fetch-User: ?1",
"Cache-Control: max-age=0",
]
根据你的浏览器,你可能会得到略有不同的输出。既然我们正在打印请求数据,我们可以通过查看请求第一行中 GET 之后的路径,来了解为什么从一个浏览器请求会得到多个连接。如果重复的连接都在请求 /,我们就知道浏览器因为未从我们的程序获得响应而重复尝试获取 /。
让我们分解这些请求数据,以理解浏览器在向我们的程序请求什么。
更仔细地查看 HTTP 请求
HTTP 是一种基于文本的协议,请求采用以下格式:
Method Request-URI HTTP-Version CRLF
headers CRLF
message-body
第一行是请求行(request line),包含关于客户端正在请求的信息。请求行的第一部分表示正在使用的方法,例如 GET 或 POST,它描述了客户端如何发起这个请求。我们的客户端使用了 GET 请求,这意味着它在请求信息。
请求行的下一部分是 /,表示客户端请求的统一资源标识符(uniform resource identifier,URI):URI 几乎但不完全等同于统一资源定位符(uniform resource locator,URL)。URI 和 URL 的区别对于本章的目的来说并不重要,但 HTTP 规范使用了术语 URI,因此我们这里可以在心里将 URL 替换为 URI。
最后一部分是客户端使用的 HTTP 版本,然后请求行以 CRLF 序列结束。(CRLF 代表回车(carriage return)和换行(line feed),这是打字机时代的术语!)CRLF 序列也可以写成 \r\n,其中 \r 是回车,\n 是换行。CRLF 序列将请求行与请求数据的其余部分分开。请注意,当 CRLF 被打印时,我们看到的是新行开始,而不是 \r\n。
查看我们到目前为止运行程序接收到的请求行数据,我们看到 GET 是方法,/ 是请求 URI,HTTP/1.1 是版本。
在请求行之后,从 Host: 开始的剩余行是头部(headers)。GET 请求没有主体。
尝试从不同的浏览器发起请求,或者请求不同的地址,例如 127.0.0.1:7878/test,看看请求数据如何变化。
既然我们知道浏览器在请求什么,让我们发送回一些数据!
编写响应
我们将实现发送数据以响应客户端请求。响应具有以下格式:
HTTP-Version Status-Code Reason-Phrase CRLF
headers CRLF
message-body
第一行是状态行(status line),包含响应中使用的 HTTP 版本、总结请求结果的数值状态码(status code),以及提供状态码文本描述的原因短语(reason phrase)。在 CRLF 序列之后是任何头部、另一个 CRLF 序列,以及响应的主体(body)。
这里是一个示例响应,使用 HTTP 版本 1.1,状态码 200,OK 原因短语,没有头部,也没有主体:
HTTP/1.1 200 OK\r\n\r\n
状态码 200 是标准的成功响应。这个文本是一个很小的成功 HTTP 响应。让我们将其写入流中,作为对成功请求的响应!从 handle_connection 函数中,删除打印请求数据的 println!,并替换为清单 21-3 中的代码。
use std::{
io::{BufReader, prelude::*},
net::{TcpListener, TcpStream},
};
fn main() {
let listener = TcpListener::bind("127.0.0.1:7878").unwrap();
for stream in listener.incoming() {
let stream = stream.unwrap();
handle_connection(stream);
}
}
fn handle_connection(mut stream: TcpStream) {
let buf_reader = BufReader::new(&stream);
let http_request: Vec<_> = buf_reader
.lines()
.map(|result| result.unwrap())
.take_while(|line| !line.is_empty())
.collect();
let response = "HTTP/1.1 200 OK\r\n\r\n";
stream.write_all(response.as_bytes()).unwrap();
}第一个新行定义了 response 变量,保存成功消息的数据。然后,我们在 response 上调用 as_bytes 将字符串数据转换为字节。stream 上的 write_all 方法接受一个 &[u8] 并将这些字节直接发送到连接中。因为 write_all 操作可能失败,我们在任何错误结果上使用 unwrap 如之前一样。同样,在真正的应用程序中,你应该在这里添加错误处理。
通过这些更改,让我们运行代码并发出请求。我们不再向终端打印任何数据,因此除了 Cargo 的输出外,我们看不到任何输出。当你在 Web 浏览器中加载 127.0.0.1:7878 时,应该会看到一个空白页面,而不是错误。你刚刚手动编写代码实现了接收 HTTP 请求和发送响应!
返回真实的 HTML
让我们实现返回不仅仅是空白页面的功能。在项目目录的根目录(而不是 src 目录)中创建新文件 hello.html。你可以输入任何你想要的 HTML;清单 21-4 展示了一种可能性。
<!DOCTYPE html>
<html lang="en">
<head>
<meta charset="utf-8">
<title>Hello!</title>
</head>
<body>
<h1>Hello!</h1>
<p>Hi from Rust</p>
</body>
</html>
这是一个带有标题和一些文本的最小 HTML5 文档。要在收到请求时从服务器返回此内容,我们将修改 handle_connection,如清单 21-5 所示,读取 HTML 文件,将其作为响应的主体添加,并发送出去。
use std::{
fs,
io::{BufReader, prelude::*},
net::{TcpListener, TcpStream},
};
// --snip--
fn main() {
let listener = TcpListener::bind("127.0.0.1:7878").unwrap();
for stream in listener.incoming() {
let stream = stream.unwrap();
handle_connection(stream);
}
}
fn handle_connection(mut stream: TcpStream) {
let buf_reader = BufReader::new(&stream);
let http_request: Vec<_> = buf_reader
.lines()
.map(|result| result.unwrap())
.take_while(|line| !line.is_empty())
.collect();
let status_line = "HTTP/1.1 200 OK";
let contents = fs::read_to_string("hello.html").unwrap();
let length = contents.len();
let response =
format!("{status_line}\r\nContent-Length: {length}\r\n\r\n{contents}");
stream.write_all(response.as_bytes()).unwrap();
}我们将 fs 添加到 use 语句中,以将标准库的文件系统模块引入作用域。将文件内容读取为字符串的代码应该看起来很熟悉;我们在清单 12-4 中为 I/O 项目读取文件内容时使用过它。
接下来,我们使用 format! 将文件的内容作为成功响应的主体添加。为了确保有效的 HTTP 响应,我们添加了 Content-Length 头部,其值设置为响应主体的大小——在本例中是 hello.html 的大小。
使用 cargo run 运行此代码,然后在浏览器中加载 127.0.0.1:7878;你应该看到你的 HTML 被渲染出来了!
目前,我们忽略了 http_request 中的请求数据,无条件地发送回 HTML 文件的内容。这意味着如果你在浏览器中请求 127.0.0.1:7878/something-else,你仍然会收到相同的 HTML 响应。目前,我们的服务器非常有限,不像大多数 Web 服务器那样工作。我们希望根据请求自定义响应,并且只在对 / 的正确格式请求时发送回 HTML 文件。
验证请求并有选择地响应
目前,无论客户端请求什么,我们的 Web 服务器都会返回 HTML 文件。让我们添加功能,在返回 HTML 文件之前检查浏览器是否在请求 /,如果浏览器请求其他内容,则返回错误。为此,我们需要修改 handle_connection,如清单 21-6 所示。这个新代码将收到的请求内容与我们已知的 / 请求的样子进行比较,并添加 if 和 else 块来区别对待请求。
use std::{
fs,
io::{BufReader, prelude::*},
net::{TcpListener, TcpStream},
};
fn main() {
let listener = TcpListener::bind("127.0.0.1:7878").unwrap();
for stream in listener.incoming() {
let stream = stream.unwrap();
handle_connection(stream);
}
}
// --snip--
fn handle_connection(mut stream: TcpStream) {
let buf_reader = BufReader::new(&stream);
let request_line = buf_reader.lines().next().unwrap().unwrap();
if request_line == "GET / HTTP/1.1" {
let status_line = "HTTP/1.1 200 OK";
let contents = fs::read_to_string("hello.html").unwrap();
let length = contents.len();
let response = format!(
"{status_line}\r\nContent-Length: {length}\r\n\r\n{contents}"
);
stream.write_all(response.as_bytes()).unwrap();
} else {
// some other request
}
}我们只查看 HTTP 请求的第一行,因此不将整个请求读取到向量中,而是调用 next 从迭代器中获取第一个元素。第一个 unwrap 处理 Option,如果迭代器没有元素则停止程序。第二个 unwrap 处理 Result,效果与清单 21-2 的 map 中添加的 unwrap 相同。
接下来,我们检查 request_line 是否等于对 / 路径的 GET 请求的请求行。如果是,if 块返回我们 HTML 文件的内容。
如果 request_line 不等于对 / 路径的 GET 请求,意味着我们收到了其他请求。稍后我们将向 else 块添加代码以响应所有其他请求。
现在运行此代码,请求 127.0.0.1:7878;你应该会得到 hello.html 中的 HTML。如果你发出任何其他请求,例如 127.0.0.1:7878/something-else,你会看到与运行清单 21-1 和清单 21-2 中的代码时类似的连接错误。
现在让我们将清单 21-7 中的代码添加到 else 块中,以返回状态码 404 的响应,表示未找到请求的内容。我们还将返回一些 HTML,用于在浏览器中渲染一个页面,向最终用户指示响应。
use std::{
fs,
io::{BufReader, prelude::*},
net::{TcpListener, TcpStream},
};
fn main() {
let listener = TcpListener::bind("127.0.0.1:7878").unwrap();
for stream in listener.incoming() {
let stream = stream.unwrap();
handle_connection(stream);
}
}
fn handle_connection(mut stream: TcpStream) {
let buf_reader = BufReader::new(&stream);
let request_line = buf_reader.lines().next().unwrap().unwrap();
if request_line == "GET / HTTP/1.1" {
let status_line = "HTTP/1.1 200 OK";
let contents = fs::read_to_string("hello.html").unwrap();
let length = contents.len();
let response = format!(
"{status_line}\r\nContent-Length: {length}\r\n\r\n{contents}"
);
stream.write_all(response.as_bytes()).unwrap();
// --snip--
} else {
let status_line = "HTTP/1.1 404 NOT FOUND";
let contents = fs::read_to_string("404.html").unwrap();
let length = contents.len();
let response = format!(
"{status_line}\r\nContent-Length: {length}\r\n\r\n{contents}"
);
stream.write_all(response.as_bytes()).unwrap();
}
}这里,我们的响应有一个状态行,状态码为 404,原因短语为 NOT FOUND。响应的主体将是文件 404.html 中的 HTML。你需要在 hello.html 旁边创建一个 404.html 文件用于错误页面;同样,随意使用任何你想要的 HTML,或使用清单 21-8 中的示例 HTML。
<!DOCTYPE html>
<html lang="en">
<head>
<meta charset="utf-8">
<title>Hello!</title>
</head>
<body>
<h1>Oops!</h1>
<p>Sorry, I don't know what you're asking for.</p>
</body>
</html>
通过这些更改,再次运行你的服务器。请求 127.0.0.1:7878 应返回 hello.html 的内容,而任何其他请求(如 127.0.0.1:7878/foo)应返回 404.html 中的错误 HTML。
重构
目前,if 和 else 块有很多重复:它们都在读取文件并将文件内容写入流。唯一的区别是状态行和文件名。让我们通过将这些差异提取到单独的 if 和 else 行中(这些行将状态行和文件名的值赋给变量),使代码更简洁;然后,我们可以在读取文件和写入响应的代码中无条件地使用这些变量。清单 21-9 显示了替换掉大型 if 和 else 块后的结果代码。
use std::{
fs,
io::{BufReader, prelude::*},
net::{TcpListener, TcpStream},
};
fn main() {
let listener = TcpListener::bind("127.0.0.1:7878").unwrap();
for stream in listener.incoming() {
let stream = stream.unwrap();
handle_connection(stream);
}
}
// --snip--
fn handle_connection(mut stream: TcpStream) {
// --snip--
let buf_reader = BufReader::new(&stream);
let request_line = buf_reader.lines().next().unwrap().unwrap();
let (status_line, filename) = if request_line == "GET / HTTP/1.1" {
("HTTP/1.1 200 OK", "hello.html")
} else {
("HTTP/1.1 404 NOT FOUND", "404.html")
};
let contents = fs::read_to_string(filename).unwrap();
let length = contents.len();
let response =
format!("{status_line}\r\nContent-Length: {length}\r\n\r\n{contents}");
stream.write_all(response.as_bytes()).unwrap();
}if 和 else 块,使其仅包含两种情况之间不同的代码现在 if 和 else 块只返回元组中状态行和文件名的适当值;然后,我们使用解构来通过 let 语句中的模式将这两个值赋给 status_line 和 filename,如第 19 章所述。
之前重复的代码现在位于 if 和 else 块之外,并使用 status_line 和 filename 变量。这使得更容易看到两种情况之间的区别,并且意味着如果我们想要更改文件读取和响应写入的工作方式,我们只有一个地方需要更新代码。清单 21-9 中代码的行为将与清单 21-7 相同。
太棒了!我们现在有了一个用大约 40 行 Rust 代码编写的简单 Web 服务器,它用一个页面内容响应一个请求,并用 404 响应响应所有其他请求。
目前,我们的服务器在单线程中运行,意味着它一次只能处理一个请求。让我们通过模拟一些慢请求来检查这如何成为一个问题。然后,我们将修复它,使我们的服务器能够同时处理多个请求。
从单线程到多线程服务器
从单线程到多线程服务器
目前,服务器将依次处理每个请求,这意味着在第一个连接处理完成之前,它不会处理第二个连接。如果服务器收到越来越多的请求,这种串行执行会变得越来越低效。如果服务器收到一个需要很长时间处理的请求,后续请求将不得不等待该长请求完成,即使新请求可以快速处理。我们需要修复这个问题,但首先让我们看一下这个问题的实际表现。
模拟慢请求
我们将看看一个处理缓慢的请求如何影响对我们当前服务器实现的其他请求。清单 21-10 实现了对 /sleep 请求的处理,通过模拟慢响应使服务器在响应之前休眠五秒钟。
use std::{
fs,
io::{BufReader, prelude::*},
net::{TcpListener, TcpStream},
thread,
time::Duration,
};
// --snip--
fn main() {
let listener = TcpListener::bind("127.0.0.1:7878").unwrap();
for stream in listener.incoming() {
let stream = stream.unwrap();
handle_connection(stream);
}
}
fn handle_connection(mut stream: TcpStream) {
// --snip--
let buf_reader = BufReader::new(&stream);
let request_line = buf_reader.lines().next().unwrap().unwrap();
let (status_line, filename) = match &request_line[..] {
"GET / HTTP/1.1" => ("HTTP/1.1 200 OK", "hello.html"),
"GET /sleep HTTP/1.1" => {
thread::sleep(Duration::from_secs(5));
("HTTP/1.1 200 OK", "hello.html")
}
_ => ("HTTP/1.1 404 NOT FOUND", "404.html"),
};
// --snip--
let contents = fs::read_to_string(filename).unwrap();
let length = contents.len();
let response =
format!("{status_line}\r\nContent-Length: {length}\r\n\r\n{contents}");
stream.write_all(response.as_bytes()).unwrap();
}我们已将 if 切换为 match,因为现在我们有三种情况。我们需要显式匹配 request_line 的切片以与字符串字面量值进行模式匹配;match 不会像相等方法那样自动进行引用和解引用。
第一个分支与清单 21-9 中的 if 块相同。第二个分支匹配对 /sleep 的请求。当收到该请求时,服务器将在渲染成功的 HTML 页面之前休眠五秒钟。第三个分支与清单 21-9 中的 else 块相同。
你可以看到我们的服务器有多原始:真正的库会以更简洁的方式处理多个请求的识别!
使用 cargo run 启动服务器。然后,打开两个浏览器窗口:一个用于 http://127.0.0.1:7878,另一个用于 http://127.0.0.1:7878/sleep。如果你像之前一样多次输入 / URI,你会看到它响应很快。但如果你输入 /sleep,然后加载 /,你会看到 / 会一直等待,直到 sleep 完成了它的完整五秒休眠后才加载。
有几种技术可以用来避免请求在慢请求后面排队,包括使用我们在第 17 章中介绍的 async;我们要实现的一种是线程池(thread pool)。
使用线程池提高吞吐量
*线程池(thread pool)*是一组已经生成并准备好等待处理任务的线程。当程序收到新任务时,它会将池中的一个线程分配给该任务,该线程将处理这个任务。池中剩余的其他线程可以处理第一个线程正在处理时传入的任何其他任务。当第一个线程完成其任务的处理时,它会被返回到空闲线程池中,准备处理新任务。线程池允许你并发处理连接,从而提高服务器的吞吐量。
我们将池中的线程数量限制为一个较小的数值,以保护我们免受 DoS 攻击;如果我们的程序为每个传入的请求创建一个新线程,那么有人向我们的服务器发起 1000 万个请求可能会耗尽我们服务器的所有资源,并使请求处理陷入停顿。
因此,我们不会创建无限数量的线程,而是在池中有一个固定数量的线程等待。传入的请求被发送到池中进行处理。池将维护一个传入请求的队列。池中的每个线程都将从该队列中弹出一个请求,处理该请求,然后向队列请求下一个请求。通过这种设计,我们可以同时处理多达 N 个请求,其中 N 是线程数。如果每个线程都在响应一个长时间运行的请求,后续请求仍然可能在队列中堆积,但我们在达到那个临界点之前能够处理的长时间运行请求的数量增加了。
这种技术只是提高 Web 服务器吞吐量的众多方法之一。你可能探索的其他选项包括 fork/join 模型、单线程异步 I/O 模型和多线程异步 I/O 模型。如果你对这个主题感兴趣,可以阅读更多关于其他解决方案的内容并尝试实现它们;使用像 Rust 这样的底层语言,所有这些选项都是可能的。
在开始实现线程池之前,让我们谈谈使用线程池应该是什么样子。当你尝试设计代码时,首先编写客户端接口可以帮助指导你的设计。编写代码的 API,使其按照你希望调用的方式结构化;然后,在该结构内实现功能,而不是先实现功能再设计公有 API。
类似于我们在第 12 章的项目中使用测试驱动开发的方式,这里我们将使用编译器驱动开发。我们将编写调用我们想要的函数的代码,然后查看编译器的错误,以确定下一步应该更改什么才能使代码工作。不过在此之前,我们将探讨我们不打算使用的技术作为起点。
为每个请求生成一个线程
首先,让我们探讨如果为每个连接创建一个新线程,代码会是什么样子。如前所述,由于可能生成无限数量的线程的问题,这并非我们的最终计划,但它是让一个多线程服务器先工作的起点。然后,我们将添加线程池作为改进,对比这两种解决方案会更容易。
清单 21-11 显示了对 main 所做的更改,以便在 for 循环中生成一个新线程来处理每个流。
use std::{
fs,
io::{BufReader, prelude::*},
net::{TcpListener, TcpStream},
thread,
time::Duration,
};
fn main() {
let listener = TcpListener::bind("127.0.0.1:7878").unwrap();
for stream in listener.incoming() {
let stream = stream.unwrap();
thread::spawn(|| {
handle_connection(stream);
});
}
}
fn handle_connection(mut stream: TcpStream) {
let buf_reader = BufReader::new(&stream);
let request_line = buf_reader.lines().next().unwrap().unwrap();
let (status_line, filename) = match &request_line[..] {
"GET / HTTP/1.1" => ("HTTP/1.1 200 OK", "hello.html"),
"GET /sleep HTTP/1.1" => {
thread::sleep(Duration::from_secs(5));
("HTTP/1.1 200 OK", "hello.html")
}
_ => ("HTTP/1.1 404 NOT FOUND", "404.html"),
};
let contents = fs::read_to_string(filename).unwrap();
let length = contents.len();
let response =
format!("{status_line}\r\nContent-Length: {length}\r\n\r\n{contents}");
stream.write_all(response.as_bytes()).unwrap();
}如你在第 16 章中所学,thread::spawn 将创建一个新线程,然后在新线程中运行闭包中的代码。如果你运行此代码,在浏览器中加载 /sleep,然后在另外两个浏览器标签页中加载 /,你会看到对 / 的请求不必等待 /sleep 完成。然而,正如我们提到的,这最终会使系统不堪重负,因为你会无限制地创建新线程。
你可能还从第 17 章中记得,这正是 async 和 await 真正发光发热的情况!在我们构建线程池时请记住这一点,并思考如果使用 async,事情会有什么不同或相同之处。
创建有限数量的线程
我们希望线程池以类似且熟悉的方式工作,以便从线程切换到线程池不需要对使用我们 API 的代码进行大量更改。清单 21-12 展示了我们想要用来替代 thread::spawn 的 ThreadPool 结构体的假设接口。
use std::{
fs,
io::{BufReader, prelude::*},
net::{TcpListener, TcpStream},
thread,
time::Duration,
};
fn main() {
let listener = TcpListener::bind("127.0.0.1:7878").unwrap();
let pool = ThreadPool::new(4);
for stream in listener.incoming() {
let stream = stream.unwrap();
pool.execute(|| {
handle_connection(stream);
});
}
}
fn handle_connection(mut stream: TcpStream) {
let buf_reader = BufReader::new(&stream);
let request_line = buf_reader.lines().next().unwrap().unwrap();
let (status_line, filename) = match &request_line[..] {
"GET / HTTP/1.1" => ("HTTP/1.1 200 OK", "hello.html"),
"GET /sleep HTTP/1.1" => {
thread::sleep(Duration::from_secs(5));
("HTTP/1.1 200 OK", "hello.html")
}
_ => ("HTTP/1.1 404 NOT FOUND", "404.html"),
};
let contents = fs::read_to_string(filename).unwrap();
let length = contents.len();
let response =
format!("{status_line}\r\nContent-Length: {length}\r\n\r\n{contents}");
stream.write_all(response.as_bytes()).unwrap();
}ThreadPool 接口我们使用 ThreadPool::new 创建一个具有可配置数量线程的新线程池,这里指定为四个。然后,在 for 循环中,pool.execute 具有与 thread::spawn 类似的接口,它接受一个闭包,池应该为每个流运行该闭包。我们需要实现 pool.execute,使其接受闭包并将其交给池中的一个线程运行。这段代码还不能编译,但我们会尝试,以便编译器可以指导我们如何修复它。
使用编译器驱动开发构建 ThreadPool
将清单 21-12 中的更改应用到 src/main.rs,然后让我们使用 cargo check 的编译器错误来驱动我们的开发。这是我们得到的第一个错误:
$ cargo check
Checking hello v0.1.0 (file:///projects/hello)
error[E0433]: failed to resolve: use of undeclared type `ThreadPool`
--> src/main.rs:11:16
|
11 | let pool = ThreadPool::new(4);
| ^^^^^^^^^^ use of undeclared type `ThreadPool`
For more information about this error, try `rustc --explain E0433`.
error: could not compile `hello` (bin "hello") due to 1 previous error
太好了!这个错误告诉我们,我们需要一个 ThreadPool 类型或模块,所以我们现在就构建一个。我们的 ThreadPool 实现将独立于我们的 Web 服务器所执行的工作类型。因此,让我们将 hello crate 从二进制 crate 转换为库 crate,以保存我们的 ThreadPool 实现。当我们改为库 crate 后,我们还可以将单独的线程池库用于任何我们想要使用线程池的工作,而不仅仅是处理 Web 请求。
创建一个 src/lib.rs 文件,其中包含以下内容,这是我们现在能拥有的最简单的 ThreadPool 结构体定义:
pub struct ThreadPool;然后,编辑 main.rs 文件,通过将以下代码添加到 src/main.rs 顶部,将 ThreadPool 从库 crate 引入作用域:
use hello::ThreadPool;
use std::{
fs,
io::{BufReader, prelude::*},
net::{TcpListener, TcpStream},
thread,
time::Duration,
};
fn main() {
let listener = TcpListener::bind("127.0.0.1:7878").unwrap();
let pool = ThreadPool::new(4);
for stream in listener.incoming() {
let stream = stream.unwrap();
pool.execute(|| {
handle_connection(stream);
});
}
}
fn handle_connection(mut stream: TcpStream) {
let buf_reader = BufReader::new(&stream);
let request_line = buf_reader.lines().next().unwrap().unwrap();
let (status_line, filename) = match &request_line[..] {
"GET / HTTP/1.1" => ("HTTP/1.1 200 OK", "hello.html"),
"GET /sleep HTTP/1.1" => {
thread::sleep(Duration::from_secs(5));
("HTTP/1.1 200 OK", "hello.html")
}
_ => ("HTTP/1.1 404 NOT FOUND", "404.html"),
};
let contents = fs::read_to_string(filename).unwrap();
let length = contents.len();
let response =
format!("{status_line}\r\nContent-Length: {length}\r\n\r\n{contents}");
stream.write_all(response.as_bytes()).unwrap();
}这段代码仍然不能工作,但让我们再次检查以获取我们需要处理的下一个错误:
$ cargo check
Checking hello v0.1.0 (file:///projects/hello)
error[E0599]: no function or associated item named `new` found for struct `ThreadPool` in the current scope
--> src/main.rs:12:28
|
12 | let pool = ThreadPool::new(4);
| ^^^ function or associated item not found in `ThreadPool`
For more information about this error, try `rustc --explain E0599`.
error: could not compile `hello` (bin "hello") due to 1 previous error
这个错误表明,接下来我们需要为 ThreadPool 创建一个名为 new 的关联函数。我们也知道 new 需要有一个可以接受 4 作为参数的参数,并应返回一个 ThreadPool 实例。让我们实现最简单的具有这些特征的 new 函数:
pub struct ThreadPool;
impl ThreadPool {
pub fn new(size: usize) -> ThreadPool {
ThreadPool
}
}我们选择 usize 作为 size 参数的类型,因为我们知道负数个线程没有意义。我们也知道我们将使用这个 4 作为线程集合中的元素数量,这正是 usize 类型的用途,如第 3 章中的“整数类型”部分所述。
让我们再次检查代码:
$ cargo check
Checking hello v0.1.0 (file:///projects/hello)
error[E0599]: no method named `execute` found for struct `ThreadPool` in the current scope
--> src/main.rs:17:14
|
17 | pool.execute(|| {
| -----^^^^^^^ method not found in `ThreadPool`
For more information about this error, try `rustc --explain E0599`.
error: could not compile `hello` (bin "hello") due to 1 previous error
现在错误发生,因为我们没有 ThreadPool 上的 execute 方法。回想一下“创建有限数量的线程”部分,我们决定线程池应该有一个类似于 thread::spawn 的接口。此外,我们将实现 execute 函数,使其接受给定的闭包并将其交给池中的一个空闲线程来运行。
我们将在 ThreadPool 上定义 execute 方法,接受一个闭包作为参数。回顾第 13 章中的“将捕获的值移出闭包”,我们可以使用三种不同的 trait 将闭包作为参数:Fn、FnMut 和 FnOnce。我们需要决定在这里使用哪种闭包。我们知道最终会做与标准库 thread::spawn 实现类似的事情,因此我们可以查看 thread::spawn 签名对其参数有哪些约束。文档向我们显示以下内容:
pub fn spawn<F, T>(f: F) -> JoinHandle<T>
where
F: FnOnce() -> T,
F: Send + 'static,
T: Send + 'static,F 类型参数是我们这里关心的;T 类型参数与返回值有关,我们不关心它。我们可以看到 spawn 使用 FnOnce 作为 F 上的 trait 约束。这可能也是我们想要的,因为我们最终会将 execute 中获得的参数传递给 spawn。我们可以进一步确信 FnOnce 是我们想用的 trait,因为运行请求的线程只会执行该请求的闭包一次,这与 FnOnce 中的 Once 匹配。
F 类型参数也有 trait 约束 Send 和生命周期约束 'static,这些在我们的场景中很有用:我们需要 Send 来将闭包从一个线程转移到另一个线程,以及 'static 因为我们不知道线程需要多长时间来执行。让我们在 ThreadPool 上创建一个 execute 方法,该方法将接受具有这些约束的泛型参数 F:
pub struct ThreadPool;
impl ThreadPool {
// --snip--
pub fn new(size: usize) -> ThreadPool {
ThreadPool
}
pub fn execute<F>(&self, f: F)
where
F: FnOnce() + Send + 'static,
{
}
}我们仍然在 FnOnce 后面使用 (),因为这个 FnOnce 表示一个不带参数并返回单元类型 () 的闭包。就像函数定义一样,返回类型可以从签名中省略,但即使我们没有参数,我们仍然需要圆括号。
同样,这是 execute 方法最简单的实现:它什么也不做,但我们只是试图使我们的代码编译。让我们再次检查:
$ cargo check
Checking hello v0.1.0 (file:///projects/hello)
Finished `dev` profile [unoptimized + debuginfo] target(s) in 0.24s
它编译了!但请注意,如果你尝试 cargo run 并在浏览器中发出请求,你会看到本章开头我们在浏览器中看到的错误。我们的库实际上还没有调用传递给 execute 的闭包!
注意:关于具有严格编译器的语言(如 Haskell 和 Rust),你可能听到过一种说法:“如果代码能编译,它就能工作。“但这个说法并非普遍正确。我们的项目能编译,但它什么也不做!如果我们在构建一个真实的、完整的项目,现在正是开始编写单元测试以检查代码是否编译并且具有我们想要的行为的好时机。
思考一下:如果我们执行 future 而不是闭包,这里会有什么不同?
在 new 中验证线程数量
我们没有对 new 和 execute 的参数做任何操作。让我们用我们想要的行为来实现这些函数的主体。首先,让我们考虑一下 new。之前我们为 size 参数选择了无符号类型,因为负数个线程的池没有意义。然而,零个线程的池也同样没有意义,但零是完全有效的 usize。我们将添加代码来检查 size 是否大于零,然后再返回 ThreadPool 实例,如果收到零,我们将使用 assert! 宏使程序 panic,如清单 21-13 所示。
pub struct ThreadPool;
impl ThreadPool {
/// Create a new ThreadPool.
///
/// The size is the number of threads in the pool.
///
/// # Panics
///
/// The `new` function will panic if the size is zero.
pub fn new(size: usize) -> ThreadPool {
assert!(size > 0);
ThreadPool
}
// --snip--
pub fn execute<F>(&self, f: F)
where
F: FnOnce() + Send + 'static,
{
}
}size 为零,实现 ThreadPool::new 使其 panic我们还为我们的 ThreadPool 添加了一些带有文档注释的文档。请注意,我们遵循了良好的文档实践,添加了一个章节来指出我们的函数可能 panic 的情况,如第 14 章所述。尝试运行 cargo doc --open 并单击 ThreadPool 结构体,以查看为 new 生成的文档是什么样子!
除了像这里一样添加 assert! 宏,我们也可以将 new 改为 build 并返回 Result,就像我们在第 12 章 I/O 项目的清单 12-9 中对 Config::build 所做的那样。但我们在这个案例中决定,尝试创建一个没有任何线程的线程池应该是一个不可恢复的错误。如果你有雄心壮志,尝试编写一个名为 build 的具有以下签名的函数,与 new 函数进行比较:
pub fn build(size: usize) -> Result<ThreadPool, PoolCreationError> {创建空间来存储线程
现在我们有了知道在池中存储有效数量线程的方式,我们可以创建这些线程并将它们存储到 ThreadPool 结构体中,然后返回该结构体。但我们如何“存储“一个线程呢?让我们再看看 thread::spawn 的签名:
pub fn spawn<F, T>(f: F) -> JoinHandle<T>
where
F: FnOnce() -> T,
F: Send + 'static,
T: Send + 'static,spawn 函数返回一个 JoinHandle<T>,其中 T 是闭包返回的类型。让我们也尝试使用 JoinHandle,看看会发生什么。在我们的案例中,我们传递给线程池的闭包将处理连接并且不返回任何内容,因此 T 将是单元类型 ()。
清单 21-14 中的代码将编译,但它还没有创建任何线程。我们更改了 ThreadPool 的定义,使其持有一个 thread::JoinHandle<()> 实例的向量,使用 size 的容量初始化了该向量,设置了一个 for 循环来运行一些创建线程的代码,并返回一个包含这些线程的 ThreadPool 实例。
use std::thread;
pub struct ThreadPool {
threads: Vec<thread::JoinHandle<()>>,
}
impl ThreadPool {
// --snip--
/// Create a new ThreadPool.
///
/// The size is the number of threads in the pool.
///
/// # Panics
///
/// The `new` function will panic if the size is zero.
pub fn new(size: usize) -> ThreadPool {
assert!(size > 0);
let mut threads = Vec::with_capacity(size);
for _ in 0..size {
// create some threads and store them in the vector
}
ThreadPool { threads }
}
// --snip--
pub fn execute<F>(&self, f: F)
where
F: FnOnce() + Send + 'static,
{
}
}ThreadPool 创建一个向量来持有线程我们将 std::thread 引入到库 crate 的作用域中,因为我们在 ThreadPool 中使用 thread::JoinHandle 作为向量中项目的类型。
一旦收到有效的大小,我们的 ThreadPool 将创建一个可以容纳 size 个项目的新向量。with_capacity 函数执行与 Vec::new 相同的任务,但有一个重要的区别:它在向量中预分配了空间。因为知道我们需要在向量中存储 size 个元素,提前进行这种分配比使用 Vec::new(它在插入元素时会调整自身大小)稍微高效一些。
当你再次运行 cargo check 时,它应该会成功。
将代码从 ThreadPool 发送到线程
我们在清单 21-14 的 for 循环中留下了一条关于创建线程的注释。这里,我们将看看如何实际创建线程。标准库提供了 thread::spawn 作为创建线程的方式,并且 thread::spawn 期望在创建线程时立即获得一些线程应该运行的代码。然而,在我们的情况下,我们希望创建线程并让它们等待我们稍后发送的代码。标准库的线程实现不包括任何方式来做这件事;我们必须手动实现它。
我们将通过引入一个新的数据结构(位于 ThreadPool 和线程之间)来管理这个新行为。我们将这个数据结构称为 Worker,这是池化实现中常用的术语。Worker 拾取需要运行的代码并在其线程中运行该代码。
可以把这想象成在餐厅厨房工作的人:工人们一直等侯,直到顾客的订单到达,然后他们负责取走这些订单并完成它们。
我们将不在线程池中存储 JoinHandle<()> 实例的向量,而是存储 Worker 结构体的实例。每个 Worker 将存储一个单独的 JoinHandle<()> 实例。然后,我们将在 Worker 上实现一个方法,该方法接受要运行的闭包代码并将其发送到已经运行的线程执行。我们还为每个 Worker 赋予一个 id,以便在记录日志或调试时能够区分池中不同的 Worker 实例。
以下是我们创建 ThreadPool 时将发生的新过程。在以这种方式设置 Worker 之后,我们将实现将闭包发送到线程的代码:
- 定义一个
Worker结构体,它持有一个id和一个JoinHandle<()>。 - 将
ThreadPool改为持有一个Worker实例的向量。 - 定义一个
Worker::new函数,它接受一个id编号,并返回一个持有该id和以空闭包生成的线程的Worker实例。 - 在
ThreadPool::new中,使用for循环计数器生成一个id,使用该id创建一个新的Worker,并将Worker存储在向量中。
如果你准备好接受挑战,在查看清单 21-15 中的代码之前,尝试自己实现这些更改。
准备好了吗?这里是清单 21-15,其中包含进行上述修改的一种方法。
use std::thread;
pub struct ThreadPool {
workers: Vec<Worker>,
}
impl ThreadPool {
// --snip--
/// Create a new ThreadPool.
///
/// The size is the number of threads in the pool.
///
/// # Panics
///
/// The `new` function will panic if the size is zero.
pub fn new(size: usize) -> ThreadPool {
assert!(size > 0);
let mut workers = Vec::with_capacity(size);
for id in 0..size {
workers.push(Worker::new(id));
}
ThreadPool { workers }
}
// --snip--
pub fn execute<F>(&self, f: F)
where
F: FnOnce() + Send + 'static,
{
}
}
struct Worker {
id: usize,
thread: thread::JoinHandle<()>,
}
impl Worker {
fn new(id: usize) -> Worker {
let thread = thread::spawn(|| {});
Worker { id, thread }
}
}ThreadPool 以持有 Worker 实例,而不是直接持有线程我们将 ThreadPool 上的字段名称从 threads 改为 workers,因为它现在持有的是 Worker 实例而不是 JoinHandle<()> 实例。我们使用 for 循环中的计数器作为 Worker::new 的参数,并将每个新 Worker 存储在名为 workers 的向量中。
外部代码(如我们在 src/main.rs 中的服务器)不需要知道在 ThreadPool 内部使用 Worker 结构体的实现细节,因此我们将 Worker 结构体及其 new 函数设为私有。Worker::new 函数使用我们提供给它的 id,并存储一个通过使用空闭包生成新线程而创建的 JoinHandle<()> 实例。
注意:如果由于系统资源不足而无法创建线程,
thread::spawn将会 panic。这会导致整个服务器 panic,即使某些线程的创建可能成功。为简单起见,这种行为是可以接受的,但在生产线程池实现中,你可能想要使用std::thread::Builder及其返回Result的spawn方法。
这段代码将编译,并将存储我们指定为 ThreadPool::new 参数数量的 Worker 实例。但我们仍然没有处理在 execute 中获得的闭包。接下来让我们看看如何做到这一点。
通过通道将请求发送到线程
我们接下来要解决的问题是,传递给 thread::spawn 的闭包绝对不做任何事情。目前,我们在 execute 方法中获得了要执行的闭包。但是我们需要在创建 ThreadPool 时创建每个 Worker 时,给 thread::spawn 一个闭包来运行。
我们希望刚刚创建的 Worker 结构体从 ThreadPool 持有的队列中获取要运行的代码,并将该代码发送到其线程运行。
我们在第 16 章学到的通道——一种在两个线程之间通信的简单方式——非常适合这种用例。我们将使用一个通道来充当任务队列,execute 将任务从 ThreadPool 发送到 Worker 实例,而 Worker 实例将任务发送到其线程。以下是计划:
ThreadPool将创建一个通道并持有发送端(sender)。- 每个
Worker将持有接收端(receiver)。 - 我们将创建一个新的
Job结构体,它将保存我们想要发送到通道中的闭包。 execute方法将通过发送端发送它想要执行的任务。- 在其线程中,
Worker将循环处理其接收端,并执行它收到的任何任务的闭包。
让我们首先在 ThreadPool::new 中创建一个通道,并将发送端保存在 ThreadPool 实例中,如清单 21-16 所示。Job 结构体目前不持有任何东西,但将是我们通过通道发送的项目的类型。
use std::{sync::mpsc, thread};
pub struct ThreadPool {
workers: Vec<Worker>,
sender: mpsc::Sender<Job>,
}
struct Job;
impl ThreadPool {
// --snip--
/// Create a new ThreadPool.
///
/// The size is the number of threads in the pool.
///
/// # Panics
///
/// The `new` function will panic if the size is zero.
pub fn new(size: usize) -> ThreadPool {
assert!(size > 0);
let (sender, receiver) = mpsc::channel();
let mut workers = Vec::with_capacity(size);
for id in 0..size {
workers.push(Worker::new(id));
}
ThreadPool { workers, sender }
}
// --snip--
pub fn execute<F>(&self, f: F)
where
F: FnOnce() + Send + 'static,
{
}
}
struct Worker {
id: usize,
thread: thread::JoinHandle<()>,
}
impl Worker {
fn new(id: usize) -> Worker {
let thread = thread::spawn(|| {});
Worker { id, thread }
}
}ThreadPool 以存储传输 Job 实例的通道的发送端在 ThreadPool::new 中,我们创建新的通道,并且池持有发送端。这将成功编译。
让我们在创建通道时尝试将通道的接收端传递给每个 Worker。我们知道要在 Worker 实例生成的线程中使用接收端,因此我们将在闭包中引用 receiver 参数。清单 21-17 中的代码还不能编译。
use std::{sync::mpsc, thread};
pub struct ThreadPool {
workers: Vec<Worker>,
sender: mpsc::Sender<Job>,
}
struct Job;
impl ThreadPool {
// --snip--
/// Create a new ThreadPool.
///
/// The size is the number of threads in the pool.
///
/// # Panics
///
/// The `new` function will panic if the size is zero.
pub fn new(size: usize) -> ThreadPool {
assert!(size > 0);
let (sender, receiver) = mpsc::channel();
let mut workers = Vec::with_capacity(size);
for id in 0..size {
workers.push(Worker::new(id, receiver));
}
ThreadPool { workers, sender }
}
// --snip--
pub fn execute<F>(&self, f: F)
where
F: FnOnce() + Send + 'static,
{
}
}
// --snip--
struct Worker {
id: usize,
thread: thread::JoinHandle<()>,
}
impl Worker {
fn new(id: usize, receiver: mpsc::Receiver<Job>) -> Worker {
let thread = thread::spawn(|| {
receiver;
});
Worker { id, thread }
}
}Worker我们做了一些小而直接的更改:我们将接收端传递到 Worker::new 中,然后在闭包内部使用它。
当我们尝试检查此代码时,会得到这个错误:
$ cargo check
Checking hello v0.1.0 (file:///projects/hello)
error[E0382]: use of moved value: `receiver`
--> src/lib.rs:26:42
|
21 | let (sender, receiver) = mpsc::channel();
| -------- move occurs because `receiver` has type `std::sync::mpsc::Receiver<Job>`, which does not implement the `Copy` trait
...
25 | for id in 0..size {
| ----------------- inside of this loop
26 | workers.push(Worker::new(id, receiver));
| ^^^^^^^^ value moved here, in previous iteration of loop
|
note: consider changing this parameter type in method `new` to borrow instead if owning the value isn't necessary
--> src/lib.rs:47:33
|
47 | fn new(id: usize, receiver: mpsc::Receiver<Job>) -> Worker {
| --- in this method ^^^^^^^^^^^^^^^^^^^ this parameter takes ownership of the value
help: consider moving the expression out of the loop so it is only moved once
|
25 ~ let mut value = Worker::new(id, receiver);
26 ~ for id in 0..size {
27 ~ workers.push(value);
|
For more information about this error, try `rustc --explain E0382`.
error: could not compile `hello` (lib) due to 1 previous error
代码试图将 receiver 传递给多个 Worker 实例。这行不通,正如你从第 16 章回忆起的:Rust 提供的通道实现是多个生产者(producer)、单个消费者(consumer)。这意味着我们不能简单地克隆通道的消费端来修复此代码。我们也不希望向多个消费者多次发送消息;我们希望有一个消息列表,由多个 Worker 实例处理,每个消息只被处理一次。
此外,从通道队列中取出任务涉及修改 receiver,因此线程需要一种安全的方式来共享和修改 receiver;否则,我们可能会遇到竞争条件(如第 16 章所述)。
回想一下第 16 章中讨论的线程安全智能指针:为了跨多个线程共享所有权并允许线程修改该值,我们需要使用 Arc<Mutex<T>>。Arc 类型将允许多个 Worker 实例拥有接收端,而 Mutex 将确保一次只有一个 Worker 从接收端获取任务。清单 21-18 显示了我们需要的更改。
use std::{
sync::{Arc, Mutex, mpsc},
thread,
};
// --snip--
pub struct ThreadPool {
workers: Vec<Worker>,
sender: mpsc::Sender<Job>,
}
struct Job;
impl ThreadPool {
// --snip--
/// Create a new ThreadPool.
///
/// The size is the number of threads in the pool.
///
/// # Panics
///
/// The `new` function will panic if the size is zero.
pub fn new(size: usize) -> ThreadPool {
assert!(size > 0);
let (sender, receiver) = mpsc::channel();
let receiver = Arc::new(Mutex::new(receiver));
let mut workers = Vec::with_capacity(size);
for id in 0..size {
workers.push(Worker::new(id, Arc::clone(&receiver)));
}
ThreadPool { workers, sender }
}
// --snip--
pub fn execute<F>(&self, f: F)
where
F: FnOnce() + Send + 'static,
{
}
}
// --snip--
struct Worker {
id: usize,
thread: thread::JoinHandle<()>,
}
impl Worker {
fn new(id: usize, receiver: Arc<Mutex<mpsc::Receiver<Job>>>) -> Worker {
// --snip--
let thread = thread::spawn(|| {
receiver;
});
Worker { id, thread }
}
}Arc 和 Mutex 在 Worker 实例之间共享接收端在 ThreadPool::new 中,我们将接收端放入 Arc 和 Mutex 中。对于每个新的 Worker,我们克隆 Arc 以增加引用计数,以便 Worker 实例可以共享接收端的所有权。
通过这些更改,代码编译了!我们快到了!
实现 execute 方法
让我们最终实现 ThreadPool 上的 execute 方法。我们还将把 Job 从一个结构体改为一个类型别名(type alias),用于保存 execute 接收的闭包类型的 trait 对象。如第 20 章的“类型同义词与类型别名”部分所述,类型别名允许我们将长类型缩短以方便使用。请看清单 21-19。
use std::{
sync::{Arc, Mutex, mpsc},
thread,
};
pub struct ThreadPool {
workers: Vec<Worker>,
sender: mpsc::Sender<Job>,
}
// --snip--
type Job = Box<dyn FnOnce() + Send + 'static>;
impl ThreadPool {
// --snip--
/// Create a new ThreadPool.
///
/// The size is the number of threads in the pool.
///
/// # Panics
///
/// The `new` function will panic if the size is zero.
pub fn new(size: usize) -> ThreadPool {
assert!(size > 0);
let (sender, receiver) = mpsc::channel();
let receiver = Arc::new(Mutex::new(receiver));
let mut workers = Vec::with_capacity(size);
for id in 0..size {
workers.push(Worker::new(id, Arc::clone(&receiver)));
}
ThreadPool { workers, sender }
}
pub fn execute<F>(&self, f: F)
where
F: FnOnce() + Send + 'static,
{
let job = Box::new(f);
self.sender.send(job).unwrap();
}
}
// --snip--
struct Worker {
id: usize,
thread: thread::JoinHandle<()>,
}
impl Worker {
fn new(id: usize, receiver: Arc<Mutex<mpsc::Receiver<Job>>>) -> Worker {
let thread = thread::spawn(|| {
receiver;
});
Worker { id, thread }
}
}Box 创建 Job 类型别名,然后将任务通过通道发送在使用 execute 中获得的闭包创建新的 Job 实例后,我们将该任务通过通道的发送端发送出去。我们在 send 上调用 unwrap 以处理发送失败的情况。例如,如果我们停止了所有线程的执行,意味着接收端已停止接收新消息,就可能会发生这种情况。目前,我们不能停止线程的执行:只要池存在,我们的线程就会继续执行。我们使用 unwrap 的原因是我们知道失败情况不会发生,但编译器不知道这一点。
但我们还没有完全完成!在 Worker 中,我们传递给 thread::spawn 的闭包仍然只引用了通道的接收端。相反,我们需要闭包永远循环,向通道的接收端请求一个任务,并在获得任务时运行它。让我们对 Worker::new 进行清单 21-20 中所示的更改。
use std::{
sync::{Arc, Mutex, mpsc},
thread,
};
pub struct ThreadPool {
workers: Vec<Worker>,
sender: mpsc::Sender<Job>,
}
type Job = Box<dyn FnOnce() + Send + 'static>;
impl ThreadPool {
/// Create a new ThreadPool.
///
/// The size is the number of threads in the pool.
///
/// # Panics
///
/// The `new` function will panic if the size is zero.
pub fn new(size: usize) -> ThreadPool {
assert!(size > 0);
let (sender, receiver) = mpsc::channel();
let receiver = Arc::new(Mutex::new(receiver));
let mut workers = Vec::with_capacity(size);
for id in 0..size {
workers.push(Worker::new(id, Arc::clone(&receiver)));
}
ThreadPool { workers, sender }
}
pub fn execute<F>(&self, f: F)
where
F: FnOnce() + Send + 'static,
{
let job = Box::new(f);
self.sender.send(job).unwrap();
}
}
struct Worker {
id: usize,
thread: thread::JoinHandle<()>,
}
// --snip--
impl Worker {
fn new(id: usize, receiver: Arc<Mutex<mpsc::Receiver<Job>>>) -> Worker {
let thread = thread::spawn(move || {
loop {
let job = receiver.lock().unwrap().recv().unwrap();
println!("Worker {id} got a job; executing.");
job();
}
});
Worker { id, thread }
}
}Worker 中永久循环,并在 recv 收到任务时执行该任务这里,我们首先在 receiver 上调用 lock 以获取互斥锁(mutex),然后调用 unwrap 以在出现任何错误时 panic。获取互斥锁可能会失败,如果互斥锁处于一种称为*中毒(poisoned)*的状态,其他线程在持有锁时 panic 而没有释放锁就会发生这种情况。在这些情况下,直接调用 unwrap 让该线程 panic 是可行的行动方案。你可以随意将 unwrap 改为对你更有意义的 expect。
如果我们在互斥锁上获得锁,我们就调用 recv 从通道中接收一个 Job。最后的 unwrap 也会处理任何错误,如果持有发送端的线程已经关闭就可能发生这种情况,类似于当 recv 返回 Err 时 join 方法处理错误的方式。
调用 recv 会阻塞,因此如果还没有任务,当前线程将一直等待,直到有可用的任务。Mutex<T> 确保一次只有一个 Worker 线程尝试请求一个任务。
我们的线程池现在可以工作了!执行 cargo run 并发出一些请求:
$ cargo run
Compiling hello v0.1.0 (file:///projects/hello)
warning: field `thread` is never read
--> src/lib.rs:53:5
|
53 | thread: thread::JoinHandle<()>,
| ^^^^^^
|
= note: `#[warn(dead_code)]` on by default
warning: field `id` is never read
--> src/lib.rs:54:5
|
54 | id: usize,
| ^^
我们看到了关于 Worker 的 id 和 thread 字段未被直接使用的警告,这是一个提醒,我们实际上没有清理任何东西。当我们使用不那么优雅的 ctrl-C 方式停止主线程时,所有其他线程也会立即停止,即使它们正在处理请求。
接下来,我们将实现 Drop trait 来对池中的每个线程调用 join,以便它们在关闭之前可以完成正在处理的请求。然后,我们将实现一种方式来告诉线程它们应该停止接受新请求并关闭。
优雅停机与清理
优雅停机与清理
清单 21-20 中的代码按照我们的预期通过线程池异步响应请求。我们收到了一些关于未直接使用的 workers、id 和 thread 字段的警告,这提醒我们还没有进行任何清理。当我们使用不太优雅的 ctrl-C 方式停止主线程时,所有其他线程也会立即停止,即使它们正在处理请求。
接下来,我们将实现 Drop trait,以便对池中的每个线程调用 join,使它们在关闭之前能够完成正在处理的请求。然后,我们将实现一种方式,告诉线程它们应该停止接受新请求并关闭。为了看到这段代码的实际效果,我们将修改我们的服务器,使其在接受两个请求后就优雅地关闭其线程池。
随着我们的进展,有一点需要注意:这些都不会影响处理执行闭包的代码部分,因此如果我们将线程池用于异步运行时,这里的一切都会是相同的。
在 ThreadPool 上实现 Drop Trait
让我们从在线程池上实现 Drop 开始。当池被丢弃时,我们的所有线程应该 join 以确保它们完成工作。清单 21-22 显示了 Drop 实现的第一次尝试;这段代码还不能完全工作。
use std::{
sync::{Arc, Mutex, mpsc},
thread,
};
pub struct ThreadPool {
workers: Vec<Worker>,
sender: mpsc::Sender<Job>,
}
type Job = Box<dyn FnOnce() + Send + 'static>;
impl ThreadPool {
/// Create a new ThreadPool.
///
/// The size is the number of threads in the pool.
///
/// # Panics
///
/// The `new` function will panic if the size is zero.
pub fn new(size: usize) -> ThreadPool {
assert!(size > 0);
let (sender, receiver) = mpsc::channel();
let receiver = Arc::new(Mutex::new(receiver));
let mut workers = Vec::with_capacity(size);
for id in 0..size {
workers.push(Worker::new(id, Arc::clone(&receiver)));
}
ThreadPool { workers, sender }
}
pub fn execute<F>(&self, f: F)
where
F: FnOnce() + Send + 'static,
{
let job = Box::new(f);
self.sender.send(job).unwrap();
}
}
impl Drop for ThreadPool {
fn drop(&mut self) {
for worker in &mut self.workers {
println!("Shutting down worker {}", worker.id);
worker.thread.join().unwrap();
}
}
}
struct Worker {
id: usize,
thread: thread::JoinHandle<()>,
}
impl Worker {
fn new(id: usize, receiver: Arc<Mutex<mpsc::Receiver<Job>>>) -> Worker {
let thread = thread::spawn(move || {
loop {
let job = receiver.lock().unwrap().recv().unwrap();
println!("Worker {id} got a job; executing.");
job();
}
});
Worker { id, thread }
}
}首先,我们遍历线程池中的每个 Worker。我们使用 &mut 因为 self 是一个可变引用,并且我们也需要能够修改 worker。对于每个 Worker,我们打印一条消息说这个特定的 Worker 实例正在关闭,然后我们对该 Worker 实例的线程调用 join。如果对 join 的调用失败,我们使用 unwrap 使 Rust panic 并进入不优雅的关闭。
这是我们编译这段代码时得到的错误:
$ cargo check
Checking hello v0.1.0 (file:///projects/hello)
error[E0507]: cannot move out of `worker.thread` which is behind a mutable reference
--> src/lib.rs:52:13
|
52 | worker.thread.join().unwrap();
| ^^^^^^^^^^^^^ ------ `worker.thread` moved due to this method call
| |
| move occurs because `worker.thread` has type `JoinHandle<()>`, which does not implement the `Copy` trait
|
note: `JoinHandle::<T>::join` takes ownership of the receiver `self`, which moves `worker.thread`
--> /rustc/1159e78c4747b02ef996e55082b704c09b970588/library/std/src/thread/mod.rs:1921:17
For more information about this error, try `rustc --explain E0507`.
error: could not compile `hello` (lib) due to 1 previous error
错误告诉我们不能调用 join,因为我们只有每个 worker 的可变借用,而 join 需要获取其参数的所有权。为了解决这个问题,我们需要将线程从拥有 thread 的 Worker 实例中移出来,以便 join 可以消费该线程。一种方法是在清单 18-15 中采取同样的方法。如果 Worker 持有一个 Option<thread::JoinHandle<()>>,我们可以在 Option 上调用 take 方法将值从 Some 变体中移出,并在其位置留下一个 None 变体。换句话说,一个正在运行的 Worker 将在 thread 中拥有一个 Some 变体,而当我们想要清理一个 Worker 时,我们将 Some 替换为 None,以便该 Worker 没有可运行的线程。
然而,这种情况唯一会在丢弃 Worker 时出现。作为交换,我们在任何访问 worker.thread 的地方,都必须处理 Option<thread::JoinHandle<()>>。惯用的 Rust 会大量使用 Option,但当你发现自己像这样将已知始终存在的东西包装在 Option 中作为变通方法时,最好寻找替代方法以使代码更简洁且不易出错。
在这种情况下,有一个更好的替代方案:Vec::drain 方法。它接受一个范围参数来指定要从向量中移除哪些项,并返回这些项的一个迭代器。传递 .. 范围语法将移除向量中的所有值。
因此,我们需要像这样更新 ThreadPool 的 drop 实现:
#![allow(unused)]
fn main() {
use std::{
sync::{Arc, Mutex, mpsc},
thread,
};
pub struct ThreadPool {
workers: Vec<Worker>,
sender: mpsc::Sender<Job>,
}
type Job = Box<dyn FnOnce() + Send + 'static>;
impl ThreadPool {
/// Create a new ThreadPool.
///
/// The size is the number of threads in the pool.
///
/// # Panics
///
/// The `new` function will panic if the size is zero.
pub fn new(size: usize) -> ThreadPool {
assert!(size > 0);
let (sender, receiver) = mpsc::channel();
let receiver = Arc::new(Mutex::new(receiver));
let mut workers = Vec::with_capacity(size);
for id in 0..size {
workers.push(Worker::new(id, Arc::clone(&receiver)));
}
ThreadPool { workers, sender }
}
pub fn execute<F>(&self, f: F)
where
F: FnOnce() + Send + 'static,
{
let job = Box::new(f);
self.sender.send(job).unwrap();
}
}
impl Drop for ThreadPool {
fn drop(&mut self) {
for worker in self.workers.drain(..) {
println!("Shutting down worker {}", worker.id);
worker.thread.join().unwrap();
}
}
}
struct Worker {
id: usize,
thread: thread::JoinHandle<()>,
}
impl Worker {
fn new(id: usize, receiver: Arc<Mutex<mpsc::Receiver<Job>>>) -> Worker {
let thread = thread::spawn(move || {
loop {
let job = receiver.lock().unwrap().recv().unwrap();
println!("Worker {id} got a job; executing.");
job();
}
});
Worker { id, thread }
}
}
}这解决了编译器错误,并且不需要对我们的代码进行任何其他更改。请注意,由于在 panic 时也可能调用 drop,因此 unwrap 也可能会 panic 并导致双重 panic,这会立即崩溃程序并结束任何正在进行的清理。这对于示例程序来说没问题,但不推荐用于生产代码。
向线程发送停止监听任务的信号
通过我们所做的所有更改,我们的代码编译没有任何警告。然而,坏消息是这段代码还没有按照我们想要的方式运行。关键在于 Worker 实例的线程运行的闭包中的逻辑:目前,我们调用 join,但这不会关闭线程,因为它们会永远循环寻找任务。如果我们尝试使用当前的 drop 实现来丢弃 ThreadPool,主线程将永远阻塞,等待第一个线程完成。
要解决这个问题,我们需要在 ThreadPool 的 drop 实现中进行一个更改,然后在 Worker 循环中进行一个更改。
首先,我们将更改 ThreadPool 的 drop 实现,在等待线程完成之前显式丢弃 sender。清单 21-23 显示了将 sender 显式丢弃的 ThreadPool 的更改。与线程不同,这里我们确实需要使用 Option 才能通过 Option::take 将 sender 从 ThreadPool 中移出。
use std::{
sync::{Arc, Mutex, mpsc},
thread,
};
pub struct ThreadPool {
workers: Vec<Worker>,
sender: Option<mpsc::Sender<Job>>,
}
// --snip--
type Job = Box<dyn FnOnce() + Send + 'static>;
impl ThreadPool {
/// Create a new ThreadPool.
///
/// The size is the number of threads in the pool.
///
/// # Panics
///
/// The `new` function will panic if the size is zero.
pub fn new(size: usize) -> ThreadPool {
// --snip--
assert!(size > 0);
let (sender, receiver) = mpsc::channel();
let receiver = Arc::new(Mutex::new(receiver));
let mut workers = Vec::with_capacity(size);
for id in 0..size {
workers.push(Worker::new(id, Arc::clone(&receiver)));
}
ThreadPool {
workers,
sender: Some(sender),
}
}
pub fn execute<F>(&self, f: F)
where
F: FnOnce() + Send + 'static,
{
let job = Box::new(f);
self.sender.as_ref().unwrap().send(job).unwrap();
}
}
impl Drop for ThreadPool {
fn drop(&mut self) {
drop(self.sender.take());
for worker in self.workers.drain(..) {
println!("Shutting down worker {}", worker.id);
worker.thread.join().unwrap();
}
}
}
struct Worker {
id: usize,
thread: thread::JoinHandle<()>,
}
impl Worker {
fn new(id: usize, receiver: Arc<Mutex<mpsc::Receiver<Job>>>) -> Worker {
let thread = thread::spawn(move || {
loop {
let job = receiver.lock().unwrap().recv().unwrap();
println!("Worker {id} got a job; executing.");
job();
}
});
Worker { id, thread }
}
}Worker 线程之前显式丢弃 sender丢弃 sender 会关闭通道,这表示不会再有消息被发送。当这种情况发生时,Worker 实例在无限循环中执行的所有 recv 调用都将返回一个错误。在清单 21-24 中,我们更改了 Worker 循环,使其在这种情况下优雅地退出循环,这意味着当 ThreadPool 的 drop 实现调用 join 时,线程将完成。
use std::{
sync::{Arc, Mutex, mpsc},
thread,
};
pub struct ThreadPool {
workers: Vec<Worker>,
sender: Option<mpsc::Sender<Job>>,
}
type Job = Box<dyn FnOnce() + Send + 'static>;
impl ThreadPool {
/// Create a new ThreadPool.
///
/// The size is the number of threads in the pool.
///
/// # Panics
///
/// The `new` function will panic if the size is zero.
pub fn new(size: usize) -> ThreadPool {
assert!(size > 0);
let (sender, receiver) = mpsc::channel();
let receiver = Arc::new(Mutex::new(receiver));
let mut workers = Vec::with_capacity(size);
for id in 0..size {
workers.push(Worker::new(id, Arc::clone(&receiver)));
}
ThreadPool {
workers,
sender: Some(sender),
}
}
pub fn execute<F>(&self, f: F)
where
F: FnOnce() + Send + 'static,
{
let job = Box::new(f);
self.sender.as_ref().unwrap().send(job).unwrap();
}
}
impl Drop for ThreadPool {
fn drop(&mut self) {
drop(self.sender.take());
for worker in self.workers.drain(..) {
println!("Shutting down worker {}", worker.id);
worker.thread.join().unwrap();
}
}
}
struct Worker {
id: usize,
thread: thread::JoinHandle<()>,
}
impl Worker {
fn new(id: usize, receiver: Arc<Mutex<mpsc::Receiver<Job>>>) -> Worker {
let thread = thread::spawn(move || {
loop {
let message = receiver.lock().unwrap().recv();
match message {
Ok(job) => {
println!("Worker {id} got a job; executing.");
job();
}
Err(_) => {
println!("Worker {id} disconnected; shutting down.");
break;
}
}
}
});
Worker { id, thread }
}
}recv 返回错误时显式跳出循环为了看到这段代码的实际效果,让我们修改 main 以在接受两个请求后优雅地关闭服务器,如清单 21-25 所示。
use hello::ThreadPool;
use std::{
fs,
io::{BufReader, prelude::*},
net::{TcpListener, TcpStream},
thread,
time::Duration,
};
fn main() {
let listener = TcpListener::bind("127.0.0.1:7878").unwrap();
let pool = ThreadPool::new(4);
for stream in listener.incoming().take(2) {
let stream = stream.unwrap();
pool.execute(|| {
handle_connection(stream);
});
}
println!("Shutting down.");
}
fn handle_connection(mut stream: TcpStream) {
let buf_reader = BufReader::new(&stream);
let request_line = buf_reader.lines().next().unwrap().unwrap();
let (status_line, filename) = match &request_line[..] {
"GET / HTTP/1.1" => ("HTTP/1.1 200 OK", "hello.html"),
"GET /sleep HTTP/1.1" => {
thread::sleep(Duration::from_secs(5));
("HTTP/1.1 200 OK", "hello.html")
}
_ => ("HTTP/1.1 404 NOT FOUND", "404.html"),
};
let contents = fs::read_to_string(filename).unwrap();
let length = contents.len();
let response =
format!("{status_line}\r\nContent-Length: {length}\r\n\r\n{contents}");
stream.write_all(response.as_bytes()).unwrap();
}你不会希望一个真实的 Web 服务器在只服务两个请求后关闭。这段代码只是演示优雅停机与清理功能在正常工作。
take 方法定义在 Iterator trait 中,将迭代限制为最多前两个项目。ThreadPool 将在 main 结束时超出作用域,并且 drop 实现将运行。
使用 cargo run 启动服务器,并发出三个请求。第三个请求应该出错,在你的终端中,你应该会看到类似于以下的输出:
$ cargo run
Compiling hello v0.1.0 (file:///projects/hello)
Finished `dev` profile [unoptimized + debuginfo] target(s) in 0.41s
Running `target/debug/hello`
Worker 0 got a job; executing.
Shutting down.
Shutting down worker 0
Worker 3 got a job; executing.
Worker 1 disconnected; shutting down.
Worker 2 disconnected; shutting down.
Worker 3 disconnected; shutting down.
Worker 0 disconnected; shutting down.
Shutting down worker 1
Shutting down worker 2
Shutting down worker 3
你可能会看到不同的 Worker ID 顺序和消息打印。我们可以从消息中看出这段代码是如何工作的:Worker 实例 0 和 3 获得了前两个请求。服务器在第二个连接后停止接受连接,并且在 Worker 3 甚至开始其任务之前,ThreadPool 上的 Drop 实现就开始执行。丢弃 sender 会断开所有 Worker 实例的连接,并告诉它们关闭。每个 Worker 实例在断开连接时打印一条消息,然后线程池调用 join 等待每个 Worker 线程完成。
注意此特定执行的一个有趣方面:ThreadPool 丢弃了 sender,并且在任何 Worker 收到错误之前,我们尝试 join Worker 0。Worker 0 尚未从 recv 获得错误,因此主线程阻塞,等待 Worker 0 完成。与此同时,Worker 3 收到了一个任务,然后所有线程都收到了错误。当 Worker 0 完成时,主线程等待其余的 Worker 实例完成。这时,它们都已经退出了循环并停止了。
恭喜!我们现在已经完成了项目;我们有了一个使用线程池异步响应的基础 Web 服务器。我们能够执行服务器的优雅停机,这会清理池中的所有线程。
以下是完整的参考代码:
use hello::ThreadPool;
use std::{
fs,
io::{BufReader, prelude::*},
net::{TcpListener, TcpStream},
thread,
time::Duration,
};
fn main() {
let listener = TcpListener::bind("127.0.0.1:7878").unwrap();
let pool = ThreadPool::new(4);
for stream in listener.incoming().take(2) {
let stream = stream.unwrap();
pool.execute(|| {
handle_connection(stream);
});
}
println!("Shutting down.");
}
fn handle_connection(mut stream: TcpStream) {
let buf_reader = BufReader::new(&stream);
let request_line = buf_reader.lines().next().unwrap().unwrap();
let (status_line, filename) = match &request_line[..] {
"GET / HTTP/1.1" => ("HTTP/1.1 200 OK", "hello.html"),
"GET /sleep HTTP/1.1" => {
thread::sleep(Duration::from_secs(5));
("HTTP/1.1 200 OK", "hello.html")
}
_ => ("HTTP/1.1 404 NOT FOUND", "404.html"),
};
let contents = fs::read_to_string(filename).unwrap();
let length = contents.len();
let response =
format!("{status_line}\r\nContent-Length: {length}\r\n\r\n{contents}");
stream.write_all(response.as_bytes()).unwrap();
}use std::{
sync::{Arc, Mutex, mpsc},
thread,
};
pub struct ThreadPool {
workers: Vec<Worker>,
sender: Option<mpsc::Sender<Job>>,
}
type Job = Box<dyn FnOnce() + Send + 'static>;
impl ThreadPool {
/// Create a new ThreadPool.
///
/// The size is the number of threads in the pool.
///
/// # Panics
///
/// The `new` function will panic if the size is zero.
pub fn new(size: usize) -> ThreadPool {
assert!(size > 0);
let (sender, receiver) = mpsc::channel();
let receiver = Arc::new(Mutex::new(receiver));
let mut workers = Vec::with_capacity(size);
for id in 0..size {
workers.push(Worker::new(id, Arc::clone(&receiver)));
}
ThreadPool {
workers,
sender: Some(sender),
}
}
pub fn execute<F>(&self, f: F)
where
F: FnOnce() + Send + 'static,
{
let job = Box::new(f);
self.sender.as_ref().unwrap().send(job).unwrap();
}
}
impl Drop for ThreadPool {
fn drop(&mut self) {
drop(self.sender.take());
for worker in &mut self.workers {
println!("Shutting down worker {}", worker.id);
if let Some(thread) = worker.thread.take() {
thread.join().unwrap();
}
}
}
}
struct Worker {
id: usize,
thread: Option<thread::JoinHandle<()>>,
}
impl Worker {
fn new(id: usize, receiver: Arc<Mutex<mpsc::Receiver<Job>>>) -> Worker {
let thread = thread::spawn(move || {
loop {
let message = receiver.lock().unwrap().recv();
match message {
Ok(job) => {
println!("Worker {id} got a job; executing.");
job();
}
Err(_) => {
println!("Worker {id} disconnected; shutting down.");
break;
}
}
}
});
Worker {
id,
thread: Some(thread),
}
}
}我们还可以做更多!如果你想继续增强这个项目,以下是一些想法:
- 为
ThreadPool及其公有方法添加更多文档。 - 添加库功能的测试。
- 将对
unwrap的调用改为更稳健的错误处理。 - 使用
ThreadPool执行除服务 Web 请求之外的其他任务。 - 在 crates.io 上找一个线程池 crate,并使用该 crate 实现一个类似的 Web 服务器。然后,将其 API 和稳健性与我们实现的线程池进行比较。
总结
做得很好!你已成功读完本书!我们要感谢你加入我们这段 Rust 之旅。你现在已经准备好实现自己的 Rust 项目,并帮助其他人的项目了。请记住,有一个热情的 Rustaceans 社区,他们很乐意帮助你解决在 Rust 之旅中遇到的任何挑战。
附录(Appendix)
以下章节包含您在 Rust 学习旅程中可能用到的参考材料。
A - 关键字
附录 A:关键字(Keywords)
以下列表包含了 Rust 语言当前或将来保留使用的关键字。因此,它们不能被用作标识符(identifier)(原始标识符(raw identifier)除外,我们将在“原始标识符”章节讨论)。标识符(Identifiers) 是函数、变量、参数、结构体字段、模块、crate、常量、宏、静态值、属性、类型、trait 或生命周期(lifetime)的名称。
当前正在使用的关键字(Keywords Currently in Use)
以下是当前正在使用的关键字列表及其功能说明。
as:执行基本类型转换(primitive casting),消除包含某一项的特质的歧义,或在use语句中重命名项。async:返回一个Future(未来值)而非阻塞当前线程。await:暂停执行,直到Future的结果就绪。break:立即退出循环。const:定义常量项或常量裸指针(constant raw pointers)。continue:继续下一次循环迭代。crate:在模块路径中,指代 crate 根(crate root)。dyn:对 trait 对象进行动态分发(dynamic dispatch)。else:if和if let控制流结构的后备分支。enum:定义枚举(enumeration)。extern:链接外部函数或变量。false:布尔(boolean)假字面量。fn:定义函数或函数指针类型。for:遍历迭代器中的项,实现 trait,或指定更高阶生命周期(higher ranked lifetime)。if:根据条件表达式的结果进行分支。impl:实现固有(inherent)或 trait 的功能。in:for循环语法的一部分。let:绑定变量。loop:无条件循环。match:将值与模式(patterns)进行匹配。mod:定义模块(module)。move:使闭包(closure)获取其所有捕获(captures)的所有权。mut:表示引用、裸指针或模式绑定中的可变性(mutability)。pub:表示结构体字段、impl块或模块中的公开可见性(public visibility)。ref:通过引用(reference)进行绑定。return:从函数返回。Self:当前正在定义或实现的类型的类型别名(type alias)。self:方法主体或当前模块。static:全局变量或持续整个程序执行的生命周期(lifetime)。struct:定义结构体(structure)。super:当前模块的父模块。trait:定义 trait。true:布尔(boolean)真字面量。type:定义类型别名(type alias)或关联类型(associated type)。union:定义联合体(union);仅在 union 声明中使用时为关键字。unsafe:表示不安全(unsafe)代码、函数、trait 或实现。use:将符号(symbols)引入作用域。where:表示约束类型的子句(clauses)。while:根据表达式的结果条件循环。
保留供将来使用的关键字(Keywords Reserved for Future Use)
以下关键字目前尚不具备任何功能,但 Rust 保留以备将来可能使用:
abstractbecomeboxdofinalgenmacrooverrideprivtrytypeofunsizedvirtualyield
原始标识符(Raw Identifiers)
原始标识符(Raw identifiers) 是一种允许你在通常不允许的地方使用关键字的语法。通过在关键字前加上 r# 前缀来使用原始标识符。
例如,match 是一个关键字。如果你尝试编译以下使用 match 作为函数名的函数:
Filename: src/main.rs
fn match(needle: &str, haystack: &str) -> bool {
haystack.contains(needle)
}你会得到以下错误:
error: expected identifier, found keyword `match`
--> src/main.rs:4:4
|
4 | fn match(needle: &str, haystack: &str) -> bool {
| ^^^^^ expected identifier, found keyword
该错误表明你不能使用关键字 match 作为函数标识符。要将 match 用作函数名,你需要使用原始标识符语法,如下所示:
Filename: src/main.rs
fn r#match(needle: &str, haystack: &str) -> bool {
haystack.contains(needle)
}
fn main() {
assert!(r#match("foo", "foobar"));
}这段代码可以无错误地编译。请注意函数定义中以及 main 中调用函数时函数名上的 r# 前缀。
原始标识符允许你将任何你选择的词语用作标识符,即使该词语恰好是保留关键字。这让我们在选择标识符名称时有更多的自由度,也使我们能够与那些将这些词语作为非关键字的语言编写的程序进行集成。此外,原始标识符还允许你使用与你当前 crate 不同 Rust 版本(edition)编写的库。例如,try 在 2015 版本中不是关键字,但在 2018、2021 和 2024 版本中则是关键字。如果你依赖一个使用 2015 版本编写的库,并且其中包含一个 try 函数,那么你需要使用原始标识符语法(在本例中为 r#try),才能在你的较新版本代码中调用该函数。更多关于版本的信息,请参见附录 E。
B - 运算符与符号
附录 B:运算符与符号(Operators and Symbols)
本附录包含 Rust 语法的词汇表,包括运算符以及其他在路径(paths)、泛型(generics)、 trait 约束(trait bounds)、宏(macros)、属性(attributes)、注释(comments)、元组(tuples) 和括号(brackets)等上下文中出现的符号。
运算符(Operators)
表 B-1 列出了 Rust 中的运算符,包括运算符在上下文中使用的示例、简要说明,以及该运算符 是否可重载(overloadable)。如果运算符可重载,则同时列出了用于重载该运算符的相应 trait。
表 B-1:运算符(Operators)
| 运算符 | 示例 | 说明 | 可重载? |
|---|---|---|---|
! | ident!(...), ident!{...}, ident![...] | 宏展开(Macro expansion) | |
! | !expr | 按位取反或逻辑非(Bitwise or logical complement) | Not |
!= | expr != expr | 不相等比较(Nonequality comparison) | PartialEq |
% | expr % expr | 算术取余(Arithmetic remainder) | Rem |
%= | var %= expr | 算术取余并赋值(Arithmetic remainder and assignment) | RemAssign |
& | &expr, &mut expr | 借用(Borrow) | |
& | &type, &mut type, &'a type, &'a mut type | 借用指针类型(Borrowed pointer type) | |
& | expr & expr | 按位与(Bitwise AND) | BitAnd |
&= | var &= expr | 按位与并赋值(Bitwise AND and assignment) | BitAndAssign |
&& | expr && expr | 短路逻辑与(Short-circuiting logical AND) | |
* | expr * expr | 算术乘法(Arithmetic multiplication) | Mul |
*= | var *= expr | 算术乘法并赋值(Arithmetic multiplication and assignment) | MulAssign |
* | *expr | 解引用(Dereference) | Deref |
* | *const type, *mut type | 裸指针(Raw pointer) | |
+ | trait + trait, 'a + trait | 复合类型约束(Compound type constraint) | |
+ | expr + expr | 算术加法(Arithmetic addition) | Add |
+= | var += expr | 算术加法并赋值(Arithmetic addition and assignment) | AddAssign |
, | expr, expr | 参数与元素分隔符(Argument and element separator) | |
- | - expr | 算术取负(Arithmetic negation) | Neg |
- | expr - expr | 算术减法(Arithmetic subtraction) | Sub |
-= | var -= expr | 算术减法并赋值(Arithmetic subtraction and assignment) | SubAssign |
-> | fn(...) -> type, |…| -> type | 函数与闭包返回类型(Function and closure return type) | |
. | expr.ident | 字段访问(Field access) | |
. | expr.ident(expr, ...) | 方法调用(Method call) | |
. | expr.0, expr.1, 等等 | 元组索引(Tuple indexing) | |
.. | .., expr.., ..expr, expr..expr | 右排除范围字面量(Right-exclusive range literal) | PartialOrd |
..= | ..=expr, expr..=expr | 右包含范围字面量(Right-inclusive range literal) | PartialOrd |
.. | ..expr | 结构体字面量更新语法(Struct literal update syntax) | |
.. | variant(x, ..), struct_type { x, .. } | “其余部分“模式绑定(“And the rest” pattern binding) | |
... | expr...expr | (已废弃,请使用 ..=)在模式中:包含范围模式(inclusive range pattern) | |
/ | expr / expr | 算术除法(Arithmetic division) | Div |
/= | var /= expr | 算术除法并赋值(Arithmetic division and assignment) | DivAssign |
: | pat: type, ident: type | 约束(Constraints) | |
: | ident: expr | 结构体字段初始化(Struct field initializer) | |
: | 'a: loop {...} | 循环标签(Loop label) | |
; | expr; | 语句与项终止符(Statement and item terminator) | |
; | [...; len] | 固定大小数组语法的一部分(Part of fixed-size array syntax) | |
<< | expr << expr | 左移(Left-shift) | Shl |
<<= | var <<= expr | 左移并赋值(Left-shift and assignment) | ShlAssign |
< | expr < expr | 小于比较(Less than comparison) | PartialOrd |
<= | expr <= expr | 小于等于比较(Less than or equal to comparison) | PartialOrd |
= | var = expr, ident = type | 赋值/等价(Assignment/equivalence) | |
== | expr == expr | 相等比较(Equality comparison) | PartialEq |
=> | pat => expr | match 分支语法的一部分(Part of match arm syntax) | |
> | expr > expr | 大于比较(Greater than comparison) | PartialOrd |
>= | expr >= expr | 大于等于比较(Greater than or equal to comparison) | PartialOrd |
>> | expr >> expr | 右移(Right-shift) | Shr |
>>= | var >>= expr | 右移并赋值(Right-shift and assignment) | ShrAssign |
@ | ident @ pat | 模式绑定(Pattern binding) | |
^ | expr ^ expr | 按位异或(Bitwise exclusive OR) | BitXor |
^= | var ^= expr | 按位异或并赋值(Bitwise exclusive OR and assignment) | BitXorAssign |
| | pat | pat | 模式备选(Pattern alternatives) | |
| | expr | expr | 按位或(Bitwise OR) | BitOr |
|= | var |= expr | 按位或并赋值(Bitwise OR and assignment) | BitOrAssign |
|| | expr || expr | 短路逻辑或(Short-circuiting logical OR) | |
? | expr? | 错误传播(Error propagation) |
非运算符符号(Non-operator Symbols)
以下表格包含所有不作为运算符使用的符号;也就是说,它们不像函数或方法调用那样运作。
表 B-2 列出了可以独立出现并在多种位置有效的符号。
表 B-2:独立语法(Stand-alone Syntax)
| 符号 | 说明 |
|---|---|
'ident | 命名生命周期或循环标签(Named lifetime or loop label) |
数字后紧跟 u8、i32、f64、usize 等 | 特定类型的数字字面量(Numeric literal of specific type) |
"..." | 字符串字面量(String literal) |
r"...", r#"..."#, r##"..."##, 等等 | 原始字符串字面量;转义字符不处理(Raw string literal) |
b"..." | 字节字符串字面量;构造字节数组而非字符串(Byte string literal) |
br"...", br#"..."#, br##"..."##, 等等 | 原始字节字符串字面量;原始字符串与字节字符串的组合 |
'...' | 字符字面量(Character literal) |
b'...' | ASCII 字节字面量(ASCII byte literal) |
|…| expr | 闭包(Closure) |
! | 发散函数的空底类型(Always-empty bottom type for diverging functions) |
_ | “忽略“模式绑定;也用于使整数数字字面量可读(“Ignored” pattern binding) |
表 B-3 列出了在通过模块层次结构访问项的路径(path)上下文中出现的符号。
表 B-3:路径相关语法(Path-Related Syntax)
| 符号 | 说明 |
|---|---|
ident::ident | 命名空间路径(Namespace path) |
::path | 相对于 crate 根路径(即显式的绝对路径) |
self::path | 相对于当前模块的路径(即显式的相对路径) |
super::path | 相对于当前模块父级的路径 |
type::ident, <type as trait>::ident | 关联常量、关联函数和关联类型(Associated constants, functions, and types) |
<type>::... | 无法直接命名的类型的关联项(例如 <&T>::...、<[T]>::... 等) |
trait::method(...) | 通过指定定义该方法的 trait 来消歧方法调用 |
type::method(...) | 通过指定方法所定义的类型来消歧方法调用 |
<type as trait>::method(...) | 通过同时指定 trait 和类型来消歧方法调用 |
表 B-4 列出了在使用泛型类型参数(generic type parameters)上下文中出现的符号。
表 B-4:泛型(Generics)
| 符号 | 说明 |
|---|---|
path<...> | 在类型中为泛型类型指定参数(例如 Vec<u8>) |
path::<...>, method::<...> | 在表达式中为泛型类型、函数或方法指定参数;通常称为 turbofish(例如 "42".parse::<i32>()) |
fn ident<...> ... | 定义泛型函数(Define generic function) |
struct ident<...> ... | 定义泛型结构体(Define generic structure) |
enum ident<...> ... | 定义泛型枚举(Define generic enumeration) |
impl<...> ... | 定义泛型实现(Define generic implementation) |
for<...> type | 更高阶生命周期约束(Higher ranked lifetime bounds) |
type<ident=type> | 一个或多个关联类型具有特定赋值的泛型类型(例如 Iterator<Item=T>) |
表 B-5 列出了在通过 trait 约束(trait bounds)约束泛型类型参数上下文中出现的符号。
表 B-5:Trait 约束(Trait Bound Constraints)
| 符号 | 说明 |
|---|---|
T: U | 泛型参数 T 被约束为实现 U 的类型 |
T: 'a | 泛型类型 T 必须存活得比生命周期 'a 长(即该类型不能传递性地包含任何生命周期短于 'a 的引用) |
T: 'static | 泛型类型 T 不包含除 'static 之外的任何借用引用 |
'b: 'a | 泛型生命周期 'b 必须存活得比生命周期 'a 长 |
T: ?Sized | 允许泛型类型参数为动态大小类型(dynamically sized type) |
'a + trait, trait + trait | 复合类型约束(Compound type constraint) |
表 B-6 列出了在调用或定义宏(macros)以及为项指定属性(attributes)上下文中出现的符号。
表 B-6:宏与属性(Macros and Attributes)
| 符号 | 说明 |
|---|---|
#[meta] | 外部属性(Outer attribute) |
#![meta] | 内部属性(Inner attribute) |
$ident | 宏替换(Macro substitution) |
$ident:kind | 宏元变量(Macro metavariable) |
$(...)... | 宏重复(Macro repetition) |
ident!(...), ident!{...}, ident![...] | 宏调用(Macro invocation) |
表 B-7 列出了用于创建注释(comments)的符号。
表 B-7:注释(Comments)
| 符号 | 说明 |
|---|---|
// | 行注释(Line comment) |
//! | 内部行文档注释(Inner line doc comment) |
/// | 外部行文档注释(Outer line doc comment) |
/*...*/ | 块注释(Block comment) |
/*!...*/ | 内部块文档注释(Inner block doc comment) |
/**...*/ | 外部块文档注释(Outer block doc comment) |
表 B-8 列出了使用圆括号(parentheses)的上下文。
表 B-8:圆括号(Parentheses)
| 符号 | 说明 |
|---|---|
() | 空元组(即 unit),既是字面量也是类型 |
(expr) | 括号表达式(Parenthesized expression) |
(expr,) | 单元素元组表达式(Single-element tuple expression) |
(type,) | 单元素元组类型(Single-element tuple type) |
(expr, ...) | 元组表达式(Tuple expression) |
(type, ...) | 元组类型(Tuple type) |
expr(expr, ...) | 函数调用表达式;也用于初始化元组 struct 和元组 enum 变体(variants) |
表 B-9 列出了使用花括号(curly brackets)的上下文。
表 B-9:花括号(Curly Brackets)
| 上下文 | 说明 |
|---|---|
{...} | 块表达式(Block expression) |
Type {...} | 结构体字面量(Struct literal) |
表 B-10 列出了使用方括号(square brackets)的上下文。
表 B-10:方括号(Square Brackets)
| 上下文 | 说明 |
|---|---|
[...] | 数组字面量(Array literal) |
[expr; len] | 包含 len 个 expr 副本的数组字面量 |
[type; len] | 包含 len 个 type 实例的数组类型 |
expr[expr] | 集合索引(Collection indexing);可重载(Index, IndexMut) |
expr[..], expr[a..], expr[..b], expr[a..b] | 集合索引,用作集合切片(collection slicing),使用 Range、RangeFrom、RangeTo 或 RangeFull 作为“索引“ |
C - 可派生 Trait
附录 C:可派生 trait(Derivable Traits)
在本书的多个地方,我们讨论了 derive 属性(attribute),你可以将其应用于结构体(struct)或枚举(enum)定义。derive 属性会生成代码,在你使用 derive 语法标注的类型上,以 trait 自身的默认实现来实现该 trait。
在本附录中,我们提供了标准库中所有可与 derive 配合使用的 trait 的参考。每个章节涵盖以下内容:
- 派生(derive)该 trait 将启用的运算符和方法
derive提供的 trait 实现做了什么- 实现该 trait 对类型意味着什么
- 允许或不允许实现该 trait 的条件
- 需要该 trait 的操作示例
如果你想要与 derive 属性提供的不同的行为,请查阅每个 trait 的标准库文档,了解如何手动实现它们。
这里列出的 trait 是标准库中唯一可以使用 derive 在你的类型上实现的 trait。标准库中定义的其他 trait 没有合理的默认行为,因此需要你来以最适合你目标的方式实现它们。
一个无法派生(derive)的 trait 示例是 Display,它负责为最终用户处理格式化。你应该始终考虑向最终用户展示类型的适当方式。最终用户应该能够看到类型的哪些部分?哪些部分对他们来说是相关的?哪种数据格式对他们最有用?Rust 编译器没有这种洞察力,因此无法为你提供合适的默认行为。
本附录中提供的可派生 trait 列表并不全面:库可以为自己的 trait 实现 derive,这使得你可以使用 derive 的 trait 列表实际上是无限开放的。实现 derive 涉及使用过程宏(procedural macro),这在第 20 章的“自定义 derive 宏”章节中有介绍。
Debug — 为程序员提供输出(for Programmer Output)
Debug trait 支持在格式字符串(format strings)中使用调试格式化,通过向 {} 占位符中添加 :? 来指示。
Debug trait 允许你出于调试目的打印类型的实例,因此你和使用你类型的其他程序员可以在程序执行的特定时刻检查实例。
例如,在使用 assert_eq! 宏时需要 Debug trait。如果相等性断言失败,该宏会打印作为参数给出的实例的值,以便程序员查看两个实例为什么不相等。
PartialEq 和 Eq — 相等性比较(for Equality Comparisons)
PartialEq trait 允许你比较类型的实例以检查是否相等,并支持使用 == 和 != 运算符。
派生 PartialEq 会实现 eq 方法。当在结构体上派生 PartialEq 时,只有在 所有 字段都相等时两个实例才相等,如果 任一 字段不相等则两个实例不相等。当在枚举上派生时,每个变体(variant)与自身相等,与其他变体不相等。
例如,在使用 assert_eq! 宏时需要 PartialEq trait,该宏需要能够比较两个类型实例是否相等。
Eq trait 没有方法。其目的是表明对于标注类型的每个值,该值都等于自身。Eq trait 只能应用于同时也实现了 PartialEq 的类型,尽管并非所有实现了 PartialEq 的类型都能实现 Eq。一个例子是浮点数类型:浮点数的实现规定非数字(NaN)值的两个实例彼此不相等。
需要 Eq 的一个例子是 HashMap<K, V> 中的键,这样 HashMap<K, V> 才能判断两个键是否相同。
PartialOrd 和 Ord — 顺序比较(for Ordering Comparisons)
PartialOrd trait 允许你比较类型的实例以进行排序。实现了 PartialOrd 的类型可以用于 <、>、<= 和 >= 运算符。你只能将 PartialOrd trait 应用于同时实现了 PartialEq 的类型。
派生 PartialOrd 会实现 partial_cmp 方法,该方法返回一个 Option<Ordering>,当给定的值无法产生顺序时返回 None。一个无法产生顺序的值示例是 NaN 浮点值,尽管该类型的大多数值都可以进行比较。使用任何浮点数和 NaN 浮点值调用 partial_cmp 将返回 None。
当在结构体上派生时,PartialOrd 按照字段在结构体定义中出现的顺序比较每个字段的值来比较两个实例。当在枚举上派生时,枚举定义中较早声明的变体被认为小于较晚列出的变体。
例如,rand crate 中的 gen_range 方法需要 PartialOrd trait,该方法在范围表达式指定的范围内生成一个随机值。
Ord trait 让你知道对于标注类型的任意两个值,都会存在一个有效的排序。Ord trait 实现了 cmp 方法,该方法返回一个 Ordering 而非 Option<Ordering>,因为始终会存在一个有效的排序。你只能将 Ord trait 应用于同时实现了 PartialOrd 和 Eq 的类型(而 Eq 又需要 PartialEq)。当在结构体和枚举上派生时,cmp 的行为与 PartialOrd 的 partial_cmp 派生实现相同。
需要 Ord 的一个例子是将值存储到 BTreeSet<T> 中时,这是一种基于值的排序顺序来存储数据的数据结构。
Clone 和 Copy — 复制值(for Duplicating Values)
Clone trait 允许你显式创建值的深拷贝(deep copy),复制过程可能涉及运行任意代码和拷贝堆(heap)数据。更多关于 Clone 的信息请参见第 4 章的“变量与数据的交互:Clone”章节。
派生 Clone 会实现 clone 方法,当为整个类型实现时,会在该类型的各个部分上调用 clone。这意味着类型中的所有字段或值也必须实现 Clone 才能派生 Clone。
需要 Clone 的一个例子是在切片(slice)上调用 to_vec 方法时。切片并不拥有其包含的类型实例,但从 to_vec 返回的向量(vector)需要拥有其实例,因此 to_vec 在每个项上调用 clone。因此,存储在切片中的类型必须实现 Clone。
Copy trait 允许你仅通过复制存储在栈(stack)上的位来复制值;无需执行任意代码。更多关于 Copy 的信息请参见第 4 章的“仅栈数据:Copy”章节。
Copy trait 没有定义任何方法,以防止程序员重载这些方法并违反“没有执行任意代码“的假设。这样,所有程序员都可以假设复制一个值会非常快。
你可以对任何其所有组成部分都实现了 Copy 的类型派生 Copy。实现了 Copy 的类型还必须实现 Clone,因为实现了 Copy 的类型有一个简单的 Clone 实现,其执行与 Copy 相同的任务。
Copy trait 很少被要求;实现了 Copy 的类型可以使用优化,这意味着你不必调用 clone,从而使代码更简洁。
使用 Copy 能完成的所有事情,使用 Clone 也能完成,但代码可能更慢或需要在某些地方使用 clone。
Hash — 将值映射为固定大小的值(for Mapping a Value to a Value of Fixed Size)
Hash trait 允许你获取一个任意大小的类型实例,并使用哈希函数(hash function)将该实例映射为一个固定大小的值。派生 Hash 会实现 hash 方法。hash 方法的派生实现会将对该类型各个部分调用 hash 的结果组合起来,这意味着所有字段或值也必须实现 Hash 才能派生 Hash。
需要 Hash 的一个示例是在 HashMap<K, V> 中存储键,以便高效地存储数据。
Default — 默认值(for Default Values)
Default trait 允许你为类型创建默认值。派生 Default 会实现 default 函数。default 函数的派生实现会在该类型的每个部分上调用 default 函数,这意味着该类型中的所有字段或值也必须实现 Default 才能派生 Default。
Default::default 函数通常与第 5 章中讨论的“使用结构体更新语法从其他实例创建实例”章节中的结构体更新语法(struct update syntax)结合使用。你可以自定义结构体的几个字段,然后使用 ..Default::default() 为其余字段设置并使用默认值。
例如,在 Option<T> 实例上使用 unwrap_or_default 方法时需要 Default trait。如果 Option<T> 是 None,unwrap_or_default 方法将返回 Option<T> 中存储的类型 T 的 Default::default 结果。
D - 实用开发工具
附录 D:有用的开发工具(Useful Development Tools)
在本附录中,我们将讨论 Rust 项目提供的一些有用的开发工具。我们将了解自动格式化、快速应用警告修复、一个 linter(代码检查工具)以及与 IDE 的集成。
使用 rustfmt 进行自动格式化(Automatic Formatting)
rustfmt 工具会根据社区代码风格重新格式化你的代码。许多协作项目使用 rustfmt 来避免在编写 Rust 时关于使用哪种风格的争论:每个人都使用该工具格式化他们的代码。
Rust 安装默认包含 rustfmt,因此你的系统上应该已经有了 rustfmt 和 cargo-fmt 程序。这两个命令类似于 rustc 和 cargo 的关系:rustfmt 提供更精细的控制,而 cargo-fmt 则理解使用 Cargo 的项目的惯例。要格式化任何 Cargo 项目,请输入以下命令:
$ cargo fmt
运行此命令会重新格式化当前 crate 中的所有 Rust 代码。这只会改变代码风格,不会改变代码语义。有关 rustfmt 的更多信息,请参见其文档。
使用 rustfix 修复代码(Fix Your Code)
rustfix 工具包含在 Rust 安装中,可以自动修复那些有明确修正方案的编译器警告(通常正是你想要的)。你可能之前见过编译器警告。例如,考虑以下代码:
Filename: src/main.rs
fn main() {
let mut x = 42;
println!("{x}");
}这里,我们将变量 x 定义为可变的(mutable),但从未真正修改它。Rust 对此发出警告:
$ cargo build
Compiling myprogram v0.1.0 (file:///projects/myprogram)
warning: variable does not need to be mutable
--> src/main.rs:2:9
|
2 | let mut x = 0;
| ----^
| |
| help: remove this `mut`
|
= note: `#[warn(unused_mut)]` on by default
警告建议我们移除 mut 关键字。我们可以使用 rustfix 工具通过运行 cargo fix 命令来自动应用该建议:
$ cargo fix
Checking myprogram v0.1.0 (file:///projects/myprogram)
Fixing src/main.rs (1 fix)
Finished dev [unoptimized + debuginfo] target(s) in 0.59s
当我们再次查看 src/main.rs 时,会发现 cargo fix 已经修改了代码:
Filename: src/main.rs
fn main() {
let x = 42;
println!("{x}");
}现在变量 x 是不可变的(immutable),警告也不再出现。
你还可以使用 cargo fix 命令在不同 Rust 版本(editions)之间迁移代码。版本相关内容在附录 E 中介绍。
使用 Clippy 获得更多 Lint(More Lints with Clippy)
Clippy 工具是一组 lint(代码检查规则)的集合,用于分析你的代码,帮助你发现常见错误并改进 Rust 代码。Clippy 包含在标准 Rust 安装中。
要在任何 Cargo 项目上运行 Clippy 的 lint,请输入以下命令:
$ cargo clippy
例如,假设你编写了一个程序,使用了数学常量的近似值,比如圆周率 pi:
fn main() {
let x = 3.1415;
let r = 8.0;
println!("the area of the circle is {}", x * r * r);
}在此项目上运行 cargo clippy 会导致以下错误:
error: approximate value of `f{32, 64}::consts::PI` found
--> src/main.rs:2:13
|
2 | let x = 3.1415;
| ^^^^^^
|
= note: `#[deny(clippy::approx_constant)]` on by default
= help: consider using the constant directly
= help: for further information visit https://rust-lang.github.io/rust-clippy/master/index.html#approx_constant
这个错误让你知道 Rust 已经定义了一个更精确的 PI 常量,如果你的程序使用该常量将会更准确。然后你应该修改代码来使用 PI 常量。
以下代码不会导致 Clippy 产生任何错误或警告:
fn main() {
let x = std::f64::consts::PI;
let r = 8.0;
println!("the area of the circle is {}", x * r * r);
}有关 Clippy 的更多信息,请参见其文档。
使用 rust-analyzer 进行 IDE 集成(IDE Integration)
为了帮助实现 IDE 集成,Rust 社区推荐使用 rust-analyzer。这个工具是一组以编译器为中心的实用工具,实现了语言服务器协议(Language Server Protocol,LSP)——这是一个用于 IDE 和编程语言之间相互通信的规范。不同的客户端可以使用 rust-analyzer,例如 Visual Studio Code 的 Rust analyzer 插件。
请访问 rust-analyzer 项目的主页获取安装说明,然后在你的特定 IDE 中安装语言服务器支持。你的 IDE 将获得诸如自动补全(autocompletion)、跳转到定义(jump to definition)和内联错误提示(inline errors)等功能。
E - 版次
附录 E:版本(Editions)
在第 1 章中,你看到 cargo new 会在你的 Cargo.toml 文件中添加一些关于版本(edition)的元数据。本附录将讨论这意味着什么!
Rust 语言和编译器有一个六周的发布周期,这意味着用户可以持续不断地获得新功能。其他编程语言发布较大变更的频率较低;而 Rust 则以更高的频率发布较小的更新。久而久之,所有这些微小的变化累积起来。但从一个版本到另一个版本,很难回顾并说,“哇,在 Rust 1.10 和 Rust 1.31 之间,Rust 已经发生了很大变化!”
大约每三年,Rust 团队会推出一个新的 Rust 版本(edition)。每个版本将已经落地的功能整合成一个清晰的包,并附带完全更新的文档和工具。新版本作为常规六周发布流程的一部分发布。
版本(Editions)对不同的人有不同的用途:
- 对于活跃的 Rust 用户而言,新版本将增量式变更整合成一个易于理解的包。
- 对于非用户而言,新版本标志着一些重大进展已经落地,这可能让 Rust 值得再看一看。
- 对于 Rust 开发者而言,新版本为整个项目提供了一个凝聚点。
在撰写本文时,有四个 Rust 版本(editions)可用:Rust 2015、Rust 2018、Rust 2021 和 Rust 2024。本书使用 Rust 2024 版本(edition)的习惯用法编写。
Cargo.toml 中的 edition 键指示编译器应为你的代码使用哪个版本。如果该键不存在,为了向后兼容,Rust 将使用 2015 作为版本值。
每个项目可以选择使用默认的 2015 版本以外的版本。版本(Editions)可能包含不兼容的变更,例如引入与代码中标识符冲突的新关键字。但是,除非你选择接受这些变更,否则即使你升级所使用的 Rust 编译器版本,你的代码也仍然可以继续编译。
所有 Rust 编译器版本都支持在该编译器发布之前就已存在的任何版本,并且它们可以将任何受支持版本的 crate 链接在一起。版本变更只影响编译器最初解析代码的方式。因此,如果你使用的是 Rust 2015,而你的某个依赖项使用了 Rust 2018,你的项目仍然可以编译并使用该依赖项。反过来,如果你的项目使用 Rust 2018 而依赖项使用 Rust 2015,也同样可以工作。
需要说明的是:大多数功能在所有版本中都是可用的。使用任何 Rust 版本的开发者都会随着新的稳定版本的发布而不断看到改进。然而,在某些情况下,主要是在添加新关键字时,一些新功能可能只适用于较新的版本。如果你想利用这些功能,就需要切换版本。
更多详情,请参阅 The Rust Edition Guide(《Rust 版本指南》)。这是一本完整的书籍,列举了各版本之间的差异,并解释了如何通过 cargo fix 自动将你的代码升级到新版本。
F - 本书的翻译
附录 F:本书的翻译(Translations of the Book)
以下是除英语外的其他语言资源。大部分仍在进行中;请参阅 Translations 标签 来提供帮助或告知我们新的翻译!
- Português (BR)
- Português (PT)
- 简体中文: KaiserY/trpl-zh-cn, gnu4cn/rust-lang-Zh_CN
- 正體中文
- Українська
- Español, alternate, Español por RustLangES
- Русский
- 한국어
- 日本語
- Français
- Polski
- Cebuano
- Tagalog
- Esperanto
- ελληνική
- Svenska
- Farsi, Persian (FA)
- Deutsch
- हिंदी
- ไทย
- Danske
- O’zbek
- Tiếng Việt
- Italiano
- বাংলা
G - Rust 的开发和"Nightly Rust"
附录 G - Rust 是如何开发的以及“Nightly Rust“
本附录介绍 Rust 是如何开发的,以及这对你作为 Rust 开发者有何影响。
稳定而不停滞(Stability Without Stagnation)
作为一门语言,Rust 非常关注代码的稳定性。我们希望 Rust 成为你可以依赖的坚如磐石的基础,如果事物不断变化,那将是不可能的。同时,如果我们不能实验新特性,我们可能直到发布之后才会发现重要的缺陷,而那时我们已经无法再更改了。
我们对此问题的解决方案被称为“稳定而不停滞(stability without stagnation)“,我们的指导原则是:你永远不必害怕升级到新版本的稳定版 Rust。每次升级都应该是无痛的,同时还应该为你带来新特性、更少的 bug 和更快的编译时间。
嘟——嘟!发布频道与“乘坐火车“(Release Channels and Riding the Trains)
Rust 的开发遵循列车时刻表(train schedule)。也就是说,所有开发都在 Rust 仓库的主分支(main branch)中进行。发布遵循软件发布火车模型(software release train model),该模型已被 Cisco IOS 和其他软件项目所使用。Rust 有三个发布频道(release channels):
- Nightly(夜间版)
- Beta(测试版)
- Stable(稳定版)
大多数 Rust 开发者主要使用稳定版频道,但那些想要尝试实验性新特性的人可以使用 nightly 或 beta。
以下是开发和发布流程的一个示例:假设 Rust 团队正在开发 Rust 1.5 的发布。该版本实际上是在 2015 年 12 月发布的,但它能给我们提供实际的版本号。一个新特性被添加到 Rust:一个新的提交(commit)合并到主分支。每晚都会生成一个新的 nightly 版本的 Rust。每天都是发布日,这些发布由我们的发布基础设施自动创建。因此,随着时间的推移,我们的发布看起来像这样,每晚一次:
nightly: * - - * - - *
每六周,就到了准备新发布的时候! Rust 仓库的 beta 分支从 nightly 使用的主分支分出。现在有两个发布:
nightly: * - - * - - *
|
beta: *
大多数 Rust 用户不会主动使用 beta 版,但会在他们的 CI 系统中针对 beta 版进行测试,以帮助 Rust 发现可能的回归(regression)。与此同时,每晚仍有一个 nightly 发布:
nightly: * - - * - - * - - * - - *
|
beta: *
假设发现了一个回归。还好我们有一些时间在回归潜入稳定版之前测试 beta 版!修复被应用到主分支,这样 nightly 版得到修复,然后将修复回溯(backport)到 beta 分支,并生成一个新的 beta 版发布:
nightly: * - - * - - * - - * - - * - - *
|
beta: * - - - - - - - - *
在第一个 beta 版创建六周后,是时候发布稳定版了!stable 分支由 beta 分支生成:
nightly: * - - * - - * - - * - - * - - * - * - *
|
beta: * - - - - - - - - *
|
stable: *
万岁!Rust 1.5 完成了!然而,我们忘了一件事:因为六周已经过去了,我们还需要一个 Rust _下一个_版本 1.6 的新 beta 版。因此,在 stable 从 beta 分出之后,下一版本的 beta 再次从 nightly 分出:
nightly: * - - * - - * - - * - - * - - * - * - *
| |
beta: * - - - - - - - - * *
|
stable: *
这被称为“火车模型(train model)“,因为每六周,一个发布“离开车站”,但它在作为稳定版发布之前仍需经过 beta 频道的旅程。
Rust 每六周发布一次,像时钟一样准确。如果你知道一次 Rust 发布的日期,你就知道下一次发布的日期:六周后。每六周安排一次发布的一个好处是,下一趟火车很快就会到来。如果一个特性错过了某个特定版本,不必担心:很快就会有另一个版本!这有助于减少在发布日期临近时偷偷塞入可能不够完善的特性的压力。
得益于这一过程,你始终可以查看下一个 Rust 构建版本,并自行验证升级是否容易:如果 beta 版没有按预期工作,你可以向团队报告,并在下一个稳定版发布之前修复它!beta 版中出现问题的概率相对较小,但 rustc 仍然是一个软件,bug 确实存在。
维护时间(Maintenance time)
Rust 项目支持最新的稳定版本。当新的稳定版本发布时,旧版本达到生命周期终点(end of life, EOL)。这意味着每个版本的支持周期为六周。
不稳定特性(Unstable Features)
这个发布模型还有一个问题:不稳定特性。Rust 使用一种称为“特性标志(feature flags)“的技术来确定在给定版本中启用哪些特性。如果某个新特性正在积极开发中,它会合并到主分支,因此也会出现在 nightly 中,但会隐藏在**特性标志(feature flag)**之后。如果你,作为用户,希望尝试正在开发中的特性,你可以这样做,但你必须使用 nightly 版 Rust 并在源代码中使用相应的标志来启用。
如果你使用的是 beta 或稳定版 Rust,则无法使用任何特性标志。这是关键所在,它让我们可以在将新特性永久声明为稳定之前先进行实际使用。那些希望尝鲜的人可以选择使用最新技术,而那些想要坚如磐石体验的人可以坚持使用稳定版,并知道他们的代码不会出问题。稳定而不停滞。
本书仅包含稳定特性的信息,因为正在开发中的特性仍在变化,并且它们肯定会在本书编写完成与它们在稳定版构建中启用之间有所不同。你可以在线查找仅用于 nightly 版的文档。
Rustup 与 Rust Nightly 的作用
Rustup 可以轻松地在不同的 Rust 发布频道之间切换,无论是全局还是按项目设置。默认情况下,你将安装稳定版 Rust。例如,要安装 nightly 版:
$ rustup toolchain install nightly
你也可以使用 rustup 查看所有已安装的工具链(toolchains)(Rust 版本及相关组件)。以下是在作者之一的 Windows 电脑上的示例:
> rustup toolchain list
stable-x86_64-pc-windows-msvc (default)
beta-x86_64-pc-windows-msvc
nightly-x86_64-pc-windows-msvc
如你所见,稳定版工具链是默认的。大多数 Rust 用户大部分时间使用稳定版。你可能大部分时间使用稳定版,但在特定项目中使用 nightly 版,因为你关心前沿特性。为此,你可以使用 rustup override 在该项目的目录中设置 nightly 工具链,以便 rustup 在该目录下使用它:
$ cd ~/projects/needs-nightly
$ rustup override set nightly
现在,每当你进入 ~/projects/needs-nightly/ 目录并调用 rustc 或 cargo 时,rustup 将确保你使用的是 nightly Rust,而不是默认的稳定版 Rust。当你有很多 Rust 项目时,这非常方便!
RFC 流程与团队(The RFC Process and Teams)
那么,你如何了解这些新特性呢?Rust 的开发模式遵循 RFC(Request For Comments,意见征求)流程。如果你希望改进 Rust,你可以编写一份提案,称为 RFC。
任何人都可以编写 RFC 来改进 Rust,这些提案由 Rust 团队(由许多主题子团队组成)进行审查和讨论。在 Rust 官网 上有完整的团队列表,包括项目各个领域的团队:语言设计、编译器实现、基础设施、文档等。相应的团队阅读提案和评论,撰写他们自己的评论,最终达成共识以接受或拒绝该特性。
如果特性被接受,就会在 Rust 仓库中开启一个 issue(问题),然后有人可以实现它。实现它的人很可能不是最初提出该特性的人!当实现准备好后,它会合并到主分支中,并置于特性门控(feature gate)之后,正如我们在 “Unstable Features” 部分讨论的那样。
一段时间后,一旦使用 nightly 版的 Rust 开发者能够试用新特性,团队成员将讨论该特性、它在 nightly 版上的表现,并决定是否应将其纳入稳定版 Rust。如果决定推进,特性门控将被移除,该特性现在被认为是稳定的!它将乘坐火车进入新的 Rust 稳定版发布。